

Banana Upside Down Cake is a delightful twist on the classic dessert that brings a burst of flavor and nostalgia to any gathering. This cake not only showcases the natural sweetness of ripe bananas but also offers a beautiful presentation that is sure to impress your guests. The origins of upside-down cakes can be traced back to the early 20th century, when they were a popular way to use fresh fruits, making them a staple in many households.
What I love most about Banana Upside Down Cake is its perfect balance of moistness and caramelized goodness. The combination of soft, tender cake with the rich, gooey topping creates a texture that is simply irresistible. Plus, it’s incredibly convenient to make, allowing you to whip up a stunning dessert with minimal effort. Whether you’re serving it at a family gathering or enjoying a slice with your morning coffee, Banana Upside Down Cake is a crowd-pleaser that will leave everyone asking for seconds!

Ingredients:
- 3 ripe bananas, sliced
- 1/2 cup unsalted butter, melted
- 1 cup brown sugar, packed
- 1 1/2 cups all-purpose flour
- 1 teaspoon baking powder
- 1/2 teaspoon baking soda
- 1/4 teaspoon salt
- 1/2 cup granulated sugar
- 2 large eggs
- 1 teaspoon vanilla extract
- 1/2 cup buttermilk (or milk with 1/2 tablespoon vinegar added)
Preparing the Topping
1. Start by preheating your oven to 350°F (175°C). This ensures that your cake bakes evenly and rises beautifully. 2. In a medium bowl, combine the melted butter and brown sugar. Mix them together until they are well combined and smooth. This will create a lovely caramel-like base for your bananas. 3. Pour the butter and brown sugar mixture into the bottom of a 9-inch round cake pan. Make sure to spread it evenly across the bottom. 4. Now, take your sliced bananas and arrange them in a single layer over the brown sugar mixture. You can get creative here; I like to fan them out for a beautiful presentation, but you can simply lay them flat if you prefer.Preparing the Batter
5. In a separate large mixing bowl, whisk together the all-purpose flour, baking powder, baking soda, and salt. This step is crucial as it helps to evenly distribute the leavening agents throughout the flour. 6. In another bowl, beat together the granulated sugar and eggs until the mixture is light and fluffy. This usually takes about 2-3 minutes with an electric mixer. The air incorporated during this step will help your cake rise. 7. Add the vanilla extract to the egg and sugar mixture, and mix until combined. 8. Gradually add the dry ingredients to the wet ingredients, alternating with the buttermilk. Start with a third of the flour mixture, then add half of the buttermilk, followed by another third of the flour, the remaining buttermilk, and finally the last of the flour. This method helps to keep the batter smooth and prevents overmixing. 9. Mix until just combined. Be careful not to overmix; a few lumps are perfectly fine. Overmixing can lead to a dense cake, and we want it to be light and fluffy.Combining and Baking
10. Gently pour the batter over the arranged bananas in the cake pan. Use a spatula to spread it evenly, ensuring that all the bananas are covered. 11. Place the cake pan in the preheated oven and bake for 30-35 minutes, or until a toothpick inserted into the center comes out clean. The top should be golden brown and spring back when lightly pressed. 12. Once baked, remove the cake from the oven and let it cool in the pan for about 10 minutes. This cooling time allows the cake to set slightly, making it easier to flip.Flipping the Cake
13. After the cooling period, carefully run a knife around the edges of the cake to loosen it from the sides of the pan. This step is important to ensure that the cake releases easily. 14. Place a serving plate upside down over the cake pan. With one swift motion, flip the pan over so that the cake falls onto the plate. Gently lift the pan off, and you should see the beautiful banana topping glistening in all its glory. 15. If any bananas stick to the pan, simply remove them with a spatula and place them back on the cake. It’s all about presentation, and we want it to look perfect!Serving Suggestions
16. Allow the cake to cool for a few minutes before slicing. This cake is delicious served warm, but it’s also fantastic at room temperature. 17. For an extra touch, consider serving it with a dollop of whipped cream or a scoop of vanilla ice cream. The creaminess complements the sweetness of the bananas beautifully. 18. If you have any leftovers (which is rare, but it happens!), store them in an airtight container at room temperature for up to 2 days. You can also refrigerate it for up to a week, but I recommend reheating it slightly in the microwave for the best flavor.Tips and Variations
19. If you want to add a little extra flavor, consider mixing in some chopped nuts, like walnuts or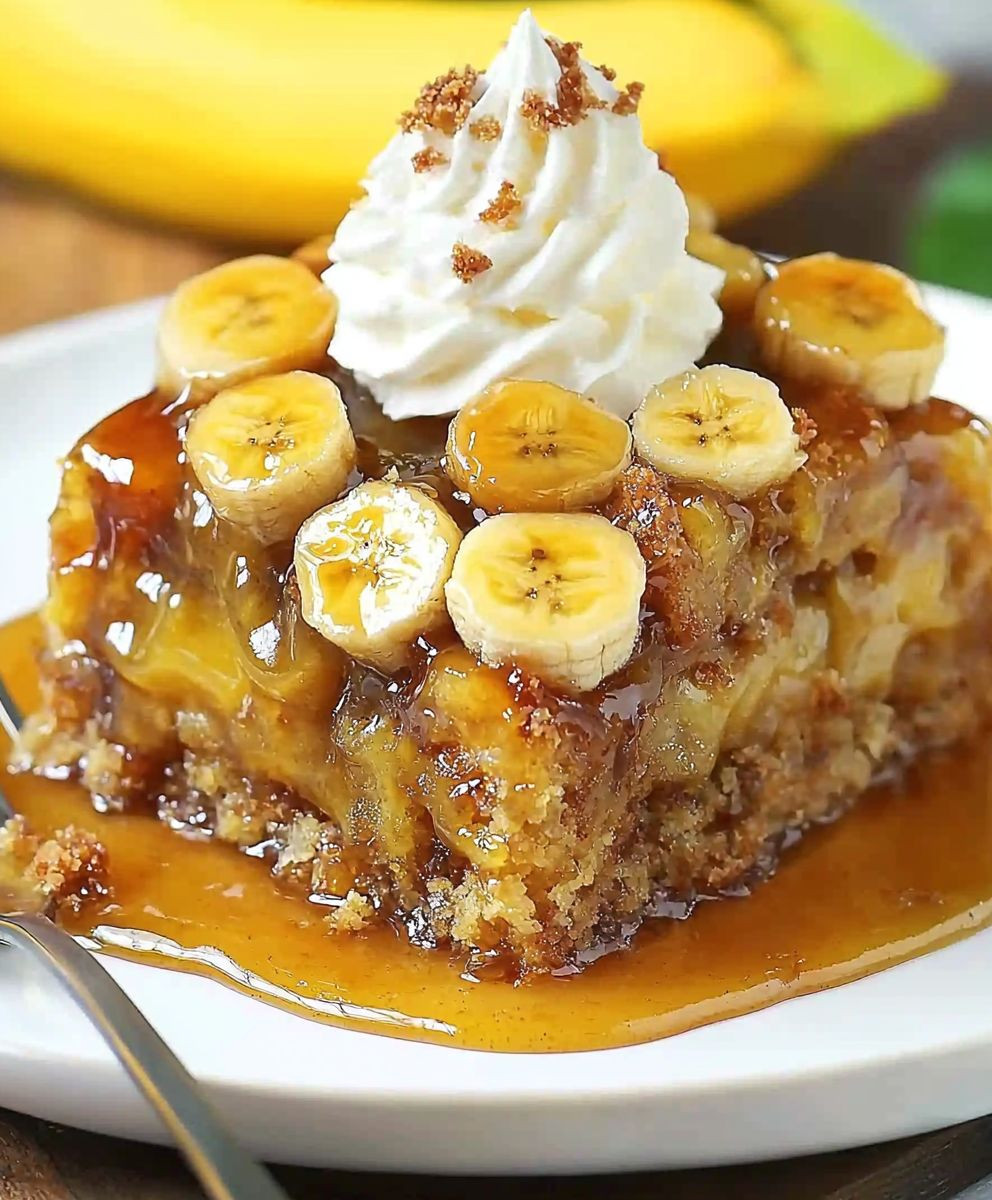
Conclusion:
In wrapping up this delightful journey into the world of Banana Upside Down Cake, I can confidently say that this recipe is a must-try for anyone looking to impress their family and friends with a deliciously unique dessert. The combination of caramelized bananas and moist cake creates a flavor profile that is simply irresistible. Not only does it taste amazing, but it also presents beautifully, making it a perfect centerpiece for any gathering or special occasion. When serving your Banana Upside Down Cake, consider pairing it with a scoop of vanilla ice cream or a dollop of whipped cream for an extra touch of indulgence. You can also experiment with variations by adding nuts for a delightful crunch or incorporating spices like cinnamon or nutmeg to elevate the flavor even further. The possibilities are endless, and I encourage you to get creative! I genuinely hope you give this Banana Upside Down Cake a try. It’s a recipe that brings joy and warmth to any table, and I would love to hear about your experience. Don’t forget to share your thoughts and any personal twists you added to the recipe. Happy baking, and may your kitchen be filled with the sweet aroma of this delightful cake! Print
Banana Upside Down Cake: A Delicious Twist on a Classic Dessert
- Total Time: 45-50 minutes
- Yield: 8 servings 1x
Description
Enjoy a delicious Banana Upside-Down Cake with caramelized bananas on top of a moist, fluffy cake. This delightful treat is perfect for dessert or a sweet breakfast, guaranteed to impress your family and friends!
Ingredients
- 3 ripe bananas, sliced
- 1/2 cup unsalted butter, melted
- 1 cup brown sugar, packed
- 1 1/2 cups all-purpose flour
- 1 teaspoon baking powder
- 1/2 teaspoon baking soda
- 1/4 teaspoon salt
- 1/2 cup granulated sugar
- 2 large eggs
- 1 teaspoon vanilla extract
- 1/2 cup buttermilk (or milk with 1/2 tablespoon vinegar added)
Instructions
### Banana Upside-Down Cake Recipe
#### Description
Indulge in this delightful Banana Upside-Down Cake, featuring a luscious layer of caramelized bananas atop a moist and fluffy cake. Perfect for dessert or a sweet breakfast treat, this recipe is sure to impress!
—
#### Ingredients
– **3 ripe bananas**, sliced
– **1/2 cup unsalted butter**, melted
– **1 cup brown sugar**, packed
– **1 1/2 cups all-purpose flour**
– **1 teaspoon baking powder**
– **1/2 teaspoon baking soda**
– **1/4 teaspoon salt**
– **1/2 cup granulated sugar**
– **2 large eggs**
– **1 teaspoon vanilla extract**
– **1/2 cup buttermilk** (or milk with 1/2 tablespoon vinegar added)
—
#### Instructions
1. **Preheat Oven**: Preheat your oven to 350°F (175°C).
2. **Prepare Caramel**: In a medium bowl, combine the melted butter and brown sugar until smooth. Pour this mixture into the bottom of a 9-inch round cake pan, spreading it evenly.
3. **Arrange Bananas**: Arrange the sliced bananas in a single layer over the brown sugar mixture.
4. **Mix Dry Ingredients**: In a large mixing bowl, whisk together the all-purpose flour, baking powder, baking soda, and salt.
5. **Beat Eggs and Sugar**: In another bowl, beat the granulated sugar and eggs together until light and fluffy (about 2-3 minutes).
6. **Add Vanilla**: Add the vanilla extract to the egg mixture and mix until combined.
7. **Combine Wet and Dry Ingredients**: Gradually add the dry ingredients to the wet ingredients, alternating with the buttermilk. Start with a third of the flour, then half of the buttermilk, followed by another third of the flour, the remaining buttermilk, and finally the last of the flour. Mix until just combined.
8. **Pour Batter**: Pour the batter over the arranged bananas in the cake pan, spreading it evenly.
9. **Bake**: Bake in the preheated oven for 30-35 minutes, or until a toothpick inserted into the center comes out clean.
10. **Cool**: Remove the cake from the oven and let it cool in the pan for about 10 minutes.
11. **Loosen Edges**: Run a knife around the edges of the cake to loosen it from the sides of the pan.
12. **Flip Cake**: Place a serving plate upside down over the cake pan and flip it over to release the cake onto the plate. If any bananas stick to the pan, carefully remove them and place them back on the cake.
13. **Serve**: Allow the cake to cool for a few minutes before slicing. Serve warm or at room temperature, optionally with whipped cream or vanilla ice cream.
—
#### Notes
– For added flavor, consider mixing in chopped nuts like walnuts or pecans into the batter.
– Store leftovers in an airtight container at room temperature for up to 2 days or refrigerate for up to a week. Reheat slightly in the microwave for best flavor.
—
#### Prep Time
15 minutes
#### Cook Time
30-35 minutes
#### Total Time
45-50 minutes
#### Yield
8 servings
Notes
- For added flavor, consider mixing in chopped nuts like walnuts or pecans into the batter.
- Store leftovers in an airtight container at room temperature for up to 2 days or refrigerate for up to a week. Reheat slightly in the microwave for best flavor.
- Prep Time: 15 minutes
- Cook Time: 30-35 minutes

Leave a Comment