

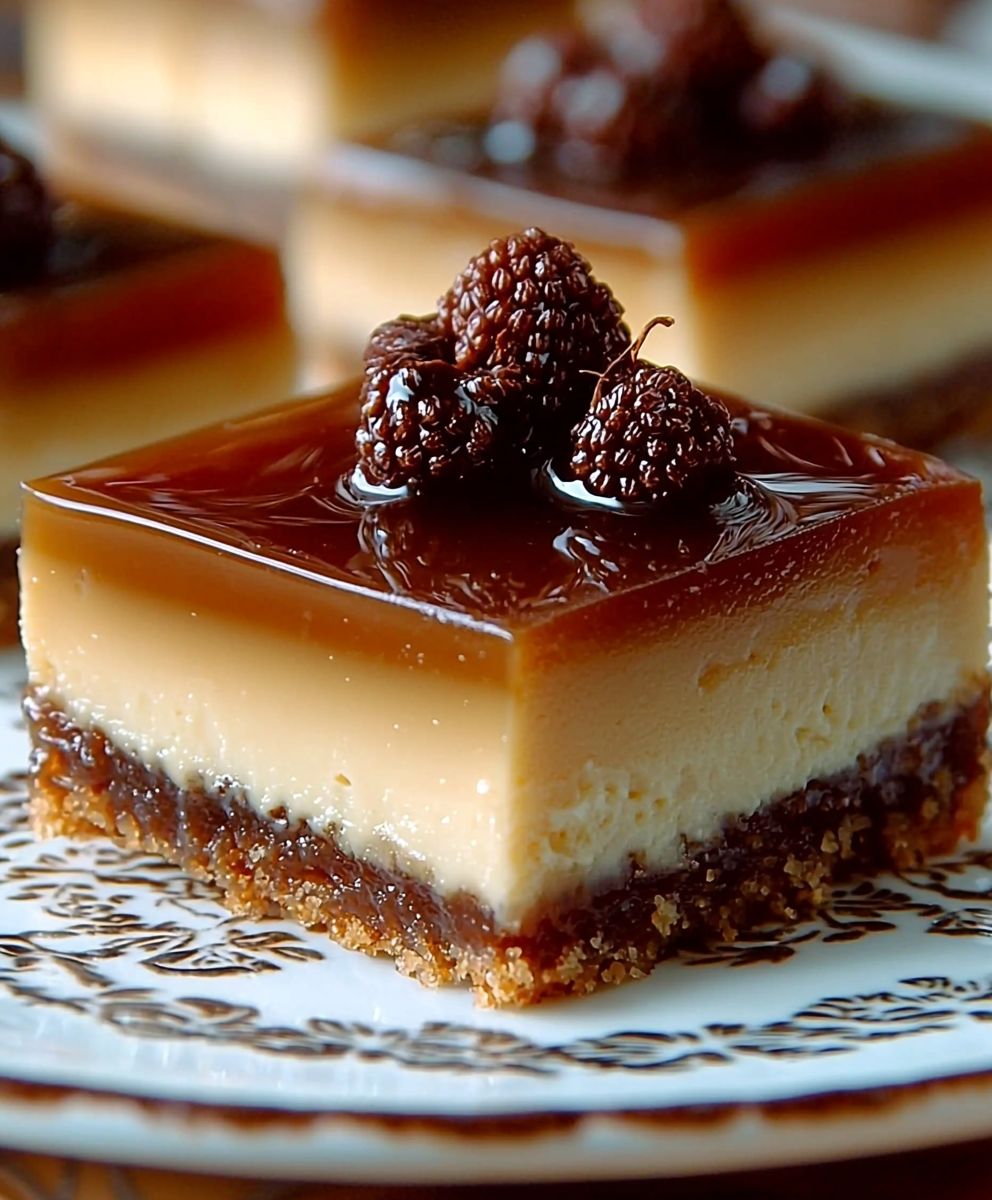
Dulce de Leche Cheesecake Bars are a delightful fusion of creamy cheesecake and rich caramel that will transport your taste buds to a world of indulgence. Originating from Latin American cuisine, dulce de leche is a beloved treat made by slowly caramelizing sweetened milk, and it adds a unique depth of flavor to these cheesecake bars. I’ve always been captivated by the way the smooth, velvety texture of the cheesecake pairs perfectly with the luscious, gooey dulce de leche, creating a dessert that is both comforting and sophisticated.
People adore these Dulce de Leche Cheesecake Bars not only for their irresistible taste but also for their convenience. They are easy to prepare and can be made ahead of time, making them perfect for gatherings or a sweet treat after dinner. The combination of the creamy cheesecake and the sweet, caramel notes of the dulce de leche creates a harmonious balance that leaves everyone craving more. Trust me, once you try these bars, they will become a staple in your dessert repertoire!

Ingredients:
- For the crust:
- 1 ½ cups graham cracker crumbs
- ½ cup unsalted butter, melted
- ¼ cup granulated sugar
- 1 teaspoon vanilla extract
- For the cheesecake filling:
- 16 oz cream cheese, softened
- 1 cup dulce de leche
- ½ cup granulated sugar
- 2 large eggs
- 1 teaspoon vanilla extract
- 1 tablespoon all-purpose flour
- For the topping:
- ½ cup dulce de leche, for drizzling
- Whipped cream, for serving (optional)
- Chocolate shavings or crushed nuts, for garnish (optional)
Preparing the Crust
- Preheat your oven to 350°F (175°C). This is an important step to ensure that your cheesecake bars bake evenly.
- In a medium mixing bowl, combine the graham cracker crumbs, melted butter, granulated sugar, and vanilla extract. Mix until the crumbs are well coated and the mixture resembles wet sand.
- Press the crumb mixture firmly into the bottom of a 9×13 inch baking dish. I like to use the bottom of a measuring cup to really pack it down. This will create a solid base for our cheesecake bars.
- Bake the crust in the preheated oven for about 10 minutes, or until it’s lightly golden. This step helps to set the crust and adds a nice crunch.
- Once baked, remove the crust from the oven and let it cool while you prepare the cheesecake filling.
Preparing the Cheesecake Filling
- In a large mixing bowl, beat the softened cream cheese with an electric mixer on medium speed until smooth and creamy. This usually takes about 2-3 minutes. Make sure there are no lumps!
- Add in the dulce de leche and granulated sugar. Continue to beat until well combined and smooth. The dulce de leche adds a rich flavor that’s simply irresistible.
- Next, add the eggs one at a time, mixing well after each addition. This helps to incorporate air into the mixture, making the cheesecake light and fluffy.
- Stir in the vanilla extract and flour until just combined. Be careful not to overmix at this stage, as it can lead to cracks in your cheesecake.
Combining and Baking
- Pour the cheesecake filling over the cooled crust, spreading it evenly with a spatula. I like to tap the baking dish gently on the counter to remove any air bubbles.
- Bake in the preheated oven for 25-30 minutes, or until the edges are set and the center is slightly jiggly. The cheesecake will continue to set as it cools.
- Once baked, turn off the oven and crack the oven door open. Let the cheesecake bars cool in the oven for about 1 hour. This gradual cooling helps prevent cracks from forming.
- After an hour, remove the cheesecake from the oven and let it cool to room temperature. Then, cover it with plastic wrap and refrigerate for at least 4 hours, or overnight if you can wait!
Assembling and Serving
- Once the cheesecake has chilled and set, it’s time to cut it into bars. Use a sharp knife and wipe it clean between cuts for neat edges.
- Drizzle the top with the remaining dulce de leche. You can warm it slightly in the microwave for easier drizzling if needed.
- If you’re feeling fancy, top each bar with a dollop of whipped cream and sprinkle with chocolate shavings or crushed nuts for added texture and flavor.
- Serve these delicious dulce de leche cheesecake bars chilled, and watch them disappear! They’re perfect for parties, potlucks, or just a sweet treat at home.
Storage Tips
- Store any leftover

Conclusion:
In conclusion, these Dulce de Leche Cheesecake Bars are an absolute must-try for anyone who loves a sweet, creamy dessert with a delightful twist. The rich, caramel-like flavor of the dulce de leche perfectly complements the smooth cheesecake filling, creating a heavenly combination that will leave your taste buds dancing with joy. Plus, the buttery graham cracker crust adds just the right amount of crunch, making each bite a delightful experience.
For serving suggestions, I recommend drizzling a little extra dulce de leche on top for an extra indulgent touch, or even adding a sprinkle of sea salt to enhance the flavors. If you’re feeling adventurous, you could also experiment with different toppings like fresh berries, whipped cream, or even a chocolate ganache for a decadent variation. The possibilities are endless!
I truly encourage you to give this recipe a try. Whether you’re hosting a gathering, celebrating a special occasion, or simply treating yourself, these Dulce de Leche Cheesecake Bars are sure to impress. Once you’ve made them, I would love to hear about your experience! Share your thoughts, any variations you tried, or even a photo of your delicious creation. Let’s spread the love for this delightful dessert together!
Dulce de Leche Cheesecake Bars: A Decadent Dessert Recipe You Must Try
These creamy Dulce de Leche Cheesecake Bars feature a crunchy graham cracker crust and a rich, sweet filling, making them a perfect dessert for any occasion. Drizzled with extra dulce de leche and optionally topped with whipped cream and chocolate shavings, they are sure to delight your taste buds!
Ingredients
- 1 ½ cups graham cracker crumbs
- ½ cup unsalted butter, melted
- ¼ cup granulated sugar
- 1 teaspoon vanilla extract
- 16 oz cream cheese, softened
- 1 cup dulce de leche
- ½ cup granulated sugar
- 2 large eggs
- 1 teaspoon vanilla extract
- 1 tablespoon all-purpose flour
- ½ cup dulce de leche, for drizzling
- Whipped cream, for serving (optional)
- Chocolate shavings or crushed nuts, for garnish (optional)
Instructions
- Preheat your oven to 350°F (175°C).
- In a medium mixing bowl, combine the graham cracker crumbs, melted butter, granulated sugar, and vanilla extract. Mix until the crumbs are well coated and the mixture resembles wet sand.
- Press the crumb mixture firmly into the bottom of a 9×13 inch baking dish.
- Bake the crust in the preheated oven for about 10 minutes, or until it’s lightly golden.
- Once baked, remove the crust from the oven and let it cool while you prepare the cheesecake filling.
- In a large mixing bowl, beat the softened cream cheese with an electric mixer on medium speed until smooth and creamy (about 2-3 minutes).
- Add in the dulce de leche and granulated sugar. Continue to beat until well combined and smooth.
- Add the eggs one at a time, mixing well after each addition.
- Stir in the vanilla extract and flour until just combined.
- Pour the cheesecake filling over the cooled crust, spreading it evenly with a spatula.
- Bake in the preheated oven for 25-30 minutes, or until the edges are set and the center is slightly jiggly.
- Once baked, turn off the oven and crack the oven door open. Let the cheesecake bars cool in the oven for about 1 hour.
- After an hour, remove the cheesecake from the oven and let it cool to room temperature. Then, cover it with plastic wrap and refrigerate for at least 4 hours, or overnight.
- Once the cheesecake has chilled and set, cut it into bars using a sharp knife.
- Drizzle the top with the remaining dulce de leche.
- Optionally, top each bar with a dollop of whipped cream and sprinkle with chocolate shavings or crushed nuts.
- Serve chilled and enjoy!
Notes
- For best results, ensure the cream cheese is fully softened to avoid lumps in the filling.
- You can store any leftovers in the refrigerator for up to 5 days.

Leave a Comment