

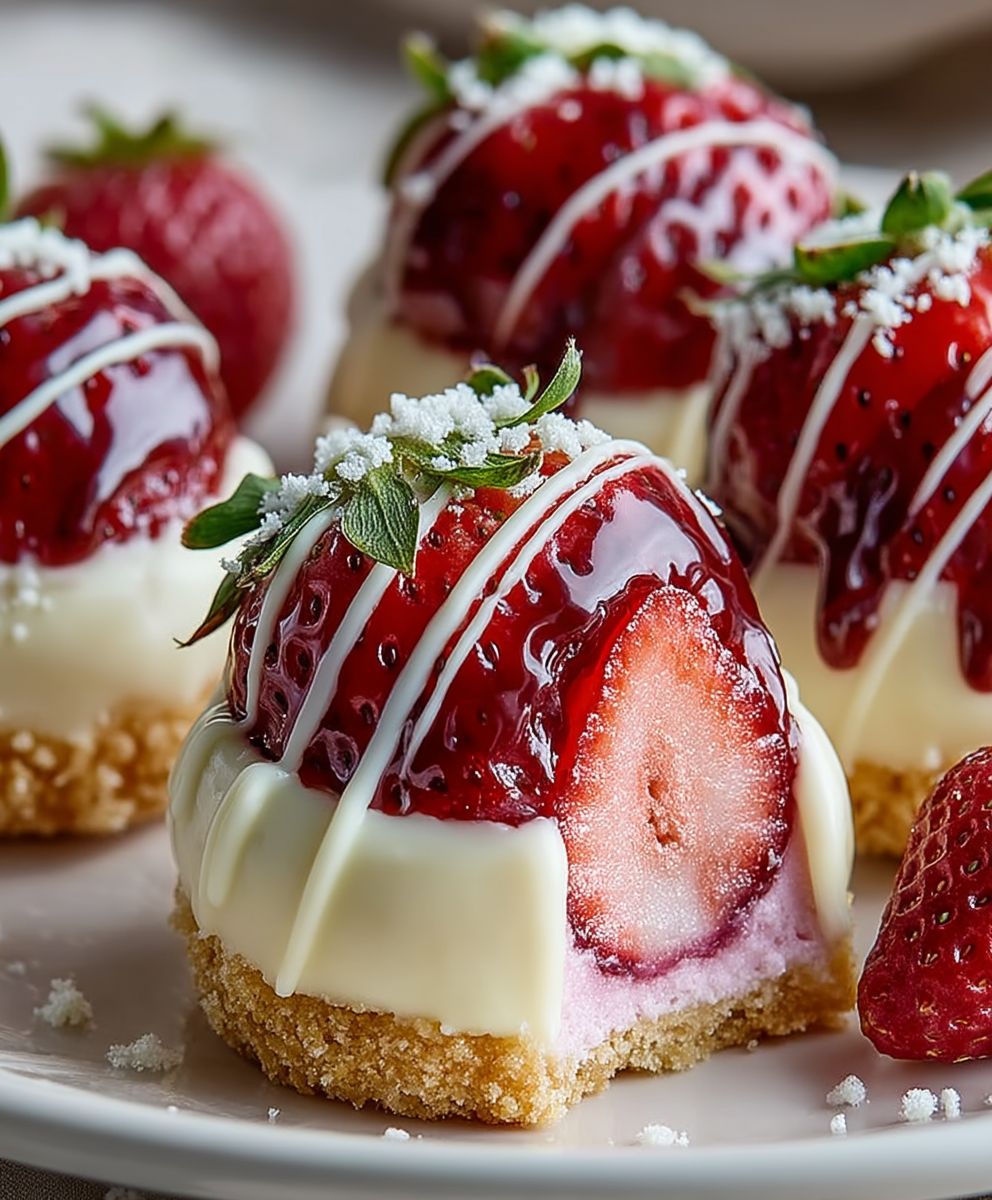
Strawberry cheesecake bites: Prepare to be utterly captivated by these miniature marvels! Imagine the creamy, decadent richness of classic cheesecake, perfectly balanced with the bright, sweet burst of fresh strawberries, all nestled into a delightful, bite-sized package. These aren’t just desserts; they’re tiny explosions of joy that will leave you craving more.
Cheesecake, in its various forms, has a history stretching back to ancient Greece, where it was even served to athletes during the Olympic Games! While our modern version is a far cry from those early iterations, the enduring appeal of creamy, cheese-based desserts is undeniable. The addition of strawberries, a beloved fruit enjoyed worldwide, elevates this classic treat to new heights.
What makes these strawberry cheesecake bites so irresistible? It’s the perfect combination of textures: the smooth, velvety cheesecake filling, the slightly crumbly base, and the juicy pop of fresh strawberries. They are incredibly easy to make, perfect for parties, potlucks, or simply a delightful treat for yourself. Plus, their individual portion size makes them ideal for portion control (if you can resist eating more than one!). Get ready to experience a symphony of flavors and textures that will make these bite-sized delights your new go-to dessert!

Ingredients:
- For the Crust:
- 1 ½ cups graham cracker crumbs
- 5 tablespoons unsalted butter, melted
- ¼ cup granulated sugar
- For the Cheesecake Filling:
- 16 ounces cream cheese, softened
- ¾ cup granulated sugar
- 2 large eggs
- 1 teaspoon vanilla extract
- ¼ cup sour cream
- For the Strawberry Topping:
- 1 pound fresh strawberries, hulled and sliced
- ¼ cup granulated sugar
- 2 tablespoons lemon juice
- 1 tablespoon cornstarch
- 2 tablespoons water
Preparing the Graham Cracker Crust
Okay, let’s get started with the foundation of our delightful strawberry cheesecake bites – the graham cracker crust! This part is super easy and sets the stage for all the deliciousness to come.
- Combine the Ingredients: In a medium-sized bowl, grab your graham cracker crumbs, melted butter, and granulated sugar. Make sure the butter is fully melted so it incorporates evenly.
- Mix Thoroughly: Use a fork or your hands (if you’re feeling adventurous!) to mix everything together until the crumbs are evenly moistened. You want the mixture to resemble wet sand. This is crucial for the crust to hold together properly.
- Press into Muffin Liners: Line a 24-cup mini muffin tin with paper liners. This makes removing the cheesecake bites a breeze later on. Take about a tablespoon of the graham cracker mixture and press it firmly into the bottom of each liner. I like to use the bottom of a measuring cup or a small glass to ensure the crust is compact and even. A well-packed crust prevents it from crumbling too much when you take a bite.
- Bake the Crust (Optional): For a slightly firmer crust, you can pre-bake it. Place the muffin tin in a preheated oven at 350°F (175°C) for about 5-7 minutes. This step is optional, but it does add a bit of extra stability and a subtle toasted flavor. If you skip this step, just move on to filling the crusts.
Making the Creamy Cheesecake Filling
Now for the star of the show – the creamy, dreamy cheesecake filling! This is where the magic really happens. It’s important to follow these steps carefully to ensure a smooth and luscious texture.
- Cream the Cream Cheese and Sugar: In a large bowl, using an electric mixer (either a stand mixer or a hand mixer), beat the softened cream cheese and granulated sugar together until smooth and creamy. This is probably the most important step for a lump-free cheesecake. Make sure your cream cheese is truly softened – leaving it out at room temperature for at least an hour is ideal. Beat on medium speed for about 3-5 minutes, scraping down the sides of the bowl occasionally to ensure everything is evenly incorporated.
- Incorporate the Eggs: Add the eggs one at a time, beating well after each addition. Don’t overmix at this stage, as this can incorporate too much air into the batter, which can cause the cheesecakes to crack during baking. Just mix until the egg is fully incorporated.
- Add Vanilla and Sour Cream: Stir in the vanilla extract and sour cream. The vanilla adds a lovely flavor, and the sour cream contributes to the cheesecake’s tanginess and creamy texture. Mix until just combined. Again, avoid overmixing.
- Fill the Crusts: Carefully spoon the cheesecake filling into each of the prepared graham cracker crusts, filling them almost to the top. Try to distribute the filling evenly.
Baking the Cheesecake Bites
Time to bake these little beauties! Baking cheesecake can be a bit tricky, but these mini versions are much more forgiving than a full-sized cheesecake. We’ll use a water bath to help prevent cracking and ensure even baking.
- Prepare the Water Bath: Wrap the bottom of the muffin tin tightly with aluminum foil. This will prevent water from seeping into the crusts. Place the foil-wrapped muffin tin inside a larger baking pan.
- Add Hot Water: Carefully pour hot water into the larger baking pan, filling it about halfway up the sides of the muffin tin. The water bath creates a humid environment in the oven, which helps the cheesecakes bake evenly and prevents them from cracking.
- Bake: Bake in a preheated oven at 325°F (160°C) for 20-25 minutes, or until the edges are set but the centers are still slightly jiggly. The jiggle should be very slight – like a gentle wobble.
- Cool Gradually: Turn off the oven and crack the oven door slightly. Let the cheesecake bites cool in the oven for about an hour. This gradual cooling process helps prevent cracking.
- Refrigerate: Remove the muffin tin from the water bath and let the cheesecake bites cool completely at room temperature. Then, refrigerate them for at least 4 hours, or preferably overnight, to allow them to set completely. This is crucial for the best texture and flavor.
Preparing the Strawberry Topping
No strawberry cheesecake bite is complete without a luscious strawberry topping! This topping is quick and easy to make, and it adds a burst of fresh, fruity flavor that perfectly complements the creamy cheesecake.
- Combine Strawberries and Sugar: In a medium saucepan, combine the sliced strawberries and granulated sugar. Let this mixture sit for about 10-15 minutes. This allows the sugar to draw out the natural juices from the strawberries, creating a delicious syrup.
- Cook the Strawberries: Place the saucepan over medium heat and bring the strawberry mixture to a simmer. Cook for about 5-7 minutes, or until the strawberries have softened and the syrup has thickened slightly. Stir occasionally to prevent sticking.
- Add Lemon Juice: Stir in the lemon juice. The lemon juice adds a bright, tangy flavor that balances the sweetness of the strawberries and sugar.
- Thicken with Cornstarch: In a small bowl, whisk together the cornstarch and water to create a slurry. Pour the cornstarch slurry into the strawberry mixture and stir constantly until the topping thickens. This should only take a minute or two.
- Cool the Topping: Remove the saucepan from the heat and let the strawberry topping cool completely. As it cools, it will thicken further.
Assembling the Strawberry Cheesecake Bites
Finally, the moment we’ve all been waiting for – assembling our beautiful strawberry cheesecake bites! This is the fun part where we get to see all our hard work come together.
- Remove from Muffin Tin: Gently remove the cheesecake bites from the muffin tin. If you used paper liners, this should be a breeze. If not, you may need to run a thin knife around the edges to loosen them.
- Top with Strawberry Topping: Spoon a generous amount of the cooled strawberry topping over each cheesecake bite.
- Garnish (Optional): For an extra touch of elegance, you can garnish the cheesecake bites with a fresh strawberry slice or a sprig of mint.
- Serve and Enjoy! Serve the strawberry cheesecake bites immediately or store them in the refrigerator for later. They are best enjoyed within a few days.
Conclusion:
These Strawberry Cheesecake Bites are truly irresistible, and I wholeheartedly believe they deserve a spot on your baking repertoire. From the buttery, crumbly base to the creamy, tangy cheesecake filling, and topped with that burst of fresh strawberry flavor, every element works in perfect harmony. They’re the ideal treat for any occasion, whether you’re hosting a party, need a quick and easy dessert for a weeknight, or simply want to indulge in a little something sweet. The individual portion sizes make them incredibly convenient and prevent any overindulgence (though, let’s be honest, it’s hard to stop at just one!).
But what truly sets these bites apart is their versatility. While the classic strawberry combination is a winner, don’t be afraid to get creative! Imagine swapping the strawberries for raspberries, blueberries, or even a mix of berries for a vibrant and colorful twist. A drizzle of chocolate ganache over the top would add a decadent touch, or you could sprinkle on some chopped nuts for extra texture and flavor. For a more sophisticated flavor profile, try adding a hint of lemon zest to the cheesecake filling or a splash of vanilla extract to the crust.
Serving suggestions are endless! These Strawberry Cheesecake Bites are fantastic on their own, but they also pair beautifully with a scoop of vanilla ice cream or a dollop of whipped cream. Arrange them on a platter for an elegant dessert presentation, or pack them in a lunchbox for a delightful midday treat. They’re also perfect for picnics and potlucks, as they’re easy to transport and require no utensils.
And if you’re looking to elevate your presentation even further, consider adding a few edible flowers or a dusting of powdered sugar. A simple garnish can make all the difference and transform these already delicious bites into a truly stunning dessert.
I’ve poured my heart into perfecting this recipe, and I’m confident that you’ll love it as much as I do. The recipe is straightforward and easy to follow, even for beginner bakers. The ingredients are readily available, and the steps are clearly outlined. Plus, the satisfaction of creating these little bites of heaven is simply unmatched.
So, what are you waiting for? Gather your ingredients, preheat your oven, and get ready to embark on a baking adventure. I promise you won’t be disappointed. These Strawberry Cheesecake Bites are a guaranteed crowd-pleaser, and they’re sure to become a new family favorite.
I’m incredibly excited for you to try this recipe and experience the joy of baking these delightful treats. Once you’ve made them, I’d love to hear about your experience! Share your photos and comments on social media using [Your Hashtag Here] or leave a review on the blog. Let me know what variations you tried and how they turned out. Your feedback is invaluable, and it helps me continue to create and share recipes that you’ll love. Happy baking! I can’t wait to see your creations!
Strawberry Cheesecake Bites: The Perfect No-Bake Dessert
Mini strawberry cheesecake bites with graham cracker crust, creamy filling, and sweet strawberry topping. Perfect for parties!
Ingredients
Instructions
Recipe Notes
- Make sure your cream cheese is fully softened for a smooth filling.
- Don’t overmix the cheesecake batter after adding the eggs to prevent cracking.
- The water bath is crucial for even baking and preventing cracks.
- Cooling the cheesecake bites gradually in the oven and then refrigerating them is essential for the best texture.
- The strawberry topping will thicken as it cools.
Leave a Comment