

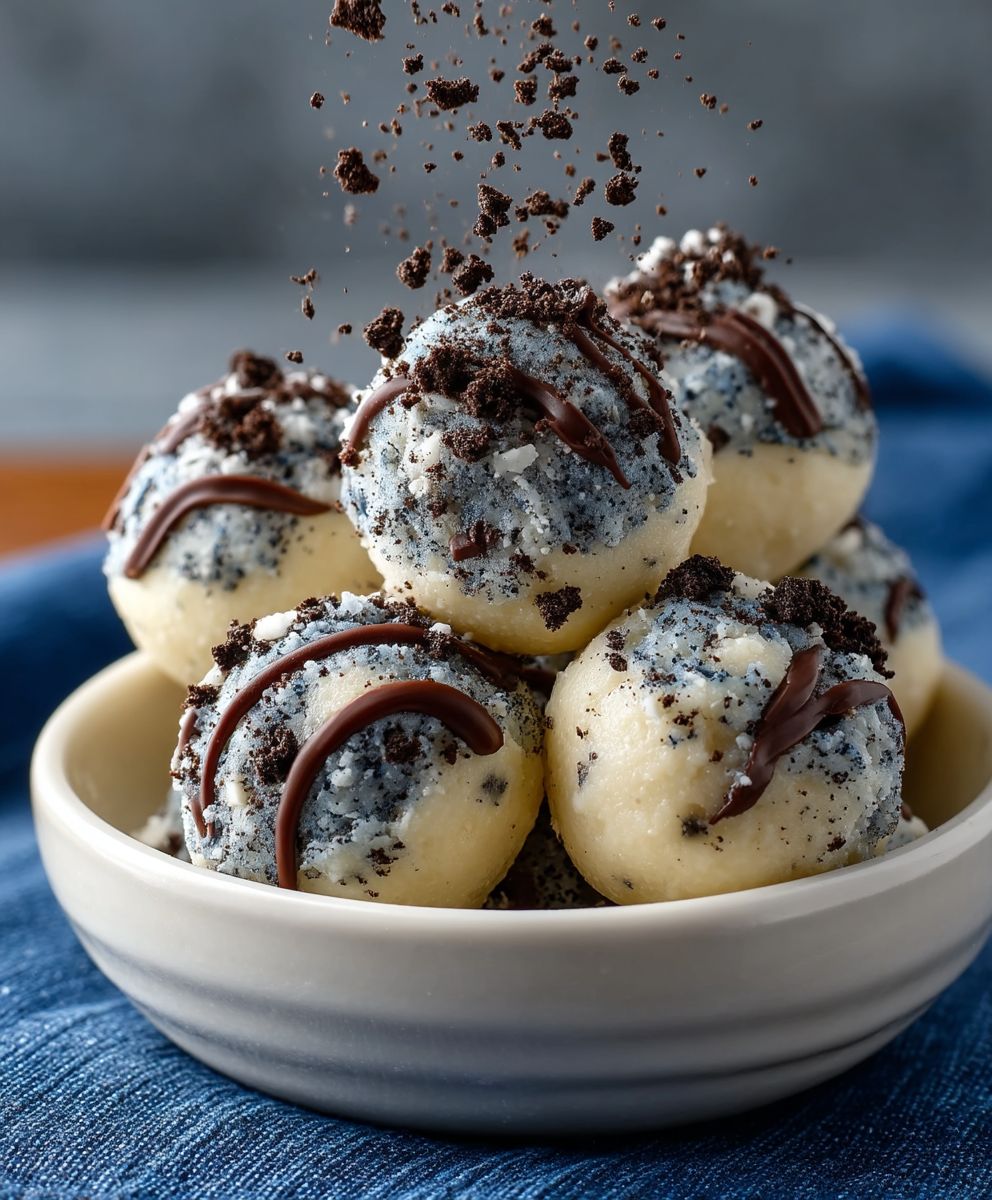
Cream Cheese Oreo Protein Balls are about to become your new favorite guilt-free indulgence! Imagine biting into a decadent treat that tastes like a cookies-and-cream dream, but secretly fuels your body with protein. Sounds too good to be true? I promise you, it’s not! These little bites of heaven are incredibly easy to make and require no baking, making them perfect for a quick snack or a post-workout boost.
While the exact origins of combining cream cheese and Oreos into a no-bake treat are a bit murky, the concept likely evolved from the popularity of Oreo truffles. These truffles, a holiday staple for many, showcase the irresistible combination of crushed Oreos and cream cheese. My version simply elevates the concept by adding a protein punch, transforming a classic dessert into a functional and delicious snack.
People adore these Cream Cheese Oreo Protein Balls for so many reasons. First, the taste is simply divine – the creamy richness of the cream cheese perfectly complements the crunchy, chocolatey goodness of the Oreos. Second, the texture is fantastic; the smooth interior gives way to a satisfying chew. But perhaps the biggest draw is the convenience. They are incredibly quick to prepare, require minimal ingredients, and are easily portable, making them the ideal on-the-go snack. Plus, who can resist a treat that satisfies your sweet tooth while contributing to your daily protein intake? Let’s get started!

Ingredients:
- 8 oz Cream Cheese, softened
- 1 package (about 36) Oreo cookies, finely crushed
- 1 scoop Vanilla Protein Powder (whey or plant-based)
- 2 tablespoons Milk (dairy or non-dairy)
- 1/4 cup Powdered Sugar, for coating (optional)
- 1/4 cup Melted Dark Chocolate, for drizzling (optional)
Preparing the Oreo Crumbs:
Okay, let’s start with the Oreos! You’ll need to crush them into fine crumbs. I find the easiest way to do this is using a food processor. Just toss the whole package of Oreos in there (yes, the filling too!) and pulse until you have a nice, even crumb. If you don’t have a food processor, no worries! You can put the Oreos in a large zip-top bag, seal it tightly, and then use a rolling pin or even a heavy can to crush them. Just make sure you get them as fine as possible – bigger chunks will make the protein balls harder to roll smoothly.
Mixing the Protein Ball Dough:
- Cream the Cream Cheese: In a large mixing bowl, add your softened cream cheese. It’s super important that the cream cheese is softened! If it’s still cold and hard, you’ll end up with lumpy protein balls. Trust me, I’ve been there! Use an electric mixer (handheld or stand mixer) to beat the cream cheese until it’s smooth and creamy. This usually takes about 2-3 minutes. You can also do this by hand, but it will take a bit more elbow grease.
- Incorporate the Oreo Crumbs: Gradually add the crushed Oreo crumbs to the cream cheese, mixing on low speed until just combined. Be careful not to overmix, as this can make the dough tough. You want everything to be evenly distributed, but you don’t want to develop any gluten (which isn’t really a concern here, but still good practice!).
- Add the Protein Powder: Now it’s time for the protein! Add one scoop of vanilla protein powder to the mixture. I prefer vanilla because it complements the Oreo flavor nicely, but you could experiment with other flavors like cookies and cream or even chocolate. Mix on low speed until the protein powder is fully incorporated. Again, be careful not to overmix.
- Adjust the Consistency: The mixture might be a little dry at this point, depending on the type of protein powder you use. This is where the milk comes in! Add the milk one tablespoon at a time, mixing after each addition, until the dough comes together and forms a cohesive ball. You want it to be moist enough to roll easily, but not so wet that it’s sticky. You might not need the full two tablespoons, so add it gradually.
Chilling and Rolling the Protein Balls:
- Chill the Dough: This is a crucial step! Cover the bowl with plastic wrap and refrigerate the dough for at least 30 minutes. This will allow the dough to firm up, making it much easier to roll into balls. If you skip this step, the dough will be too sticky and messy to work with. I sometimes chill it for even longer, up to a couple of hours, if I have the time.
- Prepare Your Work Station: While the dough is chilling, prepare your work station. Line a baking sheet with parchment paper or wax paper. This will prevent the protein balls from sticking. If you’re planning on coating them in powdered sugar, put the powdered sugar in a shallow bowl.
- Roll the Protein Balls: Once the dough is chilled, remove it from the refrigerator. Use a spoon or a small cookie scoop to portion out the dough. Roll each portion between your palms to form a smooth, round ball. I usually aim for about 1-inch balls, but you can make them bigger or smaller depending on your preference.
- Coat (Optional): If you’re using powdered sugar, roll each protein ball in the sugar until it’s evenly coated. This adds a touch of sweetness and makes them look extra pretty.
- Place on Baking Sheet: Place the rolled protein balls on the prepared baking sheet.
Finishing Touches (Optional):
- Melt the Chocolate: If you’re using melted chocolate, melt it in a microwave-safe bowl in 30-second intervals, stirring after each interval, until smooth. Be careful not to overheat the chocolate, as it can burn. You can also melt it using a double boiler.
- Drizzle with Chocolate: Transfer the melted chocolate to a piping bag or a zip-top bag with a small corner snipped off. Drizzle the chocolate over the protein balls in a decorative pattern.
- Chill Again: Return the protein balls to the refrigerator for another 15-20 minutes to allow the chocolate to set. This will prevent the chocolate from smearing when you handle them.
Storage:
These Cream Cheese Oreo Protein Balls are best stored in an airtight container in the refrigerator. They will keep for up to a week. You can also freeze them for longer storage. Just thaw them in the refrigerator before serving.
Tips and Variations:
- Protein Powder: Feel free to experiment with different flavors of protein powder. Chocolate protein powder would also be delicious! Just keep in mind that the flavor of the protein powder will affect the overall taste of the protein balls.
- Oreo Variations: You can use different flavors of Oreos, such as Golden Oreos or Mint Oreos, to change up the flavor profile.
- Add-Ins: Get creative with add-ins! You could add chopped nuts, shredded coconut, or even mini chocolate chips to the dough.
- Sweetener: If you want to make these protein balls even sweeter, you can add a tablespoon or two of honey or maple syrup to the dough.
- Vegan Option: To make these protein balls vegan, use vegan cream cheese, plant-based protein powder, and non-dairy milk.
- Lower Fat Option: Use a reduced-fat cream cheese to lower the fat content.
- Serving Suggestions: These protein balls are perfect as a post-workout snack, a healthy dessert, or even a quick breakfast on the go.
Troubleshooting:
Dough is too dry: Add more milk, one tablespoon at a time, until the dough comes together.
Dough is too sticky: Add more crushed Oreo crumbs, one tablespoon at a time, until the dough is less sticky.
Protein balls are not holding their shape: Make sure the cream cheese is softened and the dough is chilled for at least 30 minutes.
Nutritional Information (approximate, per ball):
Please note that the nutritional information is an estimate and will vary depending on the specific ingredients you use.
- Calories: 80-100
- Protein: 4-6g
- Fat: 5-7g
- Carbohydrates: 6-8g
Conclusion:
So there you have it! These Cream Cheese Oreo Protein Balls are truly a game-changer. They’re quick, easy, require minimal ingredients, and deliver a satisfying protein boost with that irresistible Oreo flavor we all crave. But beyond the convenience and deliciousness, what makes this recipe a must-try is its versatility. It’s not just a protein snack; it’s a blank canvas for your culinary creativity!
Think of these protein balls as the perfect pre-workout fuel, a guilt-free dessert, or even a fun activity to do with kids. They’re so adaptable to different dietary needs and preferences. Need a vegan option? Simply swap out the cream cheese for a plant-based alternative and use vegan Oreos (yes, they exist!). Want to lower the sugar content? Opt for sugar-free cream cheese and a touch of stevia or monk fruit sweetener. The possibilities are endless!
Serving Suggestions and Variations:
Beyond the basic recipe, I encourage you to experiment! Here are a few ideas to get you started:
* Chocolate Drizzle: Melt some dark chocolate and drizzle it over the finished protein balls for an extra decadent treat.
* Nut Butter Boost: Add a tablespoon of your favorite nut butter (peanut, almond, cashew) to the mixture for added healthy fats and flavor.
* Coconut Coating: Roll the protein balls in shredded coconut for a tropical twist.
* Sprinkle Fun: Get festive and roll them in colorful sprinkles for a party-ready snack.
* Espresso Kick: Add a teaspoon of instant espresso powder to the mixture for a coffee-flavored protein boost.
* Spice it Up: A pinch of cinnamon or nutmeg can add warmth and depth to the flavor profile.
* Mini Oreo Explosion: Instead of crushing the Oreos, chop them into larger pieces for a chunkier texture.
* Yogurt Dip: Serve the protein balls with a side of Greek yogurt for dipping.
I’ve personally tried several variations, and each one has been a delightful surprise. The nut butter version is a personal favorite for that extra dose of healthy fats, and the chocolate drizzle is perfect for satisfying those intense chocolate cravings. Don’t be afraid to get creative and tailor the recipe to your own taste preferences!
Ultimately, these Cream Cheese Oreo Protein Balls are more than just a recipe; they’re an invitation to have fun in the kitchen and create something that nourishes your body and satisfies your sweet tooth. I truly believe you’ll love how easy and delicious they are.
So, what are you waiting for? Gather your ingredients, put on your favorite music, and get ready to whip up a batch of these amazing protein balls. I’m confident that this will become a staple in your snack rotation.
I’m so excited for you to try this recipe! And more importantly, I’d love to hear about your experience. Did you try any variations? What did you think of the taste and texture? Share your photos and comments below! Let’s build a community of protein ball enthusiasts and inspire each other with our culinary creations. Happy snacking! I can’t wait to see what you come up with using this fantastic Cream Cheese Oreo Protein Balls recipe.
Cream Cheese Oreo Protein Balls: The Ultimate No-Bake Recipe
Easy no-bake Oreo protein balls made with cream cheese, protein powder, and crushed Oreos. A delicious and healthy treat!
Ingredients
Instructions
Recipe Notes
- Use softened cream cheese for best results.
- Don’t overmix the dough.
- Chilling the dough is crucial for easy rolling.
- Experiment with different flavors of protein powder and Oreos.
- Add chopped nuts, shredded coconut, or mini chocolate chips for extra flavor and texture.
- For a vegan option, use vegan cream cheese, plant-based protein powder, and non-dairy milk.
- If the dough is too dry, add more milk. If it’s too sticky, add more crushed Oreo crumbs.


Leave a Comment