

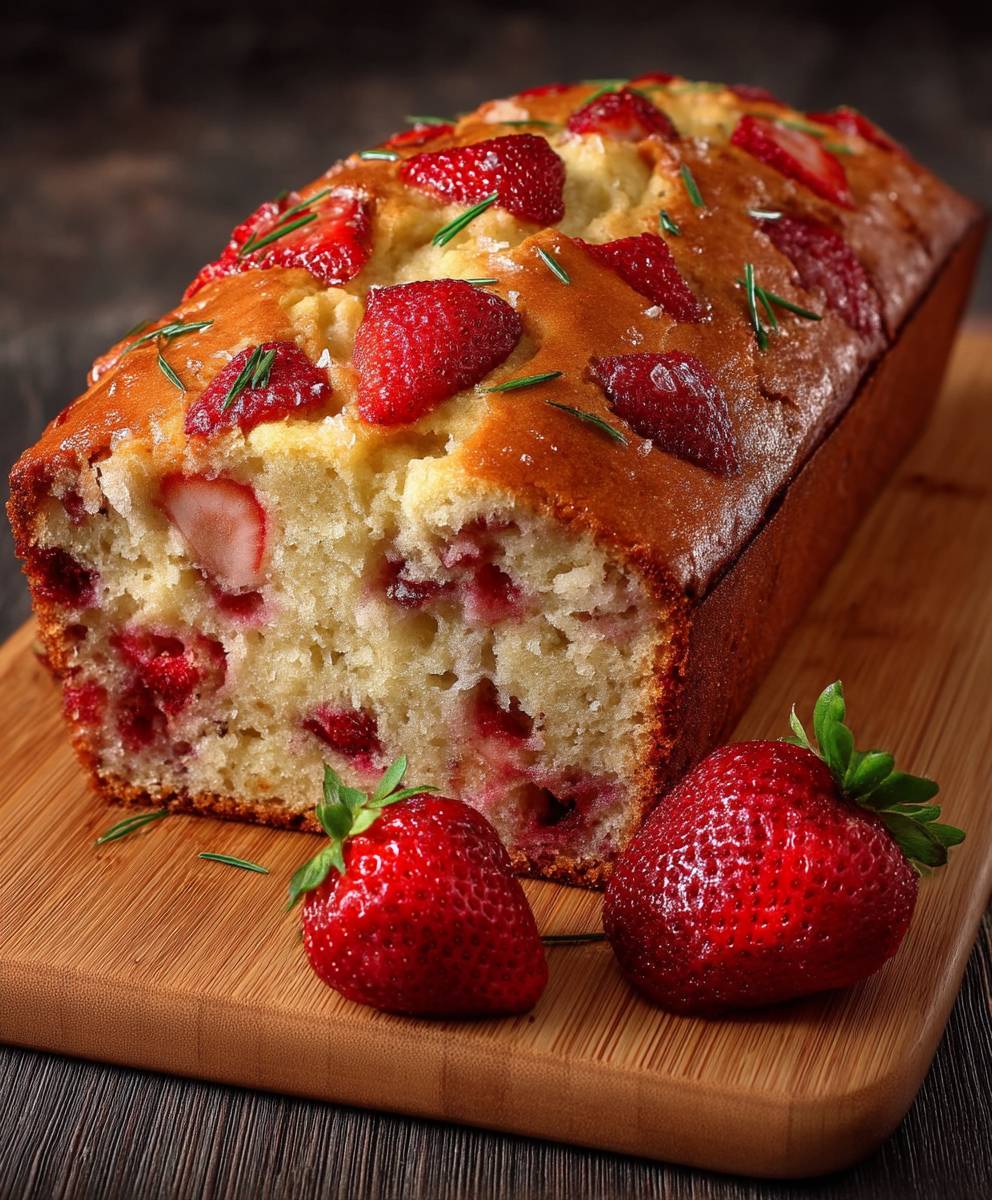
Fresh Strawberry Bread: just the name conjures up images of sun-drenched mornings and the sweet, juicy taste of summer, doesn’t it? Imagine slicing into a loaf, the vibrant pink hue peeking through, and the irresistible aroma of strawberries filling your kitchen. This isn’t just any bread; it’s a celebration of the season’s bounty, baked into a comforting and delicious treat.
While the exact origins of strawberry bread are a bit hazy, fruit-studded breads have been a staple in many cultures for centuries. Think of the Italian panettone or the German stollen – breads enriched with fruit and spices, often enjoyed during festive occasions. Fresh Strawberry Bread takes that tradition and infuses it with the bright, cheerful flavor of fresh strawberries, making it a perfect addition to brunches, afternoon teas, or simply a delightful snack any time of day.
What makes this bread so universally loved? It’s the perfect balance of flavors and textures. The sweetness of the strawberries is beautifully complemented by the subtle tang of the bread, creating a taste that’s both refreshing and satisfying. The moist, tender crumb is studded with chunks of juicy strawberries, offering a delightful burst of flavor in every bite. Plus, it’s incredibly easy to make! Whether you’re a seasoned baker or a novice in the kitchen, this recipe is foolproof and guaranteed to impress. So, grab a basket of fresh strawberries and let’s get baking!

Ingredients:
- 3 cups all-purpose flour
- 1 teaspoon baking soda
- 1 teaspoon ground cinnamon
- 1/2 teaspoon ground nutmeg
- 1/4 teaspoon salt
- 1 cup (2 sticks) unsalted butter, softened
- 2 cups granulated sugar
- 4 large eggs
- 1 teaspoon vanilla extract
- 1 cup sour cream
- 2 cups fresh strawberries, hulled and chopped
- 1/2 cup chopped walnuts or pecans (optional)
Preparing the Batter:
- First things first, let’s get our dry ingredients ready. In a large bowl, whisk together the 3 cups of all-purpose flour, 1 teaspoon of baking soda, 1 teaspoon of ground cinnamon, ½ teaspoon of ground nutmeg, and ¼ teaspoon of salt. Make sure everything is well combined. This ensures that the baking soda and spices are evenly distributed throughout the bread, giving it a consistent flavor and texture.
- Now, for the wet ingredients! In a separate, larger bowl, cream together the 1 cup (2 sticks) of softened unsalted butter and 2 cups of granulated sugar until the mixture is light and fluffy. This step is crucial for creating a tender crumb. I usually use an electric mixer for this, but you can also do it by hand if you’re feeling ambitious! Just make sure the butter is truly softened, or you’ll end up with lumps. Creaming the butter and sugar incorporates air into the mixture, which helps the bread rise.
- Next, beat in the 4 large eggs, one at a time, making sure each egg is fully incorporated before adding the next. After all the eggs are in, stir in 1 teaspoon of vanilla extract. The vanilla extract enhances the overall flavor of the bread, adding a touch of warmth and sweetness.
- Now, it’s time to combine the wet and dry ingredients. Gradually add the dry ingredients to the wet ingredients, alternating with the 1 cup of sour cream. Begin and end with the dry ingredients. This means you’ll add about a third of the flour mixture, then half of the sour cream, then another third of the flour mixture, then the remaining sour cream, and finally the last third of the flour mixture. Mix until just combined. Be careful not to overmix the batter, as this can result in a tough bread. Overmixing develops the gluten in the flour, which can make the bread dense and chewy instead of light and tender.
- Gently fold in the 2 cups of fresh strawberries, hulled and chopped, and the ½ cup of chopped walnuts or pecans (if using). I love using fresh strawberries because they add a burst of juicy sweetness to the bread. Make sure the strawberries are chopped into small pieces so they distribute evenly throughout the batter. The nuts add a nice crunch and nutty flavor, but they’re totally optional if you’re not a fan or have allergies.
Baking Process:
- Preheat your oven to 350°F (175°C). This is the ideal temperature for baking this bread, ensuring that it cooks evenly and doesn’t burn on the outside before the inside is done.
- Grease and flour a 9×5 inch loaf pan. This prevents the bread from sticking to the pan and makes it easy to remove after baking. You can also use baking spray with flour if you prefer.
- Pour the batter into the prepared loaf pan and spread it evenly. Make sure the batter is distributed evenly so that the bread bakes uniformly.
- Bake for 50-60 minutes, or until a wooden skewer inserted into the center comes out clean. The baking time may vary depending on your oven, so it’s important to check the bread periodically. If the top of the bread starts to brown too quickly, you can tent it with aluminum foil to prevent it from burning.
- Let the bread cool in the pan for 10-15 minutes before transferring it to a wire rack to cool completely. This allows the bread to set slightly and prevents it from breaking when you remove it from the pan. Cooling it completely on a wire rack ensures that the bottom of the bread doesn’t get soggy.
Serving and Storage:
- Once the bread is completely cooled, you can slice it and serve it. It’s delicious on its own, or you can spread it with butter, cream cheese, or your favorite jam.
- To store the bread, wrap it tightly in plastic wrap or place it in an airtight container. It will keep at room temperature for 2-3 days or in the refrigerator for up to a week. You can also freeze the bread for longer storage. Just wrap it tightly in plastic wrap and then in aluminum foil, or place it in a freezer bag. It will keep in the freezer for up to 2-3 months.
- If you want to reheat the bread, you can wrap a slice in foil and warm it in a 350°F (175°C) oven for a few minutes, or you can microwave it for a few seconds.
- Optional Glaze: For an extra touch of sweetness, you can make a simple glaze by whisking together 1 cup of powdered sugar with 2-3 tablespoons of milk or lemon juice. Drizzle the glaze over the cooled bread. The lemon juice adds a nice tang that complements the sweetness of the strawberries.
- Variations: Feel free to experiment with different variations of this recipe. You can add other fruits, such as blueberries, raspberries, or blackberries. You can also add chocolate chips, shredded coconut, or different types of nuts. For a more intense strawberry flavor, you can add a tablespoon of strawberry jam to the batter.
- Tips for Success:
- Make sure your butter is softened to room temperature for easy creaming.
- Don’t overmix the batter, as this can result in a tough bread.
- Check the bread for doneness by inserting a wooden skewer into the center. If it comes out clean, the bread is done.
- Let the bread cool completely before slicing it.
Enjoy your delicious homemade Fresh Strawberry Bread! I hope you love it as much as I do!
Conclusion:
This Fresh Strawberry Bread isn’t just another recipe; it’s a slice of sunshine baked into every loaf. The vibrant color, the sweet aroma, and the burst of fresh strawberry flavor make it an absolute must-try, especially when strawberries are at their peak. It’s the kind of treat that brightens up any morning, elevates an afternoon tea, and leaves everyone asking for seconds. Trust me, once you experience the delightful combination of moist bread and juicy strawberries, you’ll be hooked!
But the best part? It’s incredibly versatile! While I adore it served warm with a simple pat of butter, there are so many ways to enjoy this delicious bread. For a truly decadent experience, try toasting a slice and topping it with a dollop of whipped cream and a few extra fresh strawberries. Or, if you’re feeling adventurous, create a stunning strawberry bread French toast – the caramelized edges and soft, strawberry-infused interior are simply divine.
And don’t be afraid to experiment with variations! If you’re a fan of nuts, adding a handful of chopped walnuts or pecans to the batter provides a delightful crunch. A sprinkle of cinnamon or nutmeg can also add a warm, comforting spice. For a citrusy twist, try adding a tablespoon of lemon or orange zest to the batter. You could even swirl in a ribbon of cream cheese filling for an extra layer of richness. The possibilities are endless!
I’ve personally made this Fresh Strawberry Bread countless times, and it’s always a crowd-pleaser. It’s perfect for potlucks, bake sales, or simply a special treat for your family. It also makes a wonderful homemade gift – imagine the joy of receiving a freshly baked loaf wrapped in a pretty ribbon!
I truly believe that this recipe is a winner, and I’m so excited for you to try it. It’s simple enough for even beginner bakers, yet impressive enough to wow your guests. The satisfaction of creating something so delicious from scratch is truly rewarding.
So, what are you waiting for? Gather your ingredients, preheat your oven, and get ready to bake a loaf of pure strawberry bliss. I’m confident that this Fresh Strawberry Bread will become a new favorite in your household.
And most importantly, I’d love to hear about your experience! Once you’ve tried the recipe, please come back and share your thoughts in the comments below. Did you make any variations? What did you think of the flavor? Any tips or tricks you’d like to share? Your feedback is invaluable, and it helps other bakers create their own perfect loaf. Happy baking!
Fresh Strawberry Bread: The Ultimate Guide to Baking Perfection
Moist and flavorful strawberry bread, packed with fresh strawberries and a hint of cinnamon and nutmeg. Perfect for breakfast, brunch, or a sweet treat!
Ingredients
Instructions
Recipe Notes
- Make sure butter is softened to room temperature.
- Don’t overmix the batter.
- Check for doneness with a wooden skewer.
- Cool completely before slicing.
- Optional Glaze: Whisk together 1 cup powdered sugar with 2-3 tablespoons milk or lemon juice and drizzle over cooled bread.
- Variations: Add other fruits (blueberries, raspberries, blackberries), chocolate chips, shredded coconut, or different nuts. Add a tablespoon of strawberry jam for a more intense strawberry flavor.
- Storage: Wrap tightly in plastic wrap or place in an airtight container. Store at room temperature for 2-3 days or in the refrigerator for up to a week. Freeze for longer storage (up to 2-3 months).


Leave a Comment