

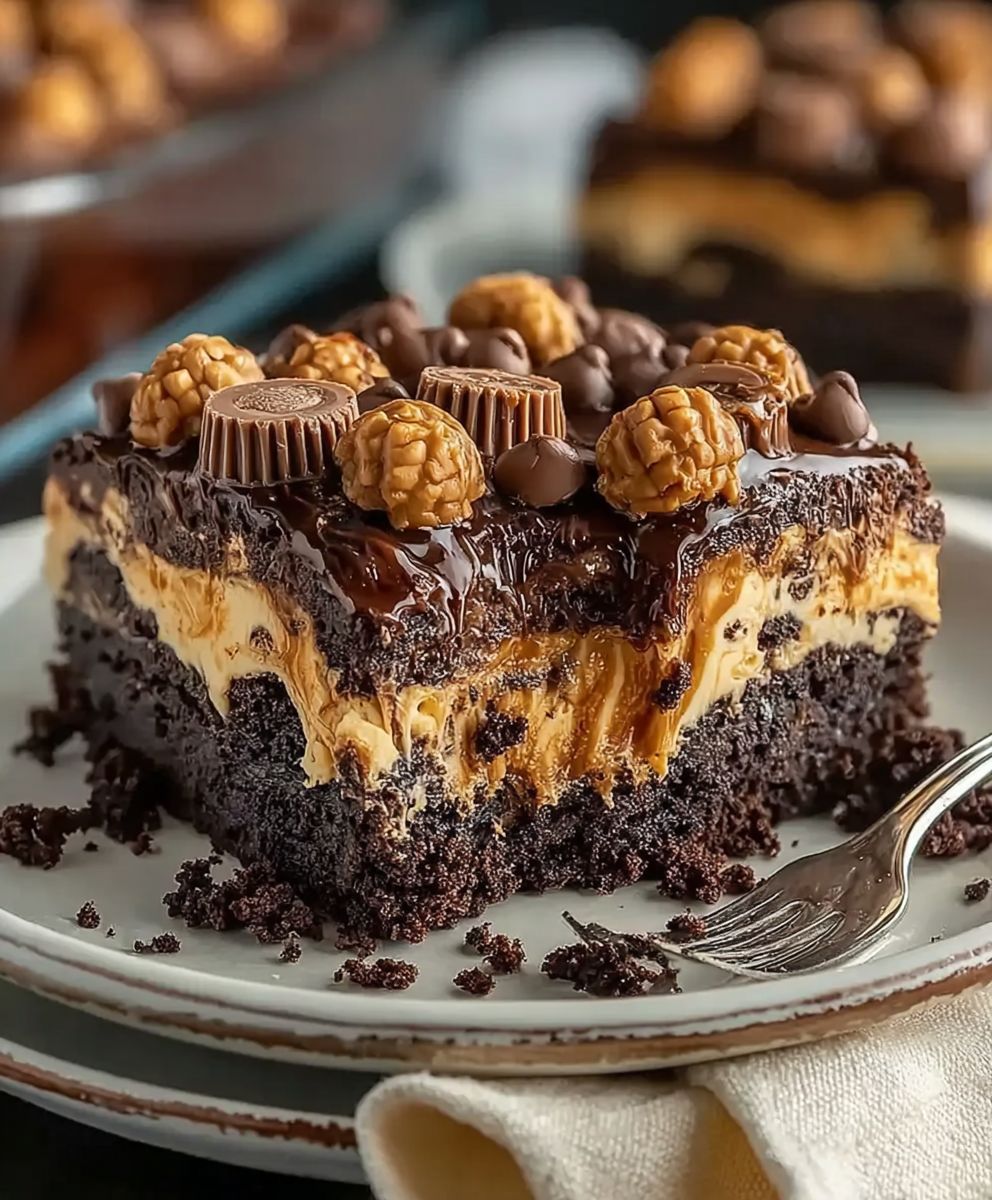
Reeses Peanut Butter Earthquake Cake: Prepare to have your dessert world rocked! Imagine a cake so decadent, so intensely peanut buttery and chocolatey, that it literally quakes with deliciousness. This isn’t just any cake; it’s an experience, a symphony of flavors and textures that will leave you craving more.
While the exact origins of “Earthquake Cake” are a bit murky, the concept of a cake with a gooey, sunken center has been around for generations. Some believe it evolved from German Butter Cake recipes, adapted and amplified with the irresistible addition of peanut butter and chocolate. Regardless of its precise history, this particular iteration, the Reeses Peanut Butter Earthquake Cake, is a modern marvel of baking ingenuity.
So, why is this cake such a crowd-pleaser? It’s simple: the combination of rich chocolate cake, creamy peanut butter swirls, and a molten, fudgy center is utterly irresistible. The slightly dense, yet incredibly moist texture is a delight, and the ease of preparation makes it perfect for both experienced bakers and kitchen novices. It’s the kind of cake that disappears in minutes, leaving behind only happy smiles and the lingering aroma of peanut butter and chocolate. Get ready to bake a cake that’s as fun to make as it is to eat!

Ingredients:
- 1 box (18.25 ounces) chocolate cake mix
- 1 cup water
- 1/2 cup vegetable oil
- 3 large eggs
- 1 cup creamy peanut butter
- 1 1/2 cups powdered sugar
- 8 ounces cream cheese, softened
- 1/2 cup butter, softened
- 1 teaspoon vanilla extract
- 1 jar (12 ounces) hot fudge topping
- 1 cup Reese’s Peanut Butter Cups, chopped (about 15-20 cups)
Preparing the Cake Batter
Okay, let’s get started with the base of our amazing Reese’s Peanut Butter Earthquake Cake – the chocolate cake! This is where the magic begins, and trust me, it’s super easy.
- Preheat your oven to 350°F (175°C). This is crucial! Make sure your oven is properly preheated to ensure the cake bakes evenly. Nobody wants a soggy center!
- Grease and flour a 9×13 inch baking pan. I like to use a baking spray that already has flour in it, but you can also grease the pan with butter or shortening and then dust it with flour. This prevents the cake from sticking and makes it easy to remove after baking. Trust me, you’ll thank me later.
- In a large mixing bowl, combine the chocolate cake mix, water, vegetable oil, and eggs. Now, grab your favorite large mixing bowl. Add the dry cake mix first, then pour in the water and oil. Crack in those eggs, and you’re ready to mix!
- Beat with an electric mixer on medium speed for 2 minutes. Use your electric mixer (handheld or stand mixer, either works great!) and beat the ingredients together on medium speed for a full 2 minutes. This ensures everything is well combined and the batter is nice and smooth. Don’t overmix, though! Overmixing can lead to a tough cake.
- Pour the batter into the prepared baking pan. Once the batter is smooth and creamy, pour it evenly into the greased and floured 9×13 inch baking pan. Spread it out so it’s nice and even.
Making the Peanut Butter Swirl
Now for the fun part – the peanut butter swirl! This is what gives the cake its signature “earthquake” look and, of course, that irresistible peanut butter flavor. Get ready to get your swirl on!
- In a separate mixing bowl, combine the peanut butter, powdered sugar, cream cheese, butter, and vanilla extract. Grab another mixing bowl (a medium-sized one will do) and add the creamy peanut butter, powdered sugar, softened cream cheese, softened butter, and vanilla extract. Make sure your cream cheese and butter are softened; otherwise, you’ll end up with a lumpy mixture.
- Beat with an electric mixer until smooth and creamy. Using your electric mixer again, beat all these ingredients together until they are perfectly smooth and creamy. This might take a few minutes, so be patient. Scrape down the sides of the bowl as needed to ensure everything is well combined.
- Drop spoonfuls of the peanut butter mixture over the chocolate cake batter. Now, using a spoon, drop spoonfuls of the peanut butter mixture randomly over the top of the chocolate cake batter. Don’t worry about being too precise; the more random, the better!
- Use a knife or skewer to swirl the peanut butter mixture into the chocolate cake batter. This is where the “earthquake” effect comes in! Take a knife or a wooden skewer and gently swirl the peanut butter mixture into the chocolate cake batter. Don’t overmix; you want to see distinct swirls of peanut butter throughout the cake. The more you swirl, the more marbled the effect will be.
Baking the Earthquake Cake
Almost there! Now it’s time to bake our masterpiece. The aroma that will fill your kitchen is simply divine. Get ready for some serious peanut butter and chocolate goodness!
- Bake in the preheated oven for 35-40 minutes, or until a wooden skewer inserted into the center comes out with moist crumbs. Place the cake in the preheated oven and bake for 35-40 minutes. To check for doneness, insert a wooden skewer into the center of the cake. If it comes out with moist crumbs attached, the cake is done. If it comes out clean, it might be slightly overbaked, so keep an eye on it.
- Let the cake cool completely in the pan. Once the cake is baked, remove it from the oven and let it cool completely in the pan. This is important because if you try to frost it while it’s still warm, the frosting will melt. Patience is key!
Frosting and Topping
The final touch! This is where we take our already amazing cake to the next level. Get ready for a decadent explosion of hot fudge and Reese’s Peanut Butter Cups. This is what makes it truly unforgettable.
- Warm the hot fudge topping according to the jar instructions. Follow the instructions on the jar of hot fudge topping to warm it up. Usually, this involves microwaving it for a short period of time. Make sure it’s nice and warm so it’s easy to pour.
- Pour the warm hot fudge topping over the cooled cake. Once the cake is completely cooled, pour the warm hot fudge topping evenly over the top. Spread it out so it covers the entire surface of the cake.
- Sprinkle the chopped Reese’s Peanut Butter Cups over the hot fudge topping. Finally, sprinkle the chopped Reese’s Peanut Butter Cups generously over the hot fudge topping. The more, the merrier! This adds a delicious crunch and that classic Reese’s flavor that we all love.
- Let the hot fudge topping set slightly before serving. Allow the hot fudge topping to set slightly before serving. This will prevent it from being too runny. You can even pop the cake in the refrigerator for a few minutes to speed up the process.
- Cut into squares and serve. Now, cut the cake into squares and serve. Get ready for rave reviews! This Reese’s Peanut Butter Earthquake Cake is sure to be a crowd-pleaser.
Tips and Variations
Want to customize your Earthquake Cake? Here are a few ideas:
- Use a different flavor of cake mix. While chocolate is classic, you could also try yellow cake, devil’s food cake, or even a peanut butter cake mix for an extra peanut butter punch!
- Add chocolate chips to the batter. For an even richer chocolate experience, stir in a cup of chocolate chips (milk chocolate, dark chocolate, or semi-sweet) to the cake batter before baking.
- Substitute the hot fudge topping with caramel sauce. If you’re not a fan of hot fudge, caramel sauce is a delicious alternative.
- Add a sprinkle of sea salt. A sprinkle of sea salt over the top of the cake enhances the sweetness and adds a delightful salty-sweet contrast.
- Make it gluten-free. Use a gluten-free chocolate cake mix to make this cake gluten-free. Just be sure to check the labels of all your ingredients to ensure they are gluten-free.
Storage Instructions
If you happen to have any leftovers (which is unlikely!), store the cake in an airtight container in the refrigerator for up to 3 days. The hot fudge topping may harden slightly, but it will still taste delicious!
Enjoy!
I hope you enjoy making and eating this Reese’s Peanut Butter Earthquake Cake as much as I do! It’s the perfect dessert for any occasion, and it’s guaranteed to impress your friends and family. Happy baking!
Conclusion:
Okay, friends, let’s be honest – if you’ve made it this far, you’re already halfway to peanut butter and chocolate heaven! This Reese’s Peanut Butter Earthquake Cake isn’t just a dessert; it’s an experience. The fudgy, gooey base, the pockets of creamy peanut butter, and that decadent chocolate ganache all come together in a symphony of flavors and textures that will have everyone begging for seconds. Trust me, this cake is a showstopper, perfect for birthdays, holidays, or just a “treat yourself” kind of day. It’s ridiculously easy to make, even if you’re not a seasoned baker, and the results are guaranteed to impress.
But why is this recipe a must-try? It’s simple: it’s the perfect balance of sweet and salty, rich and comforting. The earthquake effect, with its cracks and crevices filled with melted peanut butter, is visually stunning and adds a unique textural element that you won’t find in your average cake. Plus, who can resist the allure of Reese’s Peanut Butter Cups baked right into the batter? It’s a peanut butter lover’s dream come true!
Serving Suggestions and Variations:
While this cake is absolutely divine on its own, there are plenty of ways to customize it to your liking. For an extra touch of indulgence, serve it warm with a scoop of vanilla ice cream or a dollop of whipped cream. A sprinkle of chopped peanuts or a drizzle of melted chocolate can also elevate the presentation and add even more flavor.
Feeling adventurous? Try these variations:
- Chocolate Overload: Add chocolate chips to the batter for an even richer chocolate experience.
- Salted Caramel Swirl: Swirl in some salted caramel sauce before baking for a decadent twist.
- Peanut Butter Chip Explosion: Incorporate peanut butter chips into the batter alongside the Reese’s Cups.
- Coffee Kick: Add a tablespoon of instant coffee to the batter to enhance the chocolate flavor.
- Nutty Delight: Mix in chopped pecans or walnuts for added crunch and flavor.
The possibilities are endless! Don’t be afraid to experiment and create your own unique version of this amazing cake. You could even try using different types of peanut butter cups, like white chocolate or dark chocolate, to change up the flavor profile. Or, for a lighter version, you could substitute some of the butter with applesauce or Greek yogurt.
I’m so excited for you to try this Reese’s Peanut Butter Earthquake Cake! It’s a recipe that’s near and dear to my heart, and I know it will become a favorite in your household too. The joy of baking this cake is only surpassed by the joy of sharing it with loved ones. So, gather your ingredients, preheat your oven, and get ready to create a dessert masterpiece that will have everyone talking.
Once you’ve made it, I’d absolutely love to hear about your experience! Did you try any of the variations? What did your family and friends think? Share your photos and stories in the comments below. Let’s spread the peanut butter and chocolate love! Happy baking!
Reeses Peanut Butter Earthquake Cake: Recipe & Baking Tips
Chocolate cake swirled with peanut butter, topped with hot fudge and Reese's.
Ingredients
Instructions
Recipe Notes
- Variations:
- Use a different flavor of cake mix (yellow, devil’s food, or peanut butter).
- Add chocolate chips to the batter.
- Substitute the hot fudge topping with caramel sauce.
- Add a sprinkle of sea salt.
- Make it gluten-free with a gluten-free cake mix.
- Storage: Store leftovers in an airtight container in the refrigerator for up to 3 days.

Leave a Comment