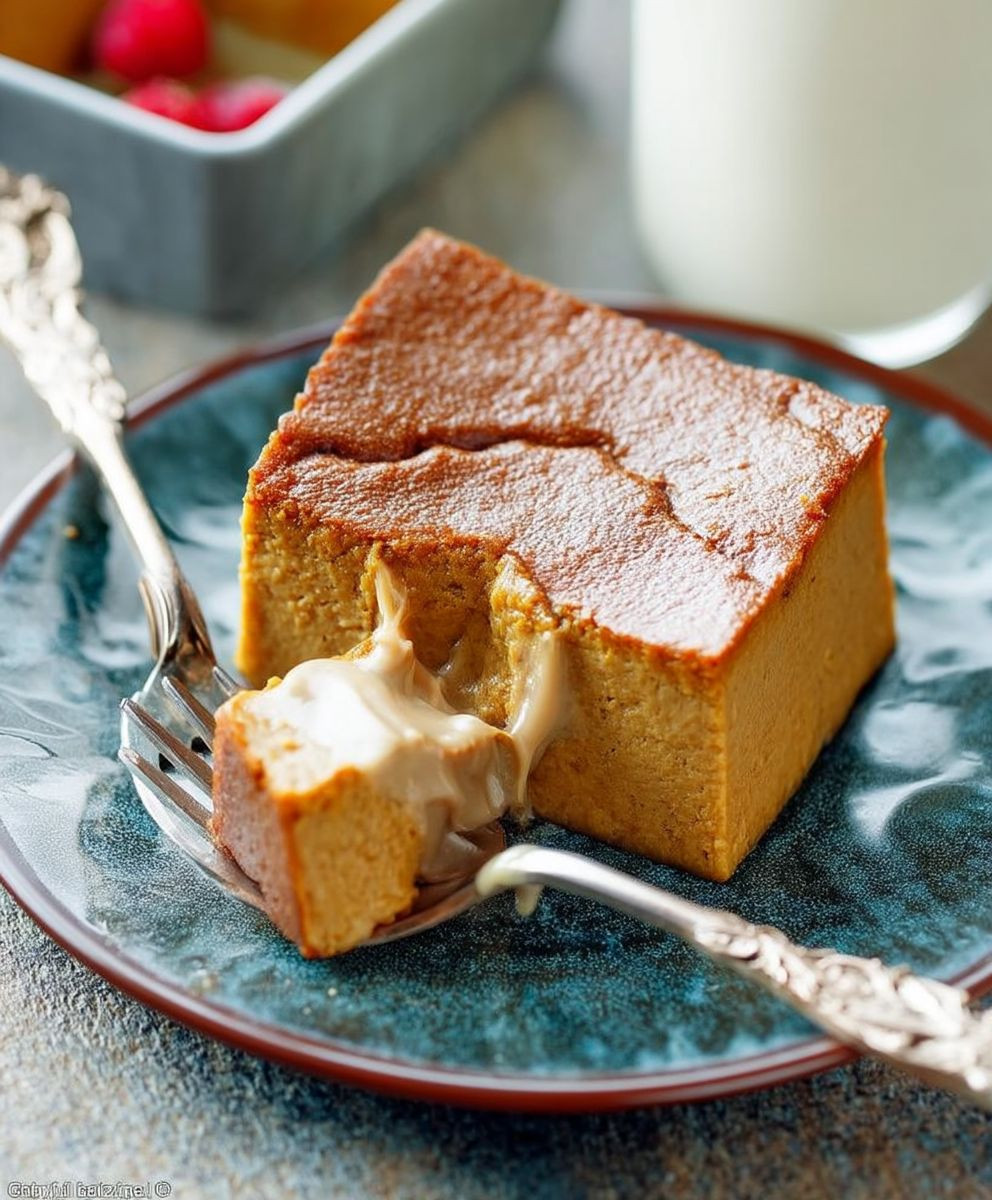
Pumpkin Magic Custard Cake: Prepare to be amazed by this dessert that transforms in the oven! Forget everything you think you know about baking, because this cake creates its own layers – a dense cake base, a creamy custard middle, and a light, airy top, all from one simple batter. It’s pure baking sorcery!
While the exact origins of magic custard cakes are debated, the concept of a self-layering cake has roots in various European baking traditions. Similar techniques can be found in French and Portuguese desserts, highlighting the ingenuity of home bakers throughout history. This particular version, featuring pumpkin, adds a distinctly autumnal twist to a classic concept.
What makes this Pumpkin Magic Custard Cake so beloved? It’s the delightful surprise in every bite! The contrasting textures – the fudgy bottom, the silky custard, and the delicate sponge – create a symphony of sensations. Plus, the warm, comforting flavors of pumpkin spice make it the perfect treat for cozy evenings. It’s also surprisingly easy to make, requiring minimal effort for maximum impact. Who wouldn’t love a dessert that’s both impressive and approachable? Get ready to experience the magic!
Ingredients:
- For the Cake:
- 1 (15 ounce) can pumpkin puree
- 1 cup granulated sugar
- 1 cup evaporated milk
- 1/2 cup (1 stick) unsalted butter, melted
- 4 large eggs
- 1 teaspoon vanilla extract
- 1 cup all-purpose flour
- 2 teaspoons baking powder
- 1 teaspoon ground cinnamon
- 1/2 teaspoon ground ginger
- 1/4 teaspoon ground cloves
- 1/4 teaspoon salt
- For the Custard:
- 1 (14 ounce) can sweetened condensed milk
- 1 (12 ounce) can evaporated milk
- 4 large eggs
- 1 teaspoon vanilla extract
- For the Caramel Topping (Optional):
- 1/2 cup granulated sugar
- 2 tablespoons water
- 1 tablespoon unsalted butter
- 1/4 cup heavy cream
- Pinch of salt
Preparing the Cake Batter
- Preheat and Prepare: First things first, let’s get our oven ready. Preheat it to 350°F (175°C). While the oven is heating up, grease and flour a 9×13 inch baking pan. This will prevent the cake from sticking and make it easier to remove later. I like to use a baking spray that contains flour for extra insurance.
- Combine Wet Ingredients: In a large mixing bowl, whisk together the pumpkin puree, granulated sugar, and evaporated milk until well combined. Make sure there are no lumps of pumpkin! This is the base of our delicious pumpkin flavor.
- Add Melted Butter and Eggs: Pour in the melted butter and whisk until it’s fully incorporated into the pumpkin mixture. Then, add the eggs one at a time, whisking well after each addition. This ensures that the eggs are evenly distributed and helps create a smooth batter. Don’t forget the vanilla extract! It adds a lovely warmth to the cake.
- Combine Dry Ingredients: In a separate medium bowl, whisk together the flour, baking powder, cinnamon, ginger, cloves, and salt. Whisking is important here to evenly distribute the baking powder and spices throughout the flour.
- Combine Wet and Dry: Gradually add the dry ingredients to the wet ingredients, mixing on low speed (or by hand) until just combined. Be careful not to overmix! Overmixing can lead to a tough cake. A few streaks of flour are okay at this point.
Preparing the Custard
- Whisk Together: In a separate bowl, whisk together the sweetened condensed milk, evaporated milk, eggs, and vanilla extract until smooth. This custard is what gives the cake its magic! Make sure everything is well combined for a creamy texture.
Assembling and Baking
- Pour Cake Batter: Pour the cake batter into the prepared 9×13 inch baking pan, spreading it evenly.
- Pour Custard Over: Gently pour the custard mixture over the cake batter. Don’t worry if it seems like the custard is sinking into the batter – that’s exactly what we want! This is where the magic happens.
- Bake: Bake in the preheated oven for 50-60 minutes, or until a toothpick inserted into the center comes out clean. The top of the cake should be golden brown and the custard should be set. Keep an eye on it, as baking times can vary depending on your oven. If the top starts to brown too quickly, you can loosely tent it with foil.
- Cool Completely: Remove the cake from the oven and let it cool completely in the pan on a wire rack. This is crucial! The cake needs to cool completely for the custard to fully set. I know it’s tempting to dig in right away, but trust me, it’s worth the wait.
- Chill (Optional but Recommended): For the best flavor and texture, cover the cake and chill it in the refrigerator for at least 2 hours, or even better, overnight. This allows the flavors to meld together and the custard to become even more firm.
Making the Caramel Topping (Optional)
While the cake is cooling (or chilling), you can prepare the caramel topping, if desired. This adds a lovely touch of sweetness and richness to the cake.
- Combine Sugar and Water: In a medium saucepan, combine the sugar and water.
- Cook Until Amber: Cook over medium heat, without stirring, until the sugar dissolves and turns a deep amber color. This will take about 5-7 minutes. It’s important not to stir the sugar, as this can cause it to crystallize. You can swirl the pan gently if needed to ensure even cooking.
- Add Butter: Remove the saucepan from the heat and carefully whisk in the butter. Be careful, as the mixture will bubble up.
- Add Heavy Cream: Slowly pour in the heavy cream, whisking constantly. The mixture will bubble up again.
- Cook Until Smooth: Return the saucepan to low heat and cook, stirring constantly, until the caramel is smooth and creamy. This will take about 1-2 minutes.
- Add Salt: Stir in a pinch of salt to balance the sweetness.
- Cool Slightly: Let the caramel cool slightly before drizzling it over the cooled cake.
Serving and Storage
- Cut and Serve: Once the cake is completely cooled (and chilled, if desired), cut it into squares and serve.
- Drizzle with Caramel (Optional): If you made the caramel topping, drizzle it generously over the cake slices.
- Garnish (Optional): You can garnish the cake with a sprinkle of cinnamon, a dollop of whipped cream, or a few chopped pecans for an extra touch of elegance.
- Storage: Store any leftover cake in an airtight container in the refrigerator for up to 3 days. The caramel topping can be stored separately in an airtight container at room temperature for up to 1 week.
Tips and Tricks for the Perfect Pumpkin Magic Custard Cake
- Don’t Overmix: Overmixing the cake batter can lead to a tough cake. Mix until just combined.
- Use Room Temperature Eggs: Room temperature eggs emulsify better and create a smoother batter.
- Cool Completely: Cooling the cake completely is essential for the custard to set properly.
- Chill for Best Results: Chilling the cake for at least 2 hours (or overnight) allows the flavors to meld and the custard to firm up.
- Adjust Spices to Taste: Feel free to adjust the amount of cinnamon, ginger, and cloves to your liking. If you prefer a more intense pumpkin spice flavor, add a little more.
- Use a Water Bath (Optional): For an even creamier custard, you can bake the cake in a water bath. To do this, place the baking pan in a larger pan and fill the larger pan with hot water until it reaches about halfway up the sides of the baking pan. This helps to regulate the temperature and prevent the custard from curdling.
- Caramel Variations: For a salted caramel, add a bit more salt to the caramel topping. You can also add a splash of vanilla extract or a tablespoon of bourbon for extra flavor.
- Nut Allergies: If you have nut allergies, be sure to omit the pecans or any other nuts used for garnish.
- Gluten-Free Option: To make this cake gluten-free, substitute the all-purpose flour with a gluten-free all-purpose flour blend. Be sure to check the label to ensure that the blend contains xanthan gum, which helps to bind the ingredients together.
Troubleshooting
- Cake is Sinking: If the cake sinks in the middle, it could be due to underbaking or overmixing. Make sure to bake the cake until a toothpick inserted into the center comes out clean, and avoid overmixing the batter.
- Custard is Curdling: If the custard curdles, it could be due to baking at too high of a temperature. Try baking the cake at a slightly lower temperature or using a water bath to regulate the temperature.
- Caramel is Crystallizing: If the caramel crystallizes, it could be due to stirring the sugar while it’s cooking. Avoid stirring the sugar and swirl the pan gently if needed to ensure even cooking.
Enjoy Your Pumpkin Magic Custard Cake!
<
Conclusion:
This Pumpkin Magic Custard Cake isn’t just another fall dessert; it’s a culinary adventure waiting to happen! The way it magically separates into layers – a dense, fudgy base, a creamy custard middle, and a light, airy cake top – is truly something you have to witness (and taste!) to believe. It’s the perfect blend of textures and flavors, offering a comforting warmth that’s ideal for cozy evenings or festive gatherings. I promise, the “magic” isn’t just in the name; it’s in every single bite.
Why is this a must-try? Because it’s surprisingly easy to make, even though it looks incredibly impressive. You don’t need any fancy equipment or advanced baking skills. The ingredients are simple and readily available, and the instructions are straightforward. Plus, the wow factor is off the charts! Imagine the look on your guests’ faces when you present this beautiful, layered cake. It’s a guaranteed conversation starter and a dessert they won’t soon forget. Forget complicated recipes that take hours; this one delivers maximum impact with minimal effort.
But the best part? It’s incredibly versatile! While I adore it served warm with a dollop of whipped cream and a sprinkle of cinnamon, there are so many ways to customize it to your liking.
Serving Suggestions and Variations:
* Spice it up: Add a pinch of nutmeg, cloves, or ginger to the batter for an even more intense pumpkin spice flavor.
* Chocolate lovers rejoice: Swirl in some melted dark chocolate into the batter before baking for a decadent twist.
* Nutty delight: Sprinkle chopped pecans or walnuts on top before baking for added texture and flavor.
* Coffee kick: Add a tablespoon of instant espresso powder to the batter for a subtle coffee flavor that complements the pumpkin beautifully.
* Iced perfection: Once cooled, dust the cake with powdered sugar for an elegant finish.
* Seasonal fruit pairing: Serve with a side of caramelized apples or pears for a delightful autumnal combination.
* Make it mini: Bake the batter in muffin tins for individual servings – perfect for parties or portion control! Just adjust the baking time accordingly.
I truly believe that this Pumpkin Magic Custard Cake will become a new favorite in your household. It’s the kind of recipe that you’ll want to make again and again, experimenting with different variations and sharing it with everyone you know. It’s more than just a cake; it’s an experience.
So, what are you waiting for? Gather your ingredients, preheat your oven, and prepare to be amazed. I’m confident that you’ll love this recipe as much as I do. And please, don’t be shy! I’d absolutely love to hear about your experience. Did you try any of the variations? Did you make any tweaks of your own? Share your photos and stories in the comments below! I can’t wait to see your creations and hear your thoughts. Happy baking! Let the magic begin!
Pumpkin Magic Custard Cake: A Delicious Fall Dessert Recipe
A moist and delicious pumpkin cake with a creamy custard layer, perfect for fall! Optionally topped with homemade caramel.
Ingredients
Instructions
Recipe Notes
- Don’t overmix the cake batter.
- Use room temperature eggs for a smoother batter.
- Cool the cake completely for the custard to set properly.
- Chilling the cake enhances flavor and texture.
- Adjust spices to taste.
- For an even creamier custard, bake in a water bath.
- For salted caramel, add more salt to the topping.
- Omit nuts for nut allergies.
- Use gluten-free flour blend for a gluten-free option.
- If the cake sinks, it may be underbaked or overmixed.
- If the custard curdles, bake at a lower temperature or use a water bath.
- If the caramel crystallizes, avoid stirring the sugar.


Leave a Comment