

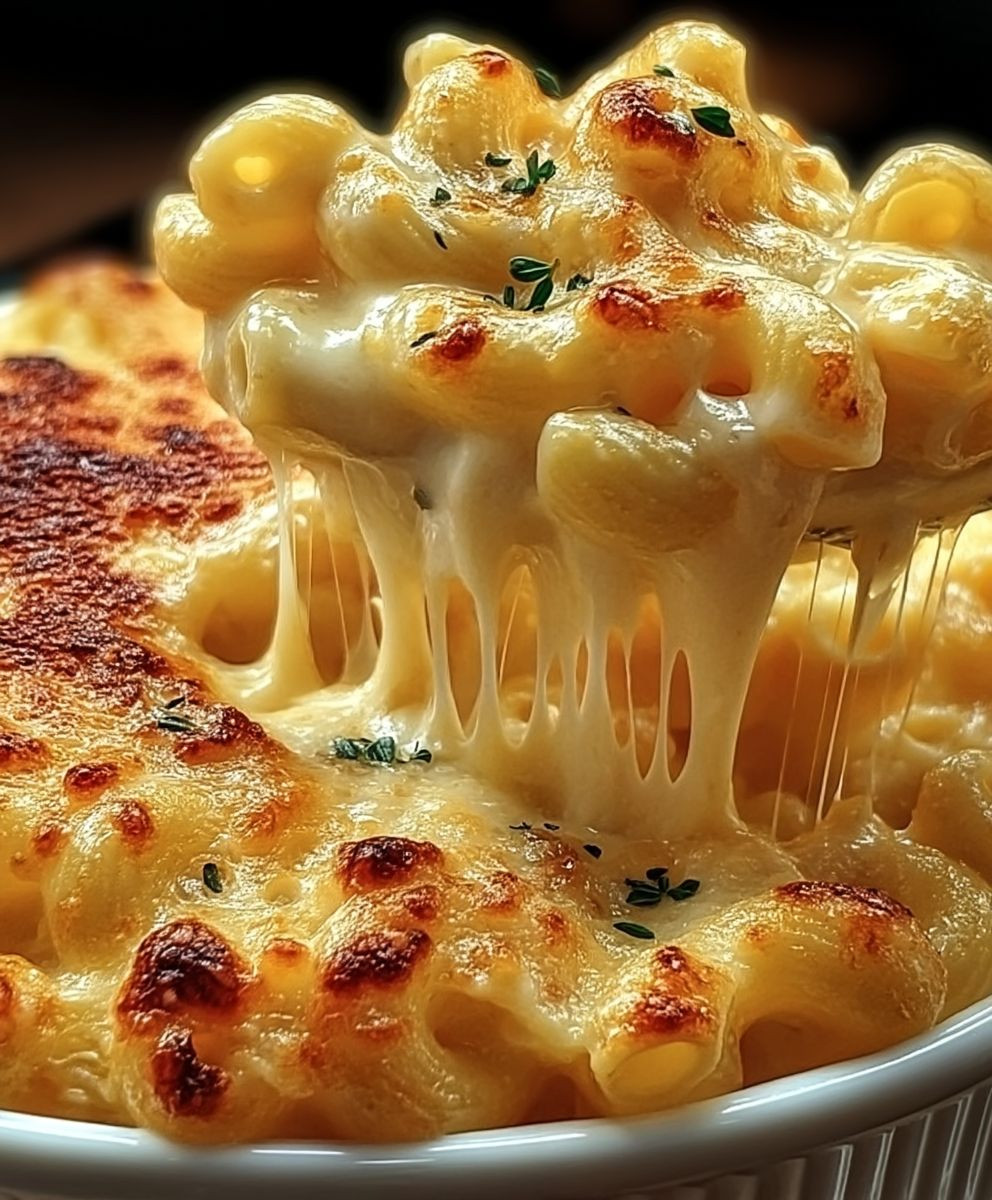
Baked Mac and Cheese, oh, the very words conjure up images of bubbling cheese, golden crusts, and pure comfort food bliss! Have you ever craved a dish that feels like a warm hug on a cold day? Look no further, because this recipe is about to become your new best friend.
Macaroni and cheese, in its various forms, has a surprisingly rich history. While its exact origins are debated, variations of pasta and cheese casseroles have been enjoyed for centuries, with documented recipes appearing as early as the 14th century in Europe. It wasn’t until the 18th century that it truly took hold in England and then made its way across the Atlantic to become a beloved staple in American cuisine. Thomas Jefferson even served a macaroni pie at a state dinner in 1802!
But what is it about Baked Mac and Cheese that makes it so universally adored? It’s the creamy, cheesy sauce clinging to perfectly cooked macaroni, the satisfying chew, and the crispy, golden-brown topping that adds a delightful textural contrast. It’s a dish that’s both incredibly simple to make and endlessly customizable, allowing you to add your own personal touch with different cheeses, spices, and toppings. Whether you’re looking for a quick weeknight dinner or a show-stopping side dish for a holiday gathering, this recipe is guaranteed to be a crowd-pleaser. Get ready to experience the ultimate comfort food!

Ingredients:
- 1 pound elbow macaroni
- 1/2 cup (1 stick) unsalted butter
- 1/2 cup all-purpose flour
- 3 cups whole milk
- 1 cup heavy cream
- 1 teaspoon salt
- 1/2 teaspoon black pepper
- 1/4 teaspoon nutmeg
- 1/2 teaspoon garlic powder
- 4 cups shredded sharp cheddar cheese, divided (about 1 pound)
- 2 cups shredded Gruyere cheese, divided (about 1/2 pound)
- 1 cup shredded Monterey Jack cheese, divided (about 1/4 pound)
- 1/2 cup panko breadcrumbs
- 2 tablespoons melted butter, for topping
Cooking the Macaroni
Alright, let’s get started! The first thing we need to do is cook our macaroni. Don’t overcook it, though; we want it slightly underdone because it will continue to cook in the oven. Trust me on this one!
- Bring a large pot of salted water to a rolling boil. I always say, salt the water like the sea! This helps season the pasta from the inside out.
- Add the elbow macaroni and cook according to package directions, but reduce the cooking time by about 2 minutes. You want it al dente, meaning it should still have a slight bite to it.
- Drain the macaroni well in a colander. Make sure to shake off any excess water. We don’t want a watery mac and cheese!
- Set the cooked macaroni aside while we prepare the cheese sauce.
Making the Cheese Sauce
Now for the star of the show: the cheese sauce! This is where the magic happens. We’re going to make a roux-based sauce, which is the key to a creamy, dreamy mac and cheese. Don’t be intimidated; it’s easier than you think!
- In a large, heavy-bottomed saucepan (I prefer using a Dutch oven), melt the 1/2 cup (1 stick) of unsalted butter over medium heat. Make sure the butter is fully melted and shimmering.
- Once the butter is melted, whisk in the 1/2 cup of all-purpose flour. Whisk constantly for about 2-3 minutes, until the mixture forms a smooth paste. This is called a roux, and it’s the foundation of our cheese sauce. It should be a light golden color and smell slightly nutty. Be careful not to burn it!
- Slowly pour in the 3 cups of whole milk, whisking constantly to prevent lumps from forming. This is crucial! Add the milk in a steady stream, whisking vigorously as you go.
- Continue whisking until the sauce is smooth and starts to thicken. This should take about 5-7 minutes. The sauce should be thick enough to coat the back of a spoon.
- Stir in the 1 cup of heavy cream. This adds richness and creaminess to the sauce.
- Season the sauce with 1 teaspoon of salt, 1/2 teaspoon of black pepper, 1/4 teaspoon of nutmeg, and 1/2 teaspoon of garlic powder. The nutmeg adds a subtle warmth that complements the cheese perfectly.
- Reduce the heat to low and gradually add 3 cups of the shredded sharp cheddar cheese, 1 1/2 cups of the shredded Gruyere cheese, and 3/4 cup of the shredded Monterey Jack cheese, stirring constantly until the cheese is completely melted and the sauce is smooth and creamy. Add the cheese in batches, allowing each batch to melt completely before adding the next. This helps prevent the cheese from clumping.
- Taste the sauce and adjust the seasonings as needed. You might want to add a little more salt, pepper, or garlic powder to your liking.
Combining and Baking
We’re almost there! Now it’s time to combine the macaroni and cheese sauce and bake it to golden perfection.
- Preheat your oven to 350掳F (175掳C).
- Add the drained macaroni to the cheese sauce and stir gently to coat all the noodles evenly. Make sure every single noodle is covered in that glorious cheese sauce!
- Pour the macaroni and cheese mixture into a greased 9×13 inch baking dish. I like to use butter to grease the dish, but you can also use cooking spray.
- In a small bowl, combine the 1/2 cup of panko breadcrumbs and 2 tablespoons of melted butter. Toss to coat the breadcrumbs evenly. This will create a crispy, golden topping.
- Sprinkle the remaining 1 cup of shredded cheddar cheese, 1/2 cup of shredded Gruyere cheese, and 1/4 cup of shredded Monterey Jack cheese evenly over the macaroni and cheese.
- Sprinkle the buttered panko breadcrumbs over the cheese.
- Bake in the preheated oven for 20-25 minutes, or until the topping is golden brown and bubbly. The mac and cheese should be heated through and the cheese should be melted and gooey.
- Remove from the oven and let it cool for a few minutes before serving. This allows the cheese to set slightly and prevents it from being too runny.
Tips and Variations
Want to take your baked mac and cheese to the next level? Here are a few tips and variations to try:
- Use different cheeses: Feel free to experiment with different types of cheese. Some other great options include Gouda, Havarti, Fontina, and Pepper Jack.
- Add some spice: For a little kick, add a pinch of cayenne pepper or a dash of hot sauce to the cheese sauce.
- Mix in some veggies: Stir in some cooked broccoli, cauliflower, peas, or spinach for a healthier twist.
- Add some protein: Mix in some cooked bacon, ham, sausage, or shredded chicken for a heartier meal.
- Make it ahead of time: You can assemble the mac and cheese ahead of time and store it in the refrigerator for up to 24 hours. Just add a few extra minutes to the baking time.
- Freeze it: Baked mac and cheese freezes well. Let it cool completely, then wrap it tightly in plastic wrap and foil. Freeze for up to 3 months. Thaw overnight in the refrigerator before baking.
- Breadcrumb Alternatives: If you don’t have panko breadcrumbs, you can use regular breadcrumbs, crushed crackers (like Ritz), or even crushed potato chips for the topping.
- Broil for Extra Crispiness: For an extra crispy topping, broil the mac and cheese for the last minute or two of baking, but watch it carefully to prevent burning.
- Don’t Overbake: Overbaking can dry out the mac and cheese. Keep an eye on it and remove it from the oven as soon as the topping is golden brown and bubbly.
- Use a Thermometer: If you want to be absolutely sure the mac and cheese is heated through, use a food thermometer to check the internal temperature. It should reach 165掳F (74掳C).
Cheese Selection Notes
The combination of cheeses I’ve suggested provides a great balance of flavor and texture. The sharp cheddar gives it that classic mac and cheese taste, the Gruyere adds a nutty and slightly tangy flavor, and the Monterey Jack contributes to the overall creaminess. Feel free to adjust the ratios to your liking, but I recommend sticking with a combination of at least two different types of cheese for the best results.
Why Use a Roux?
The roux is essential for creating a smooth and stable cheese sauce. It acts as a thickening agent, preventing the sauce from becoming grainy or separating. By cooking the flour with the butter before adding the milk, you’re essentially gelatinizing the starch in the flour, which allows it to absorb more liquid and create a thicker sauce.
Preventing a Grainy Cheese Sauce
Nobody wants a grainy cheese sauce! Here are a few tips to prevent it:
- Use freshly grated cheese: Pre-shredded cheese often contains cellulose, which can prevent it from melting smoothly.
- Don’t overheat the cheese: Overheating can cause the cheese to separate and become grainy. Keep the heat low and stir constantly while the cheese is melting.
- Add the cheese gradually: Adding the cheese in batches allows each batch to melt completely before adding the next, which helps prevent clumping.
- Use an acid: A small amount of acid, such as a squeeze of lemon juice or a dash of white wine vinegar, can help stabilize the cheese sauce and prevent it from becoming grainy.
Conclusion:
And there you have it! This isn’t just any mac and cheese; it’s a Baked Mac and Cheese experience, a symphony of creamy, cheesy goodness that will have everyone begging for seconds. I truly believe this recipe is a must-try because it elevates the humble mac and cheese to a whole new level of comfort food sophistication. The combination of sharp cheddar, Gruyere, and a touch of Parmesan creates a depth of flavor that’s simply irresistible. The baked element adds a delightful crusty top that contrasts beautifully with the creamy interior. It’s the perfect balance of textures and tastes, making it a guaranteed crowd-pleaser for any occasion.
But the best part? It’s incredibly versatile! While I’ve shared my go-to recipe, feel free to experiment and make it your own. Looking for serving suggestions? This Baked Mac and Cheese is fantastic as a main course, especially on a chilly evening. Serve it alongside a crisp green salad and some roasted vegetables for a complete and satisfying meal. It’s also a wonderful side dish for potlucks, holiday gatherings, or even a casual weeknight dinner.
For variations, consider adding some cooked bacon or ham for a smoky, savory twist. Stir in some roasted vegetables like broccoli, cauliflower, or butternut squash for added nutrients and flavor. If you’re feeling adventurous, try incorporating some spicy chorizo or jalape帽os for a kick. You could even top it with breadcrumbs for an extra layer of crunch. The possibilities are endless!
Think about adding a sprinkle of fresh herbs like parsley or thyme before serving to brighten up the dish and add a touch of freshness. A drizzle of truffle oil can also elevate the flavor profile to something truly special. For a lighter version, you can substitute some of the cheese with low-fat alternatives or use whole wheat pasta.
I’ve made this Baked Mac and Cheese countless times, and it’s always a hit. It’s the kind of dish that brings people together and creates lasting memories. It’s perfect for family dinners, holiday celebrations, or even just a cozy night in. The rich, cheesy flavor and comforting texture are sure to warm your heart and soul.
So, what are you waiting for? Gather your ingredients, preheat your oven, and get ready to create a culinary masterpiece. I’m confident that you’ll love this recipe as much as I do. Don’t be afraid to get creative and personalize it to your liking.
I’m so excited for you to try this recipe! Once you’ve made it, I’d love to hear about your experience. Did you make any variations? What did you serve it with? What did your family and friends think? Share your photos and stories in the comments below. I can’t wait to see your creations and hear all about your Baked Mac and Cheese adventures! Happy cooking!
Baked Mac and Cheese: The Ultimate Comfort Food Recipe
Creamy, cheesy baked mac and cheese with a golden, crispy panko breadcrumb crust. The ultimate comfort food and a guaranteed crowd-pleaser.
Ingredients
Instructions
Recipe Notes
- Cheese Selection: The combination of sharp cheddar, Gruyere, and Monterey Jack provides a great balance of flavor and texture. Feel free to experiment with other cheeses like Gouda, Havarti, or Fontina.
- Spice It Up: Add a pinch of cayenne pepper or a dash of hot sauce to the cheese sauce for a little kick.
- Add Veggies/Protein: Stir in cooked broccoli, cauliflower, peas, spinach, bacon, ham, sausage, or shredded chicken for a heartier meal.
- Make Ahead: Assemble the mac and cheese ahead of time and store it in the refrigerator for up to 24 hours. Add a few extra minutes to the baking time.
- Freezing: Baked mac and cheese freezes well. Let it cool completely, then wrap it tightly in plastic wrap and foil. Freeze for up to 3 months. Thaw overnight in the refrigerator before baking.
- Breadcrumb Alternatives: Use regular breadcrumbs, crushed crackers (like Ritz), or even crushed potato chips for the topping.
- Broil for Extra Crispiness: For an extra crispy topping, broil the mac and cheese for the last minute or two of baking, but watch it carefully to prevent burning.
- Don’t Overbake: Overbaking can dry out the mac and cheese. Keep an eye on it and remove it from the oven as soon as the topping is golden brown and bubbly.
- Use a Thermometer: If you want to be absolutely sure the mac and cheese is heated through, use a food thermometer to check the internal temperature. It should reach 165掳F (74掳C).
- Why Use a Roux? The roux is essential for creating a smooth and stable cheese sauce. It acts as a thickening agent, preventing the sauce from becoming grainy or separating.
- Preventing a Grainy Cheese Sauce: Use freshly grated cheese, don’t overheat the cheese, add the cheese gradually, and use an acid.


Leave a Comment