

Date Caramels: A Taste of Sweet History
Date Caramels: Just the name conjures up images of rich, chewy goodness, doesn’t it? I’ve always been captivated by the simple elegance of this confection, a perfect blend of sweet and subtly earthy flavors that’s both incredibly satisfying and surprisingly easy to make.
The history of date caramels isn’t as precisely documented as some other sweets, but their popularity speaks volumes. Dates, of course, have a long and storied history, prized for their sweetness and nutritional value across numerous cultures for millennia. Their incorporation into a caramel-like treat likely evolved naturally, a testament to the ingenuity of cooks experimenting with readily available ingredients. The specific recipe we’ll explore today is a modern interpretation, designed for ease and deliciousness.
What makes Date Caramels so beloved? It’s the perfect combination of textures and tastes, I think. The soft, chewy caramel base provides a delightful contrast to the slightly firm, naturally sweet dates. The subtle caramel notes dance beautifully with the date’s inherent richness, creating a flavor profile that’s both sophisticated and comforting. And let’s be honest, the ease of making them is a huge plus! No complicated techniques or obscure ingredients are required – just a few simple steps to pure caramel bliss.
So, are you ready to embark on this delicious journey with me? Let’s dive into the recipe and create some unforgettable Date Caramels together!

Ingredients:
- 1 cup (2 sticks) unsalted butter, cut into cubes
- 1 ½ cups granulated sugar
- ½ cup light corn syrup
- ½ cup heavy cream
- ½ cup water
- 1 teaspoon vanilla extract
- Pinch of salt
- Optional: ½ cup chopped pecans or walnuts
- Optional: Sea salt flakes for sprinkling
Preparing the Caramel
- I always start by preparing my baking sheet. Line a baking sheet with parchment paper, leaving some overhang on the sides to easily lift out the caramels later. This is a crucial step to prevent sticking and makes cleanup a breeze!
- In a heavy-bottomed saucepan (I prefer stainless steel or copper), combine the butter, granulated sugar, corn syrup, and water. Make sure your saucepan is large enough to prevent boil-overs.
- Over medium heat, stir the mixture constantly until the butter is completely melted and the sugar is dissolved. This takes a little patience, but it’s worth it! Don’t rush this step, or you risk burning the sugar.
- Once the sugar is dissolved, I stop stirring. This is important! You want the caramel to cook undisturbed to achieve the perfect color and consistency. Continue to cook, swirling the pan occasionally, until the mixture turns a deep amber color, similar to the color of a dark honey. This usually takes about 10-15 minutes. Keep a close eye on it – caramel burns quickly!
- Caution: The caramel will be extremely hot at this stage. Be very careful not to touch it. If you see any smoke, immediately remove the pan from the heat.
- Once the caramel reaches the desired amber color, carefully remove the pan from the heat. This is where things get a little tricky, so be prepared!
- Slowly and carefully pour in the heavy cream. This will cause the mixture to bubble vigorously, so be prepared for a bit of a steam explosion! It’s best to pour the cream slowly in a steady stream, while keeping a safe distance from the pan.
- Stir vigorously until the mixture is smooth and creamy. The caramel will thicken as it cools.
- Remove from heat and stir in the vanilla extract and salt. If using nuts, add them now and stir to combine.
Pouring and Setting the Caramels
- Immediately pour the caramel mixture onto the prepared baking sheet. Spread it evenly to your desired thickness. I usually aim for about ½ inch thick.
- Let the caramel cool completely at room temperature. This will take at least 2-3 hours, or even longer depending on the ambient temperature. Do not refrigerate the caramel while it’s still hot, as this can cause it to become grainy.
- Once the caramel is completely cool and set, use a sharp knife to cut it into squares or other desired shapes. I find a sharp, thin-bladed knife works best for clean cuts.
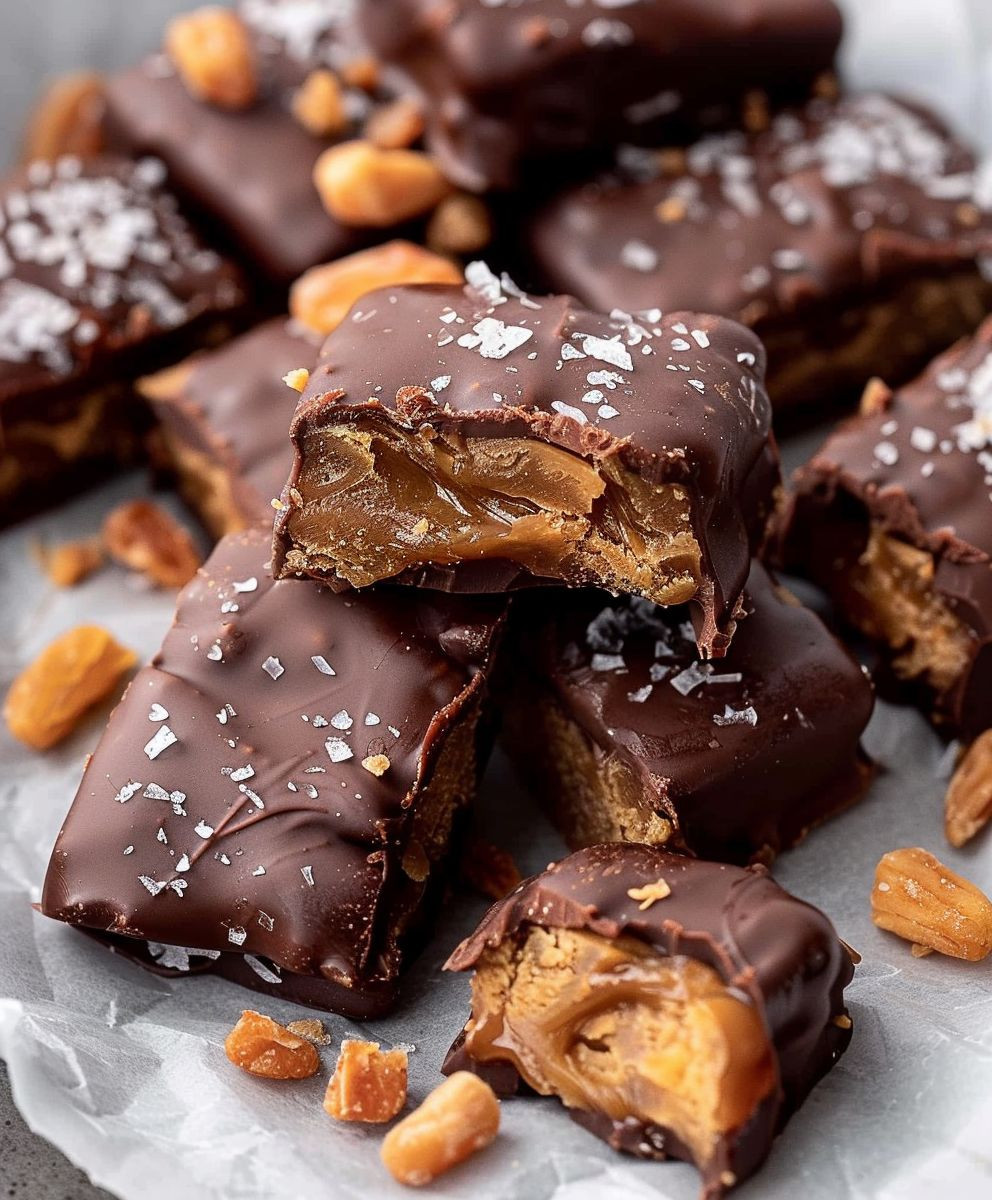
- If desired, sprinkle the caramels with sea salt flakes for an extra touch of flavor and visual appeal.
Storage and Serving
- Store the caramels in an airtight container at room temperature. They will keep for about a week, but they rarely last that long in my house!
- For longer storage, you can refrigerate the caramels. However, they may become slightly softer when refrigerated, so allow them to come to room temperature before serving.
- Serve these delicious date caramels as a treat on their own, or use them as a topping for ice cream, cakes, or other desserts. They’re incredibly versatile!
- Enjoy your homemade date caramels! They make a wonderful gift, too. Just be sure to package them carefully to prevent breakage.
Troubleshooting Tips
- Caramel is too dark: If your caramel becomes too dark before the sugar dissolves completely, it may taste burnt. Start again with a fresh batch. Remember, patience is key!
- Caramel is too soft: If your caramel is too soft after cooling, it may not have cooled completely. Allow it to cool for longer at room temperature before cutting.
- Caramel is grainy: Grainy caramel is often caused by stirring too much after adding the cream or by refrigerating it too soon. Make sure to follow the instructions carefully.
- Caramel is sticking to the pan: Use a heavy-bottomed saucepan and make sure to line your baking sheet with parchment paper. This will prevent sticking and make cleanup much easier.
Variations
- Sea Salt Caramels: Sprinkle sea salt flakes on top of the caramels before they cool for a sweet and salty treat.
- Chocolate Caramels: Dip the cooled caramels in melted chocolate for an extra decadent touch.
- Spiced Caramels: Add a pinch of cinnamon, nutmeg, or ginger to the caramel mixture for a warm, spiced flavor.
- Nut Caramels: Add chopped nuts like pecans, walnuts, or almonds to the caramel mixture for added texture and flavor.
Conclusion:
So there you have it – my recipe for the most incredible Date Caramels you’ll ever taste! I truly believe this recipe is a must-try for several reasons. First, the flavor combination is simply divine. The rich, deep sweetness of the dates perfectly complements the buttery, salty caramel, creating a truly unforgettable taste experience. It’s a sophisticated treat that feels both indulgent and surprisingly wholesome, thanks to the natural sweetness of the dates.
Secondly, these Date Caramels are surprisingly easy to make. While the process involves a few steps, each one is straightforward and manageable, even for beginner bakers. You don’t need any fancy equipment or hard-to-find ingredients; just a few pantry staples and a little bit of patience. The result, however, is far beyond what you’d expect from such a simple recipe. The texture is unbelievably smooth and creamy, melting in your mouth with every bite.
Thirdly, and perhaps most importantly, these Date Caramels are incredibly versatile. They’re perfect for any occasion, from a casual weeknight treat to a sophisticated dessert for a dinner party. They make a wonderful gift, too – beautifully packaged, they’re sure to impress anyone lucky enough to receive them. Imagine the delighted faces of your friends and family as they savor the exquisite taste of your homemade Date Caramels!
Serving Suggestions & Variations:
While these Date Caramels are delicious on their own, there are countless ways to elevate them even further. Try drizzling them with melted dark chocolate for an extra layer of richness and sophistication. A sprinkle of sea salt on top enhances the caramel’s sweetness and adds a delightful textural contrast. You can also get creative with the presentation – arrange them on a beautiful platter, or package them individually in small cellophane bags tied with ribbon.
For those who prefer a less sweet treat, you can reduce the amount of sugar in the recipe slightly. Experiment with adding different spices, such as a pinch of cinnamon or cardamom, to create unique flavor profiles. You could also incorporate chopped nuts, like pecans or walnuts, into the caramel for added texture and flavor. The possibilities are truly endless!
Perhaps you’d like to try adding a splash of bourbon or rum to the caramel for an adult twist. Or, for a vegan option, simply ensure you use vegan butter. The beauty of this recipe lies in its adaptability; feel free to experiment and make it your own!
Don’t Forget to Share!
I genuinely hope you’ll give this Date Caramel recipe a try. I’m confident that it will become a new favorite in your kitchen. Once you’ve made them, I’d love to hear about your experience! Share your photos and feedback on social media using the hashtag #DateCaramelPerfection – I can’t wait to see your creations. Let’s connect and celebrate the deliciousness of these amazing Date Caramels together! Your feedback helps me improve and inspires me to create even more delicious recipes.
So, what are you waiting for? Gather your ingredients, put on your apron, and get ready to embark on a culinary adventure that will leave you craving more. These Date Caramels are more than just a recipe; they’re an experience. And I’m excited for you to share that experience with me and with others.
Happy Baking!
Date Caramels: A Delicious Homemade Candy Recipe
Rich and creamy homemade caramels, easily customized with nuts or sea salt. Requires about 2-3 hours cooling time.
Ingredients
Instructions
Recipe Notes
- Heavy-bottomed saucepan is crucial to prevent burning.
- Patience is key when making caramel. Don’t rush the cooking process.
- Be extremely careful when adding the cream; it will bubble and splatter.
- Do not refrigerate the caramel while it’s still hot to prevent graininess.
- A sharp knife is essential for clean cuts.
Leave a Comment