

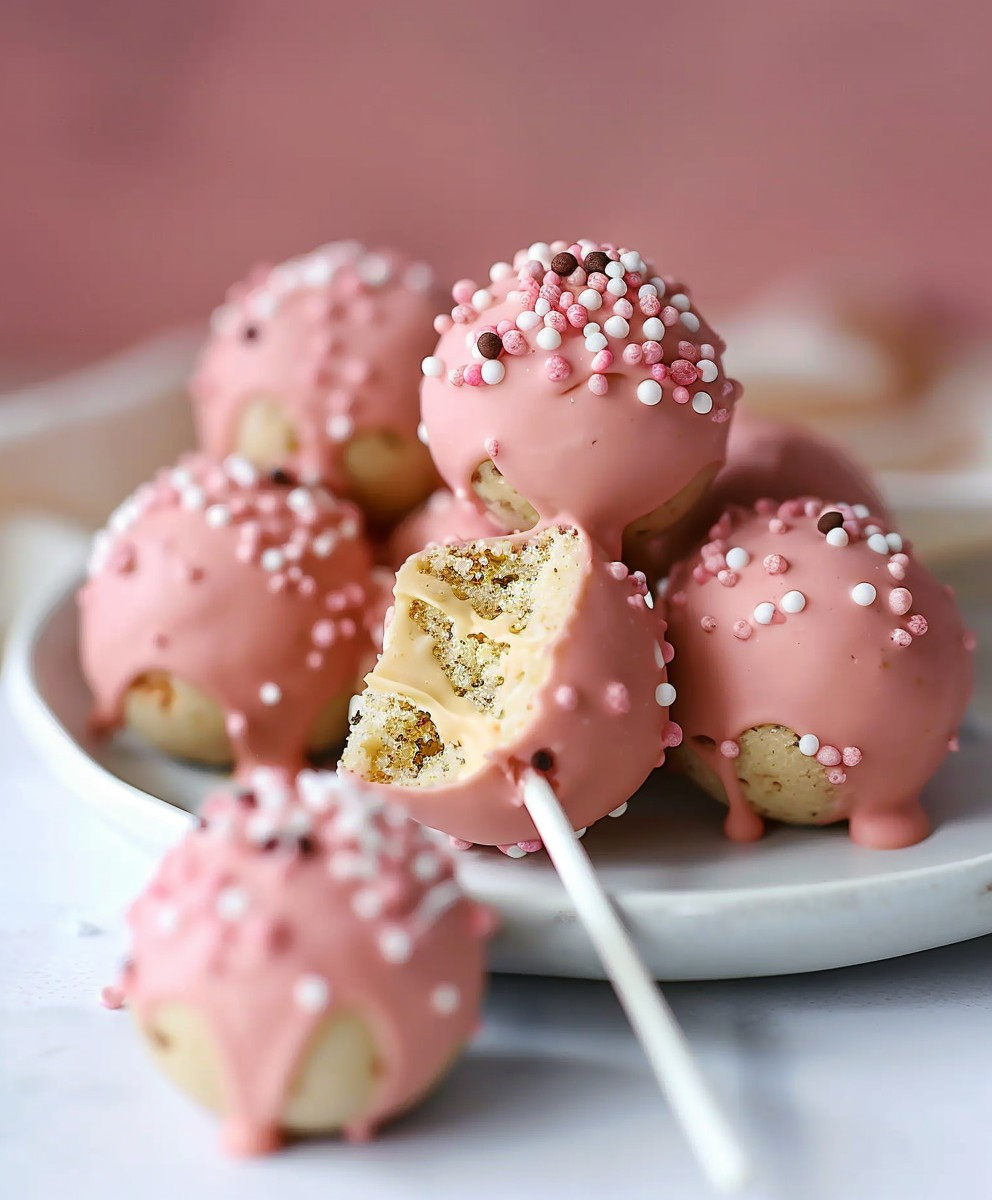
Starbucks Cake Pops
Starbucks Cake Pops: Have you ever craved that irresistible, perfectly sweet treat you get from your favorite coffee shop, but wished you could enjoy it at home, anytime? Then you’ve come to the right place! I’m thrilled to share my recipe for homemade Starbucks Cake Pops, a delightful confection that captures the magic of those iconic little balls of deliciousness.
While Starbucks doesn’t publicly share their exact recipe, I’ve spent countless hours perfecting a version that truly replicates the rich, decadent flavor and satisfying texture we all know and love. These aren’t just any cake pops; they’re a journey back to those cozy moments spent sipping coffee and indulging in a sweet treat. The inspiration for this recipe comes from my own love of Starbucks and a desire to recreate that familiar taste in my own kitchen.
The beauty of Starbucks Cake Pops lies in their versatility. They’re perfect for parties, celebrations, or simply a delightful afternoon pick-me-up. The moist, flavorful cake combined with the creamy, chocolatey coating creates a textural experience that’s simply irresistible. Many people adore them for their portability – a perfect on-the-go snack or dessert. And let’s be honest, who can resist a bite-sized piece of pure cakey goodness dipped in rich chocolate?
So, grab your aprons and let’s embark on this delicious adventure together! I’ll guide you through each step, ensuring you create Starbucks Cake Pops that are as impressive as they are delicious. Prepare to be amazed by how easy it is to recreate this beloved treat at home!

Ingredients:
- 1 box (15.25 ounces) yellow cake mix
- 1 cup water
- 1/3 cup vegetable oil
- 3 large eggs
- 1 teaspoon vanilla extract
- 1 (16 ounce) container vanilla frosting
- 1 cup semi-sweet chocolate chips
- 1/2 cup milk chocolate chips
- 1/4 cup white chocolate chips
- Sprinkles (various colors, optional)
- Lollipop sticks
- Parchment paper
- Baking spray with flour
- Large mixing bowls
- Muffin tin
- Rubber spatula or wooden spoon
- Microwave-safe bowl
- Double boiler or heat-safe bowl set over a pan of simmering water
- Small bowl
Preparing the Cake
- Preheat your oven to 350°F (175°C). I like to grease and flour a 12-cup muffin tin. You can also use baking spray with flour – it’s a real time saver! Line the muffin tin with paper liners for easier removal later. This step is crucial for preventing the cake pops from sticking.
- In a large mixing bowl, I combine the yellow cake mix, water, vegetable oil, eggs, and vanilla extract. Give it a good, thorough mix until everything is completely incorporated and the batter is smooth. Don’t be shy with the mixing; you want a consistent batter for evenly baked cake pops.
- Evenly distribute the batter into the prepared muffin cups, filling each about 2/3 full. I find that using an ice cream scoop helps ensure consistent portion sizes and makes the process much quicker.
- Bake for 18-20 minutes, or until a toothpick inserted into the center comes out clean. Keep a close eye on them during the last few minutes, as ovens can vary.
- Once baked, let the cakes cool in the muffin tin for about 10 minutes before transferring them to a wire rack to cool completely. This is very important! Trying to work with warm cakes will result in a messy and difficult process.
Preparing the Frosting and Chocolate
- While the cakes are cooling, I prepare the chocolate. In a microwave-safe bowl, I melt the semi-sweet chocolate chips in 30-second intervals, stirring after each, until smooth and melted. Be careful not to overheat the chocolate, as this can cause it to seize up.
- Alternatively, you can melt the chocolate using a double boiler or a heat-safe bowl set over a pan of simmering water. This method provides more control over the melting process and prevents burning.
- Repeat the melting process for the milk chocolate and white chocolate chips in separate bowls. I usually keep the melted chocolate in a warm place (like a low oven) to prevent it from hardening while I work.
- Once the cakes are completely cool, I use a small spoon or a melon baller to carefully crumble each cake into a fine crumb. This is easier if you let them cool completely. If they are still slightly warm, they will be more difficult to crumble.
- In a large bowl, I gently combine the cake crumbs and the vanilla frosting. I mix until the crumbs are evenly coated and the mixture is well combined but not overly wet. If it’s too wet, add a few more cake crumbs. If it’s too dry, add a tiny bit more frosting.
Assembling the Cake Pops
- Roll the cake mixture into 1-inch balls. I find it helpful to use my hands, lightly moistened with water, to prevent the mixture from sticking. Make sure the balls are uniform in size for consistent cake pops.
- Insert a lollipop stick about halfway into each cake pop ball. I gently press it in to ensure it stays securely in place. You can also dip the end of the stick in melted chocolate before inserting it to help it adhere better.
- Place the cake pops on a parchment-lined baking sheet and refrigerate for at least 30 minutes to allow the cake pops to firm up. This step is crucial for preventing the chocolate from sliding off.
- Once the cake pops are firm, I dip each one into the melted chocolate, rotating to coat evenly. I use a fork to help remove excess chocolate. For a more visually appealing cake pop, you can dip it in one color of chocolate, then immediately dip it in a second color for a marbled effect.
- Immediately after dipping, I sprinkle the cake pops with sprinkles (if using) while the chocolate is still wet. This ensures the sprinkles adhere properly.
- Place the dipped cake pops back onto the parchment-lined baking sheet and allow the chocolate to set completely. This usually takes about 30 minutes at room temperature, or you can speed up the process by placing them in the refrigerator for 15-20 minutes.
Finishing Touches and Storage
- Once the chocolate is completely set, your Starbucks-inspired cake pops are ready to enjoy! Store them in an airtight container at room temperature for up to 3 days, or in the refrigerator for up to a week. Remember to bring them to room temperature before serving for the best flavor and texture.
- For an extra special touch, you can drizzle melted white chocolate in a Starbucks-inspired design over the finished cake pops before the chocolate sets completely.
Conclusion:
So there you have it – my recipe for incredibly delicious Starbucks Cake Pops! I truly believe this recipe is a must-try for several reasons. First, the flavor profile is simply irresistible. That signature Starbucks coffee taste, perfectly balanced with the sweetness of the cake and the creamy coating, creates a truly unforgettable treat. It’s the perfect blend of indulgence and sophistication, a far cry from your average cake pop.
Secondly, this recipe is surprisingly easy to make. While the process involves a few steps, each one is clearly explained and straightforward, making it accessible even to beginner bakers. You don’t need any fancy equipment or hard-to-find ingredients; everything is readily available at your local grocery store. I’ve designed it to be as user-friendly as possible, ensuring a successful and enjoyable baking experience for everyone.
Thirdly, and perhaps most importantly, these Starbucks Cake Pops are incredibly versatile. They’re perfect for any occasion – from casual get-togethers to elegant parties. Imagine serving them at your next book club meeting, a holiday gathering, or even just as a special after-dinner treat for yourself! The possibilities are endless.
Serving Suggestions & Variations:
To elevate your Starbucks Cake Pops even further, consider these serving suggestions and variations:
- Drizzle with Chocolate Sauce: A simple drizzle of rich chocolate sauce adds an extra layer of decadence and visual appeal.
- Sprinkle with Coffee Beans: For an authentic Starbucks touch, sprinkle some whole coffee beans on top of the melted chocolate before it sets.
- Add a Caramel Swirl: Incorporate a swirl of caramel into the cake batter for an extra flavor dimension.
- Experiment with Different Coatings: Instead of white chocolate, try using milk chocolate, dark chocolate, or even a flavored white chocolate like peppermint or mocha.
- Get Creative with Decorations: Use sprinkles, edible glitter, or even small candies to decorate your cake pops and personalize them for different occasions.
- Make Mini Cake Pops: For a bite-sized treat, simply use a smaller cookie scoop to create smaller cake balls.
- Dip in Different Flavored Coatings: Try dipping your cake pops in melted peanut butter, or even a flavored white chocolate like strawberry or raspberry.
Don’t Forget to Share!
I genuinely hope you enjoy making and sharing these Starbucks Cake Pops as much as I do. They’re a guaranteed crowd-pleaser, and the perfect way to impress your friends and family with your baking skills. Once you’ve tried this recipe, I’d love to hear about your experience! Share your photos and feedback on social media using #StarbucksCakePopsRecipe – I can’t wait to see your creations!
So, what are you waiting for? Grab your ingredients, put on your apron, and get ready to bake up a batch of these amazing Starbucks Cake Pops. Trust me, you won’t regret it! They’re the perfect combination of delicious coffee flavor and delightful cake, making them an absolute must-have for any coffee lover or baking enthusiast. Happy baking!
Starbucks Cake Pops: A Delicious Treat – Review & Where to Find Them
Easy Starbucks-inspired cake pops perfect for any occasion! Made with yellow cake mix, frosting, and various chocolates.
Ingredients
Instructions
Recipe Notes
- Using paper liners in the muffin tin makes removing the cooled cakes much easier.
- Don’t overheat the chocolate when melting, or it will seize up.
- Completely cooling the cakes before crumbling is crucial for easy handling.
- Refrigerating the cake pops before dipping helps prevent the chocolate from sliding off.

Leave a Comment