

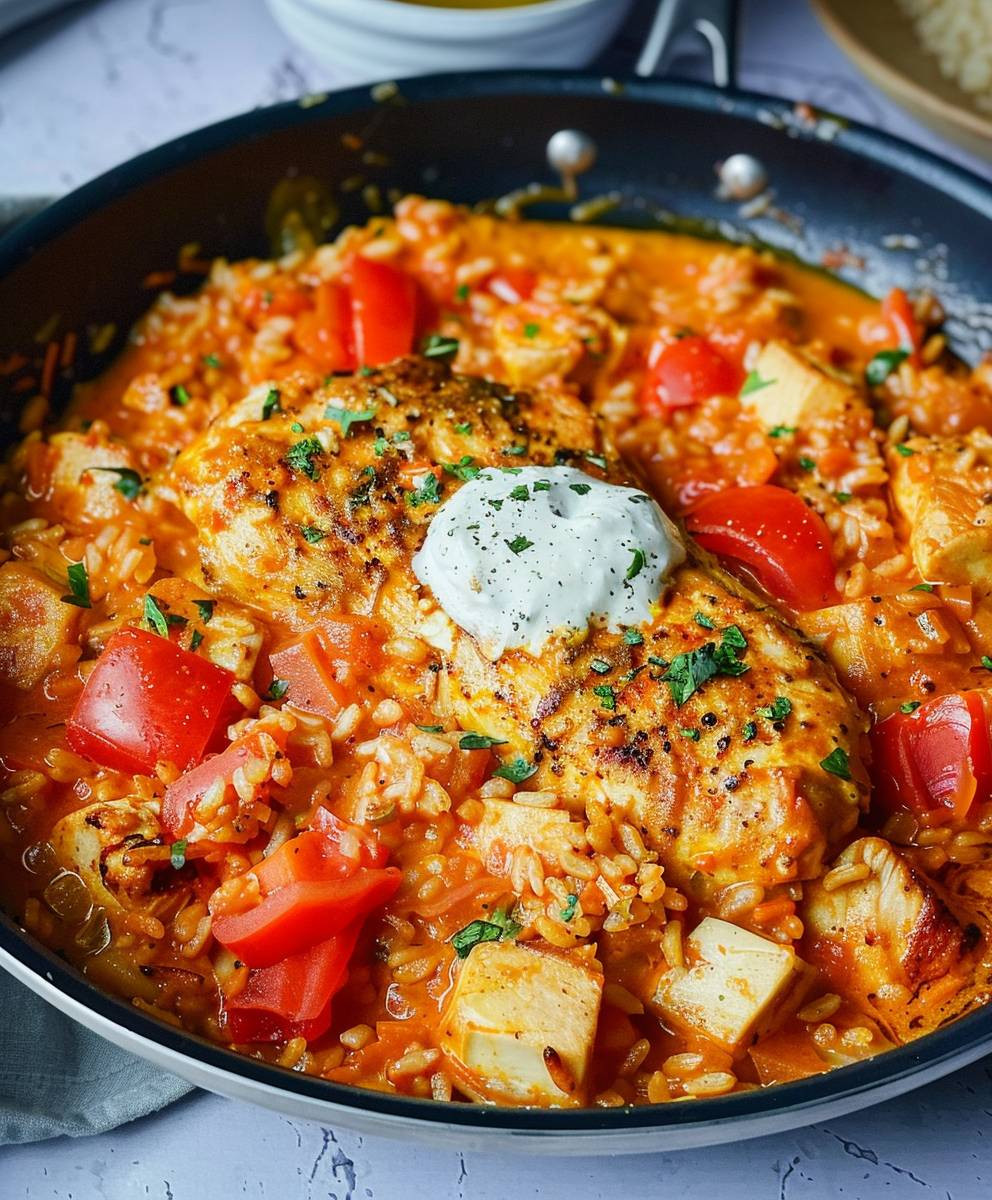
Paprika Chicken Pan: A Flavor Explosion in One Pan
Paprika Chicken Pan – just the name conjures up images of vibrant color and mouthwatering aromas, doesn’t it? This recipe isn’t just about convenience; it’s a culinary journey that transports you to the heart of Hungarian cuisine, where paprika reigns supreme. I’ve always been captivated by the rich history of Hungarian cooking, and this Paprika Chicken Pan recipe is a testament to its bold and flavorful traditions. The use of sweet paprika, often combined with a touch of smoky paprika, creates a depth of flavor that’s simply unforgettable.
What makes this Paprika Chicken Pan so beloved? It’s the perfect blend of sweet and savory, the tender chicken infused with the smoky warmth of paprika, and the satisfying crunch of the accompanying vegetables. The ease of preparation is another major draw; everything cooks together in a single pan, minimizing cleanup and maximizing your time. Whether you’re a seasoned cook or a kitchen novice, this recipe is incredibly accessible, promising delicious results without the fuss.
Beyond its convenience, the Paprika Chicken Pan offers a delightful textural experience. The tender chicken contrasts beautifully with the slightly crisp vegetables, creating a symphony of sensations in your mouth. And let’s not forget the vibrant color! The deep red hue of the paprika is visually stunning, making this dish as appealing to the eye as it is to the palate. So, are you ready to embark on this culinary adventure with me? Let’s dive into the recipe and create a Paprika Chicken Pan that will become a staple in your kitchen.

Ingredients:
- 1 whole chicken (about 3-4 pounds), cut into 8 pieces
- 1 tablespoon paprika (Hungarian paprika is best, but regular works too)
- 1 teaspoon garlic powder
- 1 teaspoon onion powder
- 1/2 teaspoon dried oregano
- 1/2 teaspoon dried thyme
- 1/4 teaspoon cayenne pepper (optional, for a little heat)
- 1/2 teaspoon salt
- 1/4 teaspoon black pepper
- 1/4 cup all-purpose flour
- 2 large eggs, beaten
- 1 1/2 cups panko bread crumbs
- 1/2 cup vegetable oil, for frying
- 1 lemon, cut into wedges (for serving)
- Fresh parsley, chopped (for garnish, optional)
Preparing the Chicken
- First, I like to pat the chicken pieces dry with paper towels. This helps the breading adhere better.
- In a medium bowl, I whisk together the paprika, garlic powder, onion powder, oregano, thyme, cayenne pepper (if using), salt, and black pepper. I make sure everything is well combined.
- Next, I generously coat each chicken piece with the paprika spice blend, ensuring that every surface is evenly seasoned. I really press the spices into the chicken to help them stick.
- I set the seasoned chicken aside for at least 15 minutes, or even longer if I have time. This allows the flavors to penetrate the chicken, resulting in a more flavorful dish. This step is crucial for maximum flavor!
Breading the Chicken
- I set up a breading station with three shallow dishes. In the first dish, I place the all-purpose flour. In the second, I put the beaten eggs. The third dish is where I put the panko bread crumbs.
- I dredge each chicken piece in the flour, shaking off any excess. I want a nice even coating, but not too thick.
- Then, I dip the floured chicken piece into the beaten eggs, making sure it’s fully coated.
- Finally, I coat the egg-dipped chicken in the panko bread crumbs, pressing gently to help the crumbs adhere. Again, I aim for an even coating.
- I place the breaded chicken pieces on a wire rack set over a baking sheet. This helps them stay crispy and prevents them from getting soggy.
Frying the Chicken
- I heat the vegetable oil in a large, heavy-bottomed skillet or Dutch oven over medium-high heat. The oil should be hot enough that a small piece of breading dropped in sizzles immediately. Don’t overcrowd the pan! This will lower the oil temperature and result in greasy chicken.
- Carefully place the breaded chicken pieces in the hot oil, making sure not to overcrowd the pan. I usually fry them in batches to ensure even cooking.
- Fry the chicken for about 6-8 minutes per side, or until it’s golden brown and cooked through. The internal temperature should reach 165°F (74°C). I use a meat thermometer to check.
- Once cooked, I remove the chicken from the skillet and place it on a wire rack to drain any excess oil. This helps keep the chicken crispy.
- I repeat steps 10-13 until all the chicken pieces are cooked.
Serving Suggestions
- Serve the paprika chicken immediately while it’s hot and crispy. I like to garnish it with fresh parsley and a lemon wedge for a pop of color and flavor.
- The paprika chicken is delicious on its own, but it also pairs well with various sides. Some of my favorites include roasted vegetables, mashed potatoes, rice, or a simple green salad.
- For a complete meal, I often serve it with a side of creamy coleslaw or a tangy potato salad to balance the richness of the chicken.
- Leftovers can be stored in an airtight container in the refrigerator for up to 3 days. They can be reheated in the oven or microwave.
- For an extra crispy reheating experience, I recommend placing the leftover chicken on a baking sheet and baking it in a preheated oven at 350°F (175°C) for about 10-15 minutes, or until heated through and crispy again.
Tips and Variations
- For a spicier chicken, increase the amount of cayenne pepper or add a pinch of red pepper flakes to the spice blend.
- If you don’t have panko bread crumbs, you can use regular bread crumbs instead. However, panko bread crumbs create a lighter, crispier crust.
- Feel free to experiment with other herbs and spices. Smoked paprika, cumin, or garlic powder can add interesting flavor profiles.
- For a healthier option, you can bake the chicken instead of frying it. Simply place the breaded chicken pieces on a baking sheet lined with parchment paper and bake at 400°F (200°C) for about 25-30 minutes, or until cooked through and golden brown.
- To make it ahead of time, you can prepare the chicken and breading up to a day in advance. Store the breaded chicken in the refrigerator until ready to cook.
Conclusion:
So there you have it – my Paprika Chicken Pan recipe! I truly believe this dish is a must-try for several reasons. First, it’s incredibly flavorful. The paprika, combined with the other spices, creates a rich and complex taste that’s both savory and slightly sweet. It’s a flavor profile that’s hard to resist, and one that elevates a simple chicken dinner to something truly special. Second, it’s incredibly easy to make. The entire process, from prepping the ingredients to cleaning up, is straightforward and won’t take up your entire evening. This makes it perfect for busy weeknights when you still want a delicious and satisfying meal.
Third, and perhaps most importantly, this Paprika Chicken Pan is incredibly versatile. You can easily adapt it to your own preferences and dietary needs. Want to add some vegetables? Go for it! Bell peppers, onions, zucchini, and broccoli all work wonderfully. Feel free to experiment with different types of paprika too – smoked paprika adds a wonderful smoky depth, while sweet paprika offers a milder, sweeter flavor. You can also adjust the spice level to your liking by adding more or less cayenne pepper.
Serving Suggestions:
I love serving my Paprika Chicken Pan with a side of fluffy rice to soak up all that delicious sauce. The rice perfectly complements the savory chicken and spices. Alternatively, you could serve it with roasted potatoes, couscous, or even a simple green salad for a lighter option. For a truly complete meal, consider adding a dollop of plain yogurt or sour cream on top of the chicken for a cooling contrast to the spicy paprika.
Variations to Explore:
Don’t be afraid to get creative with this recipe! One variation I particularly enjoy is adding a handful of olives towards the end of cooking. The salty brininess of the olives adds another layer of flavor complexity. Another great option is to use bone-in, skin-on chicken thighs for a richer, more flavorful result. Just be sure to adjust the cooking time accordingly. For a spicier kick, add a pinch of chili flakes or a dash of your favorite hot sauce. The possibilities are truly endless!
This Paprika Chicken Pan recipe is more than just a meal; it’s an experience. It’s a chance to explore flavors, experiment in the kitchen, and create something delicious that you and your loved ones will enjoy. It’s a testament to the power of simple ingredients transformed into something extraordinary through careful seasoning and cooking techniques. It’s a recipe that I’m confident will become a staple in your own kitchen.
Give it a try!
I genuinely hope you give this Paprika Chicken Pan recipe a try. I’m so excited for you to experience the deliciousness for yourself. Once you’ve made it, please share your experience with me! Let me know what you thought of the recipe, what variations you tried, and how you served it. You can share your photos and feedback on social media using the hashtag #PaprikaChickenPan. I can’t wait to see your creations and hear about your culinary adventures!
Happy cooking!
Paprika Chicken Pan: A Delicious Recipe Guide
Crispy, flavorful paprika chicken, perfectly breaded and fried to golden perfection. A simple recipe with big flavor!
Ingredients
Instructions
Recipe Notes
- Don’t overcrowd the pan when frying; this lowers the oil temperature and results in greasy chicken.
- Using a meat thermometer ensures the chicken is cooked to a safe internal temperature.
- Leftovers can be stored in the refrigerator for up to 3 days and reheated in the oven (350°F/175°C for 10-15 minutes) or microwave. Oven reheating yields crispier results.
- For a healthier option, bake the breaded chicken at 400°F (200°C) for 25-30 minutes.
- Feel free to experiment with different herbs and spices.
Leave a Comment