

Easy Honey Garlic Chicken With Creamy High Protein Mac Cheese – does that not sound like the ultimate comfort food experience, thoughtfully elevated for today’s busy lifestyles? We all crave those deeply satisfying meals that transport us back to simpler times, yet also align with our desire for wholesome, convenient options. Imagine tender, juicy chicken pieces coated in a luscious, sticky honey garlic glaze – a universally adored flavor profile that strikes the perfect balance between sweet and savory. This delightful poultry dish, simple in its execution but profound in its flavor, finds its roots in various Asian-inspired cuisines, becoming a beloved staple in Western kitchens for its irresistible appeal and straightforward preparation.
But what truly elevates this meal from simply delicious to absolutely unforgettable is its incredible companion: a bowl of incredibly creamy, high protein mac and cheese. Forget the bland, watery versions; this mac and cheese is a game-changer, offering all the rich, cheesy comfort you adore, but with a significant nutritional boost. The golden, gooey pasta, enrobing every strand in a velvety sauce, perfectly complements the bold flavors of the chicken, creating a harmonious symphony on your plate. It’s the kind of complete, satisfying dinner that brings joy to the table without demanding hours in the kitchen, making our Easy Honey Garlic Chicken With Creamy High Protein Mac Cheese the ideal choice for a weeknight feast or a special family gathering.

Ingredients:
-
For the Easy Honey Garlic Chicken:
- 1.5 lbs boneless, skinless chicken thighs or breasts, cut into 1-inch pieces (I prefer thighs for juiciness!)
- 2 tablespoons olive oil (plus more for cooking)
-
For the Marinade/Sauce:
- 1/2 cup soy sauce (low sodium is a great choice)
- 1/4 cup honey
- 2 tablespoons rice vinegar (or apple cider vinegar)
- 1 tablespoon sesame oil (toasted is best for flavour)
- 4-5 cloves garlic, minced (I love my garlic, so I go generous!)
- 1 tablespoon fresh ginger, grated (the fresher, the better the zing!)
- 1 teaspoon cornstarch (for thickening the sauce)
- 1/4 teaspoon black pepper
- Pinch of red pepper flakes (optional, for a little kick)
-
For Garnish:
- 2 tablespoons fresh chives or green onions, sliced
- 1 tablespoon toasted sesame seeds
-
For the Creamy High Protein Mac Cheese:
- 12 oz elbow macaroni or small pasta shape of your choice
- 6 tablespoons unsalted butter
- 6 tablespoons all-purpose flour
- 4 cups milk (I usually use 2% or whole milk for creaminess, but any will do!)
- 1 cup plain Greek yogurt (full-fat or 2%, adds fantastic creaminess and protein!)
- 1/2 cup cottage cheese (small curd works best, adds more protein and disappears into the sauce)
- 2 scoops unflavored whey protein powder (optional, but a fantastic way to boost protein without altering taste significantly)
- 1 teaspoon Dijon mustard (secret ingredient for depth!)
- 1/2 teaspoon onion powder
- 1/4 teaspoon garlic powder
- Pinch of nutmeg (really enhances the cheese flavor, trust me!)
- Salt and freshly ground black pepper, to taste
- 3 cups shredded sharp cheddar cheese
- 1 cup shredded Gruyere or Monterey Jack cheese (for extra meltiness and flavor)
- 1/2 cup grated Parmesan cheese (for an extra cheesy punch)
Easy Honey Garlic Chicken: Preparing the Marinade and Chicken
- Prepare the Chicken: First things first, let’s get our chicken ready. If you’re using chicken breasts, I recommend slicing them into smaller, uniform pieces, about 1-inch cubes or thin strips, so they cook evenly and quickly. For chicken thighs, simply cut them into bite-sized pieces. Pat the chicken really dry with paper towels. This step is crucial! A dry surface helps the chicken sear beautifully and caramelize, locking in all those wonderful juices. Set aside your perfectly prepped chicken.
- Whisk Up the Marinade Magic: Now, for the star of our chicken dish – the incredible honey garlic sauce! In a medium-sized bowl or a large resealable bag (my preferred method for easy cleanup and even coating), combine the soy sauce, honey, rice vinegar, sesame oil, minced garlic, grated ginger, and a pinch of red pepper flakes if you like a little heat. Whisk everything together thoroughly until the honey is fully incorporated and the sauce is well mixed. You want all those delicious flavors to mingle together.
- Create a Slurry for Thickness: In a small separate bowl, take about 2 tablespoons of the prepared marinade liquid (before adding it to the chicken) and mix it with the 1 teaspoon of cornstarch. Whisk this cornstarch slurry until it’s completely smooth and there are no lumps. This little mixture is what will thicken our sauce later, giving it that glossy, irresistible texture. Set this aside for now.
- Marinate the Chicken: Add your dry chicken pieces to the bowl or bag with the remaining marinade. Toss everything together, making sure every piece of chicken is thoroughly coated in that gorgeous, aromatic sauce. Once coated, cover the bowl or seal the bag and let it marinate in the refrigerator for at least 30 minutes. If you have more time, an hour or even up to 4 hours will infuse even more flavor into the chicken. Don’t marinate for too long if using breasts, as the acid in the vinegar can start to break down the protein too much.
Easy Honey Garlic Chicken: Cooking the Chicken and Creating the Glaze
- Sear the Chicken: When you’re ready to cook, remove the chicken from the refrigerator about 10-15 minutes before cooking to bring it closer to room temperature. Heat 2 tablespoons of olive oil in a large non-stick skillet or a cast-iron pan over medium-high heat. You want the pan to be nice and hot. Once shimmering, add the marinated chicken pieces to the pan in a single layer. Avoid overcrowding the pan; you might need to cook the chicken in two batches. Overcrowding will steam the chicken instead of searing it, and we want beautiful golden-brown edges!
- Cook to Golden Perfection: Let the chicken cook undisturbed for 3-4 minutes on one side until it develops a lovely golden-brown crust. Then, flip the chicken pieces and cook for another 3-4 minutes on the other side, or until the chicken is cooked through and reaches an internal temperature of 165°F (74°C). Once cooked, remove the chicken from the pan and set it aside on a plate. It’s okay if it’s not super saucy yet; we’re about to make the magic happen!
- Build the Irresistible Honey Garlic Glaze: With the chicken removed, pour the remaining marinade (the marinade that was in the bowl/bag with the raw chicken, not the slurry) into the hot skillet. Bring this to a simmer, scraping up any delicious browned bits from the bottom of the pan. These bits are packed with flavor! Let it simmer gently for about 1-2 minutes.
- Thicken the Sauce: Now, re-whisk your cornstarch slurry (from step 3) quickly, as cornstarch tends to settle. Pour the slurry into the simmering marinade in the pan while continuously whisking. Keep whisking gently as the sauce comes back to a simmer. You’ll notice it will start to thicken beautifully and become glossy. Continue to simmer for another 1-2 minutes, or until the sauce has reached your desired consistency – thick enough to coat the back of a spoon, but still pourable. Taste the sauce and adjust seasonings if needed; a little more soy sauce for saltiness, or honey for sweetness.
- Glaze the Chicken: Return the cooked chicken pieces to the pan with the thickened honey garlic glaze. Toss the chicken gently, ensuring every piece is generously coated in that luscious, sweet, and savory sauce. Let it simmer with the chicken for just another minute to warm through and allow the flavors to meld perfectly. This is where the “Easy Honey Garlic Chicken” truly shines!
- Garnish and Serve: Remove the pan from the heat. Sprinkle generously with fresh sliced chives or green onions and a handful of toasted sesame seeds. The aroma alone will have everyone ready to dive in! This gorgeous, sticky chicken is now ready to be served alongside our incredible Creamy High Protein Mac Cheese.
Creamy High Protein Mac Cheese: Preparing the Pasta
- Boil the Macaroni: Grab a large pot and fill it with plenty of water. Add a generous pinch of salt – I always say the water should taste like the ocean! Bring the water to a rolling boil over high heat. Once boiling, add your elbow macaroni or chosen pasta shape. Stir occasionally to prevent the pasta from sticking.
- Cook to Al Dente: Cook the pasta according to the package directions until it’s al dente, meaning it’s tender but still has a slight bite to it. We don’t want mushy pasta for our mac and cheese! Al dente pasta holds its shape better in the creamy sauce.
- Drain and Set Aside: Once cooked, drain the macaroni well in a colander. You don’t need to rinse it. Return the drained pasta to the empty pot, or a large bowl, and set it aside. We’ll be adding our incredibly rich and creamy high protein cheese sauce to this very soon!
Creamy High Protein Mac Cheese: Crafting the High Protein Cheese Sauce
- Start the Roux: In the same large pot (if you returned the pasta to a bowl) or a separate heavy-bottomed pot, melt the unsalted butter over medium heat. Once the butter is fully melted and slightly shimmering, gradually whisk in the all-purpose flour. Keep whisking constantly for 1-2 minutes. This creates what we call a roux, which is the base that will thicken our sauce and prevent it from being lumpy. You want a light golden color and a fragrant, nutty aroma. Don’t rush this step; a well-cooked roux is key!
- Whisk in the Milk: Slowly, and I mean slowly, pour in the milk, whisking continuously as you add it. Pouring it in gradually prevents lumps and ensures a smooth, velvety sauce. Continue to whisk constantly as the sauce heats up. Bring the mixture to a gentle simmer, allowing it to thicken. It should be thick enough to coat the back of a spoon. This typically takes about 5-7 minutes.
- Incorporate the High Protein Goodness and Seasonings: Remove the pot from the heat briefly. Now, for the protein power-up! Whisk in the plain Greek yogurt and cottage cheese until they are fully incorporated and smooth. If you’re using unflavored protein powder, whisk that in now too, ensuring there are no clumps. The heat from the sauce will help everything melt and blend beautifully. Now, stir in the Dijon mustard, onion powder, garlic powder, and that magical pinch of nutmeg. Season generously with salt and freshly ground black pepper. Taste and adjust as needed. This combination of ingredients makes this “Creamy High Protein Mac Cheese” truly exceptional!
- Melt in the Cheeses: Return the pot to very low heat (or off the heat if your pot retains heat well). Gradually add your shredded sharp cheddar, Gruyere/Monterey Jack, and Parmesan cheeses, a handful at a time, whisking constantly until each addition is fully melted and smooth before adding more. This gradual melting process ensures a beautifully smooth and lump-free cheese sauce. Resist the urge to dump all the cheese in at once; patience here will reward you with ultimate creaminess!
- Achieve Ultimate Creaminess: Once all the cheese is melted, you should have a luxuriously smooth, thick, and incredibly creamy cheese sauce. Taste again and adjust the salt and pepper if necessary. Remember, the cheeses also contribute saltiness, so be mindful not to over-salt too early.
Creamy High Protein Mac Cheese: Assembling and Finishing
- Combine Pasta and Sauce: Pour the magnificent high protein cheese sauce directly over the drained macaroni in the large pot or bowl. Using a large spoon or spatula, gently fold and stir the pasta until every single piece is completely coated in that rich, creamy, cheesy goodness. You want an even distribution of sauce throughout the pasta.
-
Serve Immediately (or Bake!): Your Creamy High Protein Mac Cheese is now ready to be devoured! It’s absolutely divine served immediately straight from the pot.
Optional Step: For a Baked Mac & Cheese Twist:
If you prefer a baked mac and cheese with a golden crust, you can transfer the mixture to a 9×13 inch baking dish. Top with a sprinkle of extra cheddar and Parmesan cheese, and a handful of panko breadcrumbs mixed with a drizzle of melted butter for a crispy topping. Bake in a preheated oven at 375°F (190°C) for 20-25 minutes, or until bubbly and golden brown on top. For an even crispier top, you can broil for the last 2-3 minutes, but watch it carefully to prevent burning!
Bringing it All Together: Serving Suggestions
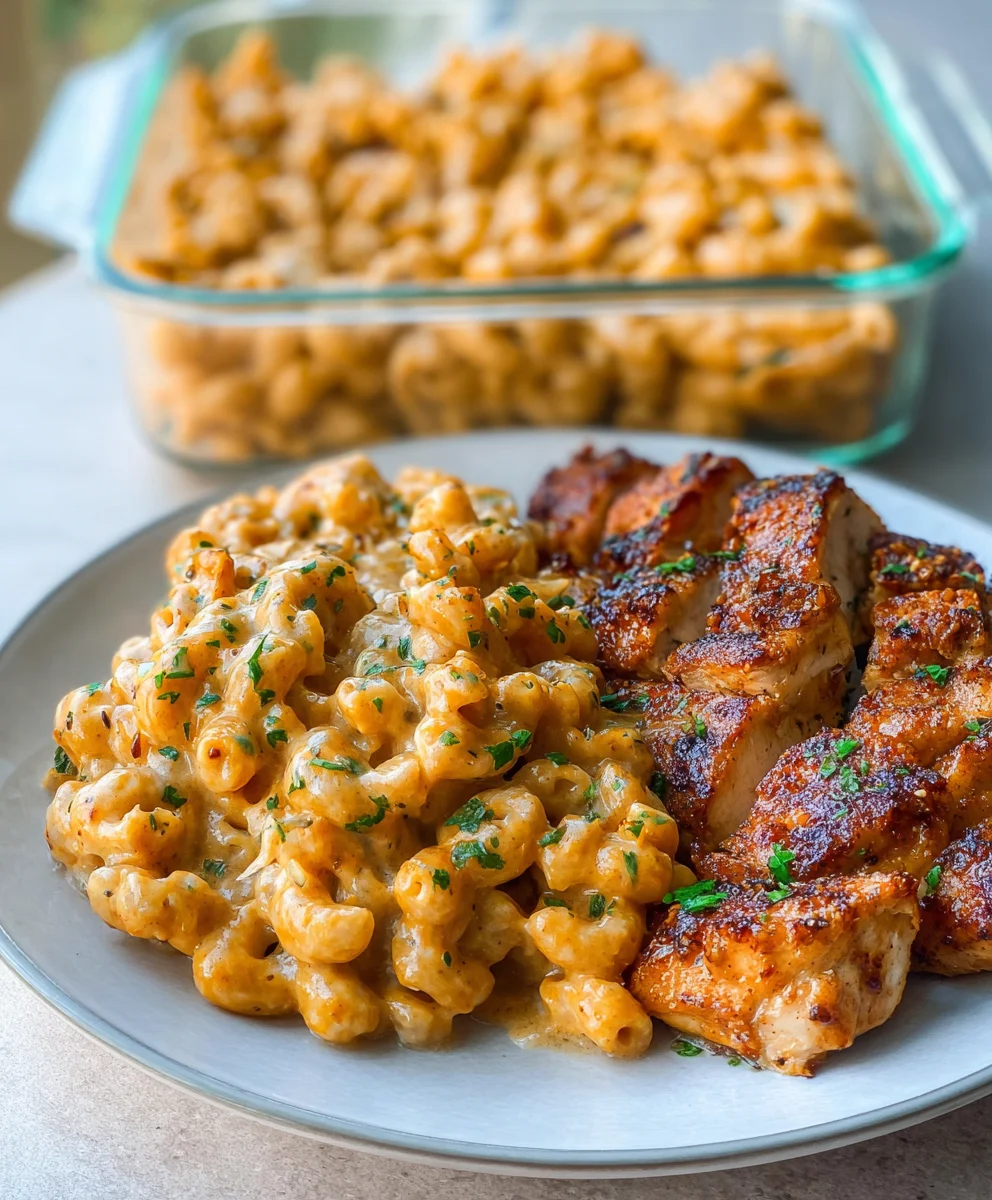
- Plate with Panache: Now for the grand finale! Serve generous portions of the hot, Easy Honey Garlic Chicken right alongside a comforting scoop of the Creamy High Protein Mac Cheese.
- Garnish for Freshness: For an extra touch, you can garnish the mac and cheese with a sprinkle of fresh parsley or chives, adding a pop of color and freshness that beautifully complements the richness of the dish. The savory sweetness of the chicken with the ultra-creamy, cheesy, protein-packed pasta creates a truly satisfying and wholesome meal. I promise, this combination will quickly become a favorite in your kitchen!
Conclusion:
As we wrap up our culinary journey with this incredible recipe, I sincerely hope you’re feeling as excited as I am about bringing this delightful dish to your own kitchen. There are countless reasons why this isn’t just another meal, but a true game-changer for your weeknight rotation, your weekend gatherings, or simply when you crave something utterly satisfying and profoundly comforting. At its heart, this recipe delivers on a promise of flavor that truly sings – the sticky, sweet, and savory notes of the honey garlic chicken are perfectly balanced, creating a glaze that you’ll want to lick right off the plate. This isn’t just chicken; it’s an experience in succulent tenderness, each bite bursting with a depth of flavor that feels both familiar and excitingly gourmet.
But let’s not forget the star alongside our chicken: the macaroni and cheese. Forget everything you thought you knew about mac and cheese because this version is a revelation. We’ve elevated classic comfort to new heights, creating a creamy, dreamy, and utterly irresistible side that’s also packed with protein. This means you’re not just indulging; you’re nourishing your body with a substantial meal that keeps you feeling full and energized. It’s the kind of dish that warms you from the inside out, making it the perfect antidote to a long day or a celebratory feast with loved ones. The harmony between the robust chicken and the smooth, cheesy pasta is simply impeccable, a testament to how truly complementary flavors can transform a meal from good to absolutely unforgettable. Trust me, once you experience the blissful combination of our Easy Honey Garlic Chicken With Creamy High Protein Mac Cheese, you’ll understand why it’s destined to become a beloved staple in your cooking repertoire.
Serving Suggestions & Creative Variations:
While this dish is phenomenal on its own, I love offering a few tweaks to make it uniquely yours or to present it with a little extra flair. For the chicken, a sprinkle of toasted sesame seeds and freshly chopped green onions provides a lovely visual appeal and a fresh burst of flavor that cuts through the richness beautifully. If you’re looking to add some greens to your plate, a simple side of steamed broccoli, asparagus, or a crisp garden salad with a light vinaigrette makes for a perfectly balanced meal. For those who love a bit of heat, don’t hesitate to add a pinch of red pepper flakes or a dash of Sriracha to the honey garlic sauce – it truly elevates the flavor profile without overwhelming the sweetness. You could also experiment with using chicken thighs instead of breasts for an even juicier, more robust chicken component.
Now, onto the mac and cheese. This creamy concoction is incredibly versatile! Feel free to stir in some additional vegetables like sautéed mushrooms, peas, or even some blanched spinach during the final stages of cooking for an added nutritional punch and textural contrast. Don’t be shy about experimenting with your cheese blend either; a mix of sharp cheddar and gruyere, or perhaps a smoky gouda, could introduce exciting new dimensions of flavor. For a delightful crunch, consider topping your mac and cheese with a sprinkle of panko breadcrumbs mixed with a little melted butter before a quick bake or broil. And for the ultimate indulgence, a sprinkle of crispy bacon bits over the top of the mac and cheese is always a winner in my book! This recipe is a canvas, and I encourage you to paint your own culinary masterpiece with it.
I truly believe in the magic of homemade meals, and this recipe for Easy Honey Garlic Chicken With Creamy High Protein Mac Cheese embodies everything I love about cooking: it’s approachable, incredibly rewarding, and utterly delicious. I’ve shared my tips, my enthusiasm, and my genuine belief that this dish will bring joy to your table. Now, it’s your turn! I absolutely cannot wait for you to try this recipe in your own kitchen. Take the plunge, gather your ingredients, and let the enticing aromas fill your home. When you do, please come back and share your experience with me! Did you add a unique twist? Was it a hit with your family? Your feedback and shared culinary adventures truly inspire me. Don’t hesitate to leave a comment below or tag me on social media with your delicious creations. Happy cooking, and bon appétit!
Frequently Asked Questions (FAQs)
What makes the mac and cheese in this recipe “high protein”?
Our “high protein” mac and cheese achieves its elevated protein content primarily through the intelligent use of ingredients like Greek yogurt or cottage cheese (blended smooth) alongside the traditional milk and cheese, and often fortified pasta. These additions significantly boost the nutritional profile without sacrificing the creamy texture or rich flavor you expect from a classic mac and cheese. It transforms a comfort food into a more substantial, energy-sustaining meal, making it a smarter choice for those looking to increase their protein intake.
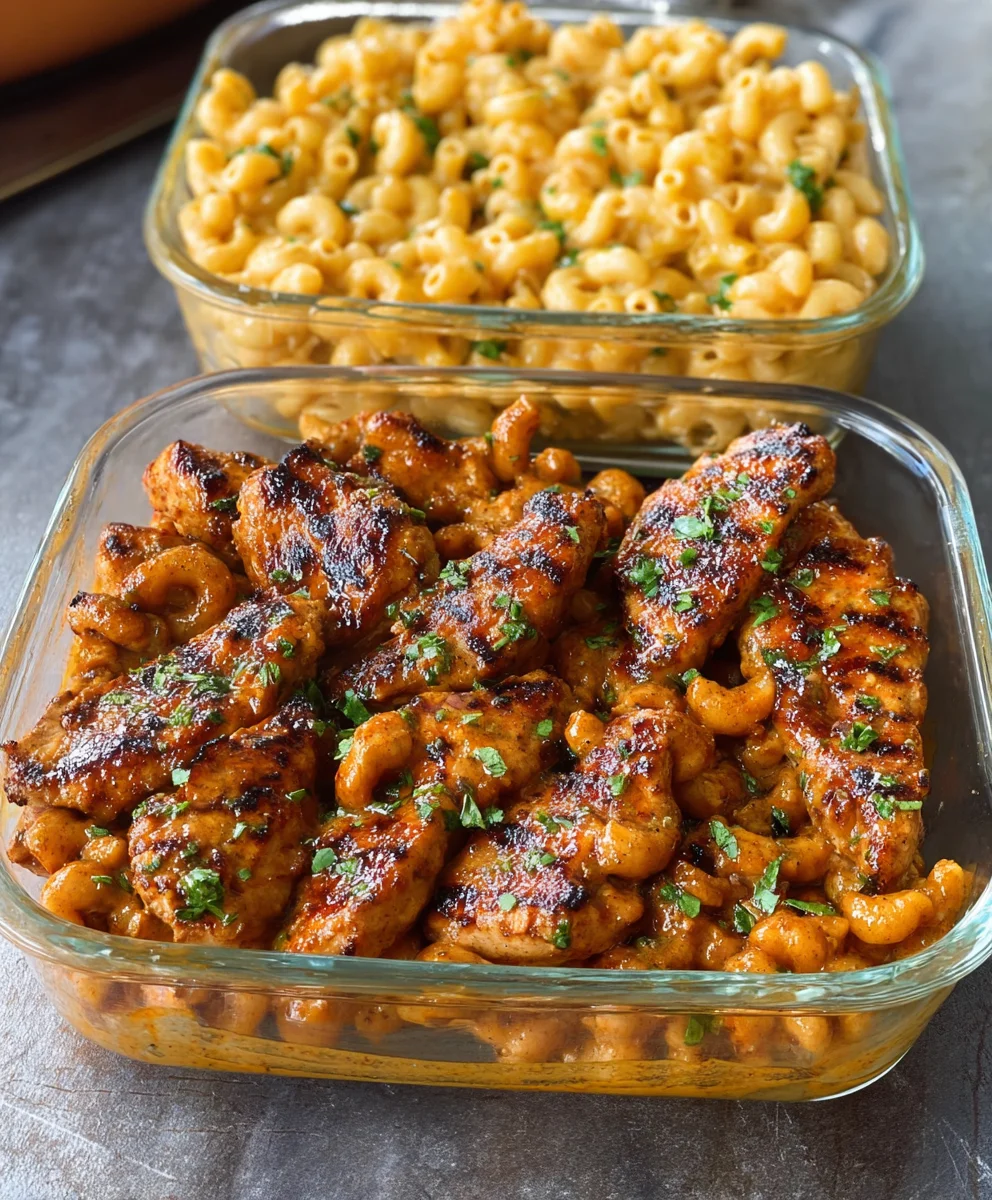
Can I prepare the Easy Honey Garlic Chicken With Creamy High Protein Mac Cheese ahead of time?
Absolutely! Both components of this dish can be prepped in advance. The honey garlic chicken can be cooked and stored in an airtight container in the refrigerator for up to 3-4 days. For the mac and cheese, you can prepare the sauce and cook the pasta, then combine them and store in the fridge. When ready to serve, gently reheat the chicken in a skillet or oven. For the mac and cheese, you might need to add a splash of milk or broth while reheating on the stovetop or in the oven to restore its creamy consistency. This makes it a fantastic option for meal prep!
What are some good substitutions if I don’t have all the ingredients for the honey garlic sauce?
While the specific blend of soy sauce, honey, garlic, ginger, and rice vinegar creates that signature flavor, you can certainly make substitutions. If you don’t have fresh ginger, a pinch of ground ginger can work. For honey, maple syrup or brown sugar can be used in a pinch, though the flavor will be slightly different. If you’re out of rice vinegar, a small amount of apple cider vinegar or even fresh lemon juice can provide the necessary acidity. Just remember to taste and adjust as you go to achieve your preferred balance of sweet, savory, and tangy.
How do I ensure the chicken is perfectly juicy and the glaze is sticky?
The key to juicy chicken is not to overcook it; aim for an internal temperature of 165°F (74°C). Searing the chicken first to get a nice golden-brown crust locks in moisture. For the sticky glaze, patience is your best friend. After adding the sauce to the pan, allow it to simmer gently with the chicken, stirring occasionally, until it thickens and coats the chicken beautifully. Don’t rush this step, as reducing the sauce slowly concentrates its flavors and creates that desirable syrupy texture.
Can I make this recipe gluten-free or dairy-free?
Yes, with a few simple swaps! For a gluten-free version, use tamari instead of soy sauce for the chicken and opt for gluten-free macaroni for the mac and cheese. Many brands offer excellent gluten-free pasta options that hold up well. For a dairy-free alternative, you can use dairy-free butter, unsweetened plain dairy-free milk (like almond or oat milk), and a good quality dairy-free cheese blend for the mac and cheese. For the high-protein aspect, look for dairy-free yogurts or tofu-based cream cheese alternatives that can be blended for creaminess. Adjust seasonings as needed to ensure the flavor profile remains rich and satisfying.
What are the best ways to store and reheat leftovers?
Store any leftover Easy Honey Garlic Chicken With Creamy High Protein Mac Cheese in separate airtight containers in the refrigerator for up to 3-4 days. To reheat the chicken, you can gently warm it in a skillet over medium-low heat with a tablespoon of water or broth to prevent it from drying out, or in the microwave. For the mac and cheese, reheating it on the stovetop over low heat with a splash of milk or broth, stirring frequently, is ideal to restore its creaminess. You can also reheat it in the microwave in short intervals, stirring between each, until heated through. Avoid excessive reheating, as it can cause the pasta to become mushy and the chicken to dry out.
Easy Honey Garlic Chicken & Creamy High Protein Mac Cheese
Enjoy a comforting and wholesome meal with tender honey garlic chicken paired with a rich, high-protein mac and cheese. This recipe combines sweet and savory flavors for a satisfying dish, thoughtfully elevated for nutritional value and convenient preparation.
Ingredients
-
1.5 lbs boneless, skinless chicken thighs or breasts
-
Salt and black pepper, to taste
-
1 tbsp olive oil
-
2 tbsp unsalted butter
-
4 cloves garlic, minced
-
1/4 cup honey
-
2 tbsp low-sodium soy sauce
-
1 tbsp apple cider vinegar
-
1/2 tsp chili flakes
-
8 oz high-protein pasta
-
1 tbsp butter
-
1 tbsp all-purpose flour
-
1.5 cups unsweetened milk
-
1.5 cups shredded sharp cheddar cheese
-
1/4 cup grated parmesan cheese
Instructions
-
Step 1
Cut 1.5 lbs chicken into 1-inch pieces; pat dry. In a bowl, whisk 2 tbsp low-sodium soy sauce, 1/4 cup honey, 1 tbsp apple cider vinegar, 4 cloves minced garlic, 1/2 tsp chili flakes, salt, and pepper. Add chicken, toss to coat, and refrigerate for 30-60 minutes. -
Step 2
Heat 1 tbsp olive oil in a skillet over medium-high heat. Sear chicken in batches until golden-brown and cooked through (165°F), about 3-4 minutes per side. Remove chicken and set aside. -
Step 3
Pour remaining marinade from the chicken bowl into the hot skillet. Bring to a simmer, scraping up browned bits. Simmer for 1-2 minutes until slightly reduced. -
Step 4
Return cooked chicken to the pan, toss to coat in the sauce. Simmer for 1 minute to warm through and meld flavors. Set aside. -
Step 5
Boil 8 oz high-protein pasta in salted water according to package directions until al dente. Drain and set aside. -
Step 6
In a separate pot, melt 1 tbsp butter over medium heat. Whisk in 1 tbsp all-purpose flour and cook for 1-2 minutes until light golden and fragrant. -
Step 7
Slowly whisk in 1.5 cups unsweetened milk until smooth. Bring to a gentle simmer, whisking constantly, until sauce thickens to coat the back of a spoon (5-7 minutes). -
Step 8
Remove from heat. Gradually add 1.5 cups shredded sharp cheddar cheese and 1/4 cup grated parmesan cheese, whisking until smooth and melted. Season with salt and pepper to taste. -
Step 9
Pour the cheese sauce over the drained pasta. Stir until every piece of pasta is completely coated in the sauce. -
Step 10
Serve generous portions of the hot Easy Honey Garlic Chicken alongside the Creamy High Protein Mac Cheese immediately.
Important Information
Nutrition Facts (Per Serving)
It is important to consider this information as approximate and not to use it as definitive health advice.
Allergy Information
Please check ingredients for potential allergens and consult a health professional if in doubt.

Leave a Comment