

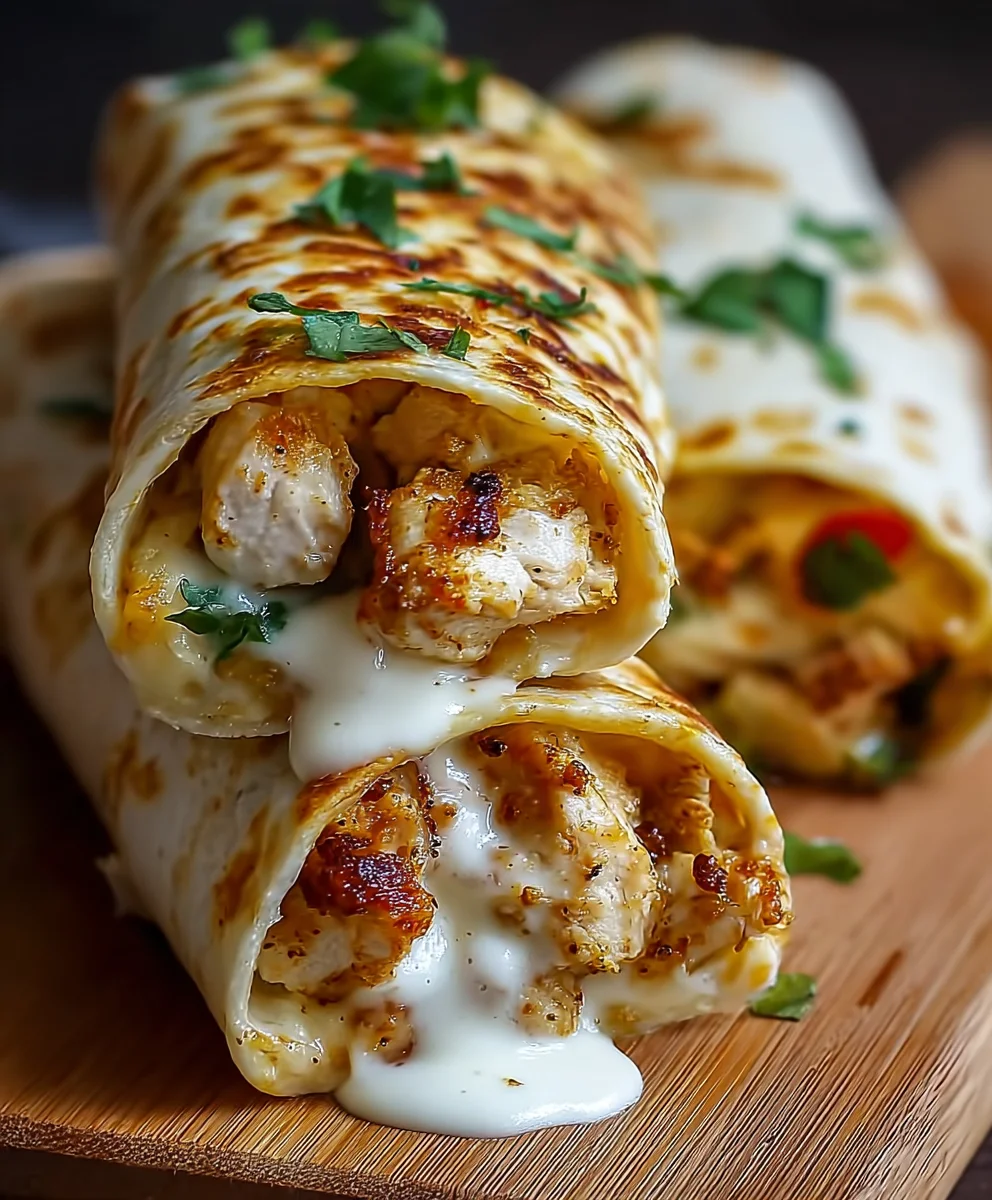
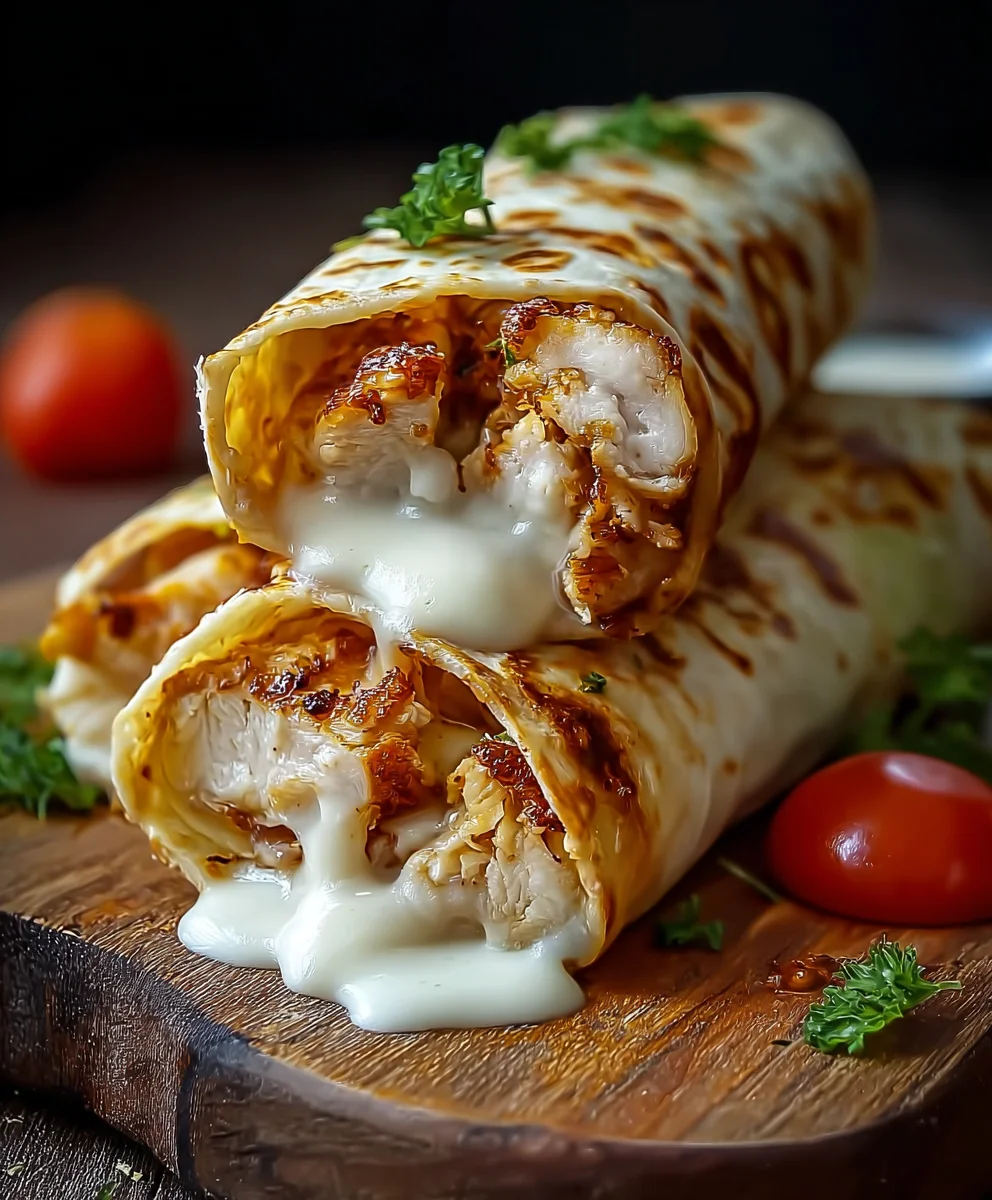
Cheesy Garlic Chicken Wraps Recipe – prepare to revolutionize your weeknight dinners and elevate your lunch game with a dish that promises an explosion of flavor in every single bite. Imagine succulent, perfectly seasoned chicken, infused with aromatic garlic, lovingly enveloped in a warm, soft tortilla, and generously layered with melted, gooey cheese. It’s a symphony of textures and tastes that truly captivates the palate, making it an instant favorite for anyone who tries it.
While the humble wrap, or flatbread, has roots tracing back centuries across various cultures as a practical and delicious way to enjoy meals, our modern take celebrates convenience and global appeal. This particular creation leverages universally adored flavors – the savory depth of garlic, the comforting richness of cheese, and the tender succulence of chicken – transforming them into an incredibly satisfying and remarkably easy-to-prepare meal. People adore this dish not only for its irresistible combination of savory, cheesy goodness but also for its incredible versatility and speed. Whether you’re seeking a quick lunch, a fuss-free dinner, or an impressive appetizer, the Cheesy Garlic Chicken Wraps Recipe delivers consistently.
Why This Dish Will Become Your New Favorite
I find that the magic truly lies in how these simple, high-quality ingredients come together to create something extraordinary. The golden-brown chicken, glistening with garlic butter, pairs perfectly with the stretchy, molten cheese, all held together by the gentle embrace of a soft tortilla. It’s a comforting, hearty, yet delightfully portable option that ensures satisfaction without the lengthy cooking process. Get ready to discover your next culinary obsession!

Ingredients:
- For the Chicken:
- 1 ½ pounds boneless, skinless chicken breasts or thighs, thinly sliced against the grain into ½-inch strips or bite-sized pieces. I prefer thighs for extra juiciness!
- 2 tablespoons olive oil, plus more for cooking
- 1 teaspoon smoked paprika
- ½ teaspoon garlic powder
- ¼ teaspoon onion powder
- ¼ teaspoon dried oregano
- Salt and freshly ground black pepper to taste
- Optional: A pinch of cayenne pepper for a subtle kick
- For the Garlic Cheese Sauce:
- 2 tablespoons unsalted butter
- 3-4 cloves garlic, minced (I love garlic, so I usually go for 4!)
- 2 tablespoons all-purpose flour
- 1 ½ cups whole milk, warmed slightly (this helps prevent lumps)
- ½ cup heavy cream (for extra richness – trust me on this one!)
- 1 ½ cups shredded cheddar cheese, sharp or mild, your preference
- ½ cup shredded Monterey Jack cheese, for meltiness
- ¼ cup grated Parmesan cheese, for a nutty, salty depth
- Salt and white pepper to taste (white pepper is great here as it doesn’t show speckles)
- A pinch of nutmeg (optional, but enhances the cheesy flavor wonderfully)
- For the Wraps and Assembly:
- 8-10 large flour tortillas (10-inch diameter), warmed slightly
- 1 cup fresh spinach or baby arugula, roughly chopped (optional, for a touch of green and freshness)
- ¼ cup chopped fresh parsley or cilantro, for garnish
- Sour cream or Greek yogurt, for serving (optional)
- Hot sauce, for those who like extra heat (optional)
Equipment You’ll Need:
- Large non-stick skillet or cast-iron pan
- Medium saucepan
- Whisk
- Mixing bowls
- Cutting board and sharp knife
- Spatula or tongs
- Grater for cheese (if not buying pre-shredded)
Preparation: Crafting Your Cheesy Garlic Chicken Wraps
Phase 1: Preparing the Chicken – Building the Flavor Base
- Prepare the Chicken: First things first, let’s get our chicken ready. Take your boneless, skinless chicken breasts or thighs and thinly slice them against the grain into ½-inch strips or bite-sized pieces. Slicing against the grain ensures the chicken is tender and easy to chew. If you’re using chicken breasts, a slight flatten with a meat mallet can help them cook more evenly. For thighs, their natural tenderness usually means no extra pounding is needed.
- Marinate the Chicken: In a medium mixing bowl, combine your sliced chicken with 2 tablespoons of olive oil, 1 teaspoon of smoked paprika, ½ teaspoon of garlic powder, ¼ teaspoon of onion powder, ¼ teaspoon of dried oregano, and a good pinch of salt and freshly ground black pepper. If you’re feeling adventurous and like a little heat, now’s the time to add a pinch of cayenne pepper. Toss everything together really well, making sure every piece of chicken is coated in those delicious spices. This not only seasons the chicken but also helps tenderize it slightly. You can let this sit for at least 15-20 minutes at room temperature, or even better, cover it and refrigerate for up to an hour to let the flavors meld.
- Cook the Chicken: Heat a large non-stick skillet or cast-iron pan over medium-high heat. Add a little extra olive oil if your pan isn’t naturally slick. Once the oil is shimmering, add the marinated chicken in a single layer. Avoid overcrowding the pan; if necessary, cook the chicken in two batches. Overcrowding can lower the pan temperature, steaming the chicken instead of searing it, which means you won’t get that lovely golden-brown crust. Cook for 3-5 minutes per side, or until the chicken is golden brown, cooked through, and no longer pink in the center. The cooking time will vary depending on the thickness of your chicken pieces. Once cooked, remove the chicken from the pan and set it aside on a plate. It’s okay if there are some flavorful browned bits left in the pan – these will add character to our next step if you decide to deglaze for another recipe, but for now, we’re focusing on our Cheesy Garlic Chicken Wraps Recipe!
Phase 2: The Garlicky Cheese Sauce Sensation – The Heart of Our Cheesy Garlic Chicken Wraps
- Prepare the Roux: In a medium saucepan, melt 2 tablespoons of unsalted butter over medium heat. Once the butter is melted and slightly foamy, add your minced garlic. Sauté the garlic for about 1 minute, stirring constantly, until it’s fragrant but not browned. Be careful not to burn the garlic, as burnt garlic can taste bitter.
- Create the Velvety Base: Sprinkle 2 tablespoons of all-purpose flour over the garlic and butter. Whisk constantly for 1-2 minutes, creating a smooth paste known as a roux. This flour-butter mixture will be the thickening agent for our glorious cheese sauce. It should smell slightly nutty. Cooking the flour sufficiently helps eliminate that raw flour taste.
- Whisk in the Liquids: Gradually, a little at a time, whisk in the warmed whole milk. Starting with warm milk helps prevent lumps. Continue whisking vigorously as you pour, ensuring the mixture remains smooth. Once all the milk is incorporated, add the heavy cream. Bring the mixture to a gentle simmer, continuing to whisk occasionally. It will start to thicken as it heats.
- Add the Cheeses: Once the sauce has thickened to your liking (it should coat the back of a spoon), reduce the heat to low. Now for the star of the show: slowly add your shredded cheddar cheese, Monterey Jack cheese, and grated Parmesan cheese, a handful at a time, whisking until each addition is fully melted and incorporated before adding more. Keep the heat low to prevent the cheese from seizing or becoming stringy. This gentle process ensures a silky, smooth, and utterly delicious cheese sauce.
- Season the Sauce: Once all the cheese has melted and the sauce is smooth and glossy, season it with salt and white pepper to taste. I also love to add a tiny pinch of nutmeg here; it’s a secret ingredient that truly enhances the savory, creamy notes of the cheese without making the sauce taste like nutmeg itself. Stir well and remove from the heat. Taste and adjust seasonings as needed – this is your chance to make it perfect! Keep the sauce warm while you prepare your wraps. If it thickens too much, you can whisk in a tablespoon or two of warm milk to thin it slightly.
Phase 3: Assembling and Cooking the Wraps – Bringing Your Cheesy Garlic Chicken Wraps to Life
- Warm the Tortillas: You want your tortillas to be pliable and easy to roll without tearing. You can warm them briefly in a dry skillet over medium heat for about 15-20 seconds per side, microwave them in a stack wrapped in a damp paper towel for 30-60 seconds, or even wrap them in foil and place them in a warm oven (around 250°F / 120°C) for 5-10 minutes. Don’t skip this step! It makes a huge difference in the final product.
- Assemble the Wraps: Lay a warm tortilla flat on a clean work surface. Spoon a generous amount of the warm garlic cheese sauce onto the center of the tortilla, spreading it out to about 1 inch from the edges. Don’t be shy with the sauce – it’s key to the “Cheesy Garlic Chicken Wraps Recipe” experience!
- Add Fillings: Place a portion of your cooked chicken strips over the cheese sauce. If you’re adding fresh spinach or baby arugula, sprinkle some over the chicken now. The warmth of the sauce and chicken will slightly wilt the greens, adding a lovely texture and freshness.
- Roll the Wraps: To roll, first fold in the sides of the tortilla over the filling, then starting from the bottom, tightly roll the tortilla upwards, creating a snug wrap. Make sure it’s tight enough to hold together but not so tight that it tears. Repeat this process with the remaining tortillas and filling.
- Sear the Wraps (Optional, but Recommended!): For an extra layer of texture and warmth, heat a clean large non-stick skillet over medium heat. Place the assembled wraps seam-side down in the dry skillet. Cook for 2-3 minutes per side, or until the tortillas are golden brown and slightly crispy. This step also helps to further warm the fillings and slightly melt the cheese, intensifying the flavors of your Cheesy Garlic Chicken Wraps. If you prefer, you can also bake them seam-side down on a baking sheet at 375°F (190°C) for 10-15 minutes, or until warmed through and lightly browned.
Phase 4: Serving Suggestions and Customization for Your Cheesy Garlic Chicken Wraps
- Serve Immediately: Your Cheesy Garlic Chicken Wraps are best enjoyed hot and fresh! Carefully transfer them to a serving platter.
- Garnish and Enjoy: Sprinkle your freshly chopped parsley or cilantro over the wraps for a burst of color and fresh herb flavor. This also signals to everyone that these are ready to devour!
- Offer Accompaniments: For an even more decadent experience, consider serving these wraps with a dollop of cool sour cream or a lighter Greek yogurt on the side. A dash of your favorite hot sauce can provide a delightful counterpoint to the richness of the cheese. These Cheesy Garlic Chicken Wraps are incredibly satisfying on their own, but they also pair wonderfully with a simple side salad or a bowl of tomato soup for a complete meal.
-
Customization Ideas: Don’t be afraid to make this Cheesy Garlic Chicken Wraps Recipe your own!
- Veggies: You could add sautéed mushrooms, bell peppers, or even finely diced onions to the chicken mixture.
- Spicy Kick: For more heat, add some finely diced jalapeños (fresh or pickled) to the wrap filling, or a pinch more cayenne to the sauce.
- Cheese Blend: Experiment with different cheese combinations! Provolone, white cheddar, or even a smoked gouda could add unique flavors.
- Different Proteins: While this is a “Cheesy Garlic Chicken Wraps Recipe,” you could easily adapt the sauce and wrap method for shredded pork, beef, or even plant-based protein alternatives like seasoned chickpeas or tofu.
- Make Ahead: You can cook the chicken and prepare the sauce up to 2-3 days in advance. Store them separately in airtight containers in the refrigerator. When ready to serve, gently reheat the chicken and sauce, warm the tortillas, and assemble. This makes weeknight dinners incredibly easy!
The beauty of this Cheesy Garlic Chicken Wraps Recipe is its versatility and comforting flavors. It’s truly a crowd-pleaser that satisfies cravings for something hearty, cheesy, and incredibly delicious. Enjoy every single bite!
Conclusion:
And there you have it, folks! We’ve journeyed through the simple yet utterly sensational process of crafting what I believe will become an instant classic in your kitchen repertoire. This isn’t just another dish; it’s an experience, a delightful symphony of textures and tastes that come together in perfect harmony. The moment you take that first bite of a perfectly golden, slightly crispy tortilla yielding to an interior of tender, seasoned chicken and gooey, melted cheese, all infused with that irresistible garlic punch, you’ll understand exactly why this Cheesy Garlic Chicken Wraps Recipe is truly a must-try.
What makes these wraps stand out? It’s their uncanny ability to be both incredibly indulgent and surprisingly straightforward to prepare. They strike that perfect balance, delivering maximum flavor with minimal fuss. Imagine coming home after a long day, knowing that a meal bursting with savory goodness is just minutes away. Or perhaps you’re planning a casual get-together with friends; these wraps are guaranteed to be the star of the show, disappearing faster than you can say “more cheese, please!” They’re wonderfully versatile, appealing to even the pickiest eaters, making them an ideal choice for busy weeknights, leisurely weekend lunches, or even as a standout appetizer for your next gathering. I promise you, once you try them, the aroma alone will have you completely hooked, and the taste will solidify their spot as a regular on your menu.
Now, let’s talk about enhancing your experience and making these wraps truly your own. While they are phenomenal on their own, a few simple additions can elevate them even further. For a complete meal, I love serving these wraps alongside a crisp, fresh green salad with a zesty vinaigrette – the freshness beautifully complements the richness of the wraps. A bowl of warm tomato soup or a side of crunchy coleslaw also makes for a fantastic pairing. Don’t forget the dips! A dollop of sour cream, a spoonful of chunky salsa, a vibrant guacamole, or even a spicy sriracha mayo can add an extra layer of flavor and fun to every bite. Feel free to get creative with your accompaniments; the sky’s the limit!
Endless Possibilities for Customization
One of the aspects I adore most about this Cheesy Garlic Chicken Wraps Recipe is its incredible adaptability. This isn’t a recipe set in stone; it’s a foundation for your culinary creativity. Want to dial up the heat? A sprinkle of red pepper flakes in the chicken mixture or some finely diced jalapeños will do the trick. Looking to add more veggies? Sautéed spinach, bell peppers, onions, or even some corn and black beans can be folded into the chicken mixture for added nutrients and texture. Experiment with different cheeses – a blend of cheddar and Monterey Jack for classic appeal, or perhaps some pepper jack for a little kick, or even a smoked gouda for a more sophisticated flavor profile. For a heartier wrap, you could even add some cooked rice or quinoa to the filling. If you’re looking for a lighter option, whole wheat tortillas work wonderfully, and baking the wraps instead of pan-frying them provides a crisp, golden finish with less oil. Don’t be afraid to think outside the box; this recipe is designed to be personalized and made uniquely yours!
So, what are you waiting for? I wholeheartedly encourage you to roll up your sleeves, gather your ingredients, and give this incredible Cheesy Garlic Chicken Wraps Recipe a try this week. It’s truly one of those dishes that brings genuine joy to the table. And when you do, please, please share your experience with me and our community! Did you add any unique twists? What were your favorite serving suggestions? I absolutely love hearing about your kitchen adventures. Snap a photo of your culinary masterpiece and share it on social media, tagging us or leaving a comment below. Your insights and creativity inspire us all. Happy cooking, and get ready to fall in love with your new go-to meal!
Frequently Asked Questions
Can I make the Cheesy Garlic Chicken Wraps filling ahead of time?
Absolutely! Preparing the chicken filling in advance is a fantastic time-saver, especially for busy weeknights. Simply cook the chicken mixture according to the recipe instructions, let it cool completely, and then store it in an airtight container in the refrigerator for up to 2-3 days. When you’re ready to make the wraps, just reheat the filling gently in a pan or microwave, then proceed with assembling and cooking the wraps as directed. This makes quick dinner prep a breeze!
What kind of tortillas work best for these wraps?
For this Cheesy Garlic Chicken Wraps Recipe, I recommend using medium-sized flour tortillas (about 8-10 inches in diameter). They are pliable enough to roll easily without tearing and crisp up beautifully when cooked. You can also experiment with whole wheat tortillas for a healthier option, or even spinach or sun-dried tomato flavored tortillas if you want to add an extra layer of flavor and color to your wraps. The key is to find tortillas that are fresh and soft.
Can I bake these Cheesy Garlic Chicken Wraps instead of pan-frying them?
Yes, you absolutely can! Baking is a great alternative if you prefer a less oily option or are making a larger batch. To bake, preheat your oven to 400°F (200°C). Brush the assembled wraps lightly with a little olive oil or melted butter on both sides, then place them on a baking sheet. Bake for about 15-20 minutes, flipping halfway through, or until they are golden brown and crispy and the cheese is melted and bubbly. Keep a close eye on them to prevent over-browning.
How do I store leftover Cheesy Garlic Chicken Wraps?
Leftover Cheesy Garlic Chicken Wraps can be stored in an airtight container in the refrigerator for up to 2-3 days. For the best texture, it’s ideal to store them before cooking them on the pan. If you’ve already cooked them, they might lose some of their crispiness upon reheating. To reheat, you can use a dry skillet over medium heat for a few minutes per side to try and regain some crispness, or pop them in the microwave for a quicker reheat, though they might be softer. A toaster oven also works wonderfully for reheating and re-crisping.
Can I make these wraps gluten-free?
Yes, making these wraps gluten-free is very easy! The main ingredient that contains gluten is the tortilla. Simply substitute regular flour tortillas with your favorite brand of gluten-free tortillas. Ensure all other ingredients, like chicken broth or seasonings, are also certified gluten-free. The rest of the recipe remains exactly the same, allowing you to enjoy all the delicious flavors without any compromise.
What are some vegetarian alternatives for the chicken?
If you’re looking for a vegetarian version of this delicious recipe, there are several fantastic options! You can replace the chicken with a can of drained and rinsed black beans, crumbled firm tofu (pressed and sautéed), or even a plant-based chicken substitute. Mushrooms, especially cremini or portobello, finely chopped and sautéed with the garlic and seasonings, also make for a wonderfully savory filling. You might want to add a bit more seasoning or a touch of smoked paprika to enhance the flavor profile for the vegetarian alternatives.
Cheesy Garlic Chicken Wraps Recipe
Revolutionize your weeknight dinners and elevate your lunch game with this Cheesy Garlic Chicken Wraps Recipe! Imagine succulent, perfectly seasoned chicken, infused with aromatic garlic, enveloped in a warm tortilla, and generously layered with melted, gooey cheese. It’s a symphony of textures and tastes, an instant favorite for anyone who tries it. Quick, versatile, and incredibly satisfying, these wraps are perfect for a fuss-free meal or an impressive appetizer.
Ingredients
-
2 cups cooked chicken, shredded
-
1 cup shredded mozzarella cheese
-
1/2 cup cream cheese, softened
-
1/4 cup mayonnaise
-
2 cloves garlic, minced
-
1 teaspoon Italian seasoning
-
1/2 teaspoon salt
-
1/4 teaspoon black pepper
-
4 large flour tortillas
-
1 cup fresh spinach leaves
-
1/2 cup diced tomatoes
-
1/4 cup sliced green onions
Instructions
-
Step 1
In a medium bowl, combine the shredded cooked chicken, shredded mozzarella cheese, softened cream cheese, mayonnaise, minced garlic, Italian seasoning, salt, and black pepper. Mix thoroughly until all ingredients are well combined and the mixture is uniform. -
Step 2
Briefly warm the large flour tortillas to make them pliable. This can be done in a dry skillet over medium heat for 15-20 seconds per side, in a microwave wrapped in a damp paper towel for 30-60 seconds, or in a warm oven (250°F / 120°C) for 5-10 minutes. -
Step 3
Lay a warm tortilla flat on a clean surface. Spoon a generous amount of the chicken mixture onto the center of the tortilla, spreading it to within an inch of the edges. Top the chicken mixture with fresh spinach leaves, diced tomatoes, and sliced green onions. -
Step 4
To roll, first fold in the sides of the tortilla over the filling. Then, starting from the bottom, tightly roll the tortilla upwards to create a snug wrap. Repeat this process for the remaining tortillas and filling. -
Step 5
Serve the wraps immediately. For an extra layer of texture and warmth, you can sear the assembled wraps: heat a dry non-stick skillet over medium heat, place the wraps seam-side down, and cook for 2-3 minutes per side until golden brown and slightly crispy.
Important Information
Nutrition Facts (Per Serving)
It is important to consider this information as approximate and not to use it as definitive health advice.
Allergy Information
Please check ingredients for potential allergens and consult a health professional if in doubt.

Leave a Comment