

Spooky Baked Halloween Chips are here to redefine your holiday snacking experience, offering a delightful and creative alternative to the usual sugary treats. As the leaves begin to turn and a crisp chill fills the air, our thoughts inevitably drift towards the enchantment of Halloween. While candy often takes center stage, I’m thrilled to introduce a savory sensation that’s not only incredibly fun to make but also visually captivating for your festive gatherings.
You might wonder about the origins of such a whimsical snack. While gourmet potato chips have a long and storied past, the idea of infusing them with the playful spirit of Halloween is a modern culinary tradition, born from a desire to make every part of our holiday celebrations truly special and homemade. This dish taps into the joy of crafting unique treats that bring smiles to faces, embodying the DIY spirit that makes Halloween so charming.
Why Everyone Will Love These Spooky Baked Halloween Chips
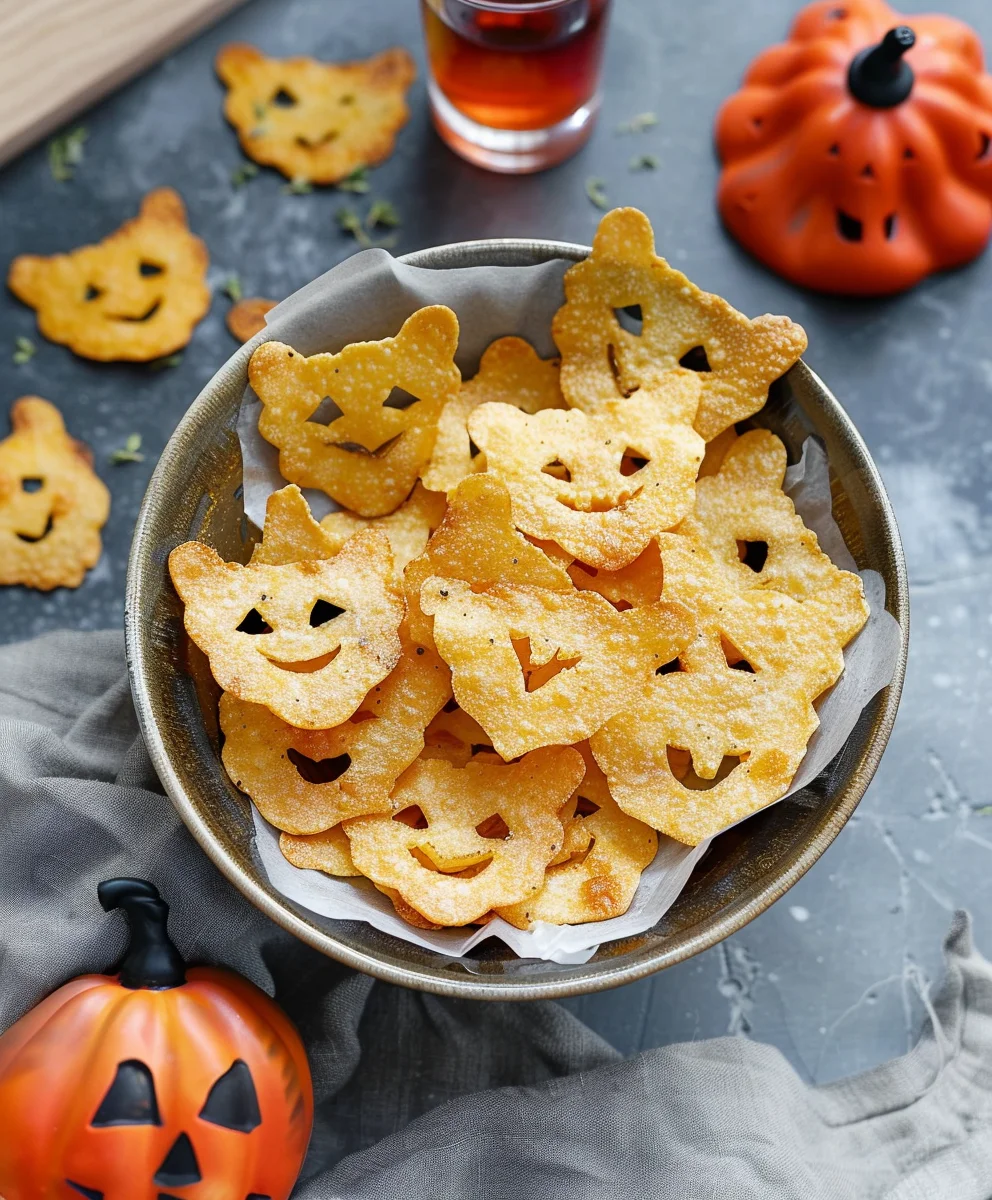
What makes these chips so beloved? It’s a combination of their irresistible crunch, customizable savory flavors, and, of course, their fantastic festive shapes! Imagine crisp, thinly sliced vegetables, artfully cut into ghosts, pumpkins, and bats, then perfectly baked to a golden, crunchy perfection. They offer a healthier, oven-baked alternative to deep-fried varieties, making them a guilt-free indulgence. They’re incredibly versatile, pairing wonderfully with various dips, and provide a fantastic way to engage kids in the kitchen. Get ready to impress your guests with a snack that’s as delicious as it is adorably eerie!

Ingredients:
- For the Spooky Baked Halloween Chips:
- 3-4 medium-sized Russet potatoes (about 2 pounds total), or a mix of Russet and Yukon Gold for varied texture and color. I find Russets give the best crispness, while Yukon Golds add a lovely golden hue.
- 2-3 tablespoons olive oil, or a neutral oil like grapeseed or avocado oil. I often use a spray bottle for even distribution, which is a fantastic trick!
- 1 teaspoon fine sea salt, plus more to taste. Don’t be shy with the salt; it really brings out the potato flavor.
- ½ teaspoon freshly ground black pepper.
- 1 teaspoon smoked paprika. This is my secret ingredient for that deep, mysterious flavor.
- ½ teaspoon garlic powder.
- ¼ teaspoon onion powder.
- Pinch of cayenne pepper (optional, for a subtle fiery kick – perfect for a “spooky” touch!).
- Halloween-themed mini cookie cutters (ghosts, bats, pumpkins, skulls, spiders). These are essential for our Halloween theme!
- Optional: For the Sinister Spinach Dip (My go-to for these chips!):
- 1 (10 ounce) package frozen chopped spinach, thawed and squeezed very dry. This step is critical; excess water will make your dip runny.
- 1 cup sour cream. Full-fat works best for creaminess.
- ½ cup mayonnaise. I prefer a good quality, creamy mayonnaise.
- 1 (8 ounce) package cream cheese, softened to room temperature. This helps avoid lumps.
- ¼ cup finely chopped fresh chives, or 1 tablespoon dried chives.
- 2 cloves garlic, minced very fine. I love the pungent kick fresh garlic adds.
- 1 tablespoon fresh lemon juice. This brightens the flavor considerably.
- ½ teaspoon salt, or to taste.
- ¼ teaspoon black pepper, or to taste.
- A few drops of green food coloring (optional, for an extra “swampy” effect – totally fun for Halloween!).
Gathering Your Ghoulish Gear and Prepping the Potatoes
Preheat Your Oven and Prepare Your Haunting Grounds: First things first, let’s get that oven ready for some serious baking. Preheat your oven to a chilling 400°F (200°C). While it’s warming up, line two large baking sheets with parchment paper. This is a game-changer for preventing sticking and making cleanup an absolute breeze, which means more time for Halloween fun! I always make sure the parchment paper lies flat to ensure even cooking of our precious chips.
Washing and Scrubbing Your Rooty Beasts: Grab your Russet potatoes. Give them a really good scrub under cold running water to remove any dirt or eyes. I personally like to leave the skins on; they add a rustic texture and a little extra nutritional oomph, plus it saves a step! If you prefer a smoother chip, feel free to peel them, but I encourage you to try them with the skins – it’s a difference-maker for homemade chips.
Slicing for Supernatural Thinness: This is arguably the most crucial step for achieving perfectly crispy chips. We’re aiming for paper-thin slices, about 1/16 to 1/8 inch thick. My absolute favorite tool for this is a mandoline slicer. It creates incredibly uniform slices quickly and safely (just be sure to use the safety guard!). If you don’t have a mandoline, a very sharp knife and a steady hand will work, but take your time. Inconsistent thickness means some chips will burn while others remain chewy, and we definitely don’t want that on our spooky snack platter! The thinner they are, the crispier they’ll become, which is the ultimate goal for any chip enthusiast like myself.
The Sacred Water Bath (and Why It’s Vital): As soon as you slice the potatoes, immediately place them into a large bowl filled with ice-cold water. This isn’t just for fun; it’s a critical step! Soaking the potato slices for at least 30 minutes, or up to 2 hours, helps to draw out excess starch. Less starch means crispier chips and a beautiful golden-brown color during baking. You might even see the water get cloudy – that’s the starch leaving the potatoes, doing its job! I sometimes change the water halfway through if I’m soaking for a longer period.
Drying for Dreadful Crispness: After their chilly bath, drain the potatoes thoroughly. Then, spread them out in a single layer on clean kitchen towels or several layers of paper towels. Pat them VERY DRY. This step cannot be emphasized enough. Any residual moisture will steam the potatoes instead of baking them to a crisp, resulting in soggy chips. I often use a second layer of dry towels to ensure every last drop of water is absorbed. This meticulous drying is the secret handshake to chip perfection!
Seasoning Your Spooky Slices
The Ominous Oiling: Transfer the perfectly dried potato slices back into a large, clean bowl. Drizzle them with 2-3 tablespoons of olive oil. Now, gently toss them with your hands until every single slice is lightly coated. My personal trick here is to use a clean spray bottle with oil; it gives a super even, fine mist that coats without oversaturating, ensuring maximum crispness. We’re looking for a thin, even layer, not swimming in oil!
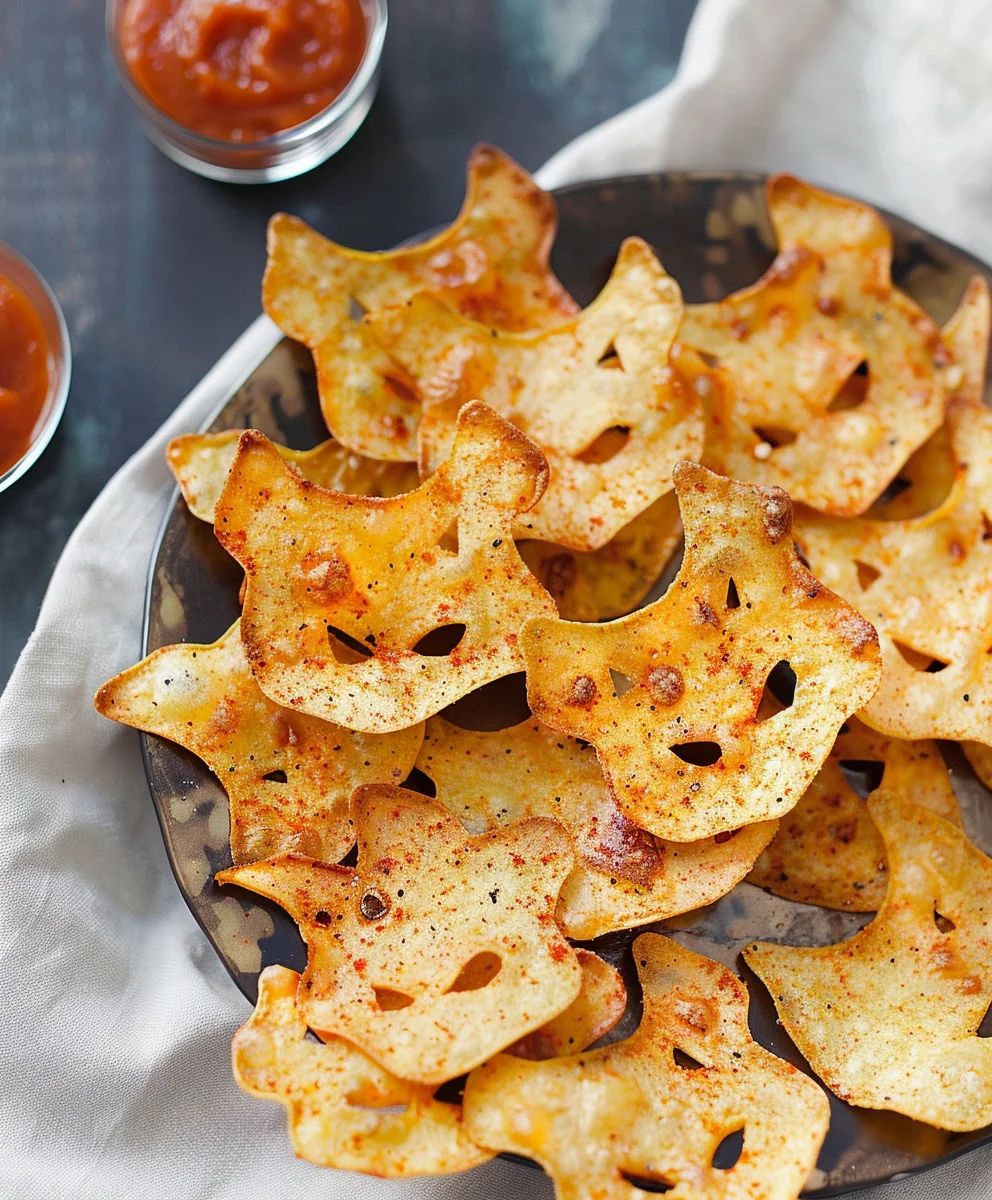
The Enchanted Spice Blend: In a small separate bowl, whisk together the sea salt, black pepper, smoked paprika, garlic powder, onion powder, and the optional pinch of cayenne pepper. This creates a beautifully balanced and slightly mysterious seasoning blend that perfectly complements the earthy potatoes. The smoked paprika truly adds an indescribable depth, a kind of campfire ghost story flavor, if you will!
Seasoning with Spectral Precision: Sprinkle half of the spice blend over the oiled potato slices. Toss again gently, ensuring the spices adhere evenly. Then, add the remaining spice blend and toss one more time. You want every chip to be a canvas for these flavors. This method ensures every bite is bursting with our Halloween-inspired seasoning.
Crafting Your Creepy Cutouts
The Macabre Cookie Cutters: Now for the fun, Halloween-themed part! Take your seasoned potato slices and, using your Halloween-themed mini cookie cutters (ghosts, bats, pumpkins, skulls, spiders), cut out shapes from the center of each slice. I find it easiest to press the cutter firmly into the potato slice on a flat surface, then gently wiggle it to release the shape. The potato scraps left over? Don’t toss them! You can bake these alongside your shaped chips; they’ll make excellent little “nibbles” for the cook, or just simple, rustic chips.
Arranging Your Apparitions: Carefully arrange the cut-out potato shapes in a single layer on your prepared baking sheets. It is absolutely crucial that they do not overlap. If they touch, they’ll steam rather than crisp, and we want crunchy chips, not sad, limp ones! Give each spooky shape a little breathing room. If you have a lot of potatoes, you might need to work in batches, or use additional baking sheets. Patience here will be rewarded with superior texture.
Baking Your Bewitching Bites
The First Incantation (Bake Time): Place the baking sheets into your preheated 400°F (200°C) oven. Bake for 15-20 minutes, or until the edges just begin to curl and turn a light golden brown. Oven temperatures can vary, so keep a watchful eye on them, especially during the last few minutes. I often rotate the baking sheets halfway through this first phase to ensure even cooking from front to back.
The Great Flip and Second Spell: After the initial bake, carefully remove the baking sheets from the oven. Using a thin spatula or tongs, flip each chip over. This ensures even browning and crisping on both sides. Return them to the oven and continue baking for another 10-15 minutes, or until they are deeply golden brown and wonderfully crispy.Pro Tip: Listen to Your Chips!
As they get closer to being done, you’ll hear a subtle sizzling sound and they’ll become visibly firmer. If some chips are crisping faster than others, don’t hesitate to remove them individually and allow the slower ones to continue baking. Over-baking even a few chips can lead to bitterness, while under-baking results in chewiness. This phase requires your full attention; they can go from perfectly golden to burnt in a matter of seconds!
The Cooling Charm: Once baked to perfection, remove the chips from the oven and immediately transfer them to a wire cooling rack. This allows air to circulate around them, preventing them from becoming soggy from residual heat. As they cool, they will become even crispier. Resist the urge to stack them while hot! I find the waiting is the hardest part, but it’s worth it for that satisfying crunch.
Optional: Unleashing Your Inner Alchemist – A Dip for Your Dreadful Delights
For the Sinister Spinach Dip (a perfect pairing!):
- 1 (10 ounce) package frozen chopped spinach, thawed and squeezed very dry.
- 1 cup sour cream.
- ½ cup mayonnaise.
- 1 (8 ounce) package cream cheese, softened to room temperature.
- ¼ cup finely chopped fresh chives.
- 2 cloves garlic, minced very fine.
- 1 tablespoon fresh lemon juice.
- ½ teaspoon salt, or to taste.
- ¼ teaspoon black pepper, or to taste.
- A few drops of green food coloring (optional, for that extra “swamp monster” vibe!).
Preparing the Sinister Spinach Dip:
The Squeeze of Destiny for Spinach: Begin by making absolutely certain your thawed frozen spinach is as dry as a desert bone. Place it in a clean kitchen towel or several layers of paper towels and squeeze out every single drop of excess water. This step is non-negotiable for a thick, creamy dip. I often twist and wring it with all my might to get rid of every bit of moisture; you’d be surprised how much water comes out!
The Concoction of Creaminess: In a medium-sized mixing bowl, combine the softened cream cheese, sour cream, and mayonnaise. Using an electric mixer (or a sturdy whisk and some elbow grease), beat these ingredients together until the mixture is completely smooth and free of any lumps. The softened cream cheese is key here for a silky texture. I beat it for about 2-3 minutes until it’s light and airy.
Infusing the Forbidden Flavors: Add the super dry spinach, minced garlic, chopped chives, fresh lemon juice, salt, and black pepper to the creamy mixture. If you’re feeling particularly festive and want to enhance the “sinister” look, now is the time to add a few drops of green food coloring. Stir everything together thoroughly until all the ingredients are well combined and the color (if using food coloring) is uniform.
The Chilling Charm: Cover the bowl with plastic wrap and refrigerate the dip for at least 1 hour. This allows the flavors to meld and deepen, making for a much more delicious and harmonious dip. The wait is truly worth it; it transforms from a simple mixture to a truly magical accompaniment.
Serving Your Spooky Baked Halloween Chips
The Grand Reveal: Once your Spooky Baked Halloween Chips are completely cooled and crispy, transfer them to a festive serving platter. Arrange them artfully, perhaps mingling the different shapes (ghosts alongside bats, pumpkins next to skulls) to create a truly captivating display for your Halloween gathering. I love to scatter a few extra sprigs of fresh parsley or dill for a pop of color, making them look even more enticing.
Presenting the Sinister Dip: If you made the Sinister Spinach Dip, spoon it into a decorative bowl. You can even create a “web” design on top with a little sour cream in a piping bag, or sprinkle some extra chives for garnish. Place the dip bowl right in the center of your chip platter, or alongside it, ready for dipping. The contrasting textures and flavors are a match made in a haunted heaven!
Enjoying Your Edible Eerie Art: Serve immediately and watch them disappear! These chips are best enjoyed fresh, when they are at their absolute crispiest. The satisfying crunch combined with the savory, smoky seasoning is utterly addictive. Your guests will be absolutely enchanted by these homemade Halloween treats.
Storing Any Surviving Spirits: In the unlikely event that you have any leftovers (which rarely happens in my experience!), store the cooled chips in an airtight container at room temperature for up to 2-3 days. While they might lose a little of their initial crispness, a quick refresh in a 300°F (150°C) oven for about 5-7 minutes can bring some of that crunch back. The dip, on the other hand, will keep well in an airtight container in the refrigerator for 3-4 days. This recipe is a fantastic way to elevate your Halloween snack game and create something truly memorable and delicious for your family and friends.
Conclusion:
Well, my friends, we’ve reached the end of our culinary journey, and I genuinely hope you’re feeling as excited as I am about trying out this incredible recipe. What makes these particular chips an absolute game-changer for your autumn festivities, you ask? It’s simple: they effortlessly combine health-consciousness with undeniable flavor and whimsical fun. Imagine the delight on faces young and old as they encounter a platter filled with perfectly crisp, uniquely shaped snacks that are not only delicious but also incredibly vibrant and festive. These aren’t just any chips; they’re a statement, a conversation starter, and a testament to how creative and engaging healthy eating can be. They offer that satisfying crunch we all crave, but without the guilt often associated with deep-fried alternatives. The ease of preparation means you can whip up a batch (or several!) without breaking a sweat, leaving you more time to enjoy the party and less time slaving away in the kitchen. For parents looking for a clever way to sneak some veggies into their kids’ diets, this recipe is a true hero. For hosts wanting to impress with something homemade and memorable, it’s a shining star. The sheer versatility and visual appeal of these chips make them an undeniable must-try for any festive gathering, offering a delightful alternative to traditional snacks.
Now, let’s talk about taking your chip game to the next level. While these chips are absolutely delightful on their own, dipping them instantly elevates the experience to new heights. Think creamy, vibrant guacamole, a chunky fresh salsa bursting with garden-fresh flavors, or even a warm, gooey cheese dip for an extra indulgent touch that’s always a crowd-pleaser. Don’t stop there! Consider a cool and tangy Greek yogurt dip seasoned with fresh herbs like dill and chives, or a smoky chipotle aioli for a subtle yet satisfying kick. For those who prefer a sweeter profile, try sprinkling a little cinnamon sugar on a batch of sweet potato shapes before baking – then serve with a light fruit dip or even some freshly whipped cream for a dessert-like snack. When it comes to presentation, get creative! Arrange your beautiful shapes on a large, themed platter alongside other Halloween treats like mini mummy hotdogs or spiderweb brownies for a truly impressive spread. You could even use them as edible garnishes for a festive punch bowl, adding both flavor and visual interest.
Serving & Variation Ideas to Spark Your Imagination!
- The Dip Duo: Always offer at least two types of dips. A fresh, zesty avocado dip and a rich, smoky black bean dip provide wonderful contrast and cater to different palates, ensuring there’s something for everyone.
- Spice it Up: Experiment with different spice blends before baking. A sprinkle of smoked paprika, a pinch of cumin, or even a dash of cayenne pepper can transform the flavor profile entirely, adding depth and warmth. For an earthy and aromatic touch, finely chopped fresh rosemary or thyme can be added to the olive oil before tossing with the vegetable shapes.
- Veggie Swap: Don’t limit yourself to just potatoes. Consider thinly sliced beets for a deep crimson hue and earthy flavor, parsnips for a subtle sweetness and delicate texture, or even a mix of root vegetables for a colorful and flavorful medley that’s visually stunning. Each vegetable will bring its own unique flavor and texture to the party.
- Cheese Please: For a quick and easy Halloween appetizer that’s sure to be devoured, pile your freshly baked chips onto an oven-safe plate, sprinkle generously with shredded cheddar and Monterey Jack cheese, and pop them back into the oven for a few minutes until the cheese is perfectly melted and bubbly. Top with a dollop of sour cream and a sprinkle of fresh chives for impromptu “Spooky Nachos” that are far healthier than their fried counterparts.
- Sweet Treat Twist: As mentioned, a sweet version is fantastically fun and unique. Try using sweet potatoes or even thinly sliced apple rounds (coated lightly in olive oil, then a mixture of cinnamon sugar) for a healthier, baked “apple chip” alternative that still fits the spooky theme beautifully!
I truly can’t wait for you to experience the joy of making these Spooky Baked Halloween Chips yourself. There’s something so satisfying about pulling a tray of perfectly golden, crispy, and creatively shaped snacks out of the oven, knowing you’ve crafted something special and delicious from scratch. This isn’t just about following a recipe; it’s about creating cherished memories, adding a touch of magic and festivity to your gatherings, and savoring the simple pleasure of good food shared with loved ones. So, gather your ingredients, fire up your oven, and prepare to be amazed by the delightful results. Once you’ve tried them, please, please share your culinary triumphs and experiences with me! I absolutely adore seeing your creations and hearing about your adventures in the kitchen. Did you try a new spice blend that was a hit? Discover a fantastic new dip pairing? Or perhaps you invented a brand new spooky shape that was the talk of the party? Tag me on social media, leave a comment below, or send me a photo. Let’s build a community of delicious Halloween fun together, celebrating creativity and flavor. Happy baking, and happy haunting!
Easy Spooky Baked Halloween Chips
Redefine your holiday snacking experience with these delightful and creative Spooky Baked Halloween Chips. This recipe offers a fun, savory, and visually captivating alternative to sugary treats, perfect for festive gatherings.
Ingredients
-
4 flour tortillas (gluten-free or grain-free, as needed)
-
Spray avocado or olive oil
-
Salt
-
Halloween cookie cutter
Instructions
-
Step 1
Preheat oven to 400°F (200°C). Line baking sheets with parchment paper. -
Step 2
Using Halloween cookie cutters, cut festive shapes from the flour tortillas. -
Step 3
Arrange the cut tortilla shapes in a single layer on the prepared baking sheets, ensuring they do not overlap. -
Step 4
Lightly spray the tortilla shapes with avocado or olive oil, then sprinkle evenly with salt. -
Step 5
Bake for 8-12 minutes, or until the chips are crisp and lightly golden. Monitor closely as tortillas can brown quickly. -
Step 6
Immediately transfer the baked chips to a wire rack to cool completely, which will enhance their crispness before serving.
Important Information
Nutrition Facts (Per Serving)
It is important to consider this information as approximate and not to use it as definitive health advice.
Allergy Information
Please check ingredients for potential allergens and consult a health professional if in doubt.

Leave a Comment