

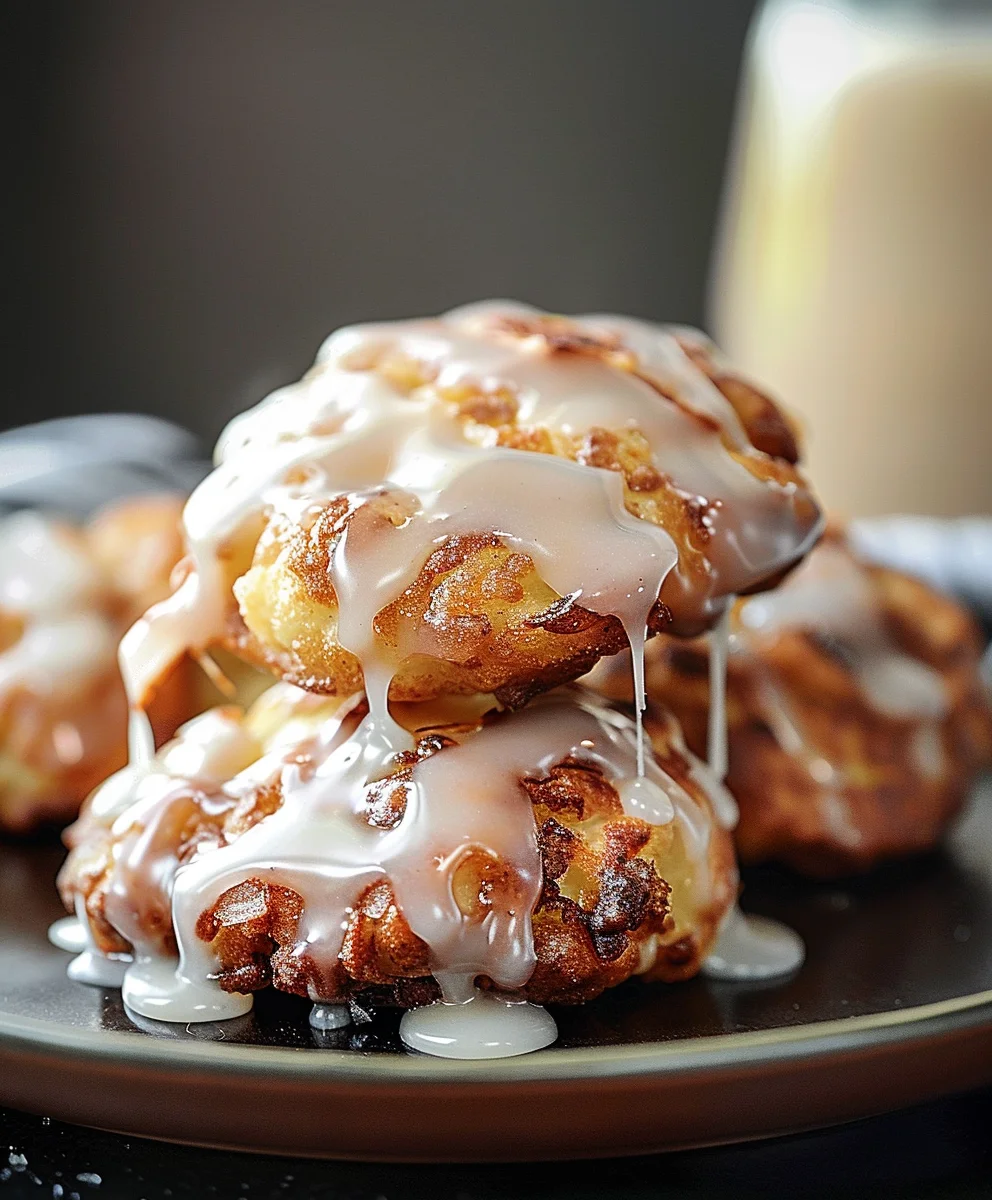
Baked Apple Fritters With Glaze – a phrase that immediately conjures images of cozy kitchens, warm spices, and a delightful treat that’s perfect for any time of day. I truly believe there’s nothing quite like the comforting aroma of apples and cinnamon wafting through your home, especially when it leads to a batch of these golden-brown beauties. While traditional apple fritters are often deep-fried, I’ve always leaned towards a baked version for its lighter touch and less messy preparation, making it a fantastic option for home cooks who crave that classic flavor without the fuss. This beloved dessert, with roots stretching back to various European traditions, has evolved into a global favorite, often enjoyed at harvest festivals or as a delightful breakfast pastry.
Why People Adore These Baked Apple Fritters With Glaze
People absolutely adore this dish for so many reasons. The irresistible combination of tender, slightly tart apple pieces nestled in a soft, cake-like dough provides an exquisite contrast to the sweet, delicate glaze that coats each one. The gentle baking process ensures a wonderfully moist interior and a slightly crisp exterior, delivering a textural experience that’s truly unforgettable. It’s this perfect balance of sweet, spiced, and comforting that makes Baked Apple Fritters With Glaze an undeniable crowd-pleaser, whether served for brunch, an afternoon snack, or a delightful dessert. Get ready to fall in love with your new favorite apple treat!

Ingredients:
- For the Baked Apple Fritters:
- 2 cups (240g) All-Purpose Flour: I always reach for unbleached, but whatever you have on hand will work beautifully.
- 2 teaspoons Baking Powder: This is our secret to fluffy, light fritters without deep frying.
- 1 teaspoon Ground Cinnamon: Essential for that classic apple fritter flavor. Feel free to add a little extra if you’re a cinnamon fiend like me!
- ½ teaspoon Ground Nutmeg: A warm, aromatic complement to the cinnamon and apples.
- ¼ teaspoon Salt: Just a pinch to balance all those wonderful sweet flavors.
- ½ cup (100g) Granulated Sugar: For the perfect amount of sweetness in the batter.
- ¼ cup (50g) Packed Light Brown Sugar: This adds a lovely molasses note and helps keep our fritters moist.
- 1 large Egg: Make sure it’s at room temperature for the best emulsion with our other wet ingredients.
- ¾ cup (180ml) Milk: Any milk will do, whether it’s whole, 2%, or even a non-dairy alternative. Room temperature is ideal.
- ¼ cup (60g) Unsalted Butter, melted and slightly cooled: This adds richness and moisture to our fritters. Melting it and letting it cool slightly prevents it from scrambling the egg.
- 1 teaspoon Vanilla Extract: A crucial flavor enhancer that brings everything together.
- 2 large Apples (about 1 ½ cups diced): I love using a mix of Granny Smith for tartness and Honeycrisp or Fuji for sweetness and texture. Peeled, cored, and finely diced, please!
- For the Simple Vanilla Glaze:
- 1 ½ cups (180g) Powdered Sugar (Confectioners’ Sugar): Make sure it’s sifted to avoid any lumps in your smooth glaze.
- 2-3 tablespoons Milk or Cream: Start with 2 tablespoons and add more, ½ teaspoon at a time, until you reach your desired consistency. Whole milk or heavy cream will give you a richer glaze.
- ½ teaspoon Vanilla Extract: To infuse our glaze with that classic sweet aroma.
- A tiny pinch of Salt: Again, just a whisper to cut the sweetness and enhance the other flavors.
Preparing Your Delicious Baked Apple Fritters:
-
Preheating and Preparing Your Baking Sheets:
First things first, let’s get our oven ready to welcome these beauties! Preheat your oven to 375°F (190°C). While it’s heating up, grab two large baking sheets and line them with parchment paper. This step is super important for easy cleanup and ensures your fritters don’t stick. Trust me, nobody wants a sticky situation when warm fritters are involved!
-
Preparing Our Star Ingredient – The Apples:
Now for the apples! I usually pick out two large apples, aiming for a total of about 1 ½ cups once they’re diced. Start by peeling them carefully. I find a good swivel peeler makes this task a breeze. Next, core the apples and then dice them into small, approximately ¼-inch pieces. The key here is consistency in size! Smaller, uniform pieces ensure that every bite of your fritter gets a lovely apple burst and that they cook evenly within the batter. Larger chunks might make your fritters fall apart or cook unevenly. Once diced, you can set them aside. If you’re particularly worried about browning, a quick toss with a teaspoon of lemon juice will do the trick, but honestly, with the speed we’re moving, it’s usually not necessary.
-
Whisking Together the Dry Ingredients:
In a large mixing bowl, we’re going to combine all our dry ingredients. Add the 2 cups of all-purpose flour, 2 teaspoons of baking powder, 1 teaspoon of ground cinnamon, ½ teaspoon of ground nutmeg, and ¼ teaspoon of salt. I like to give these a good whisk for about 30 seconds to a minute. This isn’t just about mixing them; it also helps to aerate the flour and ensures that the baking powder and spices are evenly distributed throughout. Even distribution of leavening agents is crucial for a consistent rise! Set this bowl aside for a moment.
-
Mixing the Wet Ingredients for the Batter:
In a separate, medium-sized bowl, we’ll bring our wet ingredients together. Crack in the large egg (remember, room temperature is best!), then pour in the ¾ cup of milk, the ¼ cup of melted and slightly cooled unsalted butter, and 1 teaspoon of vanilla extract. Give these a good whisk until they are thoroughly combined and smooth. We’re aiming for a homogenous mixture here, where no streaks of egg or butter are visible. This ensures that when we add it to our dry ingredients, everything incorporates beautifully.
-
Combining Wet and Dry Ingredients, and Folding in the Apples:
Now it’s time to bring our two mixtures together! Pour the wet ingredient mixture into the bowl with your dry ingredients. Add the ½ cup of granulated sugar and the ¼ cup of packed light brown sugar directly into the bowl. With a rubber spatula or a wooden spoon, gently mix everything until just combined. The cardinal rule here is: do not overmix! Overmixing develops the gluten in the flour too much, which can lead to tough, chewy fritters – and we’re going for light and tender. A few lumps in the batter are perfectly fine. Once it’s mostly combined, gently fold in your diced apples. Ensure they are evenly distributed throughout the batter.
-
Shaping and Arranging Your Fritters:
With our batter ready, it’s time to transform it into those beautiful, rustic fritter shapes. Using two spoons, or even a small ice cream scoop (I find a 1 ½ tablespoon scoop works wonders!), drop spoonfuls of the batter onto your prepared baking sheets. Aim for about ¼ cup of batter per fritter. You’ll want to leave about 2 inches of space between each fritter to allow them to spread and bake evenly without touching. Don’t worry about them being perfectly round; the charm of a fritter lies in its irregular, craggy edges, which also provide more surface area for that delicious glaze! You should get about 12-14 fritters from this batch.
-
Baking Our Apple Fritters to Golden Perfection:
Carefully place your baking sheets into the preheated oven. Bake for 18-22 minutes, or until the fritters are beautifully golden brown around the edges and on top, and feel firm to the touch when gently pressed. Around the halfway point (about 10 minutes in), I like to rotate my baking sheets and swap their positions in the oven (top to bottom, and turn them around) to ensure even baking. Every oven is a little different, so keep an eye on them. When they’re done, the aroma filling your kitchen will be absolutely heavenly!
-
Cooling Your Baked Apple Fritters:
Once baked, carefully remove the fritters from the oven. Let them cool on the baking sheets for about 5 minutes. This brief cooling period helps them to firm up slightly. After 5 minutes, transfer them to a wire rack to cool completely. While it’s tempting to glaze them hot, it’s best to let them cool down to at least warm, or even room temperature. If they’re too hot, the glaze will simply melt and run off, leaving you with less of that glorious sugary coating. Patience is a virtue, my friends!
For the Irresistible Glaze:
-
Preparing the Glaze Ingredients:
While your fritters are cooling, let’s whip up that essential glaze. In a medium-sized bowl, measure out your 1 ½ cups of powdered sugar. Seriously, take a moment to sift it! This small extra step makes a huge difference in achieving a super smooth, lump-free glaze. Trust me, biting into a crunchy lump of sugar in your glaze is not the experience we’re going for. Add the ½ teaspoon of vanilla extract and the tiny pinch of salt to the sifted powdered sugar.
-
Mixing to the Perfect Glaze Consistency:
Now, start by adding 2 tablespoons of milk or cream to the bowl. Using a whisk, mix everything together. You’ll notice it will be quite thick at first. Continue to whisk, gradually adding the remaining milk or cream, ½ teaspoon at a time, until you reach your desired consistency. What are we looking for? A glaze that is thick enough to coat the back of a spoon, but still pourable. It should be opaque and smooth, without any lumps. If you accidentally add too much liquid and it becomes too thin, simply whisk in a little more sifted powdered sugar until it thickens up. If it’s too thick, add a tiny bit more milk. This part is all about feeling it out and adjusting!
Glazing and Serving Your Baked Apple Fritters:
-
The Glazing Process:
Once your fritters have cooled sufficiently (they should be just warm, or even at room temperature), it’s time for the grand finale – glazing! You have a couple of options here, depending on your preference.
- For a full, generous coating: Take each cooled fritter and gently dip its top half into the glaze. Lift it out, letting any excess glaze drip back into the bowl for a few seconds.
- For a more rustic, drizzled look: You can simply use a spoon to generously drizzle the glaze over the tops of the fritters while they are still on the wire rack. Be sure to place a piece of parchment paper or foil underneath the rack to catch any drips and make cleanup a breeze.
I personally love dipping them because it ensures every nook and cranny gets covered, but drizzling creates a beautiful visual too!
-
Allowing the Glaze to Set:
After glazing, arrange your fritters back on the wire rack (with the parchment underneath if you’re drizzling) and let the glaze set. This usually takes about 10-15 minutes, depending on the thickness of your glaze and the humidity in your kitchen. You’ll know it’s set when the glaze no longer feels sticky to the touch and has a slightly firm, matte finish. Allowing the glaze to fully set is crucial for the best texture and to avoid sticky fingers!
-
Serving and Storage Suggestions:
Your Baked Apple Fritters With Glaze are now ready to be devoured! I find these are absolutely divine when enjoyed slightly warm, perhaps with a cup of coffee or tea. The warm spices and tender apples create a truly comforting treat. These fritters are best enjoyed on the day they are made for peak freshness and texture. However, if you happen to have any leftovers (a rare occurrence in my house!), you can store them in an airtight container at room temperature for up to 2 days. To refresh them, a quick 10-minute warm-up in a low oven (around 300°F/150°C) can bring back some of their original glory. But truly, nothing beats them fresh from the oven, still slightly warm with that glistening, set glaze. They are such a wonderful alternative to their fried counterparts, offering all the flavor with a lighter touch. Happy baking!

Conclusion:
If there’s one recipe I could urge you to try this week, it would undoubtedly be this one. I’ve shared many culinary adventures with you, but few bring the sheer joy and comforting satisfaction that these particular fritters deliver. This isn’t just another sweet treat; it’s an experience. Imagine sinking your teeth into a perfectly tender, warmly spiced apple fritter, fresh from the oven, with that irresistible, sweet glaze melting ever so slightly into every nook and cranny. It’s a sensation that truly awakens the senses and wraps you in a blanket of homemade bliss. The beauty of this recipe lies not only in its incredible flavor but also in its surprising simplicity and the delightful fact that it’s baked, offering all the joy of a traditional fritter without the mess and added fat of deep-frying. You’re getting all the delightful textures—the soft, apple-studded interior, the slightly crisp edge, and the smooth, sugary finish—in a much more approachable package. It’s perfect for those lazy weekend mornings, a thoughtful treat for an afternoon gathering, or even a comforting dessert to round off a cozy evening.
When it comes to serving, these fritters are at their absolute best warm. I highly recommend enjoying them almost immediately after they’ve cooled enough for the glaze to set. For a truly indulgent breakfast or brunch, pair them with a robust cup of coffee or a steaming mug of spiced chai. They also make an unforgettable dessert; imagine a warm fritter nestled beside a scoop of vanilla bean ice cream, the cold cream slowly melting into the warm pastry, creating a symphony of temperatures and textures. A dollop of freshly whipped cream or a drizzle of homemade caramel sauce would also elevate them to an even higher level of decadence. Don’t hesitate to get creative!
And speaking of creativity, this recipe is wonderfully forgiving and adaptable. While the cinnamon-apple combination is a timeless classic, feel free to experiment with other spices like a pinch of nutmeg, cardamom, or even a dash of allspice for a more complex flavor profile. You could also vary the fruit; imagine pear fritters with a hint of ginger, or even mixed berry fritters for a vibrant summer twist. For those who love a bit of crunch, gently fold in some toasted chopped pecans or walnuts into the batter before baking. The glaze itself offers endless possibilities too. A touch of lemon zest in the glaze can add a bright, zesty counterpoint to the sweetness, or a hint of maple extract could transform it into a maple-glazed masterpiece. For a creamier finish, try a simple cream cheese glaze. The core recipe for these Baked Apple Fritters With Glaze is incredibly versatile, allowing you to tailor them to your specific tastes and seasonal availability.
I truly hope that you’ll take the leap and try this recipe for yourself. There’s an immense satisfaction that comes from creating something so utterly delicious from scratch, something that brings smiles to the faces of those you share it with. Don’t be intimidated; the process is straightforward, and the rewards are immeasurable. Once you’ve experienced the warm aroma filling your kitchen and the exquisite taste of your very own homemade fritters, you’ll understand why I’m so excited about them. Please, when you do make them, come back and share your experience with me! Let me know about your favorite variations, your serving suggestions, or simply how much you enjoyed them. Your feedback and stories are what truly make this culinary journey so special for all of us. Happy baking, my friends, and enjoy every single delightful bite!
Baked Apple Fritters with Glaze – Easy & Delicious Recipe!
A lighter, baked version of classic apple fritters, featuring tender apple pieces in a soft, cake-like dough, topped with a sweet vanilla glaze. Perfect for breakfast, brunch, or dessert.
Ingredients
-
2 medium firm apples (Granny Smith or Honeycrisp), peeled, cored, and diced
-
1 1/2 cups all-purpose flour
-
1 1/2 teaspoons baking powder
-
1 teaspoon ground cinnamon
-
1/4 teaspoon ground nutmeg
-
1/2 cup granulated sugar
-
1/2 cup milk
-
1 large egg
-
1 teaspoon vanilla extract
-
1 cup powdered sugar
-
1 tablespoon fresh lemon juice
-
1-2 teaspoons water (adjust for consistency)
Instructions
-
Step 1
Preheat oven to 375°F (190°C). Line baking sheets with parchment paper. -
Step 2
Peel, core, and finely dice 2 medium apples. -
Step 3
In a large bowl, whisk together 1 1/2 cups all-purpose flour, 1 1/2 teaspoons baking powder, 1 teaspoon ground cinnamon, and 1/4 teaspoon ground nutmeg. -
Step 4
In a separate bowl, whisk together 1/2 cup granulated sugar, 1/2 cup milk, 1 large egg, and 1 teaspoon vanilla extract until smooth. -
Step 5
Pour wet ingredients into dry, mixing gently until just combined. Fold in diced apples. -
Step 6
Drop 1/4 cup portions of batter onto prepared baking sheets, spacing 2 inches apart. -
Step 7
Bake for 18-22 minutes at 375°F (190°C), or until golden brown and firm. Rotate baking sheets halfway through. -
Step 8
Cool fritters on baking sheets for 5 minutes, then transfer to a wire rack to cool completely. -
Step 9
For the glaze: In a medium bowl, whisk together 1 cup powdered sugar, 1 tablespoon fresh lemon juice, and 1 teaspoon of water. Add more water (1/2 teaspoon at a time) until thick but pourable. -
Step 10
Dip tops of cooled fritters into glaze, or drizzle over them. Place on wire rack with parchment underneath to allow glaze to set for 10-15 minutes. -
Step 11
Serve immediately or store in an airtight container at room temperature for up to 2 days.
Important Information
Nutrition Facts (Per Serving)
It is important to consider this information as approximate and not to use it as definitive health advice.
Allergy Information
Please check ingredients for potential allergens and consult a health professional if in doubt.


Leave a Comment