

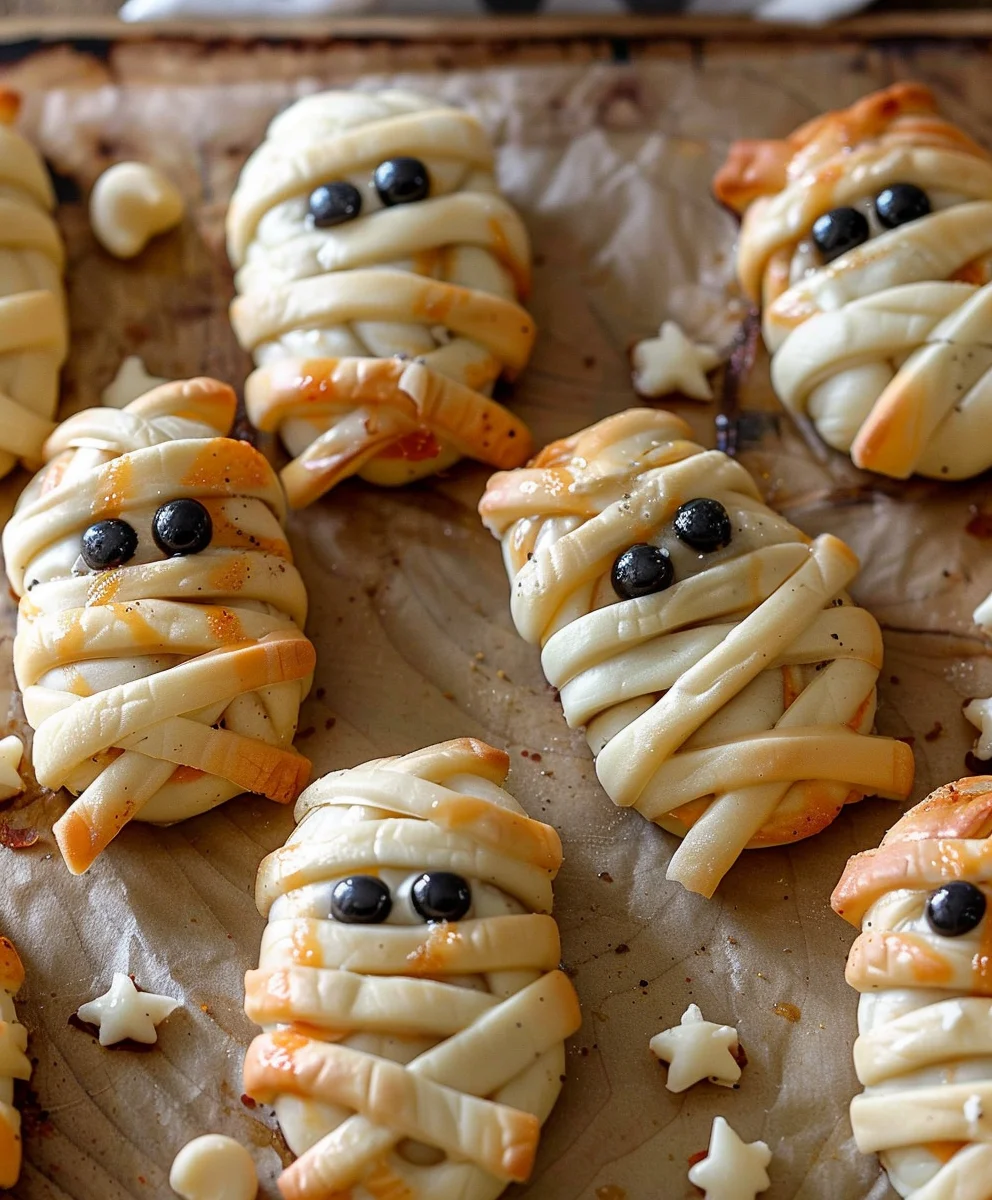
Baked Cheese Mummies are here to steal the spotlight at your next gathering, transforming simple ingredients into an irresistibly fun and delicious treat! As autumn leaves begin to fall and thoughts turn to festive celebrations, few dishes capture the spirit of playful indulgence quite like these adorable, savory snacks. I’ve personally witnessed the sheer delight on faces, young and old, as these golden-brown, cheesy creations emerge from the oven, promising a gooey, warm bite of happiness. While they may not boast ancient origins in a historical text, their modern cultural significance lies firmly rooted in our love for themed parties, cozy movie nights, and especially Halloween festivities, where they become the undisputed stars of the appetizer table.
What truly makes this dish a perennial favorite? It’s the magical combination of textures and flavors – the comforting warmth, the salty embrace of the ‘mummy’ wrapping, and that gloriously melted cheese center that stretches with every pull. Beyond their charming appearance, Baked Cheese Mummies are celebrated for their incredible convenience and ease of preparation, making them a stress-free option for busy hosts. They offer a perfect balance of savory satisfaction and whimsical charm, ensuring that every bite is not just delicious, but also a memorable part of the celebration. Get ready to wrap up some fun!

Ingredients:
-
2 sheets (approximately 17.3 oz total) store-bought frozen puff pastry, thawed according to package instructions
-
8 ounces block cheese of your choice (I love a good sharp cheddar, Monterey Jack, or even a mix of mozzarella and cheddar for ultimate meltiness!)
-
1 large egg, for egg wash
-
1 tablespoon water or milk, for egg wash
-
5-6 large black olives, pitted, for the mummy eyes
-
1-2 tablespoons all-purpose flour, for dusting your work surface
Equipment You’ll Need:
-
Large baking sheets
-
Parchment paper
-
Sharp knife or pizza cutter
-
Cutting board
-
Small bowl
-
Pastry brush
-
Grater (if your cheese isn’t already shredded)
-
Wire cooling rack
Preparing Your Workspace and Ingredients:
-
First things first, let’s get that oven preheating! I always set mine to 400°F (200°C). This ensures it’s nice and hot when our mummies are ready to bake, giving that beautiful puff pastry its best chance to rise.
-
Next, grab your baking sheets. I usually line two large ones with parchment paper. This prevents sticking and makes cleanup a breeze – trust me, you’ll thank yourself later!
-
Now, let’s talk about the star of the show: your puff pastry. If it’s still frozen, make sure it’s properly thawed. I usually let mine sit on the counter for about 30-40 minutes, or until it’s pliable but still cold. Don’t let it get too warm, as it becomes sticky and much harder to work with. Keep it cold, friends, that’s key to good puff!
-
While the pastry is thawing, let’s get the cheese ready. If you’re using a block, grate it up. I find that grated cheese melts more evenly and distributes better within the pastry. Aim for about 8 ounces, which is roughly 2 cups of shredded cheese. Feel free to use any cheese that melts well; I’ve had great success with a sharp cheddar for a bold flavor or a simple mozzarella for classic stretchiness.
-
In a small bowl, whisk together your egg and a tablespoon of water or milk to create an egg wash. This magical mixture will give our mummies a beautiful golden sheen and help them brown perfectly in the oven. Set it aside for now, we’ll use it just before baking.
-
Finally, prepare your black olives. These are for the mummy eyes! I like to slice them into very small, thin rounds or even tiny half-moon shapes. You’ll need about 10-12 tiny pieces in total, two for each mummy. Precision isn’t paramount here; they’re supposed to look a little spooky and mismatched!
Crafting the Mummy Bodies:
-
Lightly flour your work surface and carefully unroll one sheet of the thawed puff pastry. If it feels a little stiff, gently roll it out with a rolling pin just enough to smooth any creases and make it a bit more even. We want it to be roughly 9×12 inches, or whatever size your store-bought sheet typically is.
-
Using a sharp knife or a pizza cutter (my preferred tool for this!), cut the pastry sheet into 6 equal rectangles. For typical pastry sheets, this usually means cutting it in half lengthwise, then cutting each half into three sections. Each rectangle will be a body for one of our Baked Cheese Mummies.
-
Now, gently transfer these pastry rectangles to your prepared baking sheets, leaving a little space between each one. You might need two baking sheets, depending on their size, to avoid overcrowding. Overcrowding can lead to uneven baking, and we want all our mummies to be perfectly golden!
-
Spoon about 2-3 tablespoons of your grated cheese onto the center of each pastry rectangle. I like to mound it slightly in an oval or rectangular shape, leaving about a half-inch border around the edges. Be careful not to overfill them, as this can make wrapping difficult and cause cheese to seep out during baking, making a mess.
-
Repeat steps 7-10 with your second sheet of puff pastry. By the end of this step, you should have 12 lovely cheesy foundations ready for their bandages!
Wrapping the Mummies:
-
Take the remaining un-cut section of puff pastry (or if you have extra pastry scraps from trimming, you can gather and gently re-roll them, but try not to overwork the dough). We’re going to use this for the “bandages.”
-
Using your sharp knife or pizza cutter, cut this pastry into thin strips. I aim for strips that are about 1/4 to 1/2 inch wide. They don’t have to be perfectly uniform; some variation adds to the mummy’s rustic charm!
-
Now for the fun part – wrapping! Take one strip of pastry and lay it diagonally across one of your cheese-filled rectangles. Press the ends gently onto the pastry border to secure them. Think of it like you’re bandaging a little rectangle. Don’t pull too tightly, as this can stretch the dough too thin and make it tear.
-
Continue laying strips over the cheese, crisscrossing them in various directions. Make sure to leave a small gap near the top third of your rectangle – this will be where our mummy’s “face” is, so we need space for the eyes! Overlap the strips slightly to create that authentic, ancient bandage look. Press the ends firmly onto the bottom pastry to ensure they don’t unravel during baking.
-
It’s important to ensure that the strips are well-adhered to the base pastry, especially at the ends. If they’re loose, they might lift and burn during baking. A gentle press with your finger usually does the trick.
-
Repeat this wrapping process for all 12 of your cheese-filled rectangles. This part takes a little patience, but it’s incredibly satisfying to watch your mummies come to life!
-
Once all your mummies are wrapped, you might want to pop the baking sheets into the refrigerator for 10-15 minutes. This helps to firm up the pastry and ensures that it holds its shape better in the hot oven, leading to a flakier, puffier result. This chilling step is often overlooked but can make a big difference!
The Baking Process:
-
Retrieve your chilled mummies from the refrigerator. Now, remember that egg wash we prepared? It’s time to use it!
-
Using your pastry brush, lightly brush the tops of all the pastry strips and any exposed areas of the base pastry with the egg wash. Be gentle, you don’t want to dislodge any of your carefully placed bandages. The egg wash will give them a gorgeous golden-brown color and a lovely slight shine once baked.
-
Carefully transfer the baking sheets to your preheated 400°F (200°C) oven. If you’re using two sheets, I usually place one on the middle rack and one on a lower-middle rack, swapping their positions halfway through baking to ensure even cooking.
-
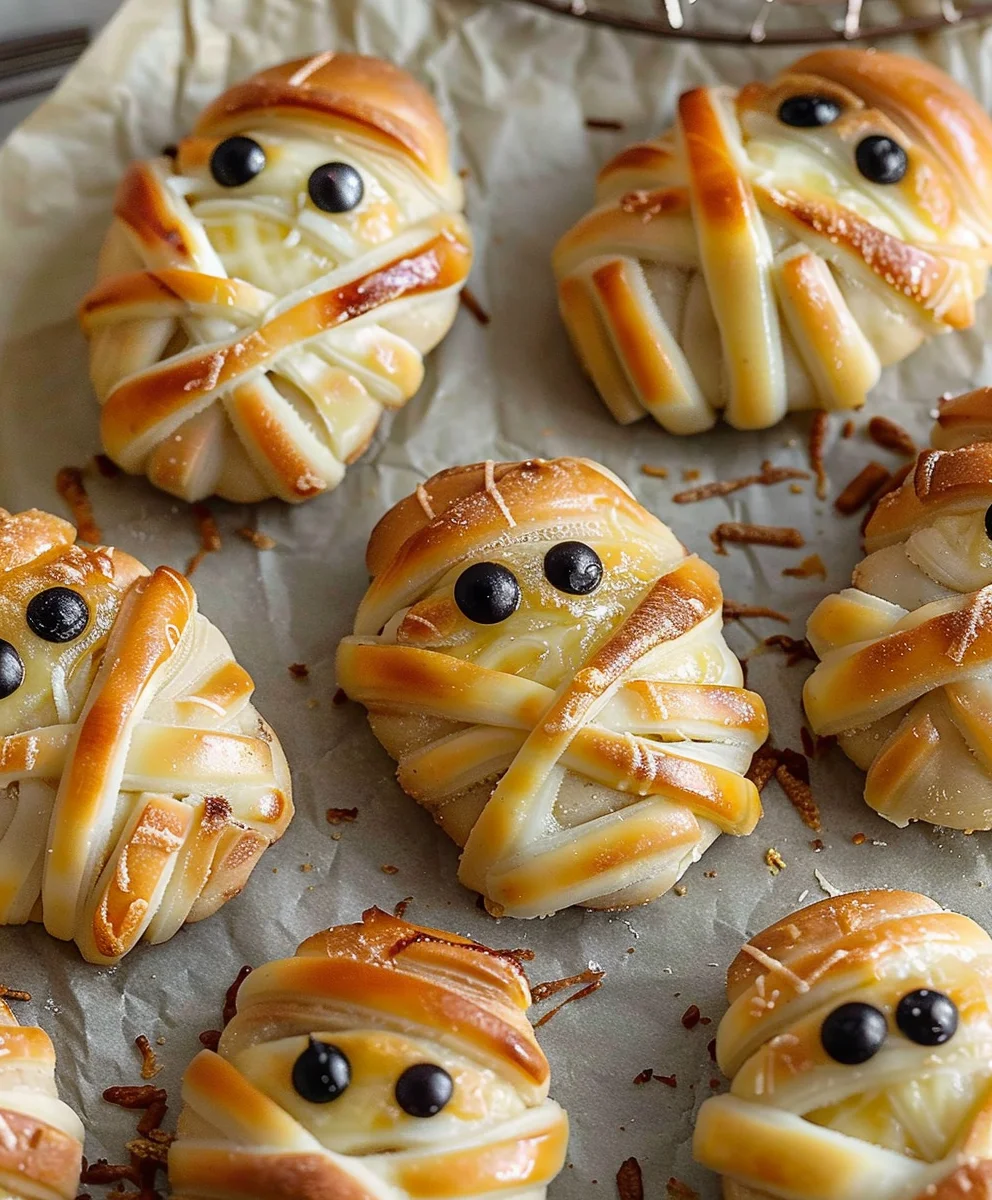
Bake for 15-20 minutes, or until the pastry is beautifully puffed, golden brown, and the cheese is melted and bubbling enticingly. Keep an eye on them, as oven temperatures can vary. If they’re browning too quickly, you can loosely tent them with aluminum foil for the last few minutes, but generally, they should be fine.
-
When they’re perfectly golden and smelling absolutely divine, remove the baking sheets from the oven. Be careful, they will be very hot!
-
Let the Baked Cheese Mummies cool on the baking sheets for a couple of minutes before carefully transferring them to a wire cooling rack. This brief cooling period on the sheet helps them firm up slightly, making them easier to handle.
Adding the Finishing Touches:
-
Once the mummies are on the cooling rack and have cooled down just enough to handle, it’s time to give them their eyes. This is where those little pieces of black olive come in!
-
Carefully place two small pieces of black olive into the “face” area you left uncovered on each mummy. I often use a pair of tweezers or a toothpick to position them precisely. You can place them close together for a slightly bewildered look or further apart for a more classic spooky stare. Have fun with it!
-
Allow the mummies to cool for about 5-10 more minutes before serving. This allows the cheese to set slightly, making them less prone to oozing, and the pastry to crisp up perfectly. They are best served warm, when the cheese is still gooey and the pastry is flaky.
Serving Suggestions and Storage:
-
These Baked Cheese Mummies are absolutely fantastic on their own, but they also pair wonderfully with dipping sauces! I love serving them with a warm marinara sauce, a tangy ranch dip, or even a spicy sriracha mayo for an extra kick. A simple bowl of ketchup works perfectly too, especially if you have younger ghouls enjoying them.
-
Arrange them artfully on a platter for a truly impressive presentation. They’re perfect for Halloween parties, game nights, or just a fun, spooky snack anytime!
-
If by some miracle you have any leftovers (which rarely happens in my house!), store them in an airtight container in the refrigerator for up to 2-3 days. For best results when reheating, pop them back into a preheated oven at 350°F (175°C) for about 5-8 minutes, or until the pastry is crisp and the cheese is melted again. The microwave tends to make the pastry soft, so the oven is definitely your best bet for retaining that delightful texture.
Tips for Perfect Baked Cheese Mummies:
-
Keep it Cold: The secret to flaky puff pastry is to keep it as cold as possible until it hits the hot oven. If your kitchen is warm, work quickly or pop the pastry back into the fridge between steps.
-
Cheese Choices: While I recommend good melting cheeses like cheddar, mozzarella, or Monterey Jack, feel free to experiment! Pepper Jack can add a nice subtle heat, or provolone offers a mild, milky flavor. Just ensure it’s a cheese that melts well.
-
Don’t Skimp on Egg Wash: A good, even coating of egg wash is crucial for that beautiful golden finish. It really elevates the appearance!
-
Pre-Portioning Cheese: To ensure all your mummies are evenly filled, you can pre-measure your grated cheese for each one before you start building. This helps maintain consistency.
-
Add a Little Flavor: For an extra layer of taste, you can sprinkle a tiny pinch of garlic powder, onion powder, or even some dried herbs like oregano or parsley over the cheese before wrapping. Just a little bit goes a long way!
-
Varying Sizes: While I’ve given instructions for a standard size, you can easily make smaller mini-mummies for bite-sized treats by cutting the pastry into smaller rectangles. Just adjust baking time accordingly (they’ll likely bake faster).
-
Make Ahead: You can assemble these mummies entirely, up to the point of brushing with egg wash, and then refrigerate them on the baking sheets for several hours. This is a fantastic trick for party prep! Just cover them loosely with plastic wrap. When ready to bake, apply the egg wash and bake as directed.
-
Alternative Eyes: If you’re not a fan of olives, you can use tiny dots of balsamic glaze, small capers, or even sesame seeds or poppy seeds for the eyes. Get creative!
-
Preventing Cheese Ooze: While some oozing is natural, you can minimize it by not overfilling and ensuring your pastry strips slightly overlap the cheese. If you find a lot of cheese escaping, your oven might not be hot enough, or your pastry was too warm.
-
Puff Pastry Quality: Not all puff pastry is created equal. I’ve found that higher-quality, all-butter puff pastry often yields the best flavor and flakiest texture, though standard brands work perfectly well too. Check your local grocery store’s freezer section for options.
Conclusion:
And there you have it, my friends! We’ve reached the delicious culmination of our culinary journey with this incredibly simple, yet profoundly satisfying, recipe. I truly believe that once you try this, you’ll understand why it’s destined to become a staple in your kitchen, especially when you need something quick, comforting, and undeniably delightful.
Why These Are a Must-Try Culinary Delight
So, why exactly are these wonderful cheesy creations a must-try? First and foremost, it’s the sheer joy they bring. Imagine biting into that warm, gooey center, the cheese perfectly melted and stretching, encased in a golden, slightly crispy pastry. It’s comfort food elevated, but without any of the fuss. These aren’t just a snack; they’re an experience. They effortlessly combine convenience with gourmet appeal, making them perfect for literally any occasion. Whether you’re hosting a game night, planning a casual get-together with friends, or simply looking for an easy weeknight treat for your family, these deliver on all fronts. They are incredibly forgiving, making them ideal for even the most novice of bakers, yet their impressive presentation will make everyone think you’ve spent hours slaving away. The magic truly lies in their simplicity, allowing the high-quality ingredients to shine through, creating a symphony of textures and flavors that are universally loved. Believe me, the moment you pull a tray of these golden delights from the oven, the aroma alone will be enough to convince anyone that they need to try one immediately. They truly hit that sweet spot of being both incredibly easy to make and utterly irresistible to eat, ensuring there are never any leftovers!
Endless Possibilities: Serving and Variation Ideas
Now, let’s talk about how to make these even more spectacular, or how to put your own unique spin on them. While these are absolutely perfect on their own, a dipping sauce can elevate them to new heights. My personal favorites include a classic marinara sauce for that pizza-like vibe, a tangy ranch dressing, or even a spicy sriracha mayo for a little kick. Don’t shy away from experimenting with other sauces like honey mustard, garlic aioli, or a sweet chili dip – the possibilities are truly endless! Beyond dips, consider serving these as a delightful accompaniment to a light green salad for a balanced meal, or alongside a hearty bowl of tomato soup for ultimate cozy comfort. They also make an incredible addition to any party spread, serving as an eye-catching and crowd-pleasing appetizer that disappears faster than you can say “more cheese, please!”
But wait, there’s more! The beauty of this recipe lies in its adaptability. Feel free to play with different types of cheese; a blend of cheddar and Monterey Jack could add another layer of flavor, or perhaps some smoked gouda for an extra sophisticated touch. For those who love a bit of heat, a thin slice of jalapeño tucked in with the cheese before baking would be divine. You could also sprinkle a pinch of garlic powder or Italian seasoning over the pastry before baking for an aromatic boost. For a truly unique twist, consider adding a tiny slice of pepperoni or a sliver of sun-dried tomato for an extra burst of savory goodness. These are not just any cheesy bites; they are your canvas for culinary creativity, and the versatility of these Baked Cheese Mummies makes them a joy to customize for any taste preference or dietary need (within reason, of course!).
Your Turn: Bake, Enjoy, and Share!
So, what are you waiting for? I wholeheartedly encourage you to roll up your sleeves, gather your ingredients, and give this recipe a try this week. I promise you won’t be disappointed. There’s something incredibly rewarding about creating something so delicious from scratch, and I am confident that these will bring smiles to everyone’s faces at your table. Once you’ve experienced the pure delight of making and devouring these, I would absolutely love to hear about it! Please share your experiences, your creative variations, and especially any photos of your glorious creations. Your feedback and personal touches inspire not just me, but our entire community of food lovers. Let’s celebrate the joy of good food together! Happy baking!
Baked Cheese Mummies
Transform simple ingredients into irresistible Baked Cheese Mummies! These adorable, savory snacks capture the spirit of Halloween with flaky puff pastry wrapped around gooey, melted cheese. Perfect for themed parties or cozy movie nights, they’re easy to make and a guaranteed crowd-pleaser.
Ingredients
-
2 sheets thawed puff pastry
-
14 Mini Babybel® cheeses (wax removed)
-
1/3 cup honey or your favorite jam
-
1 large egg
-
1 teaspoon water
-
28 candy eyes or mini chocolate chips
-
1-2 tablespoons all-purpose flour (for dusting)
Instructions
-
Step 1
Preheat oven to 400°F (200°C). Line two large baking sheets with parchment paper. Thaw puff pastry according to package instructions. In a small bowl, whisk the egg and 1 teaspoon of water for the egg wash. Remove wax from Mini Babybel® cheeses. -
Step 2
Lightly flour your work surface and unroll one sheet of puff pastry. Gently roll it out to smooth creases if needed. Cut each pastry sheet into 7 equal rectangles (14 total). Transfer the rectangles to your prepared baking sheets, leaving space between them. Place one Mini Babybel® cheese in the center of each pastry rectangle, leaving about a 1/2-inch border. -
Step 3
Cut any remaining pastry or trimmings into thin strips, about 1/4 to 1/2 inch wide. Wrap each cheese-filled rectangle with pastry strips, crisscrossing them and pressing ends gently onto the base pastry to secure. Leave a small gap near the top third for the ‘face’. Repeat for all 14 mummies. Refrigerate the wrapped mummies on the baking sheets for 10-15 minutes to firm up. -
Step 4
Retrieve chilled mummies. Lightly brush the tops of the pastry strips and any exposed base pastry with the egg wash. Transfer baking sheets to the preheated oven. Bake for 15-20 minutes, or until the pastry is beautifully puffed, golden brown, and the cheese is melted and bubbling. If using two sheets, swap their positions halfway through baking for even cooking. Remove from oven and let cool on baking sheets for a few minutes. -
Step 5
Carefully transfer the mummies to a wire cooling rack. Once cooled enough to handle, place two candy eyes or mini chocolate chips into the ‘face’ area of each mummy. Allow them to cool for about 5-10 more minutes before serving. Serve warm with honey or your favorite jam for dipping.
Important Information
Nutrition Facts (Per Serving)
It is important to consider this information as approximate and not to use it as definitive health advice.
Allergy Information
Please check ingredients for potential allergens and consult a health professional if in doubt.


Leave a Comment