

Halloween Recipe Poison Apples – the very name conjures images of enchanting wickedness and classic fairy tales, doesn’t it? This spooky season, I’m absolutely thrilled to share a confection that perfectly captures the spirit of playful fright, delivering both visual drama and irresistible flavor. Are you ready to bewitch your taste buds and enchant your guests with a treat that’s as iconic as it is delicious?
A Glimpse into Enchanted Lore
Drawing direct inspiration from the legendary poisoned fruit of folklore, particularly the one that put a certain princess into a deep, magical slumber, these apples offer a delightful, playful nod to timeless tales of magic and mystery. Far from being truly perilous, my version of this spectacular Halloween Recipe Poison Apples will simply put your palate under a delicious spell, leaving everyone enchanted by its charm.
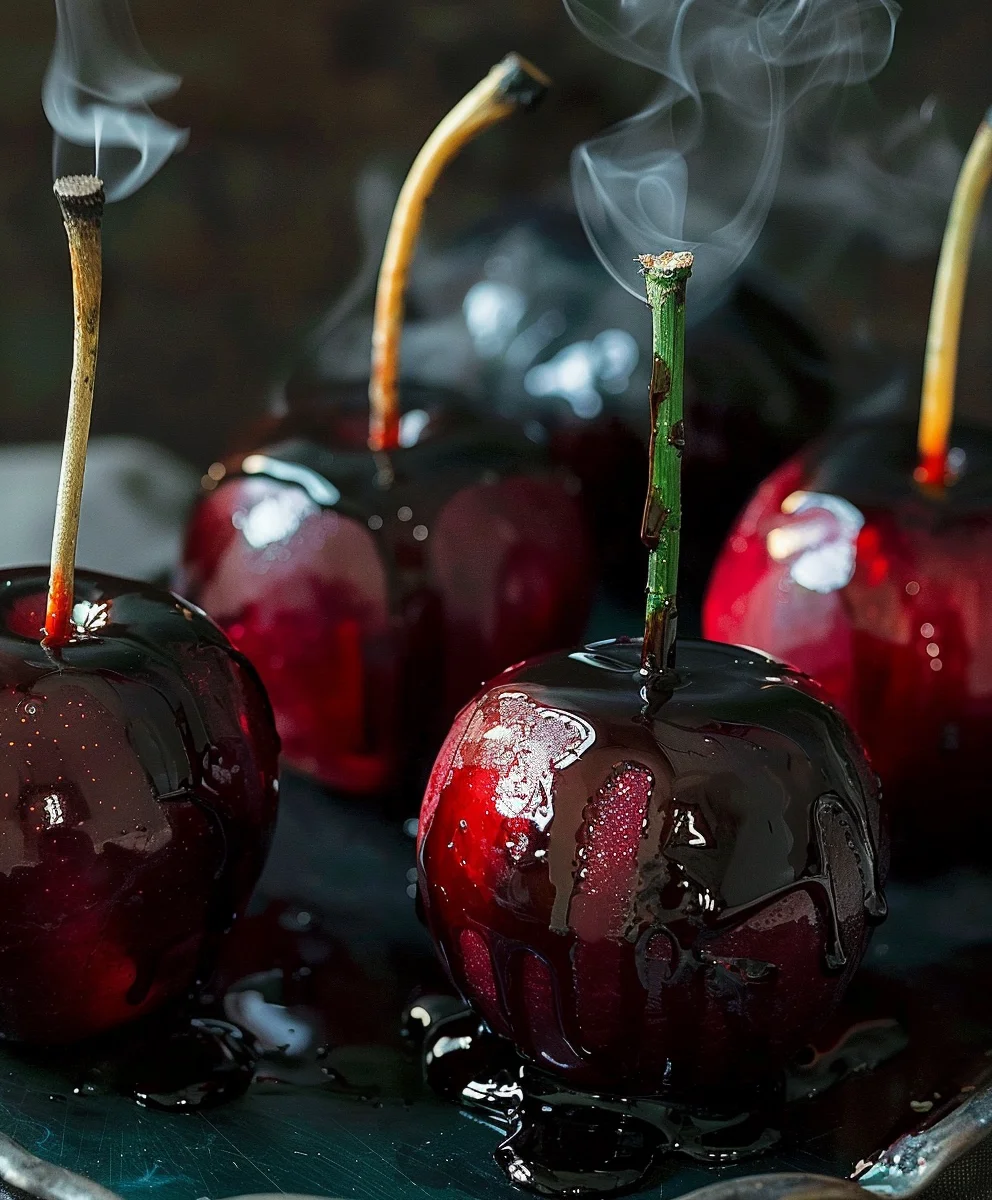
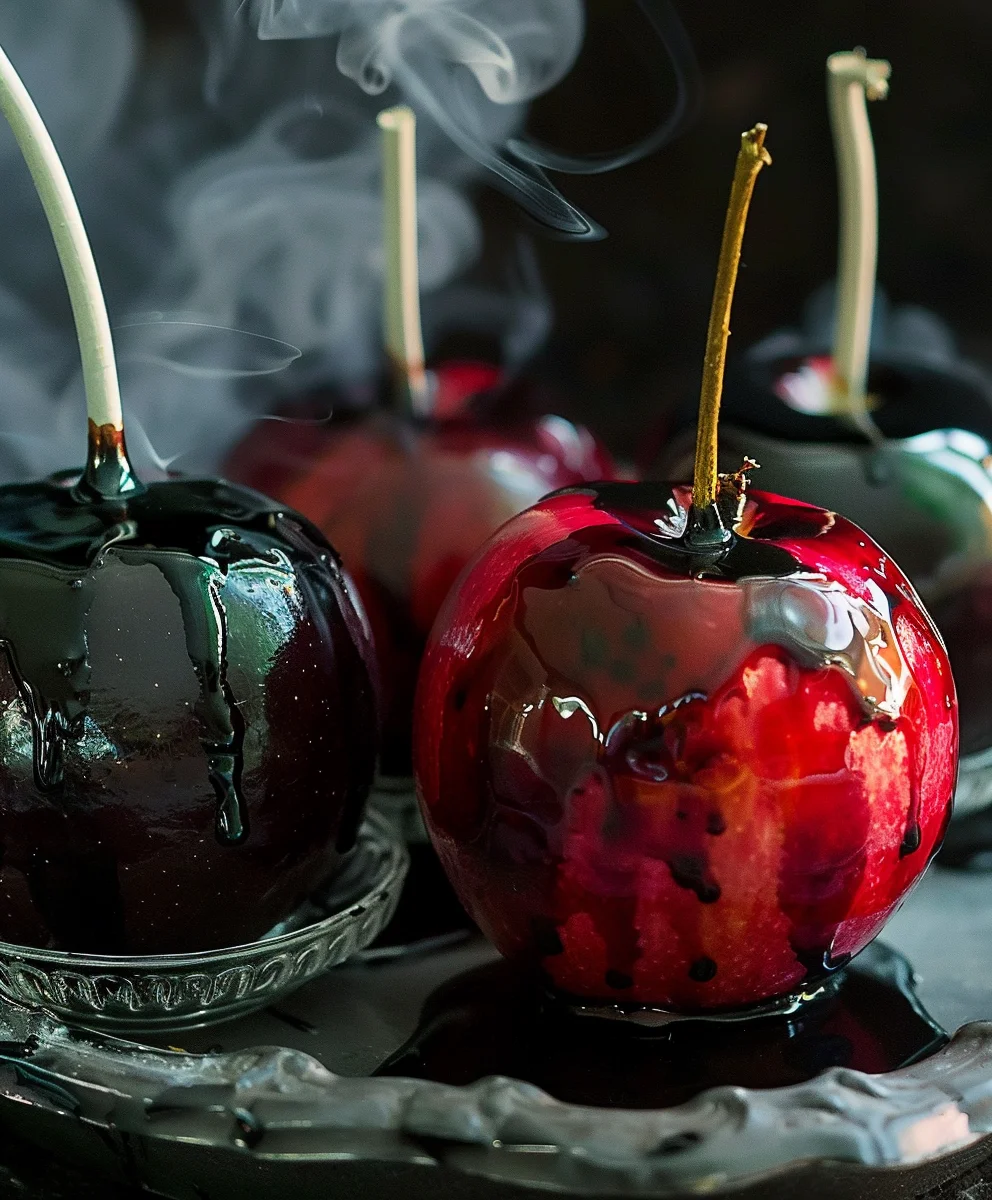
People absolutely adore this dish not only for its striking, jewel-toned appearance – often a brilliant, glossy red or a deep, ominous black that photographs beautifully – but also for the delightful contrast it offers. Imagine the satisfying crunch of a crisp, juicy apple encased in a sweet, hard candy shell that shatters with every bite. They are surprisingly simple to create, making them an ideal project for family fun and a guaranteed showstopper for any Halloween party. Get ready to create some truly enchanting memories!

Ingredients:
- 6-8 medium-sized, crisp apples (such as Granny Smith, Honeycrisp, or Fuji)
- 6-8 candy apple sticks or sturdy wooden skewers
- 2 cups (400g) granulated sugar
- ½ cup (120ml) light corn syrup
- 1 cup (240ml) water
- 1 teaspoon flavor extract (such as cherry, raspberry, or a touch of cinnamon, optional)
- 1-2 teaspoons gel food coloring (black, deep red, or even a dark purple work wonderfully for a truly “poisonous” look)
- Non-stick cooking spray or a neutral oil for greasing
- Parchment paper or a silicone baking mat
Preparing Your Apples and Workspace:
Before we even think about the magical, glistening coating, we need to get our apples ready. This step is crucial for ensuring your “poison” coating adheres beautifully and evenly to each fruit, making your Halloween Recipe Poison Apples truly stand out.
- Select and Wash Your Apples: First things first, choose apples that are firm and free of bruises. I always opt for something crisp that can hold its own against a sweet candy coating. Give each apple a thorough wash under cool running water. Many apples have a natural waxy coating, or sometimes a protective layer applied for shipping, which can prevent the candy from sticking. So, scrub them well! You can even give them a quick dip in boiling water for 10-15 seconds, followed by an ice bath, then dry them immediately to help remove any stubborn waxy residue.
- Dry Thoroughly: This is a non-negotiable step, my friends! Any moisture on your apples will cause the candy coating to slip, slide, or simply not adhere properly. Use a clean kitchen towel to meticulously dry each apple, ensuring there isn’t a single drop of water left. I even sometimes let them air dry for an additional 10-15 minutes just to be absolutely certain.
- Insert Your Sticks: With your apples perfectly dry, it’s time to insert the candy apple sticks. Gently push a stick into the stem end of each apple, going about halfway through the apple’s core. Make sure the stick is sturdy and firmly anchored, as it will be bearing the weight of the apple and the candy. A wobbly stick is an unhappy stick, and trust me, you don’t want your beautifully coated apple to tumble!
- Prepare Your Cooling Surface: While our candy coating will be hot and sticky, it needs a clean, non-stick surface to cool on. Line a large baking sheet (or two, depending on how many apples you’re making) with parchment paper or a silicone baking mat. Lightly grease the parchment paper or silicone mat with non-stick cooking spray or a tiny bit of neutral oil. This ensures your perfectly coated Halloween Recipe Poison Apples don’t stick stubbornly to the surface once they’ve cooled and hardened. Nobody wants to lose half their candy shell trying to pry it off!
Crafting the “Poison” Candy Coating:
Now for the real magic! This is where we transform simple sugar into a gleaming, mysterious, and utterly delicious “poison” coating. Pay close attention to temperatures and safety, as working with hot sugar requires respect and caution. This is the heart of our Halloween Recipe Poison Apples.
- Combine Ingredients: In a heavy-bottomed saucepan (and I truly mean heavy-bottomed – this helps distribute heat evenly and prevents scorching), combine the granulated sugar, light corn syrup, and water. The corn syrup is our secret weapon here; it helps prevent the sugar from crystallizing, ensuring a smooth, glossy finish.
- Dissolve the Sugar: Place the saucepan over medium heat. Stir the mixture gently with a heatproof spoon or spatula just until the sugar completely dissolves. You’ll see the mixture go from cloudy to clear. It’s important to stop stirring once it comes to a boil, as stirring during the boiling phase can cause sugar crystals to form on the sides of the pan, which can then fall back into your candy and make it grainy.
- Boil to Perfection: Once the sugar is dissolved and the mixture is boiling, clip a candy thermometer to the side of the saucepan, making sure the tip isn’t touching the bottom of the pan. Increase the heat to medium-high. Let the mixture boil without stirring. We are aiming for the “hard crack” stage, which is typically between 300°F and 310°F (149°C and 154°C). This stage is critical because it’s what gives candy apples their signature hard, brittle shell. If you don’t reach this temperature, your coating will be sticky; if you go too far, it can burn. Patience is key here, my friends!
- Add Food Coloring and Flavor: As soon as your candy mixture reaches 300°F (or just as it hits 300°F and you’re watching it climb to 310°F), carefully remove the saucepan from the heat. Immediately and carefully stir in your chosen flavor extract and the gel food coloring. Gel food coloring is fantastic because it’s concentrated and won’t add too much liquid to your candy, which could thin it out. Stir until the color is vibrant and evenly distributed. For a truly ominous “poison” look, I love using a deep black gel coloring, or a rich, dark blood-red. Be careful as you stir, as the mixture is extremely hot and steam will rise.
- Maintain Temperature (Briefly): The candy will start to cool and thicken quickly. If it starts to get too thick to dip your apples, you can return it to very low heat for just a moment to loosen it up, but be careful not to cook it further. You want it to remain fluid enough for dipping.
- Safety First! Let me emphasize this: hot sugar is incredibly dangerous. It can cause severe burns. Do not touch the hot candy with your bare hands. Keep children and pets away from the cooking area. Have a bowl of ice water nearby, just in case of any accidental splatters on your skin – plunging the affected area into ice water immediately is the best first aid for sugar burns. Please, be mindful and proceed with caution.
Dipping and Cooling Your Poison Apples:
Now comes the moment of truth! Dipping your apples is a delicate art, ensuring an even, shimmering coat for each of your magnificent Halloween Recipe Poison Apples. This is where they truly transform into bewitching treats.
- The Dipping Technique: Take one prepared apple by its stick. Carefully, but quickly, dip it into the hot candy mixture. I find it helpful to tilt the saucepan slightly to create a deeper pool of candy, making it easier to fully submerge the apple. Rotate the apple to ensure it’s completely covered in the glossy, dark coating. Don’t let it sit in the hot candy too long, as it can start to cook the apple.
- Allow Excess to Drip: Once coated, lift the apple out of the candy. Hold it above the saucepan and let any excess candy drip back into the pan. You can gently twirl the apple or lightly tap the stick against the edge of the pan to encourage the drips. We want a smooth, even shell, not a thick, gloopy mess at the bottom. The quicker the excess drips off, the less pooling you’ll have at the bottom of the apple.
- Place on Prepared Surface: Immediately transfer the dipped apple to your prepared baking sheet lined with greased parchment paper or a silicone mat. Make sure there’s enough space between each apple so they don’t touch while cooling.
- Repeat and Observe: Continue dipping the remaining apples, one by one. As you work, you might notice the candy coating in the saucepan starting to thicken. If it becomes too thick to work with, you can place the saucepan back on very low heat for a minute or two to warm it up and make it more fluid again. Just be very careful not to let it boil or cook further.
- Cool Completely: Allow the “poison” apples to cool completely at room temperature. This can take anywhere from 30 minutes to an hour, or even longer depending on the ambient temperature and humidity. Do not try to rush the cooling process by putting them in the refrigerator, as this can cause the candy to become cloudy or sticky due to condensation. Once fully cooled, the candy shell should be hard, glossy, and brittle. You’ll hear a satisfying “thunk” when you tap it.
Optional Embellishments and Finishing Touches:
While these Halloween Recipe Poison Apples are stunning on their own, a few extra touches can elevate them from merely beautiful to absolutely spellbinding. Let your imagination run wild!
- Edible Glitter: For an extra mystical sparkle, sprinkle a tiny amount of edible glitter (silver, black, or even iridescent) onto your apples immediately after dipping, while the candy coating is still tacky. This adds a captivating shimmer that truly makes them look enchanted.
- Spidery Webs or Drips: If you want to add a spooky web effect, once the apples have fully cooled and hardened, you can melt a small amount of white chocolate or candy melts. Drizzle it thinly over the apples to create a ghostly web or extra eerie drips.
- Edible Decorations: Tiny edible sugar spiders, bats, or even small Halloween sprinkles can be affixed to the apples while the candy coating is still slightly warm and tacky, or secured later with a tiny dot of melted chocolate.
- Presentation is Key: Arrange your finished Halloween Recipe Poison Apples on a platter with some dried leaves, faux spiderwebs, or other spooky decor for a truly impressive display at your Halloween gathering.
Tips for Success and Safety:
Making candy apples is a delightful experience, but a few pointers can ensure your success and, most importantly, your safety, especially when creating these enticing Halloween Recipe Poison Apples.
- Humidity is Your Enemy: Candy making is highly sensitive to humidity. If it’s a very humid or rainy day, your candy coating might not set properly and could remain sticky. I always recommend making candy apples on a dry, low-humidity day for the best results. A good way to tell if it’s too humid is if you feel a general stickiness in the air; if so, maybe choose another day for your candy apple adventure.
- The Mighty Candy Thermometer: I cannot stress this enough – a reliable candy thermometer is your best friend for this recipe. Eyeballing the temperature just won’t cut it for consistent hard crack candy. Make sure your thermometer is calibrated correctly. You can test it by placing it in boiling water; it should read 212°F (100°C). If it doesn’t, you’ll need to adjust your target temperature accordingly.
- Handling Hot Sugar Safely: As I mentioned earlier, hot sugar is no joke. Always wear heat-resistant gloves if you have them, and work slowly and deliberately. If any hot sugar gets on your skin, do NOT try to wipe it off; instead, immediately plunge the affected area into cold water or apply an ice pack to cool the sugar and minimize the burn. Keep a bowl of ice water ready for this purpose.
- Avoiding Crystallization: To prevent sugar crystals from forming (which can make your candy grainy), avoid stirring the mixture once it starts boiling. If you see any crystals forming on the sides of the pan, you can dip a pastry brush in hot water and gently brush down the sides of the pan to dissolve them.
- Troubleshooting Sticky Apples: If your candy apples are sticky even after cooling, it usually means the candy didn’t reach the full hard crack stage. Unfortunately, there’s not much you can do once they’ve cooled, but you’ll know for next time to cook the candy a little longer.
- Storage: Once completely cooled and hardened, store your Halloween Recipe Poison Apples individually wrapped in cellophane or in an airtight container at room temperature. They are best enjoyed within 1-2 days, as the apples can start to release moisture over time, which can affect the candy coating.
Conclusion:
So, there you have it – my ultimate guide to creating these absolutely show-stopping treats. What makes these particular apples an undeniable must-try, you ask? Well, it’s not just their incredibly spooky, almost ethereal appearance that will have everyone reaching for their phones to snap a picture; it’s the perfect, tantalizing balance of crisp, juicy apple, enveloped in that glorious, glossy, and subtly sweet candy coating. Forget those often-disappointing, flimsy caramel apples that just don’t deliver; our version offers a substantial, satisfying crunch followed by a burst of fresh, vibrant fruit flavor, perfectly complemented by the rich, slightly crackly sugar glaze. This isn’t just a simple dessert; it’s an experience, a dramatic centerpiece, and frankly, a fantastic conversation starter for any Halloween gathering or spooky themed event you might host. The vibrant, almost sinister hue truly sets them apart, making them instantly recognizable and undeniably festive. I promise you, once you taste the delightful contrast of textures and flavors – the cool, firm apple against the shatteringly crisp shell – you’ll understand why these are poised to become your new favorite spooky season staple. They are surprisingly simple to execute, requiring just a few common ingredients and a bit of patience, yet they yield results that look straight out of a professional bakery – or perhaps, a mysterious witch’s enchanted cauldron!
Elevate Your Spooky Presentation: Serving & Creative Variations
Now, let’s talk about how to make these even more spectacularly eerie, or how to adapt them to truly suit your personal taste and party theme. While they are undoubtedly magnificent on their own, serving them on a bed of dry ice (safely, of course, with proper ventilation and handling precautions!) creates an absolutely mesmerizing, swirling, smoky effect that perfectly enhances their dark, mysterious charm. Imagine a platter of these gleaming dark apples emerging from a swirling mist – it’s a vision straight out of a haunted forest! You could also arrange them artfully on a tiered stand, perhaps with some faux spiderwebs delicately draped around, or even nestled among autumn leaves and tiny decorative pumpkins for a truly gothic yet elegant display. For creative variations, don’t feel limited to just red apples; Granny Smiths offer a wonderful tart contrast to the sweetness of the candy coating, while Honeycrisps provide an extra-crisp and satisfying texture that holds up beautifully. Experiment with food coloring: a deep, royal purple, an eerie, glowing green, or even a spectral white can be just as striking and thematic as the classic black or blood-red. For an extra layer of decadence and sparkle, before the coating fully sets, you could sprinkle them with edible glitter for a truly bewitching shimmer, or perhaps some finely crushed freeze-dried raspberries or blackberries for a subtle tart crunch and a lovely, speckled, almost organic look. Or, if you’re feeling particularly adventurous and want to go all out, try dipping them partially in melted white chocolate after the candy coating has completely hardened, then drizzling with more black candy melts for an intriguing, skull-like or fractured effect. The possibilities are truly endless when it comes to customizing these delightful, and slightly sinister, treats to perfectly fit your spooky vision.
Your Spooky Culinary Adventure Awaits!
Ultimately, these Halloween Recipe Poison Apples are so much more than just a sweet treat; they are an invitation to fully embrace the magic, the mystery, and the playful mischief of the Halloween season. I genuinely believe that once you dive into this recipe, you’ll be absolutely amazed at how easily you can create something so visually stunning and utterly delicious, even if you’re a beginner in the kitchen. There’s a unique sense of accomplishment and a genuine joy in crafting something with your own hands that brings such a dramatic, theatrical flair to your festive table. So, what are you waiting for? Gather your ingredients, put on your favorite spooky playlist to set the mood, and get ready to conjure up some serious magic in your kitchen. I cannot wait for you to experience the immense satisfaction of seeing your guests’ faces light up – or perhaps, delightfully grimace in a good way – when they behold your chillingly beautiful creations. Please, please, please give this recipe a try this Halloween season! I’m absolutely thrilled about the thought of you making these showstoppers. And when you do, I’d be absolutely delighted if you’d share your experience. Did you add a special, unique touch? Were they the absolute hit of your party? Feel free to share your spooky success stories and any creative variations you came up with in the comments below. Your culinary adventures inspire me tremendously, and I love seeing how you bring these recipes to life in your own unique style. Let’s make this Halloween the most deliciously eerie one yet, one perfectly crafted, darkly gleaming ‘poison apple’ at a time!
Halloween Poison Apples: Spooky, Delicious Treat!
Conjure enchanting wickedness with these Halloween Poison Apples! Inspired by classic fairy tales, these treats feature crisp apples coated in a glossy, hard candy shell. A playful nod to folklore, they promise visual drama and irresistible flavor, perfect for any spooky celebration.
Ingredients
-
6-10 large or medium/small crisp apples
-
6-10 wooden skewers or candy apple sticks
-
2 cups granulated sugar
-
½ cup light corn syrup
-
¾ cup water
-
½ tsp blue gel food coloring
-
¼ tsp black gel food coloring
-
Waxed paper or parchment paper
-
Vegetable oil or non-stick cooking spray
Instructions
-
Step 1
Wash apples thoroughly to remove any wax, then dry meticulously. Insert a sturdy wooden skewer halfway into the core of each apple. Line a baking sheet with greased waxed paper or parchment paper. -
Step 2
In a heavy-bottomed saucepan, combine sugar, corn syrup, and water. Stir gently over medium heat until sugar dissolves. Stop stirring once boiling, and insert a candy thermometer. Boil without stirring until the mixture reaches 300-310°F (hard crack stage). -
Step 3
Immediately remove from heat. Carefully stir in blue and black gel food coloring until vibrant and evenly distributed. The mixture will be extremely hot; proceed with caution. -
Step 4
Taking one apple by its stick, carefully dip it into the hot candy, rotating to fully coat. Lift and let excess candy drip back into the pan. Immediately transfer the dipped apple to the prepared baking sheet. -
Step 5
Repeat with remaining apples, reheating candy briefly on very low heat if it thickens too much. Allow apples to cool completely at room temperature (30-60 minutes) until the shell is hard and glossy. Store individually wrapped at room temperature for up to 1-2 days.
Important Information
Nutrition Facts (Per Serving)
It is important to consider this information as approximate and not to use it as definitive health advice.
Allergy Information
Please check ingredients for potential allergens and consult a health professional if in doubt.

Leave a Comment