

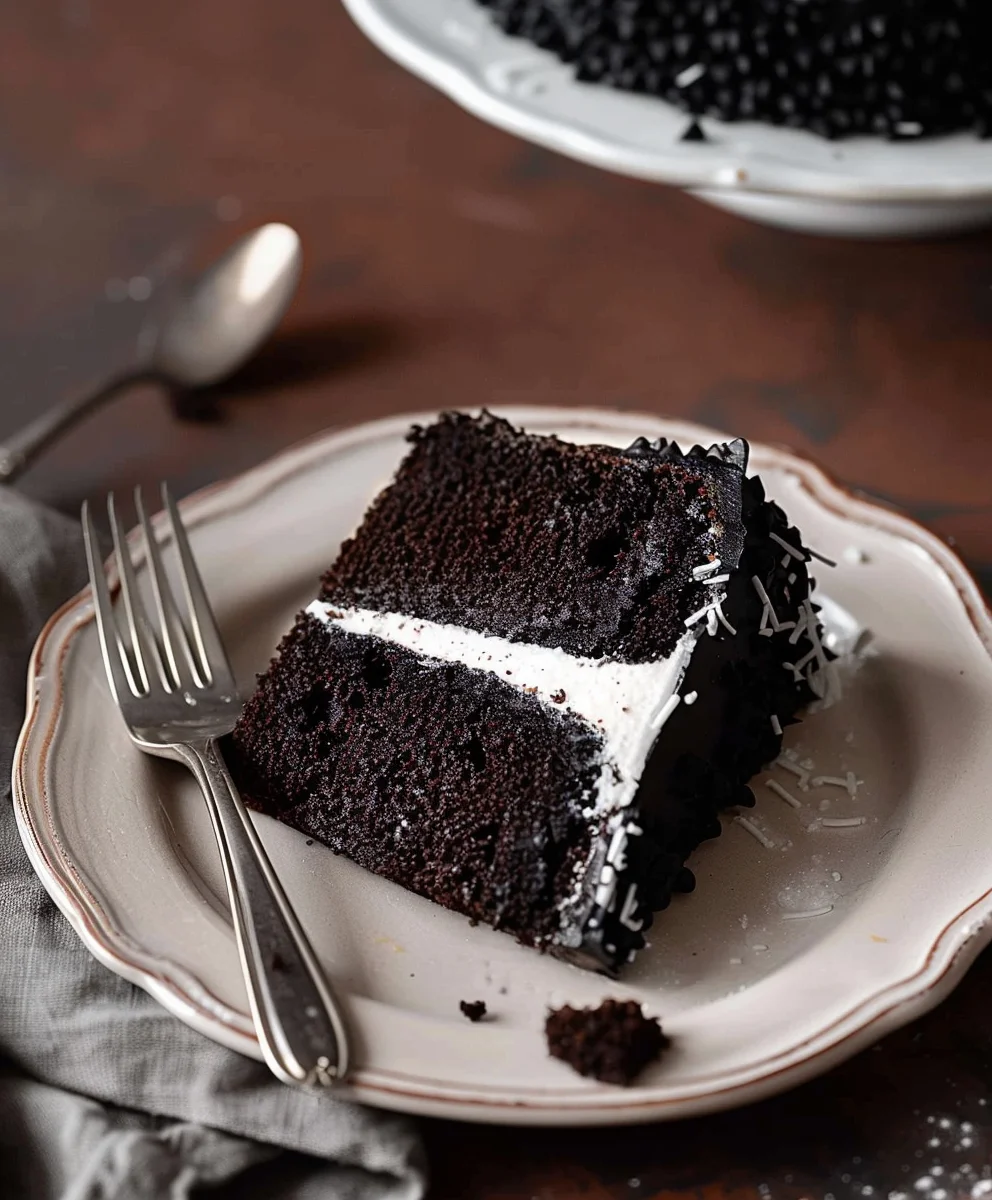
Black Velvet Cake is more than just a dessert; it’s an experience. Imagine a cake so rich, so deeply colored, it evokes the elegance of midnight, yet offers a surprising lightness with every bite. I am absolutely thrilled to share this exquisite recipe with you today, a creation that stands proudly as the sophisticated sibling to its more famous red counterpart.
While its cousin, the Red Velvet Cake, boasts a storied past rooted in the American South, the Black Velvet Cake emerged as a modern, opulent twist, capturing hearts with its dramatic appearance and irresistible flavor profile. People adore this dish for its stunning contrast – a dark, almost charcoal-black crumb achieved through a clever combination of cocoa and a touch of black food coloring, perfectly balanced with a tangy cream cheese frosting. Its deep, complex cocoa flavor, combined with an unbelievably moist and tender texture, creates a symphony on the palate that is both comforting and extraordinarily decadent. This isn’t just a cake; it’s a statement, perfect for any celebration or simply to elevate an ordinary day into something truly special.

Ingredients:
- For the Black Velvet Cake Layers:
- 2 ½ cups (300g) all-purpose flour, spooned and leveled
- 1 ½ cups (150g) unsweetened natural cocoa powder, not Dutch-processed (the natural cocoa reacts with the baking soda and buttermilk to achieve the desired rise and texture)
- 1 teaspoon baking soda
- 1 teaspoon baking powder
- 1 teaspoon fine sea salt
- 1 cup (226g) unsalted butter, softened to room temperature
- 2 cups (400g) granulated sugar
- 4 large eggs, also at room temperature
- 1 tablespoon pure vanilla extract (the good stuff, it really makes a difference)
- 1 cup (240ml) buttermilk, room temperature (if you don’t have buttermilk, you can make your own by adding 1 tablespoon of lemon juice or white vinegar to regular milk and letting it sit for 5-10 minutes)
- ½ cup (120ml) strong brewed coffee, cooled to room temperature (this enhances the chocolate flavor without making the cake taste like coffee)
- 1-2 teaspoons black gel food coloring (use a high-quality brand for best results, as liquid food coloring might thin the batter too much)
- For the Cream Cheese Frosting:
- 12 ounces (340g) full-fat cream cheese, softened to room temperature (it’s crucial that it’s soft but still cool enough to hold its shape)
- 1 cup (226g) unsalted butter, softened to room temperature
- 6-8 cups (720-960g) confectioners’ sugar (powdered sugar), sifted, depending on desired sweetness and consistency
- 2 teaspoons pure vanilla extract
- Pinch of fine sea salt
- Optional Garnish:
- Chocolate shavings or curls
- Fresh berries (raspberries or blackberries work beautifully)
- A dusting of cocoa powder
Equipment You’ll Need:
- Three 8-inch round cake pans
- Parchment paper
- Non-stick baking spray or butter/flour for greasing pans
- Large mixing bowls (at least two)
- Stand mixer with paddle attachment or a hand mixer
- Whisk
- Rubber spatula
- Measuring cups and spoons
- Sifter (for flour, cocoa, and confectioners’ sugar)
- Wire cooling racks
- Offset spatula or butter knife for spreading frosting
- Cake leveler or serrated knife
Preparation Phase: Cake Batter
- Preheat and Prepare: Before you even think about mixing, preheat your oven to 350°F (175°C). This is important because you want the oven to be at the correct temperature when the batter is ready, ensuring an even bake from the start. Grease three 8-inch round cake pans thoroughly with baking spray, or butter and flour them. Then, line the bottoms of each pan with a circle of parchment paper. This simple step is your best friend for ensuring your cake layers release easily and beautifully from the pans.
- Whisk Dry Ingredients: In a large bowl, sift together the all-purpose flour, unsweetened natural cocoa powder, baking soda, baking powder, and fine sea salt. Sifting is not just a fancy step; it aerates the flour and cocoa, prevents lumps, and ensures that the leavening agents are evenly distributed, which is key for a tender and uniformly risen cake. Whisk these dry ingredients together thoroughly and set aside.
- Cream Butter and Sugar: In the bowl of your stand mixer fitted with the paddle attachment (or using a hand mixer and a large bowl), cream together the softened unsalted butter and granulated sugar on medium-high speed. Beat them until the mixture is light, fluffy, and pale in color, typically 3-5 minutes. This process incorporates air into the butter, creating tiny pockets that will contribute to the cake’s tender texture. Scrape down the sides of the bowl as needed to ensure everything is evenly combined.
- Add Eggs and Vanilla: Reduce the mixer speed to medium-low. Add the large eggs one at a time, beating well after each addition. It’s important to give each egg enough time to fully incorporate into the butter mixture before adding the next. Once all eggs are in, add the pure vanilla extract. Increase the speed slightly and beat until the mixture is cohesive and looks smooth. The mixture might look a little curdled at this stage, especially if your eggs were a bit on the cooler side, but don’t worry, it will come together as you add the dry and wet ingredients.
-
Alternate Wet and Dry: Now, we’re going to alternately add the dry ingredient mixture and the wet ingredients (buttermilk and coffee) to the butter and egg mixture. Begin and end with the dry ingredients.
- Add about one-third of the dry ingredients to the mixer bowl and mix on low speed until just combined. Be careful not to overmix here.
- Next, add half of the buttermilk and mix until just incorporated.
- Then, add another third of the dry ingredients, mixing gently.
- Follow with the remaining half of the buttermilk and the strong brewed coffee, mixing until combined.
- Finally, add the last third of the dry ingredients and mix on the lowest speed only until no streaks of flour remain. Overmixing is the enemy of a tender cake, so stop as soon as it’s combined. A few small lumps are perfectly fine.
- Introduce the Black Coloring: Add 1-2 teaspoons of black gel food coloring to the batter. Start with 1 teaspoon, mix it in, and then add more if you desire a deeper, more intense “black velvet” hue. Gel food coloring is preferred over liquid because it’s highly concentrated and won’t thin out your perfectly balanced batter. Mix until the color is uniformly distributed throughout the batter. It’s truly fascinating to watch the batter transform into that rich, dark color!
Baking the Black Velvet Cake Layers
- Divide and Conquer: Divide the richly colored cake batter evenly among your three prepared 8-inch cake pans. An easy way to do this accurately is to use a kitchen scale; aim for roughly equal weight in each pan. If you don’t have a scale, just eyeball it as best you can. Gently tap each pan on your counter a couple of times to release any large air bubbles, which can prevent doming and promote a flatter top.
- Bake to Perfection: Place the cake pans in your preheated oven. Bake for approximately 28-32 minutes, or until a wooden skewer or toothpick inserted into the center of a cake layer comes out clean, with no wet batter clinging to it. The exact baking time can vary depending on your oven, so keep a close eye on them. The cake layers should spring back gently when lightly touched.
- Cooling Down: Once baked, remove the cake pans from the oven and place them on wire cooling racks. Let the cakes cool in their pans for about 10-15 minutes. This allows the cakes to firm up slightly, making them less fragile and easier to handle.
- Release and Fully Cool: After the initial cooling period, carefully invert each cake layer onto a wire rack. Gently peel off the parchment paper from the bottom of each cake. Allow the cake layers to cool completely at room temperature, which can take 1-2 hours. It is absolutely essential that the cakes are completely cool before you even think about frosting them. Attempting to frost a warm cake will result in a melty, sliding, frosting disaster – trust me, I’ve learned this the hard way!
Crafting the Cream Cheese Frosting
- Cream Butter and Cream Cheese: In the bowl of your stand mixer fitted with the paddle attachment, or with a hand mixer, beat the softened cream cheese and softened unsalted butter together on medium-high speed until incredibly smooth, creamy, and completely lump-free. This should take about 3-4 minutes. Scrape down the sides of the bowl often. The key to smooth cream cheese frosting is ensuring these two ingredients are perfectly emulsified before adding anything else.
- Add Vanilla and Salt: Reduce the mixer speed to low. Add the pure vanilla extract and a pinch of fine sea salt. Mix until just combined. The salt helps to balance the sweetness of the frosting and enhance its flavor profile.
- Gradually Add Confectioners’ Sugar: With the mixer still on low speed, gradually add the sifted confectioners’ sugar, about 1-2 cups at a time. Mix thoroughly after each addition until the sugar is fully incorporated. The reason we add it gradually is to prevent a sugar cloud from engulfing your kitchen, and it also allows the frosting to come together smoothly.
- Whip to Fluffy Perfection: Once all the confectioners’ sugar has been added, increase the mixer speed to medium-high. Beat the frosting for another 2-3 minutes until it becomes wonderfully light, fluffy, and spreadable. The consistency should be thick enough to hold its shape but soft enough to spread easily. If it seems too thick, you can add a tiny splash (1-2 teaspoons) of milk or cream. If it’s too thin, add more sifted confectioners’ sugar, 1/4 cup at a time, until the desired consistency is reached.
Assembling Your Black Velvet Masterpiece
- Level Your Cakes (Optional but Recommended): If your cake layers have domed tops, use a serrated knife or a cake leveler to carefully trim off the domes, creating flat surfaces. This will ensure your cake stacks evenly and looks professional. Don’t throw away those trimmings – they’re perfect for a baker’s snack!
- First Layer and Frosting: Place one of the cooled, leveled cake layers on your serving plate or cake stand. If you have a rotating cake stand, now is the time to use it – it makes frosting so much easier! Dollop about 1 to 1 ½ cups of cream cheese frosting onto the center of the first cake layer. Using an offset spatula, spread the frosting evenly all the way to the edges. Don’t press too hard, you want a nice, plush layer of frosting.
- Stack the Second Layer: Carefully place the second cake layer directly on top of the frosted first layer. Try to align it as precisely as possible. Repeat the frosting process, spreading another generous layer of cream cheese frosting.
- Add the Final Layer: Place the third and final cake layer on top. This will be the top of your cake.
- Crumb Coat: Now for the crumb coat – this is a critical step for a clean, beautiful finish. Take a small amount of frosting (about ½ cup) and spread a very thin, even layer all over the top and sides of the entire cake. The goal here is to trap any loose crumbs into this initial layer of frosting. Don’t worry if it looks messy; this is just the foundation. Once applied, refrigerate the cake for at least 20-30 minutes, or until the crumb coat is firm to the touch. This locks in all those pesky crumbs.
- Final Frosting Layer: Once the crumb coat is chilled and firm, remove the cake from the refrigerator. Apply the remaining cream cheese frosting to the top and sides of the cake. Start by placing a large dollop on top and spreading it evenly, then move to the sides. Use your offset spatula to smooth the frosting as much or as little as you like. For a rustic look, you can leave some textured swirls. For a smoother finish, dip your spatula in hot water, wipe it clean, and then glide it over the frosting.
- Garnish and Serve: If desired, garnish your Black Velvet Cake with chocolate shavings, fresh berries, or a light dusting of cocoa powder. Allow the cake to sit at room temperature for about 15-20 minutes before slicing and serving, which allows the frosting to soften slightly for a more luxurious texture. Store any leftovers in an airtight container in the refrigerator for up to 3-4 days. This cake tastes even better the next day as the flavors meld!
Tips for Black Velvet Cake Perfection:
-
Room Temperature Ingredients are Non-Negotiable:
I cannot stress this enough! For both the cake batter and the frosting, ensuring your butter, eggs, buttermilk, and cream cheese are at proper room temperature (around 68-70°F or 20-21°C) is absolutely essential. Cold ingredients don’t emulsify properly, leading to lumpy batter and separated frosting. This is the foundation of a truly smooth and consistent texture.
-
Don’t Skimp on the Cocoa:
Using a good quality, unsweetened natural cocoa powder makes a huge difference in the depth of chocolate flavor for your Black Velvet Cake. Avoid Dutch-processed cocoa for this recipe as it won’t react correctly with the baking soda, affecting the cake’s rise and texture. The natural cocoa’s acidity is key.
-
Embrace the Coffee:
Even if you’re not a coffee drinker, please trust me on this one. Adding strong brewed coffee to chocolate cake batter doesn’t make it taste like coffee; it profoundly intensifies and deepens the chocolate flavor. It’s a secret weapon for any serious chocolate cake baker.
-
Master the Crumb Coat:
This thin layer of frosting is your protective barrier against stray crumbs. It seals them in, ensuring your final frosting layer is impeccably smooth and pristine. Don’t rush it; chill the cake thoroughly after applying the crumb coat for best results.
-
Chill Out for Clean Slices:
For clean, beautiful slices of your Black Velvet Cake, chill the fully frosted cake in the refrigerator for at least 30 minutes before serving. When you’re ready to slice, use a long, sharp knife dipped in hot water and wiped clean between each cut. This creates those perfect, picture-worthy slices.
-
Experiment with Presentation:
While simple elegance is often best, feel free to get creative with your garnishes. A cascade of fresh raspberries and blackberries contrasts beautifully with the dark cake and white frosting. Or, for a truly decadent look, add chocolate shavings or curls that you can make with a vegetable peeler from a block of good quality chocolate.
-
Storage Savvy:
Because of the cream cheese frosting, this Black Velvet Cake should be stored in an airtight container in the refrigerator. Bring it to room temperature for about 30-60 minutes before serving for the best flavor and texture experience.
-
Patience is a Virtue:
Baking a showstopper like the Black Velvet Cake takes time. Don’t rush the cooling process for the cake layers, don’t rush the chilling of the crumb coat, and don’t rush the creaming of the butter and sugar. Each step contributes to the overall success and deliciousness of your cake.
Conclusion:
This isn’t just any cake; it’s a statement. The deep, almost mysterious cocoa hue, contrasted with that luscious, bright white cream cheese frosting, makes for a visual feast even before the first bite. But it’s the flavor and texture that truly seal the deal. Imagine a cake that’s incredibly moist, unbelievably tender, with a perfect balance of rich cocoa depth and subtle sweetness. It’s an experience that elevates any occasion, turning a simple dessert into a memorable highlight. I honestly believe this specific recipe for our Black Velvet Cake is superior because it nails that delicate balance – it’s decadent without being overly heavy, sophisticated yet utterly comforting. Every forkful is a testament to culinary perfection, a harmonious blend of velvety crumb and tangy-sweet frosting that will leave you, and your guests, utterly captivated. This isn’t just baking; it’s creating edible magic that begs to be shared and savored.
Why This Black Velvet Cake Will Be Your New Favorite:
What truly sets this recipe apart is its unique combination of visual appeal and profound flavor. While red velvet is iconic, the Black Velvet Cake offers a dramatic elegance that is simply unparalleled. The careful balance of cocoa and buttermilk ensures a cake that is moist without being dense, and rich without being overwhelming. It’s the kind of dessert that elicits gasps of delight when brought to the table, and sighs of contentment with every bite. I’ve refined this recipe to ensure foolproof results, so even if you’re new to baking, you’ll achieve a stunning, professional-looking, and tasting cake every time. It’s a showstopper that tastes even better than it looks, and trust me, that’s saying something!
Serving Suggestions & Creative Variations:
Once you’ve mastered the art of this spectacular Black Velvet Cake, the fun doesn’t have to stop there! One of the joys of baking is experimenting and making a recipe truly your own. Let me share some of my favorite ways to serve and tweak this masterpiece, ensuring every occasion feels extra special.
Perfect Pairings:
For a truly elevated experience, I love serving a slice of this cake alongside a steaming cup of rich, dark roast coffee or a strong, aromatic Earl Grey tea. The slight bitterness of the coffee or the floral notes of the tea beautifully complement the cake’s cocoa depth and the frosting’s creamy sweetness. If you’re feeling indulgent, a scoop of premium vanilla bean ice cream or a dollop of freshly whipped cream can add another layer of luxurious texture and temperature contrast. And for a fresh counterpoint, a scattering of fresh raspberries or blackberries on the side, or even artfully placed on the plate, provides a wonderful pop of tartness that cuts through the richness beautifully, making each mouthful a complex delight.
Frosting & Flavor Adventures:
While I’m absolutely head-over-heels for the classic cream cheese frosting, don’t be afraid to explore! Imagine this cake frosted with a dark chocolate ganache, offering an even more intense cocoa experience, or perhaps a salted caramel buttercream for a sweet and savory twist that truly excites the palate. For those who adore a hint of citrus, a subtle orange zest incorporated into the cake batter or the cream cheese frosting can add a delightful brightness that cuts through the richness. You could also infuse a little almond extract into the batter for a slightly different aromatic profile, adding an unexpected layer of flavor. Think about sprinkling mini chocolate chips, toasted coconut flakes, or even some finely chopped pecans between the layers with a thin smear of frosting for added texture and crunch. Each modification opens up a world of new taste sensations!
Beyond the Traditional Cake:
This versatile batter isn’t just for a round layer cake. Why not transform it into stunning Black Velvet cupcakes? Adjust the baking time, and you’ll have individual portions that are perfect for parties, potlucks, or simply convenient single servings. Or, consider an elegant sheet cake adorned with a simple, yet striking, design piped with the cream cheese frosting for a more casual, shareable dessert. For a charming touch, mini bundt cakes made from this recipe are absolutely adorable and make fantastic gifts, showcasing the cake’s unique color in a beautiful mold. Garnish your creations with edible glitter for a touch of sparkle, fresh mint leaves for a pop of color, or elegant chocolate shavings for a professional finish. The possibilities truly are endless, and each variation simply enhances the magic of this unique cake, proving its versatility and enduring appeal.
Your Turn to Bake and Share!
Now that you’ve explored the depths of its deliciousness and all the exciting ways to enjoy it, there’s only one thing left to do: get baking! I truly hope you’ll give this exceptional recipe a try in your own kitchen. There’s something incredibly satisfying about creating something so beautiful and delicious from scratch, and I promise you, the reward of that first perfect bite of your homemade Black Velvet Cake is absolutely worth every minute spent. It’s a wonderful project for a special occasion, a thoughtful gift for a loved one, or simply a luxurious treat to brighten an ordinary day. This recipe empowers you to create bakery-quality results right in your home, instilling a sense of pride and accomplishment that only homemade treats can offer.
So, don’t hesitate! Gather your ingredients and embark on this delicious baking adventure. I am genuinely excited for you to experience the rich flavors and luxurious texture that define this recipe. And once you’ve baked your masterpiece, please, please, please share your experience with me! I absolutely adore seeing your creations and hearing about your baking journey. Did you try a unique serving suggestion? Did you experiment with a different frosting variation? Was it a hit with your family and friends? Drop a comment below or tag me on social media if you share photos of your beautiful Black Velvet Cake. Your feedback and photos inspire me and our entire community of enthusiastic bakers. Let’s celebrate the joy of baking together, one decadent slice at a time, making memories with every delicious crumb!

Black Velvet Cake
Black Velvet Cake is more than just a dessert; it’s an experience. Imagine a cake so rich, so deeply colored, it evokes the elegance of midnight, yet offers a surprising lightness with every bite. Its deep, complex cocoa flavor, combined with an unbelievably moist and tender texture, creates a symphony on the palate that is both comforting and extraordinarily decadent. This isn’t just a cake; it’s a statement, perfect for any celebration or simply to elevate an ordinary day into something truly special.
Ingredients
-
6 tablespoons unsalted butter, softened
-
3/4 teaspoon fine sea salt (for frosting)
-
1 2/3 cup + 1/4 cup heavy whipping cream
-
1 1/2 cups granulated sugar (for frosting)
-
2/3 cup + 1 tablespoon semi-sweet chocolate chips
-
1 cup Dutch-processed cocoa powder, sifted
-
3/4 cup black cocoa powder, sifted
-
1 teaspoon vanilla extract
-
1 3/4 cup all-purpose flour
-
1 teaspoon baking soda
-
1 teaspoon fine sea salt (for cake)
-
2 cups granulated sugar (for cake)
-
1/2 cup canola oil
-
1 cup buttermilk, room temperature
-
2 large eggs, room temperature
Instructions
-
Step 1
Preheat oven to 350°F (175°C). Grease three 8-inch cake pans; line with parchment. In a large bowl, sift together 1 3/4 cup all-purpose flour, 1 cup Dutch-processed cocoa, 3/4 cup black cocoa, 1 teaspoon baking soda, and 1 teaspoon fine sea salt (for cake). Whisk well. -
Step 2
In a mixer, cream 6 tablespoons softened unsalted butter, 1/2 cup canola oil, and 2 cups granulated sugar (for cake) until light. Beat in 2 large eggs one at a time, then 1 teaspoon vanilla extract. -
Step 3
Alternately add dry ingredients and 1 cup room temperature buttermilk to the wet mixture, starting and ending with dry. Mix on low speed until just combined. Ensure uniform dark color. -
Step 4
Divide batter evenly among prepared pans. Bake for 28-32 minutes, or until a toothpick comes out clean. Cool in pans 10-15 minutes, then invert onto wire racks, remove parchment, and cool completely (1-2 hours). -
Step 5
Heat 1 2/3 cup + 1/4 cup heavy whipping cream until simmering. Pour over 2/3 cup + 1 tablespoon semi-sweet chocolate chips; let sit 5 mins, then whisk smooth. Stir in 1 1/2 cups granulated sugar (for frosting) and 3/4 teaspoon fine sea salt (for frosting). Chill thoroughly (at least 2 hours). Once very cold, whip mixture until light and fluffy. -
Step 6
Level cake layers if needed. Place first layer on serving plate, spread with generous frosting. Repeat with remaining layers. Apply a thin crumb coat over entire cake and chill 20-30 minutes. Finish with remaining frosting, smoothing as desired. -
Step 7
Garnish with chocolate shavings or fresh berries. Chill cake 30 minutes for clean slices. Store refrigerated in an airtight container.
Important Information
Nutrition Facts (Per Serving)
It is important to consider this information as approximate and not to use it as definitive health advice.
Allergy Information
Please check ingredients for potential allergens and consult a health professional if in doubt.
Leave a Comment