

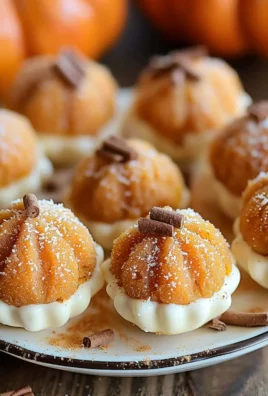
Pumpkin Cheesecake Truffles are truly a revelation, especially as autumn leaves begin to fall and the air gets crisp. If you’ve ever dreamt of a dessert that perfectly encapsulates the warmth of pumpkin pie, the creamy indulgence of cheesecake, and the delightful bite-sized convenience of a truffle, then prepare to have your dreams come true. I’ve found these little bites to be the ultimate crowd-pleaser, effortlessly blending nostalgic seasonal flavors with sophisticated dessert artistry.
While the exact origins of this specific treat might be a modern culinary marvel, combining the rich history of cheesecakes – dating back to ancient Greece – with the elegant simplicity of French chocolate truffles, their appeal is undeniable. It’s this marriage of beloved classics that makes Pumpkin Cheesecake Truffles so special. People adore them not just for their stunning appearance, but for the luxurious, velvety texture that melts in your mouth, delivering that quintessential pumpkin spice warmth followed by a tangy, sweet creaminess. They’re incredibly convenient to make, often requiring no baking, making them a stress-free yet impressive addition to any holiday gathering or a delightful treat for a cozy evening at home.

Ingredients:
- For the Pumpkin Cheesecake Truffle Base:
- 1 (8-ounce) package full-fat cream cheese, softened to room temperature
- 1/2 cup pure pumpkin puree (not pumpkin pie filling)
- 1/2 cup powdered sugar, sifted
- 1 teaspoon pumpkin pie spice
- 1/2 teaspoon pure vanilla extract
- Pinch of salt
- 2 cups crushed graham cracker crumbs (from about 14-16 full graham cracker sheets) OR 2 cups crushed gingersnap cookies for an extra spice kick
- For the Chocolate Coating:
- 12 ounces good quality melting chocolate (milk, semi-sweet, or dark chocolate chips or wafers), divided
- 1 tablespoon coconut oil or shortening (optional, helps with smoothness)
- For Optional Garnish:
- 2 ounces white chocolate (chips or wafers) for drizzling
- Additional pumpkin pie spice, finely chopped pecans, festive sprinkles, or edible glitter
Preparing the Pumpkin Cheesecake Truffle Base
- Ensure your cream cheese is wonderfully soft: Before you begin this delightful journey to homemade pumpkin cheesecake truffles, it is absolutely paramount that your full-fat cream cheese is at true room temperature. I often take mine out of the refrigerator at least an hour, sometimes even two, before I plan to start. This isn’t just a suggestion; it’s a vital step for achieving that silky-smooth, lump-free base we’re aiming for. If your cream cheese is too cold, it will be incredibly difficult to blend properly, leading to a grainy texture in your truffles, and nobody wants that! You want it pliable, almost spreadable, so it can effortlessly combine with the other ingredients.
- Creaming the foundation: In a large mixing bowl, using either a stand mixer with the paddle attachment or an electric hand mixer, beat the softened cream cheese on medium speed for about 1 to 2 minutes. What we’re doing here is aerating it slightly, making it even smoother and lighter, which will contribute to the luxurious mouthfeel of your pumpkin cheesecake truffles. Scrape down the sides of the bowl frequently to ensure everything gets evenly beaten.
- Infusing the pumpkin flavor: Now, add the pure pumpkin puree to the creamed cream cheese. Make sure you’re using pure pumpkin puree and not pumpkin pie filling, as the latter contains added sugars and spices that would throw off our recipe’s balance. Beat these two together until they are thoroughly combined and the mixture is a beautiful, uniform orange hue. This should take another 1-2 minutes. Again, scrape down the bowl to incorporate everything.
- Sweetening and spicing it up: Next, sift the powdered sugar directly into your pumpkin-cream cheese mixture. Sifting is important here to prevent any lumps of sugar from ending up in your truffles. Add the pumpkin pie spice, a true star in our “Pumpkin Cheesecake Truffles” recipe, the pure vanilla extract, and that tiny pinch of salt. The salt might seem insignificant, but trust me, it’s a flavor enhancer, bringing out the best in all the other sweet and spicy notes. Beat on low speed until just combined, then increase to medium and beat for another minute or two until the mixture is light, fluffy, and perfectly smooth. You’re aiming for a consistency that’s thick, yet still quite soft.
- Incorporating the crumbly goodness: This is where the texture really starts to build. Carefully fold in the crushed graham cracker crumbs. I like to crush my graham crackers in a food processor for a very fine, consistent crumb, but you can also place them in a zip-top bag and crush them with a rolling pin for a more rustic texture. If you’re feeling adventurous and want an extra layer of warmth and spice, gingersnap cookies are a fantastic alternative here! Fold the crumbs into the pumpkin cheesecake mixture until they are just evenly distributed. Be careful not to overmix at this stage, as overmixing can make the truffles dense. The mixture should now be thick, firm enough to hold its shape, but still pliable.
- The crucial chilling phase: Cover the bowl tightly with plastic wrap and refrigerate the pumpkin cheesecake truffle mixture for at least 2-3 hours, or even better, overnight. This chilling time is absolutely critical. It allows the mixture to firm up considerably, making it much easier to scoop and roll into perfect truffle balls. It also gives the flavors a chance to meld together beautifully, deepening that quintessential “Pumpkin Cheesecake Truffles” taste. Don’t rush this step; patience will be rewarded with perfectly shaped and delicious truffles.
Forming the Pumpkin Cheesecake Truffles
- Prepare your rolling station: Line a large baking sheet with parchment paper or a silicone baking mat. This will be where your beautifully formed pumpkin cheesecake truffles will rest and chill. Have a small cookie scoop (about 1 tablespoon in size) ready, as this is your secret weapon for ensuring uniform truffle sizes, which is key for even dipping and a professional look.
- Scoop and roll with care: Retrieve the chilled pumpkin cheesecake mixture from the refrigerator. It should be much firmer now. Using your cookie scoop, portion out the mixture. Gently roll each portion between the palms of your hands to form smooth, round balls, approximately 1 to 1.5 inches in diameter. If the mixture starts to get too sticky or warm from the heat of your hands, pop it back into the fridge for 10-15 minutes to firm up again. I find working in batches helps maintain the chill. Place the rolled truffles onto your prepared baking sheet. Take your time with this step; uniform size makes all the difference when it comes to dipping.
- Second chill for firmness: Once all your pumpkin cheesecake truffles are rolled, return the baking sheet to the refrigerator for another 30-60 minutes. This final chill before dipping is incredibly important. It ensures the truffles are very firm, allowing them to hold their shape perfectly when they hit the warm chocolate coating. This also minimizes the risk of them melting into the chocolate, which can make your coating messy and clumpy.
Preparing the Chocolate Coating and Dipping
-
Melt your beautiful chocolate: While your truffles are enjoying their final chill, it’s time to prepare the luscious chocolate coating. There are a couple of excellent ways to melt chocolate, and I’ll walk you through both:
- Double Boiler Method (my preferred for control): Fill a saucepan with about an inch or two of water and bring it to a gentle simmer over medium-low heat. Place a heat-proof bowl (glass or stainless steel works best) over the saucepan, ensuring the bottom of the bowl does not touch the simmering water. Add about two-thirds of your good quality melting chocolate (chips or wafers) to the bowl. Stir occasionally as the chocolate melts, until it’s smooth and glossy. Once mostly melted, remove the bowl from the heat and stir in the remaining one-third of chocolate. Continue stirring until all the chocolate is melted and completely smooth. This tempering technique helps achieve a beautiful shine and a snappier texture when set. If using coconut oil or shortening, stir it in now until fully incorporated and the chocolate is beautifully fluid. This optional addition dramatically improves the smoothness of your coating, making it easier to dip and ensuring a thinner, more elegant shell.
- Microwave Method (quick and convenient): Place two-thirds of your melting chocolate into a microwave-safe bowl. Microwave on 50% power in 30-second intervals, stirring thoroughly after each interval. Chocolate can seize very quickly if overheated, so low power and frequent stirring are key! Once mostly melted, remove from the microwave and stir in the remaining one-third of chocolate, continuing to stir until all lumps are gone and the chocolate is completely smooth. Again, add coconut oil or shortening now if desired.
Important Tip: Keep your chocolate warm but not hot during the dipping process. If it cools too much and thickens, you can gently reheat it using your chosen method.
- Set up your dipping station: Retrieve your very firm pumpkin cheesecake truffles from the refrigerator. Place your melted chocolate alongside. Have a second baking sheet lined with parchment paper ready for your dipped truffles. You’ll also want a fork or a dipping tool (truffle dipping forks are fantastic if you have them) to help with the coating.
- The art of dipping: Take one chilled truffle and drop it into the melted chocolate. Using your fork or dipping tool, roll the truffle gently to fully coat it. Lift the truffle out of the chocolate, allowing any excess to drip back into the bowl. You can lightly tap the fork against the side of the bowl to encourage drips and achieve a thinner, more even coating. This little trick is crucial for professional-looking “Pumpkin Cheesecake Truffles.”
- Place and repeat: Carefully transfer the coated truffle onto the prepared parchment-lined baking sheet. The chocolate will start to set fairly quickly because the truffles are so cold. Repeat this process with the remaining truffles, working efficiently.
Decorating and Final Chill
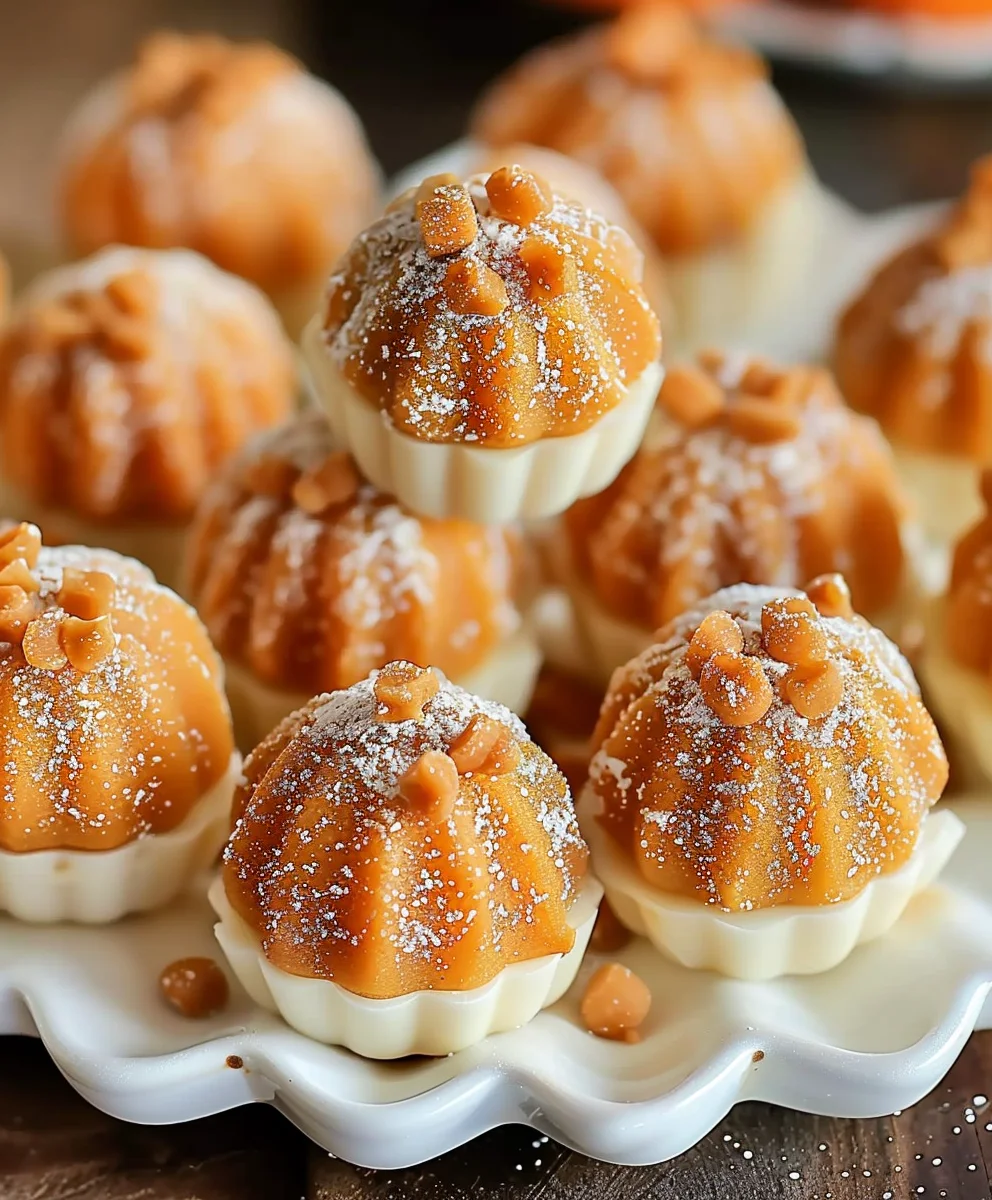
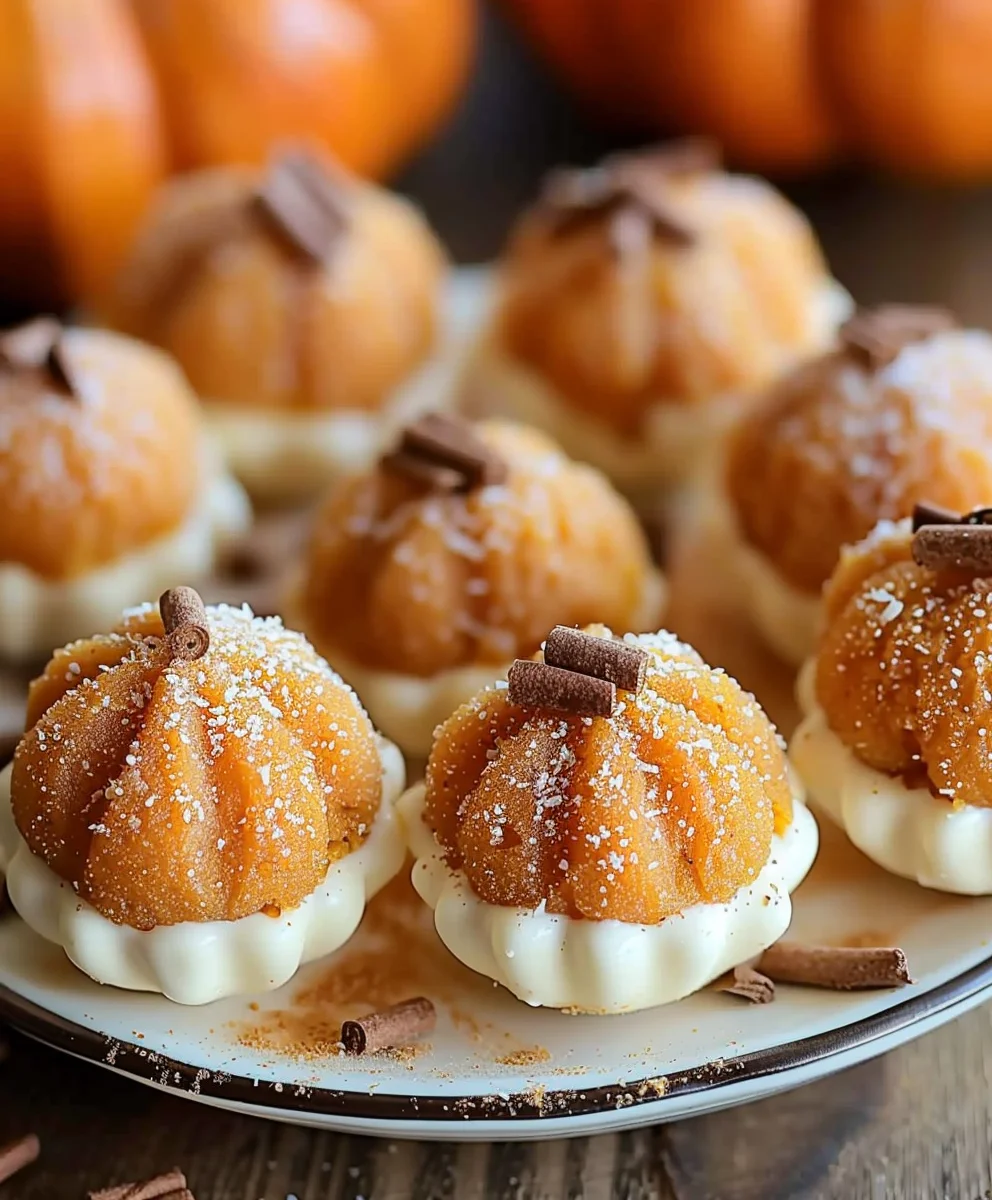
- Garnish while the chocolate is wet: If you plan to add any sprinkles, finely chopped pecans, a dusting of pumpkin pie spice, or edible glitter, do so immediately after placing each truffle on the parchment paper, while the chocolate coating is still wet. This ensures your chosen garnish adheres beautifully. For a touch of festive elegance, I often sprinkle a tiny bit of extra pumpkin pie spice on a few, and some beautiful fall-themed sprinkles on others. This really highlights the “Pumpkin Cheesecake Truffles” theme.
- Prepare your white chocolate drizzle (optional, but highly recommended): For an extra flourish, melt the white chocolate using either the double boiler or microwave method as described in Step 10. Once melted and smooth, transfer the white chocolate to a small piping bag or a zip-top bag with a tiny corner snipped off.
- Drizzle with flair: Once all your dark-chocolate-coated truffles are on the baking sheet and the coating has started to set slightly (but isn’t fully hard), use your piping bag to drizzle decorative lines or patterns over the truffles. The contrast of the white chocolate against the darker coating is visually stunning and adds another layer of gourmet appeal to your “Pumpkin Cheesecake Truffles.”
- The final set: Once decorated, return the baking sheet with all your finished pumpkin cheesecake truffles to the refrigerator. Chill for at least 30 minutes, or until the chocolate coating is completely firm and set. This step is essential for the coating to harden and give the truffles their signature snap.
-
Storage instructions: Your delightful Pumpkin Cheesecake Truffles are best enjoyed within 5-7 days. Store them in an airtight container in the refrigerator. If you manage to have any left after a few days, they also freeze beautifully for up to a month! Just make sure to thaw them in the refrigerator before serving for the best texture and flavor.
Enjoying Your Homemade Pumpkin Cheesecake Truffles:
These rich, creamy, and perfectly spiced truffles are an absolute dream. They are ideal for holiday gatherings, a thoughtful homemade gift, or simply as a special treat for yourself. Every bite is a little piece of pumpkin cheesecake heaven, perfectly portioned and ready to delight your taste buds!
Conclusion:
So, there you have it! We’ve journeyed through the simple steps to create a truly magical dessert, and I genuinely hope you’re feeling inspired to bring this delightful treat to life in your own kitchen. I truly believe this recipe for Pumpkin Cheesecake Truffles is an absolute game-changer, especially during the crisp, cozy months of autumn and the bustling holiday season. What makes these truffles an undeniable must-try isn’t just their adorable size or festive appearance; it’s the symphony of flavors and textures packed into each bite. Imagine the velvety smooth, spiced pumpkin cheesecake filling, perfectly balanced with that signature tang, all enrobed in a crisp, sweet coating. It’s a sophisticated dessert experience, yet surprisingly easy to achieve, making it perfect for both seasoned bakers and adventurous beginners. They offer that rich, indulgent taste of a traditional pumpkin cheesecake but in a convenient, no-fork-required format, which, let’s be honest, is a huge win when entertaining or just enjoying a sweet moment to yourself. They’re genuinely impressive without demanding hours of your precious time, making them the ideal candidate for your next potluck, family gathering, or even just a special weekend indulgence. They are the epitome of fall comfort and elegance, rolled into a bite-sized masterpiece.
When it comes to serving these exquisite bites, the possibilities are as endless as your imagination. For a simple, elegant presentation, arrange them artfully on a dessert platter alongside a steaming mug of spiced chai latte or a rich, dark roast coffee – the flavors complement each other beautifully, creating a perfect autumnal pairing. They also make a fantastic addition to any holiday cookie spread, offering a unique and refreshing twist among the more traditional shortbreads and sugar cookies. If you’re hosting a fall-themed brunch, a small bowl of these truffles can be a delightful and unexpected surprise for your guests, adding a touch of gourmet flair. Thinking beyond just serving them at home, these truffles are also phenomenal as thoughtful, homemade gifts. Package a dozen or so in a pretty box tied with a festive ribbon, and you’ve got a present that speaks volumes about your care and culinary skill, a truly personal touch that will be deeply appreciated. For variations, don’t hesitate to get creative and make them your own! While I adore the classic white chocolate coating, you could absolutely experiment with dark chocolate for a more intense cocoa flavor, or even a milk chocolate for extra sweetness and a creamier finish. A delicate sprinkle of flaky sea salt on top of a chocolate coating can elevate the flavor profile dramatically, offering a wonderful sweet and salty contrast that truly awakens the palate. For an extra touch of spice and texture, consider rolling some of the finished truffles in a mixture of cinnamon sugar, or finely crushed gingersnap cookies for added crunch and a punchier ginger kick. You could also try adding a tiny pinch of ground ginger, allspice, or even a dash of cardamom directly into the cheesecake filling itself before chilling, for an even more complex and aromatic experience that will delight your senses. And if you’re feeling particularly ambitious, a light drizzle of homemade caramel sauce or a generous sprinkle of toasted pecans or walnuts could turn these into miniature works of art, truly personalized to your taste and making them even more irresistible.
Your Culinary Adventure Awaits!
I cannot stress enough how much joy these Pumpkin Cheesecake Truffles bring, both in the making and, of course, in the devouring! They truly encapsulate the spirit of autumn and the warmth of the holiday season in one delightful, satisfying bite. This recipe is more than just a set of instructions; it’s an invitation to create something truly special, to fill your home with wonderful, comforting aromas, and to share delicious moments with those you care about most. So please, don’t just read about them – go ahead and whip up a batch (or two!) in your own kitchen. I promise you won’t regret dedicating a little time to these incredible treats; the reward is absolutely worth it. Once you’ve had a chance to try your hand at these, I would absolutely love to hear about your experience! Did you stick closely to the recipe, or did you venture into some delicious variations of your own, perhaps adding a unique twist that became an instant favorite? What did your friends and family think of these delightful morsels? Please feel free to share your thoughts, your successes, and even your creative tweaks and challenges in the comments below. Your feedback and stories inspire me and our entire community of home bakers to keep experimenting and sharing. Even better, snap a gorgeous photo of your beautiful creations and share them on your favorite social media platform, tagging us so we can admire your culinary masterpieces. Let’s spread the joy of these irresistible treats far and wide, making every autumn and holiday season a little sweeter, one truffle at a time!
Pumpkin Cheesecake Truffles
Pumpkin Cheesecake Truffles are a delightful fall treat, combining the warmth of pumpkin pie with the creamy indulgence of cheesecake in a convenient, bite-sized form. These no-bake truffles are perfect for holiday gatherings or a cozy evening at home.
Ingredients
-
1 tbsp butter
-
4 oz cream cheese, softened
-
1/2 cup canned pumpkin puree
-
1 (14-oz) can sweetened condensed milk
-
1 1/2 tsp pumpkin pie spice
-
1/2 cup graham cracker crumbs
-
1/3 cup white chocolate chips
-
Optional: Orange food coloring
-
Optional: Granulated sugar for rolling
Instructions
-
Step 1
In a large bowl, beat softened cream cheese, butter, pumpkin puree, sweetened condensed milk, and pumpkin pie spice until smooth. Fold in graham cracker crumbs. If using, add a few drops of orange food coloring and mix until combined. -
Step 2
Cover the bowl and refrigerate the mixture for at least 2-3 hours, or overnight, until firm. -
Step 3
Line a baking sheet with parchment paper. Scoop mixture into 1 to 1.5-inch balls and roll smooth between your palms. Optionally, roll truffles in granulated sugar at this stage. Chill rolled truffles on the baking sheet for 30-60 minutes. -
Step 4
Melt white chocolate chips using a double boiler or microwave, stirring until smooth. Dip each chilled truffle into the melted white chocolate, allowing excess to drip off. Place on the prepared parchment-lined baking sheet. -
Step 5
Refrigerate for at least 30 minutes, or until the chocolate coating is completely firm. Store finished truffles in an airtight container in the refrigerator for up to 5-7 days.
Important Information
Nutrition Facts (Per Serving)
It is important to consider this information as approximate and not to use it as definitive health advice.
Allergy Information
Please check ingredients for potential allergens and consult a health professional if in doubt.
Leave a Comment