

Knock You Naked Bars – the very name promises an experience far beyond your average dessert. Allow me to introduce you to a treat so outrageously delicious, it has earned its legendary, playful moniker for a reason. These aren’t just bars; they are a decadent symphony of flavors and textures designed to captivate your senses and leave you utterly enchanted. From the first tantalizing glance to the last blissful crumb, these bars deliver on every sweet promise, making them an unforgettable addition to any occasion.
While these delightful creations don’t trace their lineage back to ancient culinary scrolls, their history is very much rooted in the modern home kitchen, rapidly gaining fame at potlucks, family gatherings, and bake sales across the nation. They became an instant sensation, shared through word-of-mouth (and recipe cards!), precisely because of their unparalleled ability to deliver pure, unadulterated joy in every bite. It’s a testament to simple ingredients coming together to create something truly extraordinary, embodying the spirit of comfort food that brings people together.
Why are these bars so universally adored?
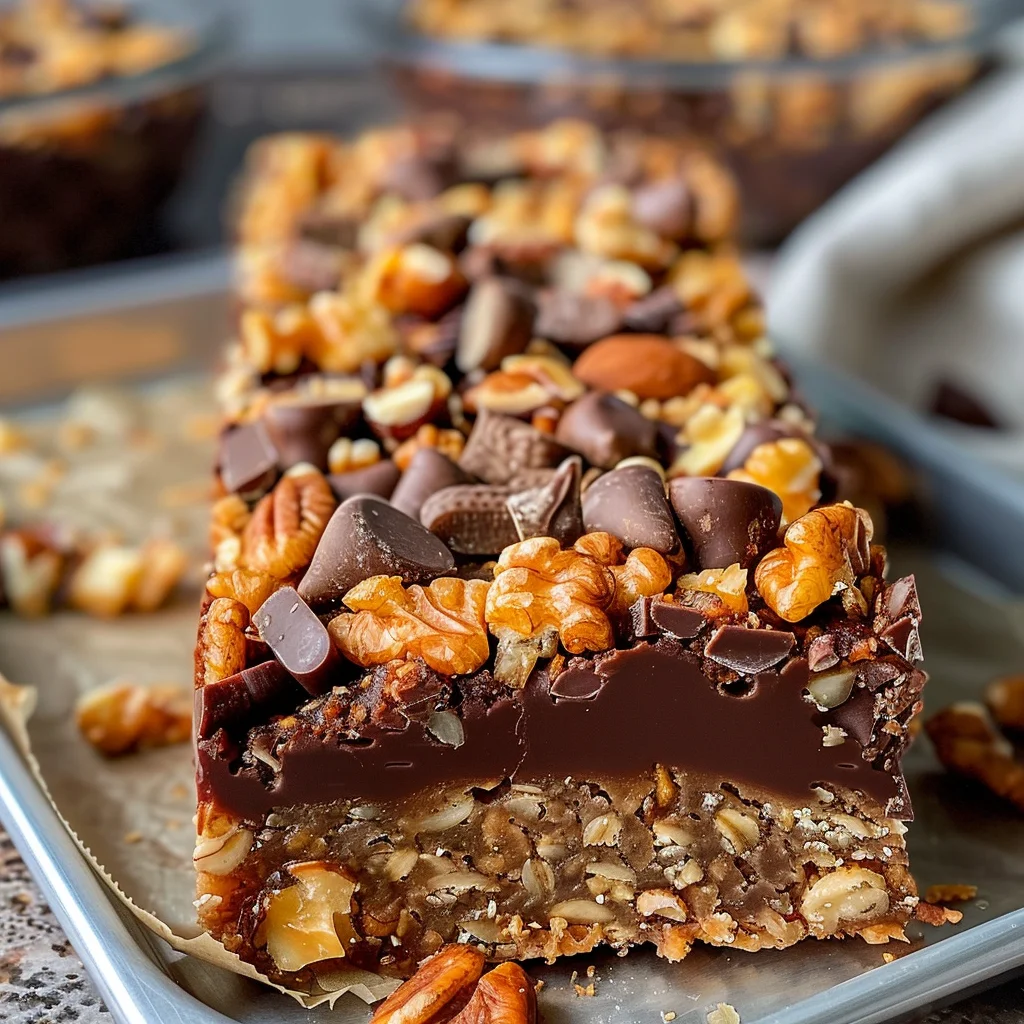
Imagine a rich, buttery shortbread-like crust providing a perfect foundation, topped with a luscious, gooey caramel layer, all generously sprinkled with chocolate chips and often pecans, then baked to golden perfection. The result is an irresistible combination of sweet and salty, chewy and crunchy, all melting together in a harmony that is incredibly satisfying. They are wonderfully convenient to prepare, requiring minimal fuss for a maximum impact treat that disappears almost as quickly as it’s served. Prepare yourself, because these “Knock You Naked Bars” are about to become your new favorite obsession.

Ingredients:
-
For the Shortbread Crust:
- 1 cup (2 sticks) unsalted butter, softened to room temperature. Using unsalted butter allows you to control the salt content precisely, ensuring the perfect balance in your Knock You Naked Bars.
- ½ cup granulated sugar. This provides just the right amount of sweetness to complement the richness of the butter in the crust.
- 2 cups all-purpose flour. I always recommend spooning and leveling your flour to ensure accuracy, preventing a dense or crumbly crust.
- ¼ teaspoon salt. A tiny pinch of salt enhances all the other flavors, giving the crust a more complex taste profile.
-
For the Irresistible Caramel Filling:
- ½ cup (1 stick) unsalted butter. Again, softened unsalted butter is key for a smooth, homogenous caramel.
- 1 cup packed light brown sugar. Packing the brown sugar ensures you get the correct measurement, contributing to the caramel’s deep flavor and chewy texture.
- ½ cup granulated sugar. This adds additional sweetness and helps the caramel achieve its desired consistency.
- ¼ cup whole milk. Whole milk provides the richness necessary for a creamy, luscious caramel.
- 1 teaspoon pure vanilla extract. I love a good quality vanilla; it truly elevates the caramel’s aroma and taste, adding a warm, comforting note to your Knock You Naked Bars.
- ¼ teaspoon salt. This little bit of salt is crucial for cutting through the sweetness of the caramel, creating a truly balanced and addictive flavor.
-
For the Dreamy Chocolate Topping:
- 1 ½ cups (approximately 9 ounces) semi-sweet chocolate chips. I find semi-sweet chips offer the perfect balance of sweetness and cocoa, not too bitter, not too sweet, for the topping of these Knock You Naked Bars.
- 2 tablespoons unsalted butter. This helps create a smooth, glossy, and spreadable chocolate topping that isn’t too firm once set.
- 1 tablespoon light corn syrup. The corn syrup is my secret weapon here; it gives the chocolate topping a beautiful shine and helps keep it from cracking when you cut the bars.
Equipment You’ll Need:
To embark on this delightful baking journey and create the most incredible Knock You Naked Bars, you’ll want to gather a few essential kitchen tools. Having the right equipment ready before you start makes the entire process smoother and more enjoyable. You’ll need a standard 9×13-inch baking pan, preferably a metal one for even heat distribution, though a glass one will work too, just keep an eye on baking times as they can vary slightly. For mixing, a large mixing bowl and a medium saucepan will be indispensable. A handheld electric mixer or a stand mixer with a paddle attachment will make quick work of the crust, ensuring it’s perfectly combined and fluffy. Don’t forget a whisk for the caramel, a rubber spatula for scraping down bowls and spreading the topping, and measuring cups and spoons for precise ingredient measurement. Finally, parchment paper is absolutely crucial for easy removal of your finished Knock You Naked Bars from the pan, making clean-up a breeze. Trust me, it’s worth the extra step!
Preparing the Irresistible Crust:
The foundation of these incredible Knock You Naked Bars is a perfectly tender and buttery shortbread crust. Getting this right sets the stage for the layers of caramel and chocolate to come. It’s a simple process, but paying attention to detail here makes all the difference.
- Preheat Your Oven and Prepare Your Pan: First things first, let’s get that oven ready. Preheat your oven to 350°F (175°C). While the oven is warming up, take your 9×13-inch baking pan. I always line mine with parchment paper, leaving an overhang on the longer sides. This creates “handles” that will make lifting the entire slab of baked bars out of the pan incredibly easy once they’re cool. A light spray with non-stick cooking spray before laying down the parchment paper can also help the paper adhere better to the pan. This step is crucial for effortless removal later on!
- Cream the Butter and Sugar: In a large mixing bowl, using either your electric mixer with the paddle attachment or a hand mixer, combine the 1 cup (2 sticks) softened unsalted butter and ½ cup granulated sugar. Beat them together on medium speed until the mixture is light, fluffy, and pale in color. This usually takes about 2-3 minutes. You want to incorporate air into the butter and sugar, which will contribute to a tender and flaky crust. Scrape down the sides of the bowl as needed to ensure everything is well combined.
- Add Dry Ingredients: With the butter and sugar beautifully creamed, it’s time to add the dry ingredients. Gradually add the 2 cups all-purpose flour and ¼ teaspoon salt to the butter mixture. Mix on low speed until just combined. Be careful not to overmix here! Overmixing can develop the gluten in the flour, leading to a tough crust, and we want it to be delightfully crumbly and tender. The mixture will look somewhat like coarse crumbs at this stage, but it should hold together when pressed.
- Press the Crust into the Pan: Now, transfer the crumbly dough mixture into your prepared 9×13-inch baking pan. Using your clean hands or the bottom of a flat-bottomed glass, press the dough evenly into the bottom of the pan. Make sure it’s a nice, compact layer, extending all the way to the edges and into the corners. The more evenly you press it, the more consistent your crust will be. A firm, even base is key to perfect Knock You Naked Bars.
- Pre-Bake the Crust: Pop the pan into your preheated oven and bake for 18-22 minutes, or until the edges are lightly golden brown and the center looks set. The aroma filling your kitchen will be absolutely heavenly – that’s how you know it’s working! Once baked, remove the pan from the oven and set it aside to cool on a wire rack while you prepare the glorious caramel filling. It doesn’t need to be completely cold, but allowing it to cool for about 10-15 minutes helps it firm up a bit before the next layer.
Crafting the Luscious Caramel Filling:
This is where the magic truly happens for your Knock You Naked Bars! A rich, buttery, and chewy caramel layer is what makes these bars so utterly irresistible. Don’t be intimidated by making caramel; with a little attention and constant stirring, you’ll achieve perfection.
- Melt the Butter: In a medium saucepan, preferably a heavy-bottomed one to prevent scorching, melt the ½ cup (1 stick) unsalted butter over medium heat. Let it melt completely and get nice and bubbly. A good quality heavy-bottomed pan ensures even heat distribution, which is vital for caramel.
- Add Sugars, Milk, and Salt: Once the butter is melted, add the 1 cup packed light brown sugar, ½ cup granulated sugar, ¼ cup whole milk, and ¼ teaspoon salt to the saucepan. Give it a good stir with a whisk or a wooden spoon to combine all the ingredients thoroughly. You want to make sure there are no lumps of sugar clinging to the bottom of the pan.
-
Bring to a Boil and Simmer: Continue stirring the mixture frequently over medium heat until it comes to a rolling boil. Once it’s boiling, reduce the heat slightly to medium-low, just enough to maintain a gentle, steady boil. This is a critical stage: you need to let it simmer for 5-7 minutes, stirring constantly. Stirring prevents the sugar from crystallizing and ensures the caramel cooks evenly and doesn’t stick or burn to the bottom of the pan. You’ll notice the color deepening to a beautiful golden-amber, and the mixture will thicken.
What to look for during simmering:
The caramel should be actively bubbling, but not so vigorously that it’s splattering everywhere. As you stir, you’ll feel it thicken slightly on the spoon. It should coat the back of a spoon and drip off slowly. Some people use a candy thermometer for caramel, aiming for about 235°F (113°C) for a soft-ball stage, but for these Knock You Naked Bars, a visual and textural check with consistent stirring is usually sufficient. Don’t rush this step; the cooking time is essential for the caramel’s final texture.
- Remove from Heat and Stir in Vanilla: After 5-7 minutes of simmering and continuous stirring, remove the saucepan from the heat. Stir in the 1 teaspoon pure vanilla extract. Be careful as the vanilla hits the hot caramel; it might bubble up slightly. Stir well until the vanilla is fully incorporated. The aroma will be absolutely divine at this point!
Assembling and Baking the Knock You Naked Bars:
With your crust pre-baked and the caramel filling perfectly cooked, it’s time to bring these two glorious components together before their final bake. This step is straightforward, but important for achieving the perfect layers in your Knock You Naked Bars.
- Pour Caramel Over Crust: Carefully and evenly pour the warm, luscious caramel filling over the pre-baked shortbread crust. Use a rubber spatula to scrape out every last bit of that delicious caramel from the saucepan. Gently spread the caramel to ensure it covers the entire crust from edge to edge. Don’t worry if it looks a little thin; it will thicken as it bakes and cools.
- Return to the Oven: Place the pan with the caramel-covered crust back into your preheated 350°F (175°C) oven. Bake for an additional 8-10 minutes. During this short baking period, the caramel will bubble and set further. It will become a deeper golden-brown color around the edges and look slightly more firm in the center. This secondary bake helps the caramel adhere to the crust and develop its chewy texture.
- Cool Completely (This is Very Important!): Once baked, remove the pan from the oven and place it on a wire rack to cool completely. This is perhaps one of the most critical steps for the success of your Knock You Naked Bars! Allowing the bars to cool fully, for at least 2-3 hours at room temperature, or even in the refrigerator for an hour, is essential. If you try to add the chocolate topping to a warm caramel layer, the chocolate will melt into the caramel and create a messy, unappealing result. Patience is a virtue, especially when it comes to these bars! The caramel needs to firm up and fully set before the final layer is added.
Creating the Dreamy Chocolate Topping:
The final crowning glory for your Knock You Naked Bars is a smooth, shiny, and perfectly set chocolate topping. This layer adds that rich, classic chocolate finish that truly completes the experience. My little trick with the corn syrup makes a world of difference for shine and cutability!
-
Melt the Chocolate Topping Ingredients: Once your caramel layer is completely cool and firm, it’s time for the chocolate. In a microwave-safe bowl, combine the 1 ½ cups semi-sweet chocolate chips, 2 tablespoons unsalted butter, and 1 tablespoon light corn syrup.
Melting options:
- Microwave Method: Heat the mixture in the microwave in 30-second intervals, stirring well after each interval, until the chocolate is mostly melted and smooth. Be very careful not to overheat the chocolate, as it can seize.
- Double Boiler Method: Alternatively, you can melt these ingredients in a heatproof bowl set over a saucepan of simmering water (a double boiler). Stir constantly until smooth and glossy. This method offers more control and less risk of burning.
Whichever method you choose, make sure the mixture is completely smooth and free of any lumps. The corn syrup will help give it a beautiful sheen and a slightly softer set, making for easier cutting later.
- Spread the Chocolate Topping: Immediately pour the melted chocolate mixture evenly over the completely cooled caramel layer. Use an offset spatula or the back of a spoon to spread the chocolate all the way to the edges of the pan, creating a smooth and even surface. Work relatively quickly, as the chocolate will start to set as it cools.
- Allow Chocolate to Set: Let the chocolate topping set at room temperature for at least 1-2 hours, or you can pop the pan into the refrigerator for about 30-45 minutes to speed up the setting process. You want the chocolate to be firm to the touch before attempting to cut the bars. A fully set chocolate layer is essential for clean cuts and preventing a gooey mess.
The Grand Finale: Chilling and Cutting Your Knock You Naked Bars:
You’re almost there! The anticipation builds as your beautiful Knock You Naked Bars are cooling. The final steps involve chilling them to perfection and then expertly cutting them into individual portions. This is where your patience truly pays off with beautiful, neat bars.
- Chill for Firmness: Once the chocolate topping has set, I highly recommend placing the entire pan into the refrigerator for at least 1 to 2 hours. This chilling step is absolutely crucial for achieving clean, precise cuts. When the bars are thoroughly chilled, all three layers—the crust, the caramel, and the chocolate—will be firm and hold their shape beautifully, preventing crumbling or smearing during cutting. Trust me, skipping this step often leads to frustration!
- Lift and Prepare for Cutting: After thorough chilling, use the parchment paper overhang “handles” you thoughtfully created at the beginning to lift the entire slab of Knock You Naked Bars out of the baking pan. Place the slab onto a sturdy cutting board. This makes it much easier to cut the bars without damaging the pan or struggling with awkward angles.
-
Cut into Bars: Now for the moment of truth! Using a large, sharp knife, carefully cut the slab into individual bars. I typically cut them into 4 rows by 6 rows, yielding 24 bars, but you can adjust the size to your preference. For the cleanest cuts, I have a couple of tricks:
- Warm the Knife: For exceptionally neat edges, dip your knife in hot water, wipe it dry, and then make each cut. Repeat this process for every few cuts. The warm blade glides through the chocolate and caramel much more smoothly.
- Wipe Between Cuts: After each cut (especially when not warming the knife), wipe any residue off the knife with a clean, damp cloth. This prevents smearing chocolate onto the next bar.
- Straight Down Pressure: Instead of dragging the knife, press straight down firmly and cleanly through all layers. This helps prevent the chocolate from cracking excessively.
Take your time with this step; neat cuts make these Knock You Naked Bars even more appealing!
- Storage: Your glorious Knock You Naked Bars are now ready to be devoured! Store any leftover bars in an airtight container at room temperature for up to 3-4 days, or in the refrigerator for up to a week. If storing in layers, place a piece of parchment paper between the layers to prevent them from sticking together. These bars also freeze exceptionally well for longer storage; just thaw them at room temperature before serving.
A Few Friendly Tips for Perfect Knock You Naked Bars:
Making these Knock You Naked Bars is a truly rewarding experience, and with a few extra pointers, you can ensure every batch is absolutely perfect. I’ve learned these little tricks over time, and they really do make a difference, enhancing both the process and the final delicious outcome of your bars.
-
Don’t Rush the Cooling:
I cannot stress this enough: patience is your best friend when making Knock You Naked Bars. Each layer—the crust, the caramel, and especially the final chocolate topping—needs ample time to cool and set completely. Trying to layer warm on warm will result in a messy, integrated texture rather than distinct, beautiful layers. Fully cooled layers are what give these bars their signature structure and clean edges. Consider making the crust and caramel the day before and chilling them overnight if you’re short on time the next day.
-
Accurate Measuring is Key:
Baking is a science, and precise measurements are crucial for success, particularly with the caramel. When measuring flour, spoon it into your measuring cup and level it off with a straight edge rather than scooping directly from the bag (which compacts the flour and leads to too much). For brown sugar, always pack it firmly into the measuring cup. These small details ensure your crust has the right texture and your caramel achieves the perfect consistency for these Knock You Naked Bars.
-
Quality Ingredients Matter:
While you don’t need to break the bank, using good quality ingredients will elevate the flavor of your Knock You Naked Bars significantly. A good quality butter, pure vanilla extract (not imitation), and your favorite semi-sweet chocolate chips will truly shine through. Since there are relatively few ingredients, each one plays a starring role, so choose wisely!
-
Troubleshooting Caramel:
If your caramel seems too thin after the initial bake, it might not have been simmered long enough. If it’s too hard, it might have been cooked too long. The 5-7 minute simmering time is a general guideline; slight variations in stove temperature or pan size can affect it. Keep an eye on the color and consistency, aiming for that beautiful golden-amber and a slight thickening on the spoon. Remember, it will continue to thicken as it cools, so err on the side of slightly less cooked if unsure, as a slightly softer caramel is often preferred in these bars.
-
Get Creative with Toppings:
While classic semi-sweet chocolate is wonderful, feel free to get creative with your chocolate topping for your Knock You Naked Bars! You could use milk chocolate chips for a sweeter bar, dark chocolate for a more intense flavor, or even a blend. A sprinkle of sea salt flakes over the still-wet chocolate topping creates an amazing sweet and salty contrast. A drizzle of white chocolate or a scattering of toasted nuts (like pecans or walnuts) could also be a delightful addition if you’re feeling adventurous!
-
Clean Cuts for Pretty Presentation:
As mentioned in the cutting step, warming your knife under hot water and wiping it dry before each cut makes a huge difference. This helps create those picture-perfect, clean slices that make your Knock You Naked Bars look as good as they taste. It’s a small extra effort that yields impressive results.

Conclusion:
If there’s one recipe that I genuinely believe will revolutionize your dessert game and become an instant classic in your home, it’s these incredible bars. We’ve journeyed through the simple steps to create a treat that is far more than the sum of its parts. What makes this recipe a true standout, an absolute must-try for any baker – novice or seasoned – is its unparalleled ability to deliver immense satisfaction with minimal fuss. From the moment you pull them from the oven, filling your kitchen with an intoxicating aroma of chocolate and caramel, you’ll understand why these are not just another sweet square. They boast a divine duality: a perfectly chewy, buttery base that cradles a rich, decadent filling of molten chocolate and luscious caramel, all crowned with a delightful crunch from toasted pecans. It’s a symphony of textures and flavors that dance on your palate, a balance of sweet and savory that keeps you reaching for just one more piece. Trust me when I say, the sheer joy and comfort these bars bring are truly unmatched, making them the ultimate crowd-pleaser for any gathering, a comforting treat on a quiet evening, or the perfect pick-me-up any day of the week.
I truly cannot emphasize enough the sheer bliss that awaits you when you take that first bite. Imagine a rich, buttery blondie-like base, perfectly baked to a golden brown, providing a tender foundation. Nested atop this, you’ll discover a generous layer of gooey, warm caramel, gently melting into a shower of premium chocolate chips that soften and slightly melt, creating irresistible pockets of pure bliss. And let’s not forget the toasted pecans – they’re not just for garnish; they offer that crucial textual counterpoint, a satisfying crunch that prevents the entire experience from being overly rich and adds a layer of sophisticated nuttiness. This carefully orchestrated combination is what elevates these treats into something truly special, something you’ll be proud to share, and something everyone will ask you to make again and again. They are, in essence, pure dessert perfection, engineered to deliver maximum delight with every single bite. The effort-to-reward ratio here is off the charts, guaranteeing a show-stopping dessert without requiring hours of complicated techniques or exotic ingredients.
Serving Suggestions & Delightful Variations:
While these bars are absolutely divine served at room temperature, allowing the caramel and chocolate to firm up slightly for a wonderfully chewy bite, I implore you to try them warm. A quick zap in the microwave for 10-15 seconds transforms them into a truly ethereal experience – the chocolate becomes molten, the caramel gloriously gooey, and the entire bar takes on an almost lava-cake-like quality. Imagine that warm, fudgy goodness paired with a scoop of vanilla bean ice cream, allowing the cold creaminess to perfectly cut through the richness of the bar. A sprinkle of flaky sea salt over the top right before serving can also dramatically enhance the flavors, bringing out an unexpected depth and curbing any excessive sweetness. For a truly luxurious experience, consider drizzling a little extra caramel sauce or a homemade chocolate ganache over individual servings. These bars also pair wonderfully with a robust cup of coffee, a creamy latte, or a cold glass of milk, making them an ideal treat for any time of day.
But don’t stop there – this recipe is also incredibly versatile and encourages your culinary creativity! Feel free to experiment with different types of chocolate chips; dark chocolate will add a more intense, sophisticated bitterness, while milk chocolate will lean into a sweeter, more comforting profile. White chocolate chips could also be a fun addition, perhaps even swirled with raspberry jam for a fruity twist. If pecans aren’t your favorite, feel free to substitute them with walnuts, almonds, or even a mix of different nuts for varied texture and flavor. For an extra layer of crunch and a salty-sweet kick, consider crushing some pretzels and sprinkling them over the caramel layer before adding the chocolate and nuts. Or, for a tropical touch, a handful of shredded coconut would be absolutely divine. The possibilities are truly endless, allowing you to personalize this already fantastic recipe to suit your unique tastes or whatever ingredients you happen to have to hand. Don’t be afraid to make them your own!
Your Turn to Bake and Share!
Now that you’re armed with the knowledge and inspiration to create these legendary treats, my biggest hope is that you’ll dive into your kitchen and give this recipe a try. I promise you, the results will be incredibly rewarding. There’s something truly special about baking, about transforming simple ingredients into something extraordinary, and sharing that joy with others. These are more than just a dessert; they’re a moment of pure indulgence, a testament to the power of a well-crafted recipe. So, gather your ingredients, preheat your oven, and prepare to be amazed. I truly cannot wait for you to experience the magic of these Knock You Naked Bars. Once you’ve baked them, savored them, and perhaps even shared them (if you can bear to!), I’d absolutely love to hear about your experience. Did you stick to the original recipe, or did you put your own unique spin on it? What were your favorite serving suggestions? Please feel free to share your thoughts, your photos, and any creative variations you came up with in the comments section below. Your feedback and creativity not only inspire me but also help build a vibrant community of passionate bakers. Let’s spread the joy of baking, one delicious bar at a time!
So go ahead, embrace the delicious challenge, and prepare to impress everyone (including yourself!) with these show-stopping treats. You won’t regret it!
Irresistible Knock You Naked Bars Recipe – Pure Decadence!
Knock You Naked Bars – the very name promises an experience far beyond your average dessert. These aren’t just bars; they are a decadent symphony of flavors and textures designed to captivate your senses and leave you utterly enchanted. From the first tantalizing glance to the last blissful crumb, these bars deliver on every sweet promise, making them an unforgettable addition to any occasion. Pure, unadulterated joy in every bite.
Ingredients
-
2 1/4 cups all-purpose flour
-
1 tsp baking soda
-
1 tsp salt
-
1 cup butter, softened
-
3/4 cup sugar
-
3/4 cup packed brown sugar
-
1 tsp vanilla extract
-
2 eggs
-
2 cups semi-sweet chocolate chips
-
5 oz evaporated milk
-
14 oz caramels
-
1/2 cup peanut butter
Instructions
-
Step 1
Preheat oven to 350°F (175°C). Line a 9×13-inch baking pan with parchment. Cream 1 cup softened butter with 3/4 cup granulated sugar and 3/4 cup packed brown sugar until light. Beat in 2 eggs and 1 tsp vanilla extract. Whisk together 2 1/4 cups all-purpose flour, 1 tsp baking soda, and 1 tsp salt. Gradually add dry ingredients to wet, mixing until just combined. Press half of the dough into the prepared pan. Bake 10-12 minutes until lightly golden. -
Step 2
While crust bakes, in a medium saucepan, melt 14 oz caramels with 5 oz evaporated milk and 1/2 cup peanut butter over low heat, stirring until smooth. -
Step 3
Remove crust from oven. Pour caramel-peanut butter mixture evenly over the warm crust. Sprinkle 2 cups semi-sweet chocolate chips over the caramel. Crumble the remaining half of the dough mixture over the chocolate chips. -
Step 4
Return pan to oven and bake for 20-25 minutes, or until the top is lightly golden brown and edges are bubbly. -
Step 5
Remove from oven and cool completely on a wire rack for at least 2-3 hours. For easier cutting, refrigerate for 1-2 hours until firm. -
Step 6
Lift bars from pan using parchment handles. Place on a cutting board and cut into 24 bars using a sharp, warm knife. Store in an airtight container.
Important Information
Nutrition Facts (Per Serving)
It is important to consider this information as approximate and not to use it as definitive health advice.
Allergy Information
Please check ingredients for potential allergens and consult a health professional if in doubt.

Leave a Comment