

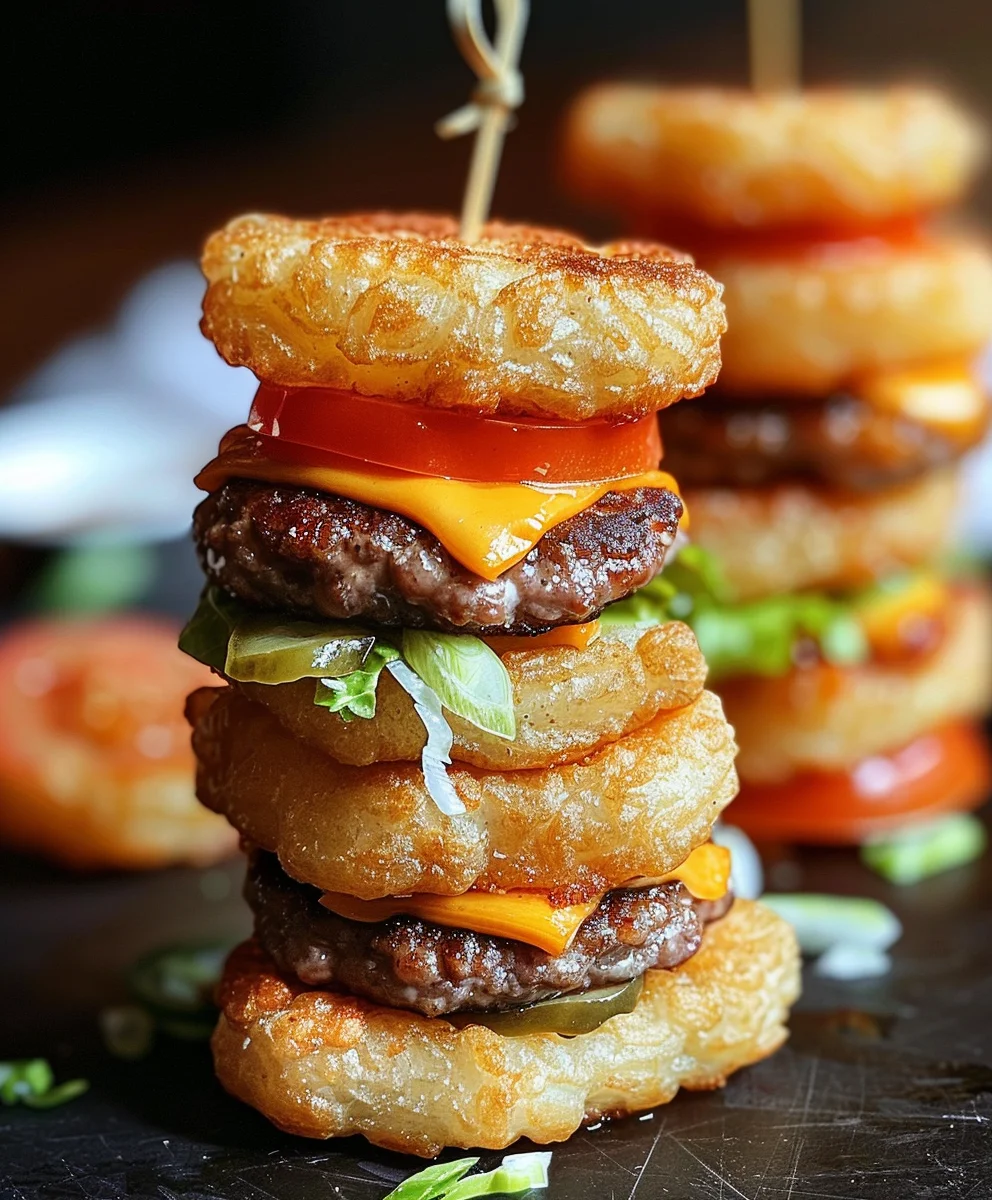
Mini Tater Tot Cheeseburgers are more than just a recipe; they are a delightful culinary innovation that brings together two beloved comfort foods into one irresistible, bite-sized package. I believe there’s something truly magical about transforming classic flavors into a format that’s perfect for sharing, snacking, and satisfying those deep cravings for something utterly delicious. Imagine the joy of a perfectly seasoned mini beef patty, topped with gooey melted cheese, all nestled upon a crispy, golden tater tot – it’s a symphony of textures and tastes designed to bring a smile to anyone’s face.
While the classic cheeseburger boasts a rich American history, evolving from humble street food to a culinary icon over the past century, and the tater tot emerged in the 1950s as a genius invention from Ore-Ida, this particular fusion represents a fantastic modern take on comfort food. It’s an homage to those nostalgic flavors we cherish, reimagined for today’s dynamic lifestyles and social gatherings, offering a touch of playful sophistication.
I’ve personally observed that people absolutely adore these Mini Tater Tot Cheeseburgers for a multitude of compelling reasons. The undeniable appeal lies in their incredible combination of textures and tastes: the satisfying crunch of the tater tot yielding to a savory, juicy beef patty and the creamy embrace of melted cheese creates an explosion of flavor in every bite. Their miniature size makes them incredibly convenient as an appetizer for game day, a fun and easy family dinner, or a charming addition to any party spread. This recipe promises not just a meal, but a memorable culinary experience that’s sure to become a new favorite in your repertoire.

Ingredients:
- 1.5 pounds lean ground beef (80/20 or 85/15): I find this balance gives us enough flavor without being overly greasy for our mini burgers.
- 1 (32-ounce) bag frozen tater tots: These are the stars of our show, serving as the perfect crunchy “buns.”
- 8 slices American or mild cheddar cheese: Sliced, and we’ll be cutting these into smaller squares to fit our mini patties.
- 1/2 small yellow onion: Finely minced, it adds a lovely aromatic kick to our patties.
- 1 teaspoon garlic powder: For that essential savory depth in our burgers.
- 1 teaspoon salt: To season our beef patties just right.
- 1/2 teaspoon black pepper: Freshly ground, if you have it, for an extra aromatic punch.
- 1 tablespoon Worcestershire sauce: My secret weapon for a rich, umami flavor in ground beef.
- 2 tablespoons vegetable oil or canola oil: For cooking our mini patties.
- Mini pickles or gherkins: Thinly sliced, for that classic burger tang.
- Cherry tomatoes: About 1 cup, halved, for a fresh pop of color and sweetness.
- Shredded iceberg lettuce: Approximately 1 cup, for a refreshing crunch.
- Ketchup, mustard, and mayonnaise: Our essential trio of burger condiments, ready for drizzling.
- Optional garnishes: A sprinkle of sesame seeds (to mimic a burger bun!) or fresh chives, finely chopped.
Gathering Your Gear and Prepping the Tots
Alright, my friends, let’s get our kitchen ready for some serious mini burger magic! The first thing I always do when embarking on a recipe like our Mini Tater Tot Cheeseburgers is to ensure I have all my tools and ingredients laid out. It makes the entire process so much smoother and more enjoyable. Think of it as setting the stage for a culinary performance!
- Preheat your oven: We’re going to start with our tater tots because achieving that perfect golden, crispy exterior is absolutely paramount. No one wants a soggy tater tot, right? Check the specific baking instructions on your bag of frozen tater tots, but generally, you’ll be looking to preheat your oven to somewhere between 400°F (200°C) and 425°F (220°C). The slightly higher heat helps them get nice and crisp.
- Prepare baking sheets: While the oven is heating up, grab one or two large baking sheets. I usually line mine with parchment paper or a silicone baking mat. This not only makes cleanup a breeze but also helps prevent the tots from sticking, ensuring every single one gets evenly cooked and gloriously crunchy. Trust me, this small step saves a lot of scraping later!
- Arrange the tater tots: Once your baking sheets are ready, spread the entire bag of frozen tater tots in a single layer. It’s crucial that they aren’t crowded. If they’re piled on top of each other, they’ll steam instead of roast, and we’ll miss out on that beautiful crispiness we’re aiming for. Give them a little breathing room! Pop them into the preheated oven as per the package directions, usually around 20-30 minutes, but we’ll monitor them closely.
- Prep your workstation: While the tots are getting toasty, take a moment to clear your counter space. Grab a large mixing bowl for the ground beef, a cutting board, and a sharp knife for our cheese and onion. Having everything within easy reach will make the next steps a breeze.
- Slice the cheese: Now, let’s tackle that cheese. Take your American or mild cheddar slices. Since we’re making mini burgers, we need mini cheese squares! I find that cutting each standard slice into four smaller squares works perfectly. So, cut it in half lengthwise, then in half widthwise. Set these aside; they’ll be ready for action when our patties are almost done cooking.
Crafting the Mini Beef Patties
This is where the heart of our Mini Tater Tot Cheeseburgers truly comes alive! Making these tiny patties is surprisingly fun, and getting the seasoning just right is key to a flavorful bite. Don’t worry, it’s simpler than you might think!
- Combine the beef and seasonings: In your large mixing bowl, gently place your 1.5 pounds of lean ground beef. Now, let’s infuse it with flavor! Add the finely minced yellow onion, garlic powder, salt, black pepper, and the star of the show for savory depth, the Worcestershire sauce.
- Mix gently, but thoroughly: Here’s a crucial tip for juicy burgers: do not overmix the ground beef! Overworking the meat can lead to tough, dense patties, and we want tender, succulent mini burgers. Use your hands (clean, of course!) and gently fold the ingredients together until everything is just combined. You want to see the seasonings distributed throughout, but you shouldn’t be mashing or squeezing the meat excessively. Think of it as a gentle massage for the beef. This usually takes less than a minute.
-
Form the mini patties: Now for the fun part – shaping our tiny burgers! Our goal is to make patties that are roughly the size of one of our tater tots, perhaps just a touch wider to account for shrinkage during cooking. I find that taking about 1 tablespoon of the beef mixture is just the right amount for each patty. Roll it gently into a small ball, then flatten it between your palms into a disk about 1-inch to 1.5-inches in diameter and about 1/4-inch thick.
- Tip for even sizing: To ensure all your patties cook evenly, try to make them as uniform in size and thickness as possible. This might take a few tries, but you’ll get the hang of it quickly. I usually place them on a clean plate or another small baking sheet as I form them.
- Creating a small dimple: For ground beef patties, especially larger ones, I often press a small dimple into the center to prevent them from puffing up into a dome shape. For these mini patties, it’s less critical due to their small size and quick cooking time, but it’s a good habit if you’re a perfectionist!
- Chill the patties (optional but recommended): If you have time, pop the plate of formed patties into the refrigerator for about 15-20 minutes. Chilling them helps them firm up, making them easier to handle and less likely to fall apart when they hit the hot pan. This also helps them hold their shape better during cooking. While not strictly necessary if you’re in a rush, I always recommend it for the best results.
Cooking the Tots and Patties to Perfection
Okay, we’ve prepped, we’ve shaped, and now it’s time for the magic of heat to transform our ingredients into deliciousness! Getting both the tater tots and the mini beef patties perfectly cooked is key to the ultimate Mini Tater Tot Cheeseburgers experience. Let’s make sure everything comes out golden, crispy, and juicy!
- Continue baking the tater tots: By now, your tater tots should be well on their way to crispy perfection. They usually take about 20-30 minutes total, but this can vary by oven and brand. About halfway through their baking time (after 10-15 minutes), flip them with a spatula. This ensures both sides get beautifully golden brown and incredibly crisp. Keep an eye on them; we want them deeply golden brown, almost crunchy, but not burnt. Once they’re done, remove them from the oven and set them aside on the baking sheet. They’ll stay warm for a bit and retain their crispness.
- Heat your cooking pan: While the tots are finishing up, grab a large skillet or frying pan. I prefer cast iron or a heavy-bottomed stainless steel pan for even heat distribution. Place it over medium-high heat. Add the 2 tablespoons of vegetable or canola oil to the hot pan. You want the oil to shimmer gently, indicating it’s hot enough but not smoking excessively.
-
Cook the mini beef patties: Carefully place your chilled mini beef patties into the hot pan. Make sure not to overcrowd the pan; cook them in batches if necessary to ensure proper searing and even cooking. Overcrowding can lower the pan’s temperature and lead to steaming rather than searing, which means less delicious crust!
- Searing for flavor: Listen for that satisfying sizzle when the patties hit the pan – that’s the sound of flavor development! Cook the patties for about 2-3 minutes per side. Since they are so small, they cook very quickly. You’re looking for a beautiful brown crust to form on the first side before flipping.
- Adding the cheese: After you’ve flipped the patties and they’ve cooked for about 1-2 minutes on the second side, it’s time for the cheese! Place one of your pre-cut mini cheese squares on top of each patty. Immediately reduce the heat to low and cover the pan with a lid (if you have one that fits) or a piece of foil. Let the cheese melt for about 30-60 seconds, just until it’s perfectly gooey and draped over the mini burgers.
- Don’t overcook! Because they are so small, these patties can go from perfectly done to dry in a flash. For well-done, 2-3 minutes per side should be plenty. If you prefer them slightly less done, adjust cooking time accordingly, but remember these are thin patties.
- Remove and drain: Once the cheese is melted and the patties are cooked to your liking, carefully remove them from the pan and place them on a plate lined with a paper towel to absorb any excess grease. This keeps our burgers from being too oily and ensures the tater tots remain crispy.
Assembling Your Irresistible Mini Tater Tot Cheeseburgers
The moment of truth is here! All our hard work culminates in the assembly of these delightful little bites. This is where your creativity can shine, making each Mini Tater Tot Cheeseburger a tiny masterpiece. It’s a bit like building a delicious Lego structure, but with far more satisfying results!
-
Gather your components: Lay out all your glorious components on a clean surface. You should have:
- Your perfectly crispy tater tots.
- The juicy, cheese-topped mini beef patties.
- Thinly sliced mini pickles.
- Halved cherry tomatoes.
- Shredded lettuce.
- And, of course, your arsenal of condiments: ketchup, mustard, and mayonnaise.
Having everything within arm’s reach makes the assembly line process incredibly efficient and fun.
- Start with the base (a tater tot!): Pick up one of your wonderfully crispy tater tots. This is going to be the bottom “bun” of our mini burger. I like to choose the crispiest, flattest ones for the base if possible, as they provide a stable foundation.
- Apply the first layer of sauce: On the bottom tater tot, add a tiny dollop or a thin smear of your preferred sauce. I usually start with ketchup, then maybe a touch of mustard or mayo on the patty itself. Remember, these are mini, so a little goes a long way! You don’t want to drown them.
- Add the cheeseburger patty: Carefully place one of your warm, melty, cheese-topped mini beef patties directly onto the sauced tater tot. The warmth from the patty will slightly soften the tot, creating a perfect melding of flavors and textures.
-
Layer on the fresh toppings: Now for the fresh stuff!
- Gently place a couple of pieces of shredded lettuce on top of the cheese.
- Next, add one or two thin slices of mini pickle. That tangy crunch is essential!
- If you like, you can add a small half of a cherry tomato on top, or save it for garnishing the platter.
Don’t overload them! The beauty of these mini burgers is their bite-sized nature. Too many toppings will make them difficult to handle and eat gracefully.
- Finish with the top (another tater tot!): Finally, grab another crispy tater tot and place it on top of all the layers. This completes your adorable little Mini Tater Tot Cheeseburger!
- Secure with a toothpick (optional but recommended): For easier handling, especially if you’re serving these for a party, gently push a small cocktail toothpick or skewer right through the center of each assembled mini burger. This keeps everything neatly stacked and prevents any toppling. You can even add a tiny cherry tomato or a small piece of pickle to the top of the toothpick for an extra decorative touch!
- Repeat the process: Continue assembling all your remaining tater tots and mini patties until you have a platter full of these glorious, bite-sized delights. It’s quite satisfying to see them all lined up!
Serving Suggestions and Enjoyment
You’ve done it! You’ve created a batch of truly irresistible Mini Tater Tot Cheeseburgers. Now, let’s talk about how to present and enjoy these culinary marvels. They are fantastic as an appetizer, a party snack, or even a fun, casual dinner. The possibilities are endless, and the joy they bring is immeasurable!
- Arrange beautifully on a platter: Presentation really elevates the experience. Arrange your assembled mini tater tot cheeseburgers artfully on a large serving platter. You can line them up in neat rows, create a circular pattern, or pile them casually for a rustic look.
- Garnish for visual appeal: Remember those extra cherry tomatoes and shredded lettuce? This is their moment to shine! Scatter the remaining halved cherry tomatoes and a little extra shredded lettuce around the platter to add freshness and vibrant color. If you have some fresh chives, a light sprinkle over the top adds a touch of gourmet flair and a lovely oniony aroma. Sometimes, I even sprinkle a few sesame seeds on the top tots to mimic a classic burger bun – it’s a playful detail!
- Offer a condiment station: While you’ve put some sauce directly onto the burgers, it’s always nice to offer small bowls of extra ketchup, mustard, and mayonnaise on the side. This allows your guests (or yourself!) to customize their dipping experience or add more sauce if desired. You could even offer a little bowl of ranch dressing or a homemade burger sauce for extra variety.
- Serve immediately for best crispiness: These mini cheeseburgers are truly at their peak when the tater tots are still wonderfully crispy and the cheese is still slightly gooey from the patty’s warmth. While they are still delicious cooled, the crunch factor is best right after assembly. So, encourage everyone to dig in while they’re fresh!
-
Perfect for any occasion:
- Game Day Appetizer: These are an absolute touchdown for any sporting event gathering. Easy to grab, mess-free (especially with toothpicks), and universally loved.
- Party Bites: For birthdays, holidays, or casual get-togethers, they are a guaranteed crowd-pleaser. They disappear quickly, so consider making a double batch!
- Fun Kid-Friendly Meal: Kids adore anything mini, and these are no exception. They’re a fantastic way to make dinner exciting and interactive.
- Unique Snack: Sometimes, you just want a fun, unconventional snack, and these fit the bill perfectly. They’re much more interesting than plain tater tots or regular sliders.
- Enjoy the praise! Prepare yourself for compliments! These Mini Tater Tot Cheeseburgers are always a hit because they combine two beloved comfort foods into one irresistible, bite-sized package. There’s something truly special about taking familiar flavors and presenting them in a new, exciting way. So, take a moment, savor your creation, and enjoy the deliciousness you’ve brought to life! They truly are a testament to how fun and creative home cooking can be.

Conclusion:
And there you have it, friends! We’ve journeyed through the simple yet utterly brilliant creation that is our featured recipe. If there’s one dish I could implore you to try this week, it’s these incredible Mini Tater Tot Cheeseburgers. Why are they a must-try, you ask? Well, let me tell you. They’re a revelation! Imagine the crispy, golden perfection of a tater tot, combined with the savory, cheesy goodness of a classic cheeseburger. It’s comfort food elevated to party-snack royalty, a culinary mash-up that consistently surprises and delights everyone who tries it.
I’ve served these at countless gatherings, from casual game nights to more formal potlucks, and they are always, without fail, the first thing to disappear. There’s an undeniable charm in a bite-sized treat that delivers such a complete flavor profile. They’re easy enough for a weeknight family meal but impressive enough to be the star of any appetizer spread. Forget complicated techniques or obscure ingredients; this recipe is about maximizing flavor and fun with minimal fuss. The simple act of biting into one of these little wonders transports you to a place of pure, unadulterated comfort food joy. They’re not just a snack; they’re an experience, a conversation starter, and quite possibly, your new favorite finger food. I truly believe that the combination of textures – the crunchy exterior, the fluffy potato interior, and the juicy, flavorful meat – creates an addictive quality that simply cannot be replicated. It’s a dish that evokes nostalgia for childhood favorites while simultaneously feeling fresh and exciting.
Unleash Your Creativity: Serving & Variations
One of the things I adore most about these Mini Tater Tot Cheeseburgers is their incredible versatility. While they are absolutely divine straight out of the oven, piping hot and cheesy, there’s a whole world of serving suggestions and variations waiting to be explored. For dipping, you can go classic with ketchup and mustard, but don’t be afraid to branch out! A zesty BBQ sauce adds a smoky sweetness, while a creamy ranch or even a spicy sriracha mayo can elevate the experience. My personal favorite is a homemade “secret sauce” – a simple mix of mayonnaise, ketchup, a touch of relish, and a dash of onion powder – it really brings that classic diner burger vibe to the party.
Thinking beyond dips, imagine setting up a mini topping bar! Offer small bowls of shredded lettuce, finely diced tomatoes, crispy bacon bits, sliced dill pickles, or even caramelized onions. Guests can then customize their bites, adding an interactive and fun element to your spread. For a full meal experience, these make a fantastic main course alongside a crisp green salad or a vibrant coleslaw to cut through the richness. They’re also superb as a fun, deconstructed “burger night” for kids, letting them pick and choose their favorite additions. They pair wonderfully with a cold beverage, making them an ideal snack for watching the big game or enjoying a casual movie night at home. The possibilities are genuinely endless, and each new pairing can unlock a slightly different but equally delicious experience.
And the variations don’t stop there! Feel free to experiment with different types of cheese. A sharp cheddar is always a winner, but pepper jack will add a subtle kick, provolone offers a mild creaminess, and a sprinkle of blue cheese crumbles could introduce an unexpected gourmet twist. If you’re looking to lighten things up, ground turkey or chicken can easily substitute the beef, maintaining the structure while altering the flavor profile. For a vegetarian option, simply swap the meat for your favorite plant-based crumbles, ensuring they’re seasoned well. You could also play with the seasoning of the meat – a pinch of smoked paprika or a dash of chili powder can introduce new dimensions. Don’t be shy about adding finely diced jalapeños directly into the meat mixture for an extra layer of heat, or even a dash of Worcestershire sauce for added umami. The beauty of this recipe lies in its adaptability; it&rsquos a canvas for your culinary imagination, encouraging you to make it truly your own.
Your Turn: Try Them and Share!
Now, it’s your turn! I genuinely hope this recipe inspires you to head into your kitchen and whip up a batch of these truly unforgettable Mini Tater Tot Cheeseburgers. They are more than just a recipe; they are a gateway to joyful, fuss-free entertaining and incredibly delicious eating. Trust me, the smiles they bring to faces are absolutely priceless, and the compliments you’ll receive will make all your efforts worthwhile, even though the effort is surprisingly minimal. Don’t let another week pass without experiencing the magic of this brilliant combination. Whether you’re making them for a crowd or just for a cozy night in, I promise they will not disappoint. The ease of preparation, combined with the overwhelmingly positive reception they always receive, makes this a recipe you’ll want to revisit again and again.
Once you’ve had a chance to try them, I would absolutely love to hear from you. What variations did you try? What sauces did you pair them with? Did your family devour them as quickly as mine does? Please, share your experiences in the comments below, or even better, tag me on social media with your photos! There’s nothing that makes me happier than seeing your successful kitchen adventures. Let’s spread the word about these fantastic little bites and make them a staple in kitchens everywhere. Your feedback and creative twists not only encourage me but also help other readers discover new ways to enjoy this delightful dish. Happy cooking, my friends, and enjoy every single delightful bite!
Mini Tater Tot Cheeseburgers
Mini Tater Tot Cheeseburgers are a delightful culinary innovation combining classic cheeseburger flavors with crispy tater tots into irresistible, bite-sized party food. A perfectly seasoned mini beef patty, melted cheese, and fresh toppings nestled upon a golden tater tot create a symphony of textures and tastes.
Ingredients
-
1 lb lean ground beef
-
1 (32-ounce) bag frozen tater tots
-
8 slices American or mild cheddar cheese, cut into quarters
-
1/2 small yellow onion, minced
-
1 tsp garlic powder
-
1/2 tsp salt
-
1/2 tsp black pepper
-
1 tbsp Worcestershire sauce
-
2 tbsp vegetable or canola oil
-
Mini pickles or gherkins, thinly sliced
-
1 cup cherry tomatoes, halved
-
1 cup shredded iceberg lettuce
-
Ketchup, mustard, mayonnaise (for serving)
-
Optional: sesame seeds, fresh chives, toothpicks
Instructions
-
Step 1
Preheat oven to 400-425°F (200-220°C) as per tater tot package directions. Line baking sheets with parchment. Spread tater tots in a single layer and bake for 20-30 minutes, flipping halfway, until golden and crispy. Set aside. -
Step 2
Cut each cheese slice into four smaller squares. -
Step 3
In a large bowl, gently combine ground beef, minced onion, garlic powder, salt, black pepper, and Worcestershire sauce until just mixed. Do not overmix. -
Step 4
Take about 1 tablespoon of beef mixture per patty. Roll into a ball, then flatten into a 1-1.5 inch diameter, 1/4-inch thick disk. Place on a plate. (Optional: chill for 15-20 min). -
Step 5
Heat 2 tablespoons oil in a large skillet over medium-high heat. Cook patties in batches for 2-3 minutes per side until browned. -
Step 6
After flipping patties and cooking for 1-2 minutes on the second side, place a cheese square on each. Reduce heat to low, cover, and melt cheese for 30-60 seconds. Remove patties to a paper towel-lined plate to drain. -
Step 7
To assemble each mini cheeseburger: Place a tater tot on a serving platter. Add a tiny dollop of desired sauce (ketchup, mustard, or mayo). Top with a cheese-melted mini beef patty. Layer with shredded lettuce and 1-2 pickle slices. Finish with another crispy tater tot on top. -
Step 8
Secure each with a toothpick if desired. Arrange on a platter with halved cherry tomatoes and extra shredded lettuce. Offer additional condiments on the side. Serve immediately for best crispiness.
Important Information
Nutrition Facts (Per Serving)
It is important to consider this information as approximate and not to use it as definitive health advice.
Allergy Information
Please check ingredients for potential allergens and consult a health professional if in doubt.


Leave a Comment