

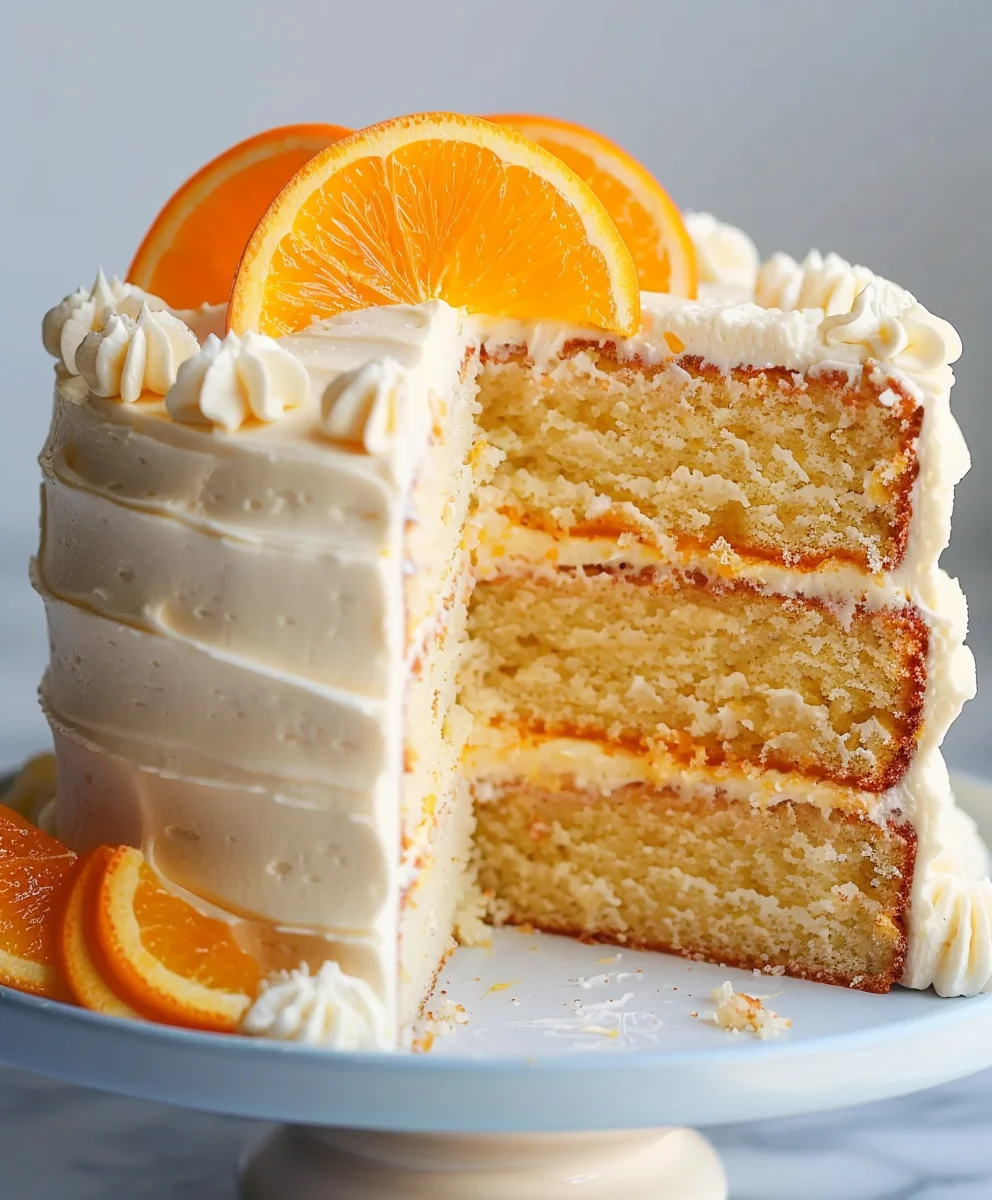
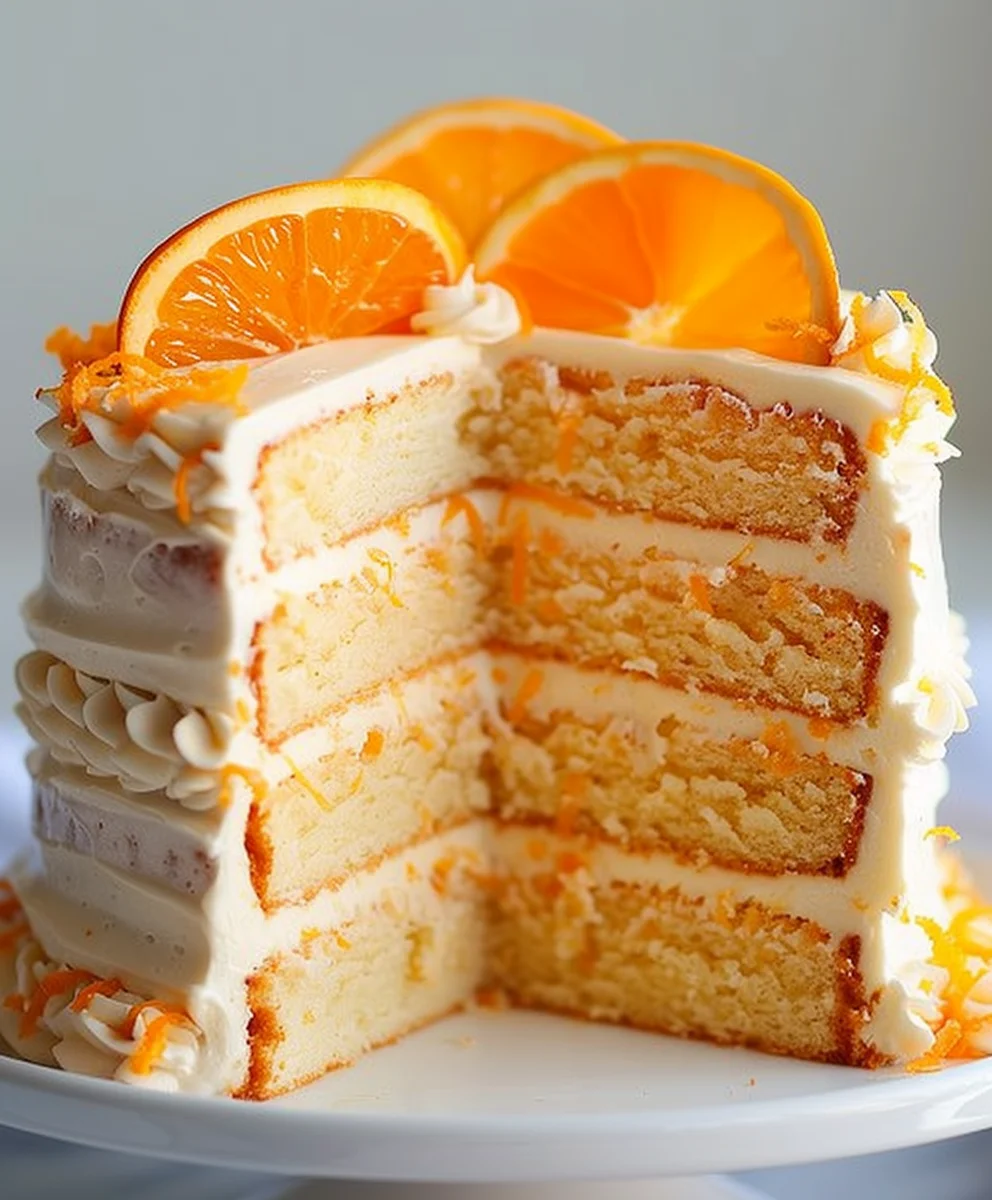
Moist Orange Layer Cake is more than just a dessert; it’s a celebration of vibrant flavors and exquisite textures that promises to brighten any occasion. Imagine a towering confection, each forkful delivering a burst of sunny citrus intertwined with a delicate, tender crumb that simply melts in your mouth. This isn’t merely a cake; it’s an experience, a delightful journey for your taste buds that captures the essence of sunshine in every bite.
A Timeless Classic with Luminous Flavor
The use of citrus in baking has a rich and storied history, with oranges, in particular, being cherished for their aromatic zest and juicy pulp for centuries. From ancient Mediterranean kitchens to modern patisseries, the humble orange has consistently transformed simple bakes into something truly extraordinary. This particular cake taps into that enduring love for bright, uplifting flavors, making it a timeless favorite that evokes warmth and joy.
People absolutely adore this cake for its unparalleled combination of zesty sweetness and that crucial, utterly satisfying moistness. It’s the perfect balance – not too tart, not too sweet – just a harmonious blend that leaves a wonderfully refreshing aftertaste. Whether you’re hosting a grand celebration or simply seeking a comforting treat, a perfectly executed Moist Orange Layer Cake serves as a stunning centerpiece and a delectable indulgence. I am thrilled to share my insights into achieving this beloved classic, ensuring every slice is a testament to its irresistible charm.

Ingredients:
- For the Moist Orange Layer Cake:
- 2 ½ cups (300g) all-purpose flour, or cake flour for an even more tender crumb. I often opt for cake flour if I have it on hand, it makes a noticeable difference!
- 2 teaspoons baking powder. This is our primary leavening agent.
- ½ teaspoon baking soda. The acidity from the buttermilk and orange juice will activate this beautifully.
- ½ teaspoon fine sea salt. Essential for balancing all the sweet flavors.
- 1 cup (226g) unsalted butter, softened to room temperature. This is crucial for achieving that light, fluffy texture when creamed.
- 2 cups (400g) granulated sugar. This sweetens our cake and contributes to its moistness.
- 4 large eggs, at room temperature. Just like the butter, room temperature eggs emulsify much better, leading to a smoother batter.
- 1 cup (240ml) buttermilk, at room temperature. The acidity in buttermilk works wonders with the baking soda and adds incredible moisture.
- 2 tablespoons freshly grated orange zest (from 2-3 medium oranges). This is where a lot of our vibrant orange flavor comes from, don’t skip it!
- ¼ cup (60ml) fresh orange juice (from the zested oranges). For an extra burst of citrus.
- 1 teaspoon pure vanilla extract. Vanilla complements orange wonderfully.
- For the Orange Cream Cheese Frosting:
- 12 ounces (340g) full-fat cream cheese, softened to room temperature. Make sure it’s brick-style cream cheese, not the spreadable kind from a tub.
- ¾ cup (170g) unsalted butter, softened to room temperature. Again, room temperature is key for a smooth frosting.
- 4 cups (480g) powdered sugar (confectioners’ sugar), sifted. Sifting prevents lumps, which is especially important for frosting.
- 1 tablespoon freshly grated orange zest. More orange goodness!
- 2-3 tablespoons fresh orange juice, to taste and consistency. Start with two and add more if needed.
- 1 teaspoon pure vanilla extract.
- Pinch of fine sea salt. To balance the sweetness.
- Optional Orange Simple Syrup (for ultimate moisture):
- ¼ cup (60ml) fresh orange juice.
- ¼ cup (50g) granulated sugar.
Equipment You’ll Need:
Having the right tools makes all the difference when baking a beautiful cake like this. Here’s what I recommend:
- Three 8-inch round cake pans. If you only have two, you can bake in batches, but three makes the process smoother.
- Parchment paper. For lining the bottoms of your cake pans – this is a non-negotiable step for easy release!
- Large mixing bowls (at least two).
- Electric mixer (stand mixer with paddle attachment or a handheld mixer). This is essential for creaming the butter and sugar, and for whipping up that fluffy frosting.
- Rubber spatula. For scraping down the sides of bowls and gently folding.
- Whisk. For combining dry ingredients.
- Sifter or fine-mesh sieve. For sifting powdered sugar and optionally the dry cake ingredients.
- Measuring cups and spoons.
- Citrus zester/grater and juicer.
- Wire cooling racks. For cooling your cake layers completely.
- Offset spatula or icing knife. For spreading frosting.
- Cake turntable (optional, but very helpful for decorating).
Baking the Moist Orange Layer Cake Layers:
Let’s get started on creating the foundation for our incredible Moist Orange Layer Cake. Precision and temperature are your best friends here!
- Prepare Your Pans and Preheat Oven:
Preheat your oven to 350°F (175°C). Prepare your three 8-inch round cake pans by greasing them thoroughly with butter or non-stick spray, then flouring them. For extra security, I always cut out parchment paper circles to line the bottoms of the pans. This simple step ensures your beautiful cakes won’t stick, which is a common baking heartache we want to avoid!
- Combine Dry Ingredients:
In a medium bowl, whisk together the flour, baking powder, baking soda, and salt. Whisking ensures these ingredients are evenly distributed, which is crucial for a consistent rise and texture. Set this aside for a moment.
- Cream Butter and Sugar:
In a large mixing bowl, using an electric mixer, beat the softened unsalted butter and granulated sugar together on medium-high speed until the mixture is light, fluffy, and pale in color. This process, called “creaming,” incorporates air into the butter, which contributes significantly to the cake’s light texture. This usually takes about 3-5 minutes. Don’t rush this step – it’s key to a tender cake.
- Add Eggs Gradually:
Reduce the mixer speed to medium-low and add the eggs one at a time, beating well after each addition. Make sure each egg is fully incorporated before adding the next. Scrape down the sides of the bowl often with a rubber spatula to ensure everything is mixing evenly. The mixture might look a little curdled at this point, but don’t worry, it will come together.
- Incorporate Wet Ingredients:
In a separate small bowl or measuring cup, whisk together the buttermilk, fresh orange juice, orange zest, and vanilla extract. This combines our liquid flavor components.
- Alternate Dry and Wet Ingredients:
With the mixer on low speed, begin adding the dry ingredient mixture to the wet mixture in three additions, alternating with the buttermilk mixture in two additions. Start and end with the dry ingredients. For example: Add 1/3 of the dry mixture, mix until just combined. Then add 1/2 of the wet mixture, mix until just combined. Repeat with another 1/3 dry, the remaining 1/2 wet, and finally the last 1/3 dry. Be careful not to overmix the batter at this stage, as overmixing can develop the gluten in the flour too much, leading to a tough cake. Mix only until just combined and no streaks of flour remain.
- Divide and Bake:
Divide the batter evenly among the three prepared cake pans. I like to use a kitchen scale for this to ensure even layers, but eyeballing works too. Smooth the tops with an offset spatula. Bake for 25-30 minutes, or until a wooden skewer or toothpick inserted into the center of a cake comes out clean. The cakes should be lightly golden and spring back when gently pressed.
- Cool the Cake Layers:
Once baked, remove the cakes from the oven and let them cool in their pans on a wire rack for about 10-15 minutes. This allows the cakes to set and firm up before handling. After this initial cooling, carefully invert the cakes onto the wire racks, remove the pans, and gently peel off the parchment paper. Allow the cakes to cool completely to room temperature before frosting. Frosting a warm cake is a recipe for disaster (and melty frosting!), so patience is key here.
- Optional Orange Simple Syrup Application (for ultimate moisture):
While the cakes are cooling, if you’re making the optional simple syrup, combine the orange juice and granulated sugar in a small saucepan. Heat over medium heat, stirring until the sugar dissolves completely. Remove from heat and let cool slightly. Once your cake layers are completely cool, gently brush the tops of each layer with the orange simple syrup. This adds another layer of orange flavor and an incredible boost of moisture, making for an extraordinarily moist orange layer cake.
Preparing the Orange Cream Cheese Frosting:
This frosting is truly the crowning glory of our Moist Orange Layer Cake. It’s tangy, sweet, and oh-so-creamy, perfectly complementing the citrusy cake.
- Beat Cream Cheese and Butter:
In a large mixing bowl, using your electric mixer with the paddle attachment, beat the softened cream cheese and softened unsalted butter together on medium speed until smooth and creamy. This usually takes 2-3 minutes. It’s incredibly important that both are at proper room temperature, otherwise, you’ll end up with lumps, and nobody wants lumpy frosting.
- Add Powdered Sugar:
Reduce the mixer speed to low and gradually add the sifted powdered sugar, one cup at a time. Mix until each addition is just incorporated before adding more. Once all the sugar is in, increase the speed to medium-high and beat for another 2-3 minutes until the frosting is light, fluffy, and visibly lighter in color. Scrape down the sides of the bowl as needed.
- Incorporate Orange and Vanilla:
Add the fresh orange zest, 2 tablespoons of fresh orange juice, and vanilla extract to the frosting. Beat on medium speed until fully combined. Taste the frosting. If you desire a stronger orange flavor or a slightly thinner consistency, add the remaining tablespoon of orange juice, a teaspoon at a time, until it reaches your preferred taste and texture. I find 2-3 tablespoons is usually perfect for a spreadable consistency that holds its shape well.
- Final Whip:
Give the frosting one final whip on medium-high for about 30 seconds. This incorporates a bit more air, making it extra light and luscious. Your Orange Cream Cheese Frosting is now ready for assembly!
Assembling the Moist Orange Layer Cake:
Now for the fun part – putting it all together! Take your time and enjoy the process of transforming your baked layers into a show-stopping Moist Orange Layer Cake.
- Prepare for Assembly:
Ensure your cake layers are completely cool. If they are even slightly warm, your frosting will melt and slide right off. If your cake layers have domed tops, you can use a serrated knife to carefully level them, creating flat surfaces for easier stacking. This also helps achieve a more professional look.
- First Layer:
Place one cake layer on your serving platter or cake stand. If you have a cake turntable, now is the time to use it – it makes frosting so much easier! Spread about 1 to 1 ½ cups of Orange Cream Cheese Frosting evenly over the top of the first layer, extending just to the edge.
- Second Layer:
Carefully place the second cake layer on top of the first, aligning it as best you can. Gently press down to secure it. Repeat the frosting process, spreading another 1 to 1 ½ cups of frosting evenly.
- Third Layer:
Place the final cake layer on top. If you leveled your cakes, sometimes it’s nice to put the bottom of one of the layers (the flattest side) on top for a perfectly flat surface for the top frosting. Gently press down.
- Crumb Coat:
Apply a very thin layer of frosting all over the top and sides of the entire cake. This is called a “crumb coat,” and its purpose is to trap any loose crumbs, preventing them from mixing into your final, beautiful layer of frosting. Don’t worry about perfection here, just a thin, even layer. Once applied, refrigerate the cake for 15-20 minutes, or until the crumb coat is firm to the touch. This step is vital for a clean, professional finish.
- Final Frosting Layer:
Remove the cake from the refrigerator. Apply the remaining Orange Cream Cheese Frosting to the top and sides of the cake. Use an offset spatula or icing knife to smooth out the frosting. You can create decorative swirls, a rustic look, or a perfectly smooth finish – whatever you prefer! I love a slightly textured look that shows off the beautiful creamy frosting. For a smooth finish, dip your spatula in warm water and wipe it clean between strokes.
- Decorate (Optional):
For an extra touch of elegance and orange flavor, you can garnish the top of your Moist Orange Layer Cake with additional orange zest, candied orange slices, or even fresh orange segments. A few fresh mint leaves can also add a nice color contrast.
- Chill Before Serving:
For the best presentation and to allow the frosting to fully set, chill the assembled cake in the refrigerator for at least 30 minutes before slicing and serving. This ensures clean slices and a wonderfully firm frosting.
Tips for a Perfectly Moist Orange Layer Cake:
Baking is a science, but a little tender loving care goes a long way. Here are my top tips for ensuring your Moist Orange Layer Cake is a resounding success every time:
- Room Temperature Ingredients are Non-Negotiable: This is probably the most important tip for cakes and frostings. Butter, eggs, and buttermilk at room temperature emulsify beautifully, creating a smooth, homogenous batter that traps air efficiently. Cold ingredients can lead to a curdled batter and a denser cake. Plan ahead and take them out of the fridge at least 1-2 hours before you start baking.
- Don’t Overmix the Batter: Once you add the flour, mix only until just combined. Overmixing develops the gluten in the flour, which results in a tough, dry cake. We’re aiming for a tender, moist crumb, so be gentle with that mixer!
- Measure Flour Correctly: For accurate results, I always recommend weighing your flour using a kitchen scale. If you don’t have one, fluff the flour in its container, then spoon it gently into your measuring cup and level it off with the back of a knife. Scooping directly with the measuring cup can compact the flour, leading to too much flour and a dry cake.
- Zest Before Juicing: Always zest your oranges before you cut them in half to juice them. It’s much easier and you’ll get more zest! The zest holds most of the intense orange oil and flavor.
- Parchment Paper is Your Friend: Lining your cake pans with parchment paper circles on the bottom ensures your beautiful cake layers release easily and intact. There’s nothing worse than a perfectly baked cake that sticks to the pan!
- Cool Completely: I can’t stress this enough – your cake layers must be completely cool before you even think about frosting them. Warm cake + frosting = a sliding, melting mess. Patience is a virtue in baking.
- Sift Powdered Sugar: For the smoothest, lump-free cream cheese frosting, always sift your powdered sugar. It breaks up any clumps and helps it incorporate seamlessly.
- Don’t Overbeat Cream Cheese Frosting: While you want to beat it until fluffy, be careful not to overbeat cream cheese frosting, especially after adding the powdered sugar. Overbeating can cause the cream cheese to break down, resulting in a runny frosting.
- Taste and Adjust: Baking is fun because you can make it your own! Taste your frosting and adjust the orange juice or zest to your liking. Every orange is slightly different in flavor intensity.
Storage Recommendations:
To keep your delicious Moist Orange Layer Cake fresh and flavorful:
- At Room Temperature: If your kitchen is cool (below 70°F or 21°C), the cake can be stored at room temperature for up to 2 days, covered loosely to prevent it from drying out. However, due to the cream cheese frosting, refrigeration is generally preferred for longer storage and food safety.
- In the Refrigerator: For optimal freshness and to ensure the cream cheese frosting remains stable, store the cake in an airtight container in the refrigerator for up to 5 days. Before serving, allow the cake to come to room temperature for about 30-60 minutes. This brings the cake and frosting to their best texture, making them softer and more flavorful.
- Freezing: You can freeze individual slices or whole unfrosted layers of this cake. Wrap slices tightly in plastic wrap, then aluminum foil, and store in an airtight container for up to 1 month. For unfrosted layers, wrap each layer tightly in plastic wrap, then foil, and freeze for up to 2-3 months. Thaw frozen cake in the refrigerator overnight before bringing to room temperature and serving or frosting.
Enjoy every delightful bite of your homemade Moist Orange Layer Cake!
Conclusion:
And there you have it, my friends! We’ve reached the sweet end of our journey through this incredible recipe, and I truly hope you’re feeling as inspired as I am to get into the kitchen. What we’ve explored together isn’t just another cake recipe; it’s a blueprint for creating a truly memorable dessert that consistently wows anyone who tastes it. This isn’t just a cake; it’s an experience, a delightful fusion of vibrant citrus and unparalleled tenderness that sets it apart from every other sweet treat.
From the moment you take that first bite, you’ll understand exactly why I rave about this particular creation. The way the bright, zesty orange flavor bursts on your palate, perfectly balanced by the rich, buttery sweetness of the cake itself, is simply magical. And that texture! It’s the kind of moistness that makes you close your eyes in pure enjoyment, a delicate crumb that practically melts in your mouth without ever feeling heavy or dense. It’s a symphony of flavors and textures, meticulously crafted to deliver sheer bliss with every single forkful. This recipe truly delivers on its promise of an exceptional dessert, making it an absolute must-try for any occasion, from a casual family gathering to the most elegant dinner party.
Now, let’s talk about making this already magnificent dessert even more special. While this cake is absolutely stunning on its own, a few thoughtful serving suggestions can elevate it further. Imagine serving a generous slice alongside a steaming cup of Earl Grey tea or a robust, freshly brewed coffee – the nuanced flavors complement each other beautifully. For a more festive touch, consider a dollop of freshly whipped cream, perhaps infused with a hint of vanilla or a tiny splash of Grand Marnier, to add an extra layer of creamy decadence. Garnishing with thin, candied orange slices or a scattering of fresh mint leaves not only adds visual appeal but also provides another aromatic dimension. On a warm day, a scoop of premium vanilla bean ice cream or even a light, refreshing sorbet would make an incredible pairing, offering a delightful contrast in temperature and texture that will keep your guests reaching for more.
One of the things I love most about baking is the opportunity for creativity, and this recipe offers a fantastic canvas for your own culinary experiments. While the classic version is undeniably perfect, don’t hesitate to explore delightful variations. Feeling adventurous? Try incorporating the zest of different citrus fruits – a lemon-orange swirl, or perhaps a lime-orange fusion, could introduce fascinating new flavor profiles. Imagine a version with a subtle hint of cardamom or ginger, adding a warm, exotic spice note that pairs beautifully with the citrus. You could also experiment with different frostings; while the orange cream cheese frosting is divine, a dark chocolate ganache would create a dramatic and intensely flavorful contrast, or a lighter buttercream infused with almond extract could offer a delicate twist. For an extra layer of indulgence, consider adding chopped toasted pecans or walnuts to the batter, or even a thin layer of orange marmalade between the cake layers for an unexpected burst of fruitiness. The possibilities are truly endless, allowing you to personalize this incredible Moist Orange Layer Cake to suit any palate or occasion.
My hope is that this recipe inspires you to create something truly wonderful in your own kitchen. There’s an immense satisfaction that comes from baking from scratch, especially when the result is as spectacularly delicious as this cake. It’s more than just following instructions; it’s about pouring a little bit of yourself into the process and then sharing that joy with others. So please, I wholeheartedly encourage you to roll up your sleeves, gather your ingredients, and give this recipe a try. You won’t regret it! Once you’ve baked this beauty, I would absolutely love to hear about your experience. Did you stick to the original, or did you venture into exciting variations? What did your family and friends think? Share your stories, your triumphs, and even your kitchen adventures with me. Your feedback and photos are always a huge source of inspiration for me and for fellow baking enthusiasts. Happy baking, and enjoy every glorious slice!
Moist Orange Layer Cake
A vibrant, exquisitely moist orange layer cake with a delicate, tender crumb and a tangy orange cream cheese frosting, perfect for any celebration, capturing the essence of sunshine in every bite.
Ingredients
-
2 ½ cups (300g) all-purpose or cake flour
-
2 tsp baking powder
-
½ tsp baking soda
-
½ tsp fine sea salt
-
1 cup (226g) unsalted butter, softened
-
2 cups (400g) granulated sugar
-
4 large eggs, room temperature
-
1 cup (240ml) buttermilk, room temperature
-
2 tbsp fresh orange zest
-
¼ cup (60ml) fresh orange juice
-
1 tsp pure vanilla extract
-
12 oz (340g) full-fat cream cheese, softened
-
¾ cup (170g) unsalted butter, softened (for frosting)
-
4 cups (480g) powdered sugar, sifted
-
1 tbsp fresh orange zest (for frosting)
-
2-3 tbsp fresh orange juice (for frosting)
-
1 tsp pure vanilla extract (for frosting)
-
Pinch of fine sea salt (for frosting)
-
¼ cup (60ml) fresh orange juice (for optional simple syrup)
-
¼ cup (50g) granulated sugar (for optional simple syrup)
Instructions
-
Step 1
Preheat oven to 350°F (175°C). Grease and flour three 8-inch round cake pans; line bottoms with parchment paper. -
Step 2
In a medium bowl, whisk together flour, baking powder, baking soda, and salt. Set aside. -
Step 3
Cream softened butter and granulated sugar in a large bowl with an electric mixer until light and fluffy (3-5 min). -
Step 4
Add eggs one at a time, beating well after each and scraping down the bowl. -
Step 5
In a separate bowl, whisk together buttermilk, orange juice, orange zest, and vanilla extract. -
Step 6
Gradually add dry ingredients (in 3 parts) alternating with wet ingredients (in 2 parts) to the butter mixture, mixing on low speed until just combined. Do not overmix. -
Step 7
Divide batter evenly among pans. Bake for 25-30 minutes, or until a toothpick inserted into the center comes out clean. -
Step 8
Cool cakes in pans for 10-15 minutes, then invert onto wire racks, remove parchment, and cool completely to room temperature. -
Step 9
For optional simple syrup, combine ¼ cup orange juice and ¼ cup sugar in a small saucepan; heat until sugar dissolves. Let cool. Brush cooled cake layers with syrup for extra moisture. -
Step 10
Beat softened cream cheese and butter with an electric mixer until smooth and creamy (2-3 min). -
Step 11
Gradually add sifted powdered sugar on low speed, then beat on medium-high for 2-3 minutes until light and fluffy. -
Step 12
Mix in orange zest, 2-3 tbsp orange juice, vanilla extract, and salt. Adjust orange juice to taste or desired consistency. -
Step 13
Whip frosting for 30 seconds on medium-high until extra light and luscious. -
Step 14
Ensure cake layers are completely cool. Level tops with a serrated knife if needed for even stacking. -
Step 15
Place the first cake layer on a serving platter. Spread with 1 to 1 ½ cups of Orange Cream Cheese Frosting. Place the second layer on top, press gently, and repeat frosting. -
Step 16
Place the third cake layer on top, gently pressing to secure. -
Step 17
Apply a very thin layer of frosting all over the cake (crumb coat). Refrigerate for 15-20 minutes until firm to trap crumbs. -
Step 18
Remove cake from refrigerator. Apply remaining frosting to the top and sides, smoothing or decorating as desired with an offset spatula. -
Step 19
Garnish with additional orange zest, candied orange slices, fresh orange segments, or mint leaves, if desired. -
Step 20
Chill assembled cake for at least 30 minutes in the refrigerator before slicing and serving for best presentation and set frosting.
Important Information
Nutrition Facts (Per Serving)
It is important to consider this information as approximate and not to use it as definitive health advice.
Allergy Information
Please check ingredients for potential allergens and consult a health professional if in doubt.


Leave a Comment