

Crack Chicken Tenders – prepare yourselves for a culinary experience that lives up to its deliciously infamous name! If you’ve ever wondered what makes a dish so incredibly addictive that people refer to it as ‘crack,’ you’re about to find out firsthand. This particular recipe takes the beloved flavor profile of the classic crack chicken dip – a glorious blend of ranch seasoning, crispy bacon, and creamy cheddar cheese – and transforms it into the ultimate, bite-sized chicken tender.
There’s no profound ancient history behind this dish; its legend began in the modern era, born from a collective craving for comfort food that simply hits every single savory note imaginable. People adore this dish not just for its undeniable, irresistible flavor – think juicy, tender chicken enveloped in a crispy, golden crust bursting with cheesy, smoky, and tangy goodness – but also for its versatility and sheer crowd-pleasing power. Whether you’re looking for an effortless weeknight dinner, a guaranteed hit for your next game day gathering, or just a truly satisfying snack, these Crack Chicken Tenders deliver on all fronts. Get ready to fall in love with a dish that promises to become a frequent request in your home.

Ingredients:
- For the Crack Chicken Filling:
- 1 (8-ounce) package cream cheese, softened to room temperature. This is crucial for a smooth, lump-free filling!
- 1 cup shredded sharp cheddar cheese. You can also use a Colby Jack blend for a milder flavor, but I find sharp cheddar truly makes these Crack Chicken Tenders sing.
- 1/2 cup cooked and crumbled bacon. I usually cook about 6-8 slices until perfectly crispy, then crumble them finely. Reserve a little extra for garnish if you’re feeling fancy!
- 1 (1-ounce) packet ranch seasoning mix. This is the secret ingredient that gives our “Crack Chicken Tenders” their irresistible flavor. Don’t skimp!
- 2 tablespoons chopped fresh green onions, plus more for garnish. The green onions add a wonderful fresh bite and a pop of color.
- 1/2 teaspoon garlic powder.
- 1/4 teaspoon black pepper.
- Pinch of cayenne pepper (optional, for a little kick!). I love a tiny bit of heat to balance the richness.
- For the Chicken:
- 2 pounds boneless, skinless chicken breasts or pre-cut chicken tenderloins. If using breasts, you’ll need to slice them into tender-sized pieces. I often use larger breasts and slice them horizontally to create a pocket for the filling.
- For the Breading:
- 1 cup all-purpose flour.
- 1 teaspoon salt.
- 1/2 teaspoon black pepper.
- 1/2 teaspoon garlic powder.
- 2 large eggs, beaten with 1 tablespoon water or milk (this creates our egg wash).
- 2 cups Panko breadcrumbs. Panko is non-negotiable for that extra crispy texture on your “Crack Chicken Tenders” – it makes a huge difference compared to regular breadcrumbs!
- For Frying:
- 4-6 cups vegetable oil, canola oil, or peanut oil, for deep frying. You’ll need enough to submerge the tenders or at least come halfway up them if pan-frying.
Preparing the Irresistible “Crack” Filling
- Soften the Cream Cheese: First things first, ensure your cream cheese is thoroughly softened to room temperature. This is paramount for achieving a smooth, homogeneous filling. If it’s too cold, you’ll end up with lumps, and nobody wants lumpy “Crack Chicken Tenders” filling! You can leave it on the counter for about an hour or gently microwave it for 10-15 seconds if you’re in a hurry, but be careful not to melt it.
- Combine the Filling Ingredients: In a medium-sized mixing bowl, combine the softened cream cheese, shredded sharp cheddar cheese, crumbled cooked bacon, ranch seasoning mix, chopped green onions, garlic powder, black pepper, and the optional pinch of cayenne pepper.
- Mix Until Well Combined: Using a sturdy spoon or a rubber spatula, mix all these glorious ingredients together. You want to mix until everything is perfectly incorporated and you have a uniform, creamy, and flavorful “Crack” mixture. This step is where the magic truly begins for your “Crack Chicken Tenders”, so take your time and make sure all those flavors are mingling beautifully. I often taste a tiny bit at this point to adjust seasoning if needed, though the ranch mix usually does the trick perfectly.
Preparing the Chicken for Stuffing
- Prepare Your Chicken: If you’re using full chicken breasts, you’ll want to carefully slice them. For stuffing, I recommend taking a large chicken breast and slicing it horizontally almost all the way through, creating a pocket. Alternatively, you can cut larger breasts into tender-sized portions and then make a smaller pocket in each. If you’re using pre-cut chicken tenderloins, you can often make a small incision along the thicker side to create a pocket.
- Pat Dry: Lay your chicken pieces on a cutting board and generously pat them dry with paper towels. This is a critical step because excess moisture on the chicken can prevent the breading from adhering properly, leading to a less crispy result, and nobody wants soggy “Crack Chicken Tenders.”
- Season the Chicken: Lightly season both sides of your chicken pieces with a pinch of salt and pepper. While the filling is very flavorful, a little seasoning on the chicken itself enhances the overall taste.
- Fill the Chicken: Now for the fun part! Take a spoonful (about 1-2 tablespoons, depending on the size of your chicken piece) of your “Crack” filling and carefully spoon it into the pocket you’ve created in each chicken tender. Don’t overfill, or it will be hard to seal, and the filling might leak out during cooking. Gently spread the filling evenly within the pocket.
- Seal the Tenders: Once filled, gently press the edges of the chicken together to enclose the filling. If you’re concerned about the filling escaping, you can secure the opening with one or two toothpicks. I find that if I don’t overfill, they usually seal quite well on their own once breaded.
- Chill (Optional but Recommended): For easier handling during the breading process, you can place the filled chicken tenders on a plate and chill them in the refrigerator for about 15-20 minutes. This helps the chicken firm up a bit and prevents the filling from becoming too soft, making your “Crack Chicken Tenders” much easier to bread cleanly.
Setting Up the Breading Station
- Prepare Three Dishes: Gather three shallow dishes or pie plates. This setup is often called a “breading station” and is essential for an organized and efficient breading process, ensuring your “Crack Chicken Tenders” get a perfect coating.
- Flour Dish: In the first dish, combine the all-purpose flour, 1 teaspoon of salt, 1/2 teaspoon of black pepper, and 1/2 teaspoon of garlic powder. Whisk these together until thoroughly combined. Seasoning the flour is important; it adds another layer of flavor to the outer crust of your “Crack Chicken Tenders.”
- Egg Wash Dish: In the second dish, crack the two large eggs and add 1 tablespoon of water or milk. Whisk vigorously until the egg and liquid are fully combined and appear slightly frothy. This “egg wash” acts as the glue for our breadcrumbs.
- Panko Breadcrumbs Dish: In the third dish, pour the 2 cups of Panko breadcrumbs. You might want to add a pinch of salt and pepper here too, just to ensure every layer is seasoned to perfection.
Breading Your Crack Chicken Tenders
- First Dredge (Flour): Take one filled chicken tender and dredge it in the seasoned flour. Make sure it’s completely coated, getting into all the nooks and crannies. Gently shake off any excess flour. A thin, even layer is what you’re aiming for. This flour layer helps the egg wash adhere better.
- Second Dredge (Egg Wash): Carefully transfer the flour-coated tender to the egg wash. Dip it fully, ensuring every part of the chicken is moistened. Let any excess egg wash drip off before moving to the next step.
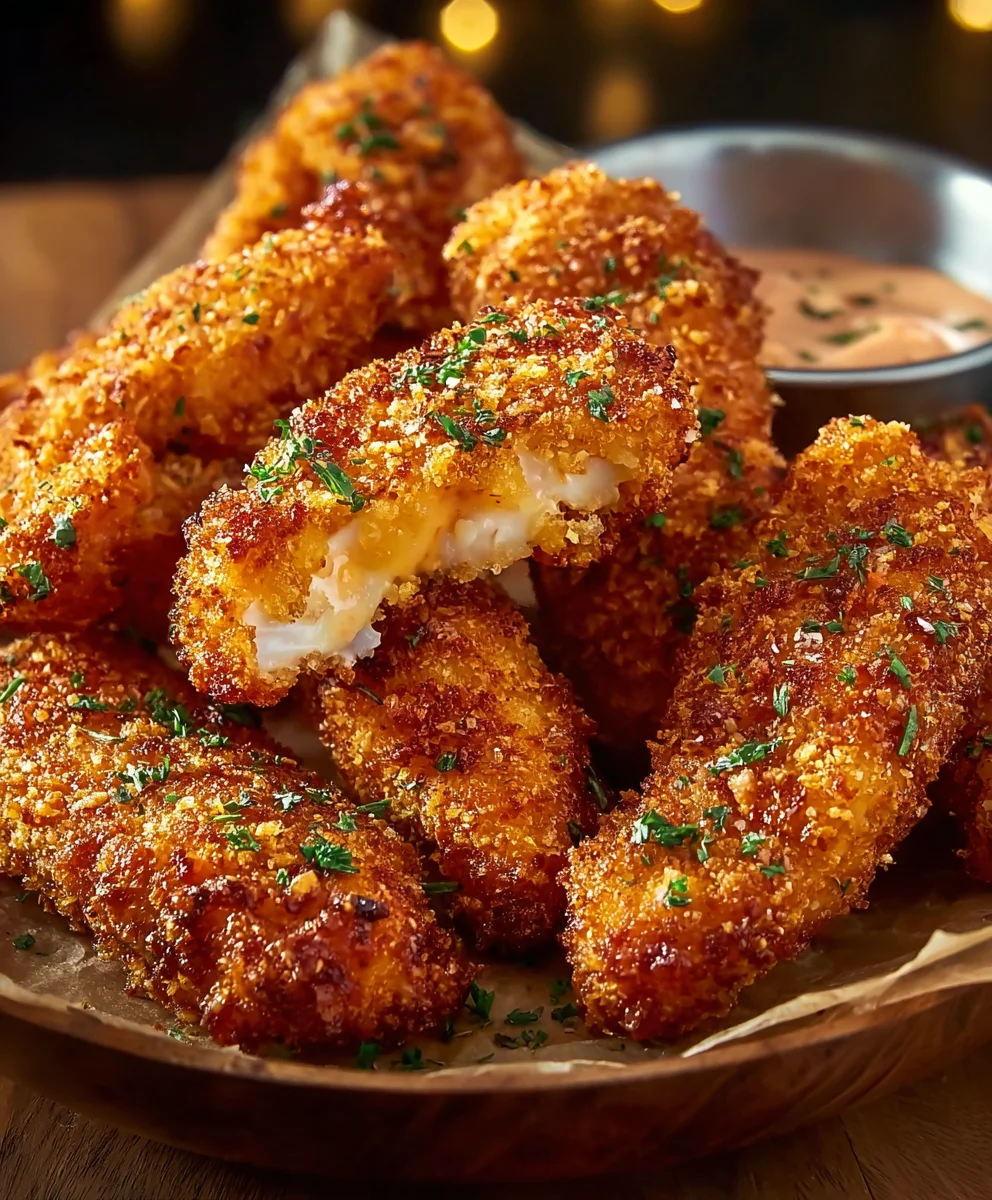
- Third Dredge (Panko): Finally, place the egg-washed tender into the Panko breadcrumbs. This is where your “Crack Chicken Tenders” truly begin to take shape! Press the Panko firmly onto all sides of the chicken, ensuring a thick, even layer. Don’t be shy; really press those breadcrumbs on there! The more Panko that adheres, the crispier your tenders will be.
- Repeat and Prepare: Place the fully breaded tender on a clean plate or baking sheet. Repeat this breading process with all remaining chicken tenders, working diligently to ensure each one is perfectly coated.
- Final Chill (Optional but Recommended for Max Crispiness): If time allows, I highly recommend placing the breaded “Crack Chicken Tenders” back into the refrigerator for at least 30 minutes, or even up to an hour. This final chill allows the breading to really set and adhere to the chicken, which significantly reduces the chances of it falling off during cooking and helps achieve an incredibly crispy crust. This extra step is a game-changer for truly amazing “Crack Chicken Tenders.”
Cooking the Perfect Crack Chicken Tenders
Deep Frying Method (My Preferred for Ultimate Crispiness)
- Heat the Oil: Pour the vegetable, canola, or peanut oil into a large, heavy-bottomed pot or a deep fryer. You’ll need enough oil to submerge the tenders, typically 3-4 inches deep. Heat the oil over medium-high heat until it reaches 350-375°F (175-190°C). Using a deep-fry thermometer is highly recommended for accurate temperature control; consistency in oil temperature is key to perfectly cooked, golden-brown “Crack Chicken Tenders” that aren’t greasy.
- Fry in Batches: Carefully lower a few breaded “Crack Chicken Tenders” into the hot oil. Do not overcrowd the pot! Overcrowding will significantly drop the oil temperature, leading to greasy, soggy tenders instead of crispy ones. Give them space to fry properly.
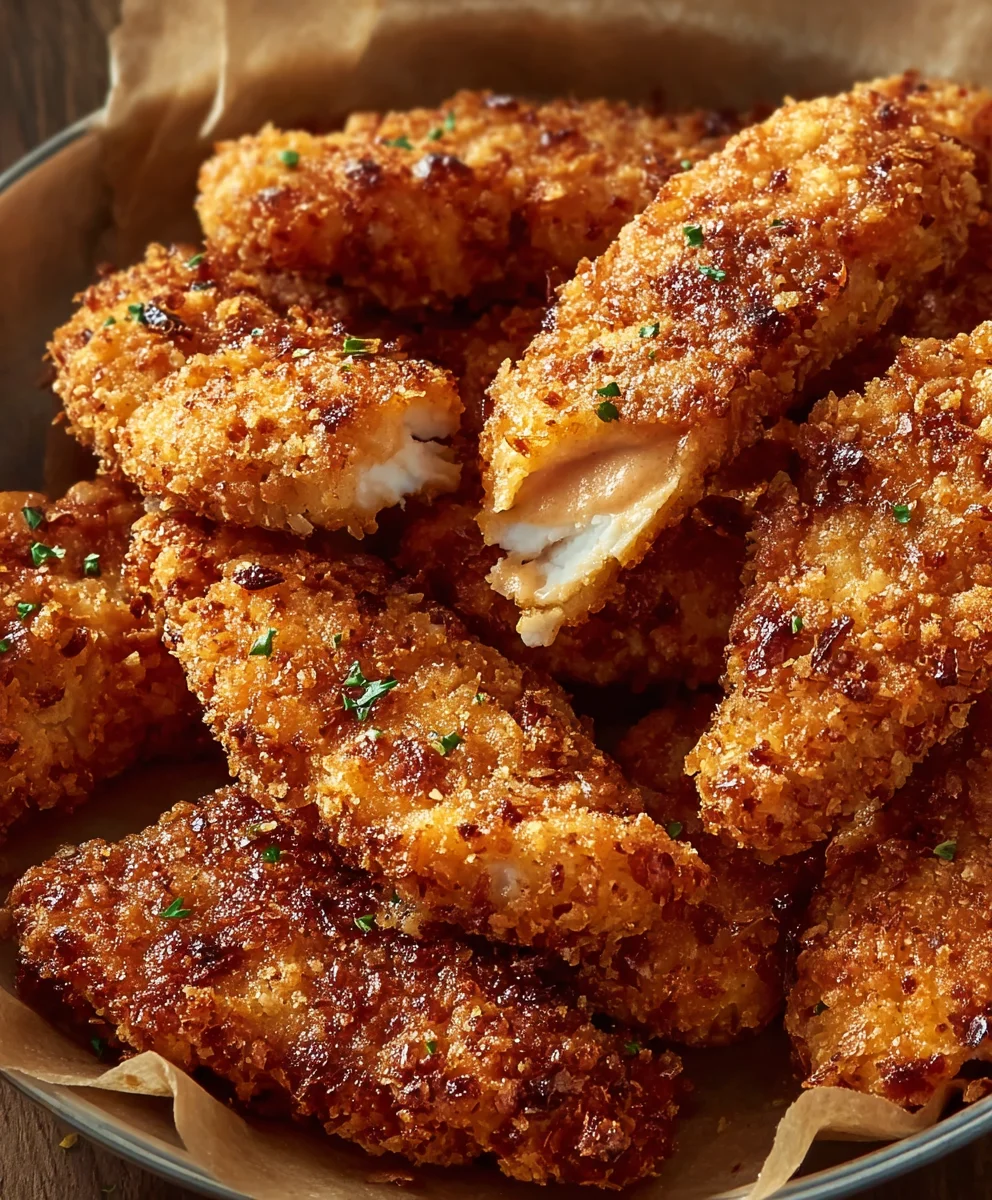
- Cook Until Golden: Fry the tenders for about 4-6 minutes, or until they are a beautiful golden-brown color and the internal temperature of the chicken reaches 165°F (74°C). The filling will be hot and gooey, and the chicken perfectly cooked through. You might need to gently turn them once or twice to ensure even browning.
- Drain Excess Oil: Once cooked, carefully remove the “Crack Chicken Tenders” from the oil using tongs or a slotted spoon. Place them on a wire rack set over a baking sheet lined with paper towels. This allows excess oil to drain off, keeping your tenders wonderfully crispy.
- Maintain Oil Temperature: Allow the oil to return to the ideal temperature before frying the next batch. This ensures consistent results for all your “Crack Chicken Tenders.”
Alternative: Pan Frying Method
- Heat Oil in Skillet: In a large, heavy-bottomed skillet (cast iron works wonderfully), pour about 1 inch of your chosen cooking oil. Heat over medium-high heat until it reaches 350-375°F (175-190°C). Again, a thermometer is your best friend here.
- Fry in Batches: Place a few breaded “Crack Chicken Tenders” into the hot oil, ensuring not to overcrowd the skillet.
- Cook and Flip: Fry for about 3-4 minutes per side, or until each side is beautifully golden brown and crispy, and the internal temperature reaches 165°F (74°C). The time might vary depending on the thickness of your tenders.
- Drain: Transfer the cooked tenders to a wire rack set over paper towels to drain any excess oil.
Alternative: Baking Method (for a lighter option)
- Preheat Oven: Preheat your oven to 400°F (200°C).
- Prepare Baking Sheet: Lightly grease a wire rack and place it on a baking sheet. This allows air to circulate around the tenders for even crisping.
- Arrange Tenders: Arrange the breaded “Crack Chicken Tenders” in a single layer on the prepared wire rack, ensuring they are not touching.
- Lightly Spray with Oil (Optional but Recommended): For extra crispiness and a golden color, lightly spray the tops of the tenders with cooking spray or drizzle with a tiny bit of oil.
- Bake: Bake for 20-25 minutes, flipping halfway through, or until the tenders are golden brown and cooked through, reaching an internal temperature of 165°F (74°C). While not as crispy as fried, they will still be incredibly flavorful!
Finishing Touches and Serving Your Amazing Crack Chicken Tenders
- Garnish and Serve Hot: Once all your “Crack Chicken Tenders” are cooked, transfer them to a serving platter. If you reserved some extra cooked bacon and green onions, now is the perfect time to sprinkle them over the top for an extra burst of flavor and visual appeal.
- Dipping Delights: These “Crack Chicken Tenders” are fantastic on their own, but they are absolutely divine with a dipping sauce. A side of extra ranch dressing is a classic choice, but don’t be afraid to get creative! A sriracha ranch for a spicy kick, honey mustard, or even a creamy avocado ranch would complement these beautifully.
- Enjoy Immediately: These tenders are best enjoyed piping hot, allowing you to experience the gooey, cheesy, bacon-packed filling and the incredibly crispy exterior at their peak. Prepare for a flavor explosion! These “Crack Chicken Tenders” are a crowd-pleaser and often disappear quickly, so make sure you grab one for yourself! They truly are addictive, living up to their “Crack Chicken” name.
Conclusion:
Well, there you have it, my friends! We’ve journeyed through the simple steps to create what I truly believe will become a staple in your kitchen and a guaranteed crowd-pleaser. These aren’t just any ordinary chicken tenders; they are a symphony of flavors and textures, meticulously crafted to deliver that irresistible ‘can’t stop eating’ experience. The glorious combination of tender, juicy chicken, enveloped in a creamy, tangy, and undeniably cheesy sauce, perfectly studded with crispy bits of bacon, creates a culinary masterpiece that truly lives up to its playful moniker. That’s right, these are the legendary Crack Chicken Tenders, and once you try them, you’ll understand exactly why they earn such an enthusiastic reputation. They are effortlessly delicious, remarkably versatile, and absolutely perfect for any occasion, from a casual weeknight dinner to a festive gathering. I promise you, the aroma alone will have everyone flocking to the kitchen, eager to get their hands on a piece of this comfort food perfection. It’s the kind of recipe that brings smiles to faces and happy sighs around the dinner table. Seriously, this isn’t just food; it’s an experience waiting to happen in your home, one that you’ll want to revisit again and again.
Serving Suggestions to Elevate Your Experience:
One of the many beautiful things about these incredible tenders is their sheer adaptability. They truly shine in a multitude of culinary settings. Consider them as the star of your next casual dinner party; cut into bite-sized pieces, they make an unforgettable appetizer, especially when paired with a side of cool ranch dressing, a zesty blue cheese dip, or even a sweet and tangy honey mustard. For a more substantial meal, serve them alongside a generous helping of golden, crispy French fries, a fresh, vibrant coleslaw, or a simple side salad to cut through the richness. They are also phenomenal tucked into warm, toasted brioche buns with a slice of fresh tomato and crisp lettuce, creating an epic chicken sandwich that rivals any restaurant. Think about them as the ultimate game-day snack – far superior to anything frozen, trust me. You could even chop them up and toss them into a vibrant green salad, transforming a simple lunch into something extraordinary. Imagine the delight of serving these up for a potluck; they disappear faster than you can say “seconds!” Furthermore, don’t underestimate their potential as a topping for baked potatoes, adding a burst of creamy, savory goodness, or even incorporated into a pasta dish for a hearty weeknight meal. The possibilities are truly endless, limited only by your imagination, but rest assured, however you choose to serve them, they are destined to be a hit and leave everyone completely satisfied.
Exciting Variations to Experiment With:
While the classic recipe for these tenders is perfection in itself, I always encourage you to get creative in the kitchen! Don’t be afraid to experiment and tailor this recipe to your own taste preferences. If you’re someone who loves a bit of a kick, try adding a pinch of red pepper flakes to the sauce, or even dicing up some fresh jalapeños and stirring them in for a fiery twist. For a different cheesy profile, consider swapping out some of the cheddar for pepper jack for extra spice, or even a smoked gouda for a deeper, nuttier flavor. A sprinkle of fresh chives or parsley right before serving can add a lovely pop of color and a fresh herbaceous note, brightening the overall flavor. If you’re looking for a slightly lighter alternative to frying, these tenders also bake beautifully in the oven on a sheet pan or can be cooked to crispy perfection in an air fryer. Just adjust the cooking time until they’re golden brown and cooked through, usually around 15-20 minutes at 400°F (200°C) for baking, or 12-15 minutes in an air fryer, flipping halfway. And why stop at chicken? You could easily adapt this creamy, cheesy bacon mixture to coat pork tenderloin medallions, shrimp, or even thick-cut potato wedges for a satisfying vegetarian-friendly option. For those who prefer dark meat, chicken thighs would also work wonderfully, offering an even juicier texture and richer flavor. The core flavor profile is so robust that it can handle a little playful experimentation, allowing you to personalize it to your heart’s content. So, feel free to make this recipe truly your own masterpiece!
Your Turn: Time to Get Cooking!
Now that you have all the insider tips, the serving inspiration, and the creative variations, there’s only one thing left to do: head into your kitchen and make these sensational tenders! I am genuinely so excited for you to experience the pure joy of creating and savoring this dish. It’s more than just a recipe; it’s a gateway to delicious moments, shared laughter, and satisfied cravings. I’m confident that once you take that first bite, you’ll understand exactly why I’ve raved about them so much. And please, please don’t keep your success a secret! I absolutely adore hearing from you. Once you’ve whipped up your batch, please come back and share your experience in the comments below. Did you try a fun variation? What did your family think? Did they disappear as quickly as mine do? Snap a photo, share your stories, and let’s celebrate the magic of cooking together. Happy cooking, and I can’t wait to hear all about your amazing Crack Chicken Tenders adventure!
Crack Chicken Tenders Recipe: Cheesy & Irresistible!
Inspired by the classic ‘crack chicken’ dip, these baked or pan-fried tenders feature juicy chicken stuffed with a creamy, savory blend of ranch seasoning, beef bacon, and cheddar cheese. A delicious and satisfying meal that lives up to its irresistible name!
Ingredients
-
1.5 lbs chicken tenders
-
6 oz cream cheese, softened
-
1 packet (1 oz) ranch seasoning mix
-
1 tsp garlic powder
-
½ tsp onion powder
-
1 cup shredded cheddar cheese, divided
-
½ cup cooked beef bacon bits
-
1 tbsp olive oil or cooking spray
-
2 tbsp chopped green onions (optional)
Instructions
-
Step 1
Prepare the ‘Crack’ Filling: In a medium bowl, combine softened cream cheese, ½ cup shredded cheddar cheese, ranch seasoning mix, garlic powder, onion powder, and beef bacon bits. Mix until smooth and well combined. -
Step 2
Prepare and Stuff Chicken: Slice each chicken tender horizontally almost all the way through to create a pocket. Pat the chicken dry with paper towels. Spoon 1-2 tablespoons of the ‘Crack’ filling into each pocket and gently press the edges to seal. Optionally, chill the stuffed tenders for 15-20 minutes for easier handling. -
Step 3
Cook (Baked Method): Preheat oven to 400°F (200°C). Lightly grease a wire rack on a baking sheet with olive oil or cooking spray. Arrange stuffed tenders on the rack in a single layer. Sprinkle the remaining ½ cup shredded cheddar cheese over the tenders. Bake for 20-25 minutes, flipping halfway through, until chicken reaches an internal temperature of 165°F (74°C) and the cheese is melted and golden. -
Step 4
Cook (Pan-Fried Method – Alternative): Heat 1 tbsp olive oil in a large skillet over medium-high heat. Place stuffed tenders in the skillet, ensuring not to overcrowd. Pan-fry for 3-4 minutes per side until golden brown and cooked through (165°F / 74°C). In the last minute, sprinkle the remaining ½ cup shredded cheddar cheese on top to melt. -
Step 5
Serve: Transfer cooked tenders to a platter. Garnish with chopped green onions, if desired. Serve immediately with extra ranch dressing or your favorite dipping sauce for a truly irresistible experience.
Important Information
Nutrition Facts (Per Serving)
It is important to consider this information as approximate and not to use it as definitive health advice.
Allergy Information
Please check ingredients for potential allergens and consult a health professional if in doubt.


Leave a Comment