

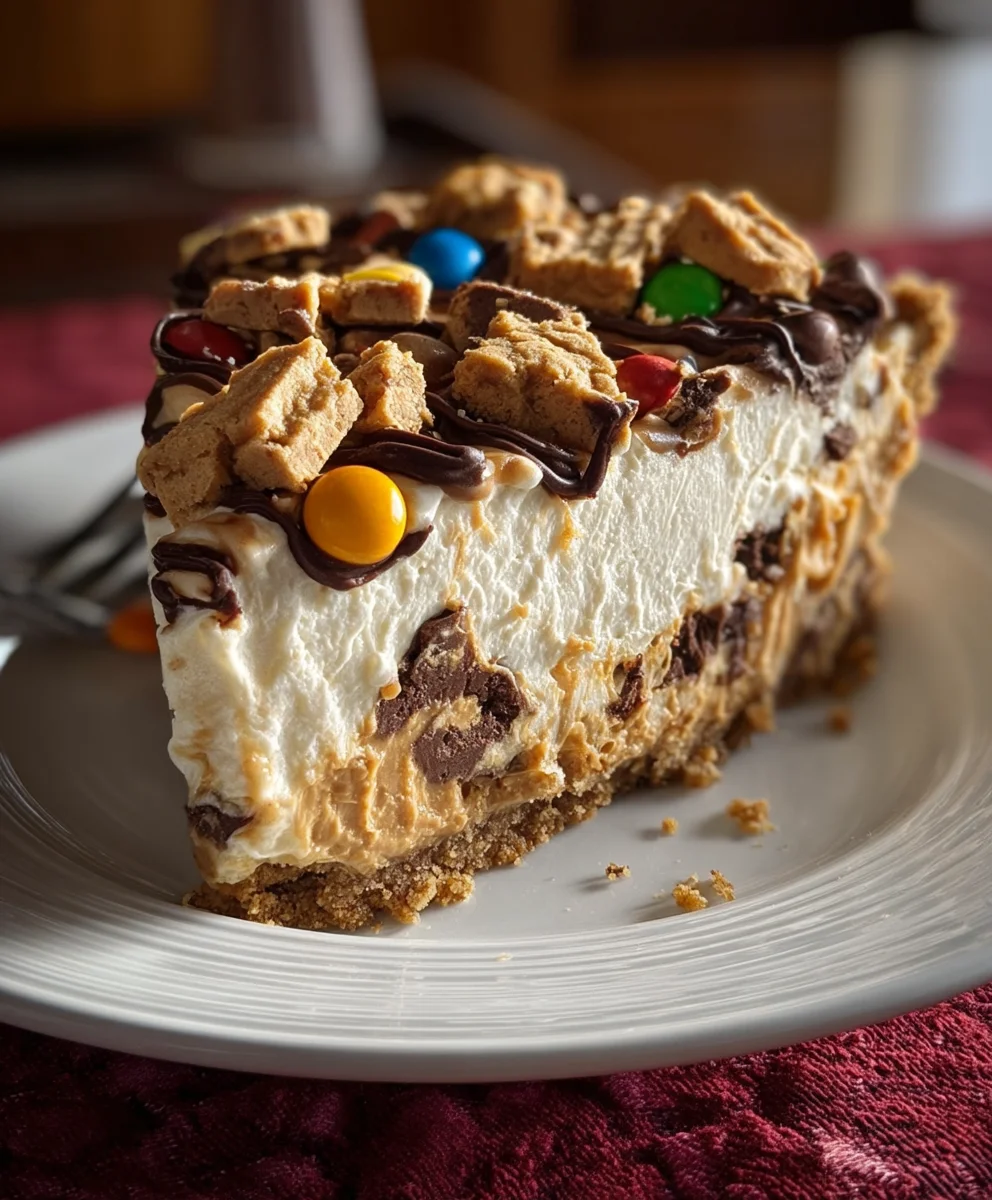
Monster Cookie Peanut Butter Cheesecake Pie Recipe is not just a dessert; it’s an experience, a symphony of flavors and textures that I am absolutely thrilled to share with you. Imagine, if you will, a creamy, dreamy peanut butter cheesecake filling, nestled in a crunchy, chewy monster cookie crust, all crowned with more delightful cookie pieces and a decadent drizzle of chocolate. This extraordinary creation brings together the nostalgic joy of a classic monster cookie, the luxurious indulgence of a rich cheesecake, and the irresistible charm of peanut butter, a flavor deeply embedded in countless households’ hearts across the globe.
While the exact origins of combining these particular elements into one magnificent pie are relatively modern, we know each component boasts a rich culinary heritage. The humble peanut butter has graced our tables for over a century, while cheesecake, in various forms, dates back to ancient Greece. The monster cookie, a relatively newer phenomenon, gained popularity for its audacious inclusion of everything delicious. Our
Monster Cookie Peanut Butter Cheesecake Pie Recipe
ingeniously marries these beloved separate entities into one harmonious, utterly irresistible dessert. We believe it’s a celebration of comfort, creativity, and pure, unadulterated deliciousness, delivering a perfect balance of sweet, salty, and incredibly satisfying creaminess with every single bite that people simply adore.

Ingredients:
-
For the Monster Cookie Crust:
- 2 ½ cups (approximately 250g) Monster Cookies, finely crushed. I find that about 20-24 standard-sized monster cookies, depending on their size, will yield the perfect amount of crumbs for our crust. You can either purchase pre-made monster cookies or bake a batch specifically for this. If you’re making your own, allow them to cool completely before crushing.
- ½ cup (113g) unsalted butter, melted. Using unsalted butter gives us control over the salt content, ensuring our pie isn’t too savory.
- 1 tablespoon granulated sugar (optional, but I always add it for a touch of extra sweetness and a slightly more stable crust).
-
For the Peanut Butter Cheesecake Filling:
- 2 (8-ounce) blocks (452g) full-fat cream cheese, softened to room temperature. This is absolutely crucial for a smooth, lump-free cheesecake filling. Take it out of the fridge at least an hour, preferably two, before you plan to start.
- 1 cup (240g) creamy peanut butter. I highly recommend using a conventional, processed creamy peanut butter (like Jif or Skippy) for this recipe, not natural peanut butter. Natural peanut butter can separate and affect the texture of the cheesecake. Make sure it’s stirred very well if there’s any oil separation at the top of the jar.
- 1 ½ cups (300g) powdered sugar (confectioners’ sugar), sifted. Sifting prevents lumps and ensures a silky-smooth filling. Trust me, this small step makes a big difference.
- 1 teaspoon pure vanilla extract. This enhances all the sweet flavors beautifully.
- ¼ teaspoon salt. Just a touch to balance the sweetness and bring out the rich peanut butter flavor.
- 1 ½ cups (360ml) heavy cream, well-chilled. Cold heavy cream whips up best, so keep it in the fridge until you’re ready to use it.
-
For the Garnish (Optional, but highly recommended for that true Monster Cookie vibe!):
- ½ cup mini chocolate chips.
- ¼ cup mini M&M’s candies.
- 2-3 tablespoons extra creamy peanut butter, melted slightly for drizzling.
- A few extra crushed monster cookies or whole mini monster cookies, for ultimate decoration.
Preparing the Monster Cookie Crust
-
Crushing the Monster Cookies:
The first step in creating our incredible Monster Cookie Peanut Butter Cheesecake Pie Recipe is to prepare the foundation: the monster cookie crust! I like to start by getting our monster cookies crushed into fine crumbs. You have a couple of options here. My preferred method is using a food processor. Simply pulse the cookies until they resemble fine, even crumbs. We’re looking for a texture similar to graham cracker crumbs – no large chunks, please! If you don’t have a food processor, no worries at all. You can place the cookies in a large, sturdy Ziploc bag, seal it, and then use a rolling pin, the bottom of a heavy glass, or even your fists to crush them. Make sure you really work them until they are uniformly fine. This ensures a cohesive crust that won’t fall apart when sliced. This step is more critical than you might think for the overall structural integrity of our pie.
-
Mixing the Crust Ingredients:
Once your monster cookie crumbs are ready, transfer them to a medium-sized mixing bowl. Now, melt your ½ cup of unsalted butter. You can do this in the microwave in 30-second intervals, stirring in between, or in a small saucepan over low heat. Pour the melted butter over the cookie crumbs. If you’re using the optional tablespoon of granulated sugar, add it in now as well. Using a fork or a rubber spatula, stir everything together until the crumbs are thoroughly moistened and resemble wet sand. Every single crumb should be coated in butter. This buttery coating is what will bind our crust together and give it that delicious, rich flavor that complements the peanut butter filling so perfectly.
-
Pressing into the Pie Plate:
Grab a standard 9-inch pie plate. I usually go for a glass pie plate because I love seeing the beautiful layers from the side, but a ceramic or metal one works just as well. Pour the moistened cookie mixture into the pie plate. Now comes the fun part, and it requires a little elbow grease! Using the bottom of a flat-bottomed glass, your clean fingers, or a measuring cup, press the crumb mixture firmly and evenly into the bottom and up the sides of the pie plate. The key here is to press very, very firmly. The harder you press, the more solid and stable your crust will be, preventing crumbling when you cut into our Monster Cookie Peanut Butter Cheesecake Pie. Ensure the thickness is even all around. Take your time with this step, making sure the edges are well-formed.
-
Chilling the Crust:
Once you’re satisfied with your beautifully pressed crust, pop the pie plate into the refrigerator. We’ll let it chill for at least 30 minutes while we prepare the filling. This chilling time is essential for the butter to solidify and bind the crumbs together, creating a sturdy base for our luscious peanut butter cheesecake filling. It prevents the crust from becoming too soft or crumbly later on.
Crafting the Dreamy Peanut Butter Cheesecake Filling
-
Creaming the Cream Cheese:
Now for the star of the show – our creamy, dreamy peanut butter cheesecake filling! In a large mixing bowl, using an electric mixer (either a stand mixer with the paddle attachment or a hand mixer), beat the two blocks of softened cream cheese on medium speed. Beat it for about 2-3 minutes, scraping down the sides of the bowl occasionally, until it is completely smooth, light, and fluffy, with absolutely no lumps. Remember, well-softened cream cheese is the secret to a silky smooth filling. If your cream cheese is even slightly cold, you’ll end up with stubborn lumps, and we definitely don’t want those!
-
Incorporating the Peanut Butter:
Add the 1 cup of creamy peanut butter to the beaten cream cheese. Continue beating on medium speed until the peanut butter is fully incorporated and the mixture is smooth and uniform in color. This might take another 1-2 minutes. The mixture will be thick and wonderfully fragrant with peanut butter.
-
Adding the Sweetness:
Next, we’ll gradually add the 1 ½ cups of sifted powdered sugar. I find it best to add it in three additions, beating well after each addition until it’s fully combined. Start on low speed to prevent a cloud of powdered sugar from erupting in your kitchen, then increase to medium speed. Beat until the mixture is smooth and no powdered sugar streaks remain. Sifting the sugar beforehand is truly key here to avoid any pesky lumps that could ruin the texture of our Monster Cookie Peanut Butter Cheesecake Pie. The mixture will become even thicker and sweeter now.
-
Flavor Boosters:
Stir in the 1 teaspoon of vanilla extract and ¼ teaspoon of salt. Beat on low speed just until combined. These ingredients enhance the overall flavor profile, adding depth and balance to the sweetness and richness of the peanut butter.
-
Whipping the Heavy Cream:
In a separate, clean, and chilled large mixing bowl, pour in your 1 ½ cups of well-chilled heavy cream. Using a whisk attachment (for a stand mixer) or a hand mixer, beat the heavy cream on high speed until stiff peaks form. This means when you lift the whisk, the cream will hold its shape firmly. This usually takes about 3-5 minutes, but keep a close eye on it to avoid over-whipping, which can turn it grainy. Using a chilled bowl and whisk attachment can significantly speed up this process and yield better results. The whipped cream adds a wonderful lightness and airiness to our otherwise dense peanut butter filling.
-
Gently Folding for Lightness:
Now, this is where we bring it all together. Gently, yet thoroughly, fold the whipped heavy cream into the peanut butter-cream cheese mixture. Use a large rubber spatula and a delicate hand. Add the whipped cream in two or three additions. Start by folding in about a third of the whipped cream to lighten the peanut butter mixture, then gently fold in the remaining whipped cream until no streaks of white remain and the mixture is uniformly light and fluffy. Be careful not to overmix, as this can deflate the whipped cream and make your filling less airy. The goal is to maintain as much of that lovely volume as possible. The final filling for our Monster Cookie Peanut Butter Cheesecake Pie should be incredibly light, airy, and unmistakably peanut buttery.
Assembling and Chilling Our Masterpiece
-
Filling the Crust:
Retrieve your chilled monster cookie crust from the refrigerator. Carefully spoon or pour the entire peanut butter cheesecake filling into the crust. You’ll notice how beautifully thick and luscious it is.
-
Smoothing to Perfection:
Using an offset spatula, the back of a spoon, or a small knife, gently spread the filling evenly across the crust. I like to create a slight dome or a swirled pattern on top for a little visual appeal. Take your time to make sure the surface is as smooth and attractive as possible, as this will be the top of your Monster Cookie Peanut Butter Cheesecake Pie.
-
The Essential Chill:
Once the pie is assembled, cover it loosely with plastic wrap (try to avoid the plastic touching the filling directly if you can, perhaps by inserting a few toothpicks around the edges to tent it) and return it to the refrigerator. This pie absolutely needs time to set properly. I recommend chilling it for a minimum of 6-8 hours, but for the very best results and a perfectly firm, sliceable cheesecake, I strongly suggest chilling it overnight. This allows all the flavors to meld together beautifully and the filling to achieve its ideal firm yet creamy consistency. Patience is a virtue here, my friends!
The Grand Finale: Decorating and Serving
-
Ready for its Close-Up:
Once your Monster Cookie Peanut Butter Cheesecake Pie has been thoroughly chilled and is firm, carefully remove it from the refrigerator. It’s now ready for its grand transformation with some delightful garnishes!
-
Decorating for Maximum Monster Appeal:
This is where you can truly let your creativity shine and emphasize the “Monster Cookie” aspect of our recipe.
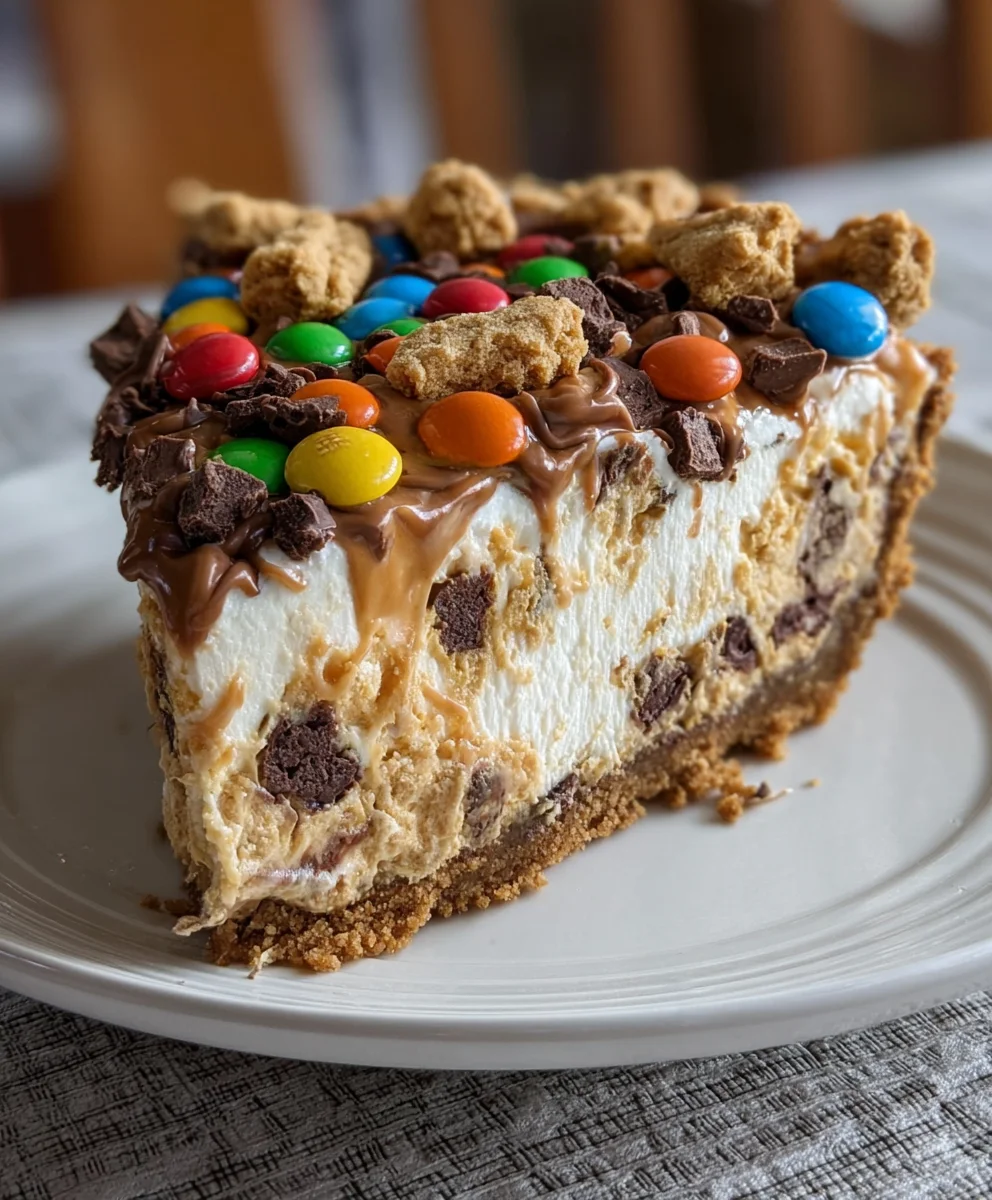
- M&M’s and Chocolate Chips: Sprinkle the mini M&M’s and mini chocolate chips generously over the top of the pie. I often like to create a border or design with them, or simply scatter them randomly for a festive look.
- Peanut Butter Drizzle: For an extra layer of peanut buttery goodness, slightly melt 2-3 tablespoons of creamy peanut butter in the microwave for about 15-20 seconds until it’s pourable but not hot. Drizzle it artfully over the top of the pie. You can use a spoon or even a small piping bag with the tip snipped off for finer lines.
- Extra Cookie Crumbles: If you saved some extra crushed monster cookies, or have a few mini ones, scatter them over the top for added texture and visual appeal.
Feel free to be as elaborate or as simple as you like with your decorations! This pie is already a showstopper, and the garnishes just elevate it further.
-
Slicing and Serving:
To get clean slices of your Monster Cookie Peanut Butter Cheesecake Pie, I recommend using a sharp knife that has been dipped in hot water and wiped clean between each slice. This will ensure beautiful, smooth edges every time. Serve immediately and watch your friends and family marvel at this incredible creation. It’s rich, decadent, and utterly irresistible.
-
Storage:
Any leftover Monster Cookie Peanut Butter Cheesecake Pie should be stored in an airtight container or covered tightly with plastic wrap in the refrigerator for up to 3-4 days. This pie is also freezer-friendly! You can freeze individual slices or the whole pie (undecorated, then decorate after thawing) for up to 1 month. Just be sure to wrap it very well in plastic wrap and then foil to prevent freezer burn. Thaw in the refrigerator overnight before serving.
Conclusion:
I’ve truly poured my heart into sharing this spectacular creation with you, and I genuinely believe that once you experience it, you’ll understand why it has become an absolute staple in my kitchen – and why it deserves a spot in yours too. This isn’t just another dessert; it’s a symphony of textures and flavors that dance together in perfect harmony. Imagine the chewy, delightful crunch of a monster cookie crust, layered with a decadently smooth and tangy cheesecake filling, all elevated by the irresistible, nutty richness of peanut butter. It’s a bold combination, I admit, but one that somehow works flawlessly, creating a dessert that is both nostalgic and excitingly new. Every single bite offers a different nuance – the sweet chocolate chips, the earthy oats, the creamy peanut butter, the slight tartness of the cream cheese – all converging into a truly unforgettable experience. I can honestly say that this recipe consistently receives rave reviews from everyone who tries it, from the pickiest eaters to the most seasoned dessert connoisseurs. It’s impressive enough to be the star of any holiday gathering or special occasion, yet surprisingly straightforward to prepare, making it a perfect project for bakers of all skill levels. Don’t be intimidated by its grandeur; the steps are simple, and the reward is immense. This pie really is a celebration in itself, a testament to the fact that some of the best culinary experiences come from combining beloved classics in innovative ways. It’s the ultimate comfort food elevated to gourmet status, without the gourmet effort.
Elevating Your Pie: Serving Suggestions and Creative Twists
Now, let’s talk about how to make this dessert even more phenomenal, or how to tailor it to your specific tastes and occasions. While the pie is absolutely divine served plain, straight from the fridge with its pristine layers, I often find joy in adding little flourishes. A generous dollop of freshly whipped cream, perhaps lightly sweetened with a touch of vanilla, adds an extra layer of luxuriousness. For the chocolate lovers out there – and let’s be honest, who isn’t? – a drizzle of high-quality chocolate syrup or a sprinkling of mini chocolate chips over the top before serving can truly elevate the experience. Don’t forget the power of texture; a few extra crushed monster cookies, sprinkled around the edge or over the top, will provide that satisfying crunch and echo the delightful crust. If you’re a true peanut butter enthusiast like me, a light dusting of chopped roasted peanuts can enhance that beloved nutty flavor even further. Think about serving temperature too; while I prefer it chilled for a firmer, more refreshing bite, some might enjoy letting it sit out for 10-15 minutes before serving to achieve a slightly softer, creamier texture that melts beautifully in the mouth. For a fun, party-friendly approach, you could even press the crust mixture into individual muffin cups lined with paper, then top with the filling and chill for adorable, portion-controlled mini pies – perfect for a buffet! And why stop there? While the core creation is fantastic as is, feel free to get creative. For instance, consider swapping out the monster cookie for a different type of cookie for the crust – perhaps an oatmeal raisin for a chewier, spiced note, or even a brownie for an ultra-chocolatey base. You could even swirl a different jam or fruit puree into the cheesecake layer for a contrasting fruity burst, though I personally love the pure, unadulterated peanut butter and cookie goodness that this particular pie offers.
Your Turn: Bake, Share, and Inspire!
I’m genuinely excited for you to embark on this culinary adventure. This isn’t just about following a recipe; it’s about creating a moment of pure joy, both for yourself and for those you share it with. I truly urge you, from the bottom of my baking heart, to set aside some time soon and give this incredible Monster Cookie Peanut Butter Cheesecake Pie Recipe a try. You won’t regret it. The smiles you’ll see and the compliments you’ll receive will be all the proof you need that this recipe is a keeper. I love connecting with fellow food enthusiasts, so once you’ve whipped up your masterpiece, please, please come back and tell me all about your experience! Did you stick to the recipe exactly? Did you put your own unique twist on it? Perhaps you found a new favorite garnish or discovered a clever serving trick. I’d be absolutely thrilled to hear your stories, see your photos (sharing is caring, after all!), and learn about any variations you explored. Your insights are invaluable and help build our wonderful community of home bakers. Don’t hesitate to share your triumphs, your learning moments, and any questions you might have. Let’s inspire each other to keep baking, keep creating, and keep sharing deliciousness. This pie is more than just a dessert; it’s an an invitation to celebrate the simple, yet profound, pleasure of good food made with love. So, preheat your ovens (or just chill your fridge!), gather your ingredients, and get ready to create a dessert that will undoubtedly become a legendary request at all your future gatherings. Happy baking, my friends!
Monster Cookie Peanut Butter Cheesecake Pie
A creamy, dreamy peanut butter cheesecake filling nestled in a crunchy monster cookie crust, crowned with delightful cookie pieces and a decadent chocolate drizzle. This no-bake pie combines the nostalgic joy of a classic monster cookie with the luxurious indulgence of peanut butter cheesecake.
Ingredients
-
2 cups monster cookies, finely crushed
-
½ cup unsalted butter, melted
-
1 tablespoon granulated sugar (optional)
-
2 (8-ounce) blocks full-fat cream cheese, softened (16 oz total)
-
1 cup creamy peanut butter
-
1 cup powdered sugar, sifted
-
1 teaspoon pure vanilla extract
-
¼ teaspoon salt
-
1 ½ cups heavy cream, well-chilled
-
½ cup mini chocolate chips
-
½ cup mini M&M’s candies
-
2-3 tablespoons extra creamy peanut butter, melted
-
Extra crushed monster cookies, for garnish
Instructions
-
Step 1
Crush 2 cups monster cookies into fine crumbs. In a medium bowl, combine crumbs with ½ cup melted unsalted butter and 1 tablespoon granulated sugar (if using) until thoroughly moistened. Press the mixture very firmly and evenly into the bottom and up the sides of a 9-inch pie plate. Chill in the refrigerator for at least 30 minutes while preparing the filling. -
Step 2
In a large mixing bowl, beat 2 (8-ounce) blocks of softened cream cheese on medium speed for 2-3 minutes until completely smooth and fluffy. Add 1 cup creamy peanut butter; beat for 1-2 minutes until fully incorporated and smooth. Gradually add 1 cup sifted powdered sugar in three additions, beating well after each, until smooth. Stir in 1 teaspoon pure vanilla extract and ¼ teaspoon salt until just combined. -
Step 3
In a separate, clean, and chilled large mixing bowl, pour in 1 ½ cups well-chilled heavy cream. Using an electric mixer, beat the heavy cream on high speed until stiff peaks form (3-5 minutes). -
Step 4
Gently fold the whipped heavy cream into the peanut butter-cream cheese mixture in two or three additions using a rubber spatula, until no white streaks remain and the mixture is uniformly light and fluffy. Be careful not to overmix. Spoon the entire filling into the chilled monster cookie crust, spreading evenly. Cover the pie loosely and refrigerate for a minimum of 6-8 hours, or preferably overnight, to allow it to set completely. -
Step 5
Once thoroughly chilled and firm, remove the pie from the refrigerator. Garnish generously with ½ cup mini chocolate chips and ½ cup mini M&M’s candies. Drizzle 2-3 tablespoons of slightly melted creamy peanut butter over the top, and add any extra crushed monster cookies for decoration. For clean slices, use a sharp knife dipped in hot water and wiped clean between each cut. Store any leftovers in an airtight container in the refrigerator for 3-4 days, or freeze for up to 1 month.
Important Information
Nutrition Facts (Per Serving)
It is important to consider this information as approximate and not to use it as definitive health advice.
Allergy Information
Please check ingredients for potential allergens and consult a health professional if in doubt.


Leave a Comment