

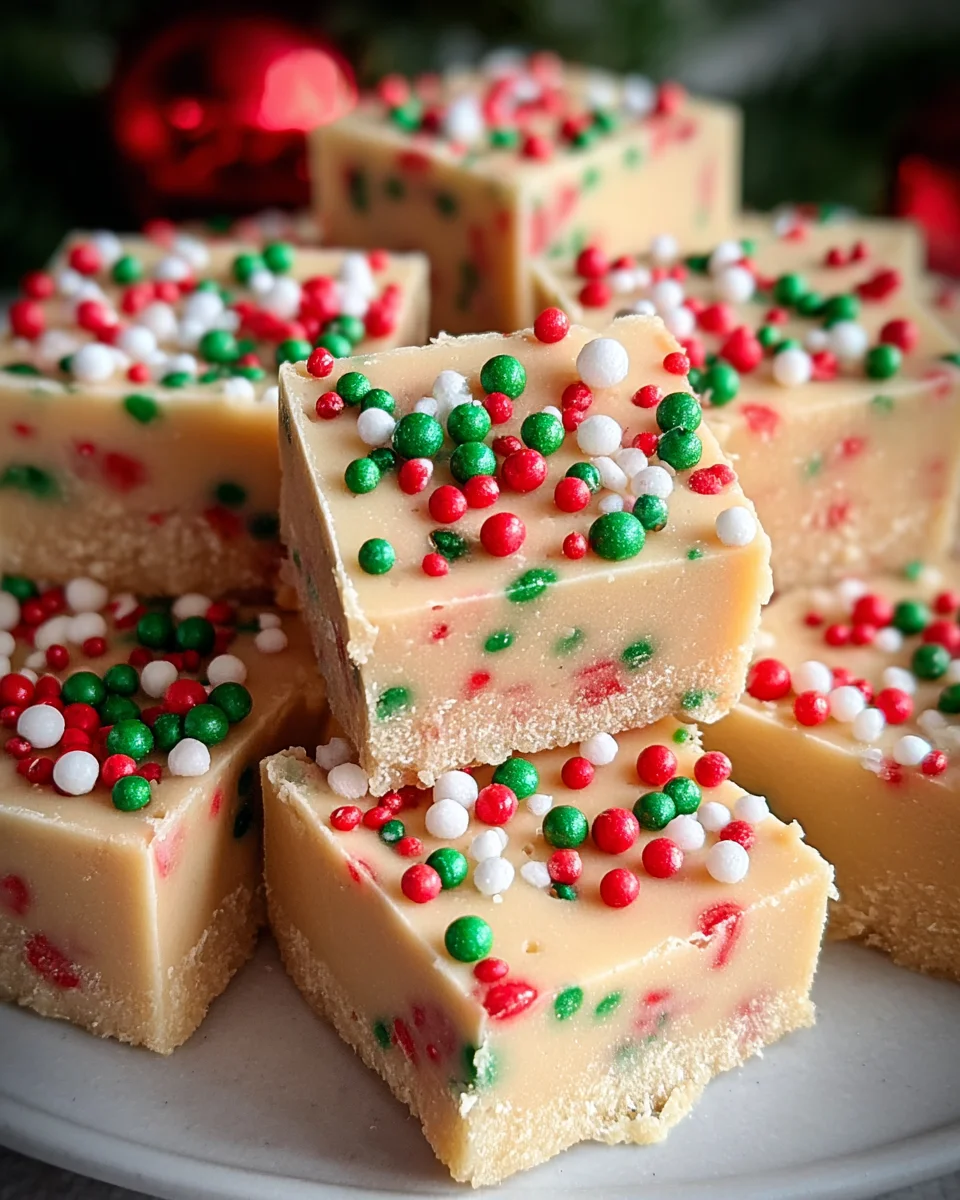
Easy Sugar Cookie Christmas Fudge – doesn’t that just sound like pure holiday magic in a bite? I’m so excited to share this recipe with you because it perfectly encapsulates everything wonderful about the festive season: joy, deliciousness, and a touch of effortless charm. Imagine combining the cheerful, nostalgic flavor of freshly baked sugar cookies with the smooth, melt-in-your-mouth indulgence of classic fudge. That’s precisely what we’re creating today, and I promise, it’s even better than it sounds!
Sugar cookies, with their simple elegance and endless decorating possibilities, have been a cornerstone of Christmas baking traditions for centuries, particularly loved for their ability to bring families together in the kitchen. Fudge, an all-American confectionary marvel, has likewise cemented its place as a holiday staple, often shared as homemade gifts or enjoyed by the fireside. This recipe beautifully bridges these two beloved legacies, offering a fresh and incredibly simple take on holiday treats that will become a new favorite tradition.
People adore this particular fudge for so many reasons. For starters, it truly lives up to its name, proving to be an incredibly quick and easy Sugar Cookie Christmas Fudge to prepare, making it ideal for busy holiday schedules. You get that irresistible, buttery vanilla flavor that evokes cherished childhood memories, all wrapped up in a creamy, rich texture that simply melts on your tongue. It’s perfect for festive parties, a thoughtful homemade gift, or simply a delightful treat to enjoy with a cup of hot cocoa. Get ready to impress everyone with minimal effort!

Ingredients:
Creating this truly delightful and Easy Sugar Cookie Christmas Fudge is an absolute joy, and it all starts with gathering a few simple, yet crucial, ingredients. Quality ingredients will elevate your fudge from good to absolutely phenomenal, so I always recommend using the best you can find, especially when it comes to extracts and chocolate. Here’s what you’ll need to whip up a batch that will disappear faster than Santa’s cookies on Christmas Eve!
-
3 cups (about 18 oz or 510g) good quality white chocolate chips or chopped white chocolate bars: I always opt for a good brand here because the quality of your white chocolate significantly impacts the final taste and texture of your fudge. Cheaper brands can sometimes be waxy or fail to melt smoothly, leading to a grainy fudge. White chocolate baking bars, finely chopped, often melt more consistently than chips, but high-quality chips work wonderfully too.
-
1 (14-ounce) can full-fat sweetened condensed milk: This is the backbone of our fudge, providing that luscious, creamy sweetness and setting power. Make sure it’s sweetened condensed milk, not evaporated milk – they are very different! Full-fat is essential for that rich, decadent mouthfeel we’re aiming for.
-
4 tablespoons (1/2 stick or 56g) unsalted butter: Butter adds richness, helps with the smooth texture, and prevents the fudge from becoming too sticky. Unsalted gives us control over the sodium content, but if you only have salted, just be mindful that your fudge might be a tiny bit saltier, which isn’t always a bad thing in a sweet treat!
-
1 teaspoon pure vanilla extract: A generous splash of good quality vanilla extract is key for that classic sugar cookie flavor. Don’t skimp here; artificial vanilla can leave a less desirable aftertaste. This ingredient ties all the sweet flavors together beautifully.
-
1/2 teaspoon pure almond extract: This is my secret weapon for truly capturing that authentic sugar cookie essence. Almond extract has a magical way of enhancing baked goods, and in this fudge, it makes all the difference, giving it that familiar, beloved taste. If you’re not an almond fan, you can omit it or slightly increase the vanilla, but I highly recommend trying it!
-
1/4 teaspoon salt: Just a tiny pinch, this helps to balance the sweetness and brightens all the other flavors. It’s amazing how a small amount of salt can make a big difference in a dessert, preventing it from being cloyingly sweet.
-
1/2 cup festive Christmas sprinkles (jimmies, nonpareils, or a holiday mix): These are not just for decoration; they add a lovely pop of color and a fun, festive crunch to our Easy Sugar Cookie Christmas Fudge. Choose your favorite holiday mix to truly make it your own! I love using a blend of red, green, and white for that classic Christmas feel.
Gathering Your Tools
Before we dive into the delicious process of making this incredibly simple and scrumptious Easy Sugar Cookie Christmas Fudge, it’s always a good idea to have all your equipment ready. Being organized makes the whole experience much more enjoyable and ensures a smoother, stress-free creation. Trust me, scrambling for a spatula mid-melt is no fun!
-
An 8×8 inch (20×20 cm) square baking pan: This size is perfect for achieving a good thickness for your fudge, yielding generous squares. If you prefer thinner fudge, you could opt for a 9×9 inch pan, but I find the 8×8 size gives the best texture and bite.
-
Parchment paper: Absolutely essential for easy removal! You’ll want to line your pan with parchment paper, leaving an overhang on two sides. This creates “slings” that allow you to lift the entire slab of fudge out of the pan once it’s set, making cutting a breeze and clean-up minimal. Don’t skip this step – it’s a lifesaver!
-
Non-stick cooking spray or a little butter for greasing: Even with parchment paper, a light spray or a quick rub of butter on the bottom and sides of the pan before laying down the parchment can provide extra insurance against sticking. It also helps the parchment adhere smoothly to the pan.
-
A medium to large heavy-bottomed saucepan: This is where the magic happens! A heavy-bottomed pan helps distribute heat evenly and prevents scorching, which is crucial when melting chocolate and condensed milk. Choose one large enough to comfortably hold all your ingredients with room to stir.
-
A heatproof rubber spatula or wooden spoon: You’ll need this for constant stirring to ensure everything melts smoothly and combines perfectly. A rubber spatula is great because it can scrape down the sides and bottom of the pan effectively, leaving no delicious bit behind.
-
Measuring cups and spoons: Precision is key in baking and candy-making, even for something as forgiving as fudge. Have your measurements ready to go.
Preparing the Fudge Base
This is where the heart of our Easy Sugar Cookie Christmas Fudge truly comes to life. The process is surprisingly straightforward, but a little care and attention here will ensure you get a wonderfully smooth, creamy, and irresistible fudge every single time. We’re aiming for a perfectly melted, velvety mixture that will soon transform into an incredible holiday treat.
-
Prepare your pan: First things first, let’s get that baking pan ready. Take your 8×8 inch square baking pan and either spray it lightly with non-stick cooking spray or grease it with a thin layer of butter. Then, line it with parchment paper, ensuring that the paper extends over two opposite sides of the pan. These overhangs will be your handy “handles” later for lifting the set fudge out effortlessly. Press the parchment paper firmly into the corners and against the sides of the pan to create a neat foundation for your fudge. This simple step is a game-changer for easy removal and clean, precise cuts.
-
Combine the core ingredients: Now, grab your medium to large heavy-bottomed saucepan. Into this pan, add your 3 cups of white chocolate chips (or chopped white chocolate bars), the entire 14-ounce can of sweetened condensed milk, and the 4 tablespoons of unsalted butter. These are the foundational components of our luscious fudge, and combining them at the start ensures they melt together into a harmonious mixture. Having a heavy-bottomed pan is really important here, as it helps prevent scorching, which can be a common pitfall when melting chocolate mixtures.
-
Gently melt over low heat: Place your saucepan over low to medium-low heat on your stovetop. This is not a race, my friends! Patience is key when melting chocolate. Using a gentle heat prevents the chocolate from seizing or burning, which would result in a grainy or clumpy fudge. Grab your heatproof rubber spatula or wooden spoon and begin to stir the mixture constantly. Yes, I said constantly! This continuous stirring ensures even melting, prevents anything from sticking to the bottom of the pan, and helps create that desirable smooth texture we’re after for our Easy Sugar Cookie Christmas Fudge. As the butter melts, it will start to incorporate with the condensed milk and chocolate, forming a thick, glossy liquid.
-
Achieve a velvety smoothness: Continue stirring and gently heating until all the white chocolate chips are completely melted and the mixture is entirely smooth and uniform. There shouldn’t be any lumps of chocolate visible. It will be thick, glossy, and have a beautiful, velvety sheen. This usually takes about 5 to 8 minutes, but it can vary depending on your stovetop and the type of chocolate you’re using. Do not let the mixture come to a rolling boil; you just want it to be hot enough to melt everything beautifully. If it starts to look like it’s boiling vigorously, reduce the heat immediately. The consistency should be thick enough to coat the back of your spoon but still pourable. This perfectly melted base is what sets the stage for our truly delightful Easy Sugar Cookie Christmas Fudge.
Adding the Sugar Cookie Magic and Finishing Touches
Now that we have our incredibly smooth and creamy fudge base, it’s time to infuse it with those delightful sugar cookie flavors and transform it into the festive Easy Sugar Cookie Christmas Fudge we’re dreaming of. This stage is all about adding aroma, balancing sweetness, and of course, those fun, celebratory sprinkles! This is where the magic truly happens, bringing all the elements together for a perfect holiday treat.
-
Remove from heat and stir in extracts: As soon as your fudge base is perfectly smooth and all the white chocolate has melted into a glossy, uniform consistency, immediately remove the saucepan from the heat. It’s crucial not to continue cooking it at this point, as it could overcook the chocolate and make the fudge too stiff or grainy. Now, swiftly add your 1 teaspoon of pure vanilla extract, the 1/2 teaspoon of pure almond extract, and the 1/4 teaspoon of salt. The aroma that will fill your kitchen at this moment is simply divine – that signature sugar cookie scent will instantly transport you to a cozy holiday kitchen! Stir these ingredients in thoroughly with your spatula, ensuring they are evenly distributed throughout the warm, creamy fudge. The extracts are quite potent, so a good stir ensures every bite gets that wonderful flavor. The salt, though small in quantity, plays a mighty role in balancing the sweetness of the white chocolate and condensed milk, really making all the other flavors pop and preventing the fudge from being overly saccharine.
-
Gently fold in the festive sprinkles: Once the extracts and salt are fully incorporated, it’s time for the fun part: adding the Christmas sprinkles! Gently fold in about half of your 1/2 cup of festive Christmas sprinkles. I recommend adding them in two stages to ensure they are well distributed but not completely crushed or melted into the fudge. Folding them in rather than vigorously stirring helps maintain their shape, color, and texture, which adds such a lovely visual and textural element to our Easy Sugar Cookie Christmas Fudge. Be careful not to overmix here; you just want them evenly dispersed throughout the warm fudge. The warmth of the fudge might cause some of the sprinkle colors to bleed slightly, especially if they are very delicate, so a gentle hand is best.
-
Transfer to the prepared pan: Working relatively quickly, before the fudge has a chance to set too much, pour the entire warm fudge mixture into your parchment-lined 8×8 inch baking pan. Use your rubber spatula to scrape out every last bit of that delicious fudge from the saucepan – no one wants to leave any behind! The mixture should be thick but still easy to spread. It will have a wonderfully inviting aroma and a beautiful, glossy appearance with flecks of colorful sprinkles peeking through.
-
Smooth and decorate: Once the fudge is in the pan, use the back of your spatula or a small offset spatula to gently spread the fudge evenly into all corners of the pan. Aim for a smooth, flat surface. Don’t press too hard; just ensure it’s level. This step is important for achieving uniformly sized pieces of fudge later. While the fudge is still warm and soft, immediately sprinkle the remaining half of your Christmas sprinkles over the top. This not only adds extra visual appeal but also provides a lovely textural contrast on the surface. Press them down ever so gently with the palm of your hand or the back of your spatula to ensure they adhere to the fudge as it cools. This makes your Easy Sugar Cookie Christmas Fudge look professionally made and incredibly inviting!
-
Allow to set: Now comes the hardest part – waiting! Place the pan of fudge in the refrigerator to chill and set completely. This typically takes at least 2 to 4 hours, but I often find it’s best to let it chill for a minimum of 4 hours, or even overnight, to ensure it’s perfectly firm and easy to cut. The cold environment helps the white chocolate and butter solidify, giving the fudge its characteristic firm yet creamy texture. Resist the urge to poke at it or try to cut it before it’s fully set; patience here will be rewarded with pristine pieces of fudge. Once fully set, your fudge will be firm to the touch and will have lost its initial soft, pliable texture.
-
Cutting and serving: Once your Easy Sugar Cookie Christmas Fudge is completely firm, use the parchment paper overhangs to carefully lift the entire slab of fudge out of the pan and onto a clean cutting board. This is where those parchment paper “handles” really shine! Using a large, sharp knife, trim off any uneven edges to create a perfectly square or rectangular block of fudge. Then, cut the fudge into 1-inch squares. For cleaner cuts, you can run your knife under hot water and wipe it dry between cuts, especially if the fudge starts to stick. The warmth of the blade helps glide through the fudge more smoothly. Arrange your beautiful squares of fudge on a festive platter and serve! This fudge is absolutely perfect for holiday parties, cookie exchanges, or just as a delightful homemade treat to enjoy with a cup of coffee or hot cocoa.
-
Storage: Store any leftover Easy Sugar Cookie Christmas Fudge in an airtight container at room temperature for up to one week, or in the refrigerator for up to two weeks. If storing in the fridge, let it sit out for about 15-20 minutes before serving to allow it to soften slightly and for the flavors to fully come alive. For longer storage, you can freeze individual pieces wrapped tightly in plastic wrap for up to 2-3 months. Just thaw them in the refrigerator overnight or at room temperature for a few hours before serving. Enjoy this truly simple and incredibly delicious festive treat!
Conclusion:
Well, my friends, we’ve reached the sweet finale of our culinary journey, and I genuinely hope you’re as excited as I am about what we’ve explored today. This isn’t just another dessert recipe; it’s a gateway to pure, unadulterated holiday joy, neatly packaged into delightful squares. What makes this recipe an absolute triumph, a definite must-try for your kitchen, is its remarkable ability to capture the very essence of two beloved holiday treats and meld them into one glorious creation. Imagine the buttery, vanilla-scented comfort of a classic sugar cookie, perfectly harmonized with the rich, creamy decadence of fudge. It’s a symphony of flavors and textures that dance on your palate, offering a nostalgic hug with every bite. The beauty of it lies in its simplicity, proving that extraordinary results don’t always require intricate steps. This fudge truly stands out, promising to be the star of any holiday gathering or a cherished quiet moment at home.
This recipe promises to transform your holiday baking experience with its irresistible charm and ease!
Once your batch of this incredible fudge is set and ready, the possibilities for enjoyment are practically endless. Of course, simply unwrapping a piece and savoring it with a cup of hot cocoa or a robust coffee is a quintessential pleasure. But let’s get creative! This fudge makes for the most heartwarming, homemade gift. Imagine packaging small boxes or cellophane bags filled with these vibrant squares, perhaps tied with a festive ribbon, to share with neighbors, teachers, or colleagues. They’ll undoubtedly appreciate such a thoughtful, delicious gesture. For holiday parties, arrange them artfully on a platter alongside other festive treats, creating an irresistible display that will disappear quickly.
Now, for those of you who love to experiment, this recipe is wonderfully adaptable. While the classic red and green sprinkles evoke the traditional Christmas spirit, don’t hesitate to customize them. Think about pastel sprinkles for an Easter treat, or orange and black for Halloween. You could even swirl in a few drops of food coloring to create different festive hues – perhaps a light blue for a winter wonderland theme, or even a soft pink. Consider adding a pinch of a different extract – a hint of almond extract for a marzipan-like nuance, or a touch of peppermint extract for a minty twist, especially if you’re a fan of those classic candy cane flavors. For an extra layer of texture and flavor, finely crushed pecans or walnuts could be folded into the mixture just before pouring, adding a delightful crunch. Another delightful variation could involve pressing a thin layer of actual crushed sugar cookies into the bottom of the pan before pouring the fudge over it, creating a truly layered experience. Or, for a darker fudge, you could experiment with swapping out a portion of the white chocolate for milk chocolate, adjusting the sweetness to your preference. The core recipe provides such a fantastic foundation that you can truly make it your own.
So, I truly hope I’ve convinced you to roll up your sleeves and give this extraordinary recipe a try. There’s an immense satisfaction that comes from creating something so delicious and beautiful with your own hands, especially when it brings smiles to the faces of those you share it with. This Easy Sugar Cookie Christmas Fudge is more than just a sweet treat; it’s a moment of joy, a shared memory, and a simple pleasure that brightens the busiest of seasons. Don’t let another holiday season pass without experiencing the magic of this delightful creation. I am genuinely excited for you to experience the rich, creamy texture and the comforting, familiar taste that makes this fudge so incredibly special. Once you’ve whipped up your own batch, please don’t keep it a secret! I would absolutely love to hear about your experience. Did you try a fun variation? Did it become an instant hit at your family gathering? Please share your stories, your photos, and your triumphs! Your feedback and creativity inspire me and our entire community of home bakers. Go ahead, make some delicious memories, and enjoy every single bite. Happy baking, everyone!
Festive Sugar Cookie Christmas Fudge – Super Easy!
Imagine combining the cheerful, nostalgic flavor of freshly baked sugar cookies with the smooth, melt-in-your-mouth indulgence of classic fudge. This incredibly quick and easy Sugar Cookie Christmas Fudge is perfect for festive parties, thoughtful homemade gifts, or a delightful treat with hot cocoa, impressing everyone with minimal effort!
Ingredients
Instructions
Important Information
Nutrition Facts (Per Serving)
It is important to consider this information as approximate and not to use it as definitive health advice.
Allergy Information
Please check ingredients for potential allergens and consult a health professional if in doubt.
Leave a Comment