

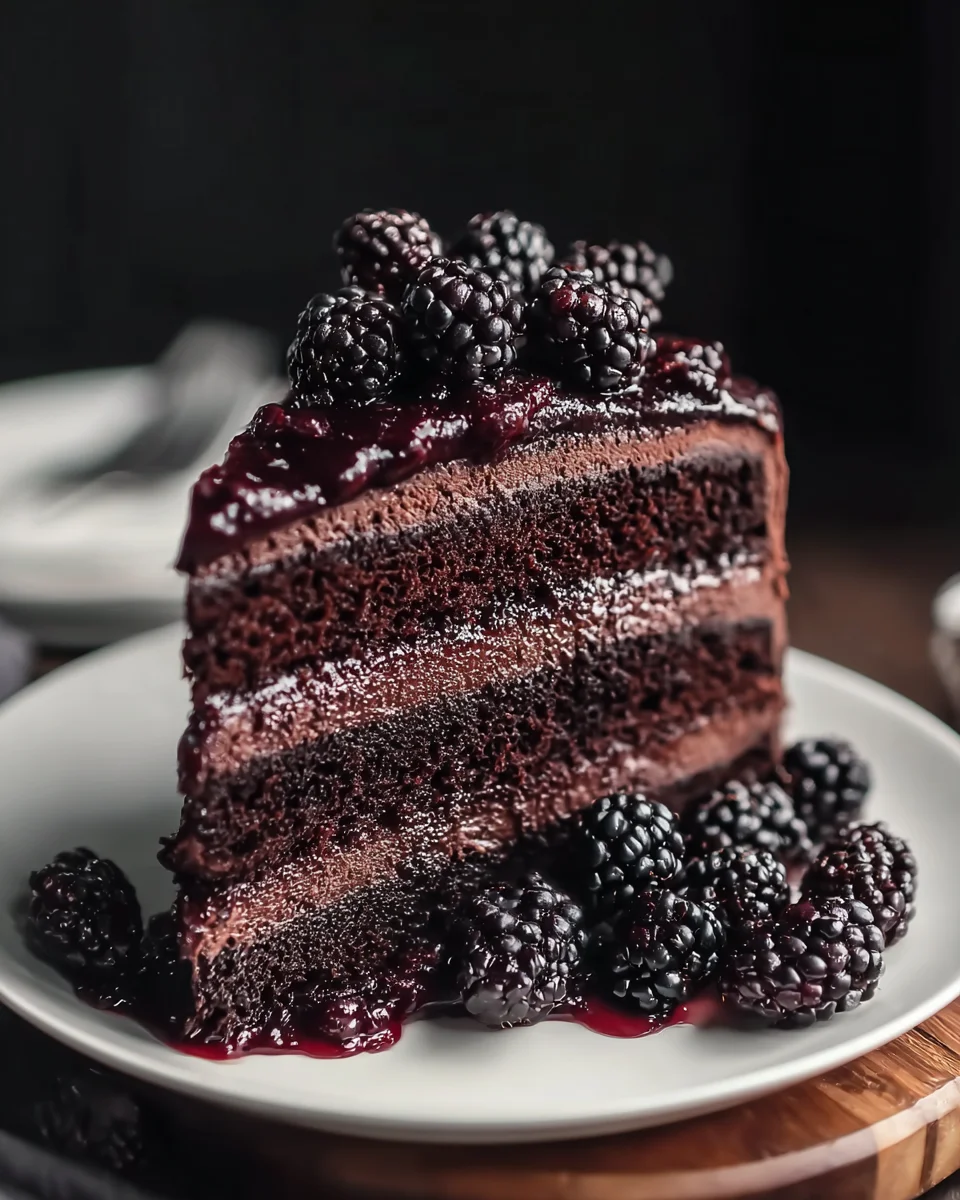
Black Velvet Cake With Blackberry Compote An Amazing Ultimate Recipe – just hearing those words, I imagine a masterpiece gracing the center of a dessert table, its dramatic appearance promising an unforgettable culinary experience. There’s something undeniably captivating about a truly black cake, offering a mysterious elegance that sets it apart from its crimson cousin, the classic Red Velvet. While Red Velvet has a rich history rooted in American baking traditions, first gaining popularity in the early 20th century, Black Velvet Cake is its modern, sophisticated sibling, a daring evolution that embraces deep cocoa notes and a visually striking hue.
I find that what truly makes this dessert a standout is the incredible interplay of flavors and textures. Imagine: a profoundly moist, tender crumb with a subtle hint of rich cocoa, contrasting beautifully with the vibrant, slightly tart, and lusciously sweet homemade blackberry compote. This is not just a cake; it’s an event, a celebration of contrasts. The bright fruit cuts through the richness of the velvet cake, creating a refreshing balance that will have everyone reaching for a second slice. I believe this Black Velvet Cake With Blackberry Compote An Amazing Ultimate Recipe will quickly become a cherished favorite for its stunning presentation, incredible flavor profile, and the sheer joy it brings to any occasion.

Ingredients:
-
For the Black Velvet Cake:
- 3 cups (360g) all-purpose flour
- 1 ½ cups (300g) granulated sugar
- 1 cup (200g) packed light brown sugar
- 1 cup (90g) unsweetened natural cocoa powder (not Dutch-processed, as we’re using baking soda)
- 2 teaspoons baking soda
- 1 teaspoon baking powder
- 1 teaspoon fine sea salt
- 1 cup (226g) unsalted butter, softened to room temperature
- 4 large eggs, at room temperature
- 1 cup (240ml) buttermilk, at room temperature
- 1 cup (240ml) strong brewed coffee, cooled to room temperature (can substitute with hot water and 2 teaspoons instant espresso powder for an intense flavor boost)
- 2 teaspoons pure vanilla extract
- 1-2 tablespoons black gel food coloring (optional, for a truly dark hue)
-
For the Blackberry Compote:
- 2 cups (about 300g) fresh or frozen blackberries
- ½ cup (100g) granulated sugar (adjust to taste, depending on blackberry sweetness)
- 2 tablespoons fresh lemon juice
- 1 teaspoon cornstarch mixed with 1 tablespoon cold water (slurry)
-
For the Cream Cheese Frosting:
- 1 ½ cups (340g) unsalted butter, softened to room temperature
- 16 oz (450g) full-fat cream cheese, chilled
- 6-8 cups (720-960g) powdered sugar, sifted
- 2 teaspoons pure vanilla extract
- ¼ teaspoon fine sea salt
- 2-4 tablespoons heavy cream or milk (as needed for consistency)
-
For Garnish (Optional):
- Fresh blackberries
- Mint sprigs
- Chocolate shavings or curls
Preparing the Blackberry Compote
Our journey to create the ultimate Black Velvet Cake with Blackberry Compote begins with this vibrant, tangy, and sweet component. While the cake itself is rich and decadent, this compote provides a crucial layer of brightness and contrasting texture that truly elevates the entire experience. It’s important to make this first so it has ample time to cool completely before we even think about assembling our magnificent cake.
- Combine Ingredients: In a medium saucepan, gently combine the fresh or frozen blackberries, granulated sugar, and fresh lemon juice. The lemon juice is key here; it brightens the flavor of the berries and also helps prevent the compote from becoming overly sweet, providing a beautiful balance. If you’re using frozen berries, there’s no need to thaw them first; they’ll release their juices beautifully as they cook.
- Simmer and Soften: Place the saucepan over medium heat. Bring the mixture to a gentle simmer, stirring occasionally to help the sugar dissolve and prevent sticking. As the blackberries heat up, they will begin to release their juices and soften. Continue to simmer for about 8-10 minutes, or until the berries are tender and the sauce has thickened slightly. At this point, you can decide how chunky you want your compote. For a smoother texture, you can gently mash some of the berries with the back of a spoon or a potato masher directly in the pot. For a more rustic feel, leave them mostly whole.
- Thicken with Slurry: Once the compote has reached your desired consistency in terms of chunkiness, give it a final stir. In a small bowl, whisk together the cornstarch and cold water to form a smooth slurry. Slowly pour the cornstarch slurry into the simmering blackberry mixture, whisking constantly to prevent lumps. Continue to cook and stir for another 1-2 minutes, allowing the compote to thicken further. It should coat the back of a spoon nicely. Do not boil vigorously after adding the cornstarch, as this can break down its thickening power.
- Cool Completely: Remove the compote from the heat and transfer it to a heatproof bowl or jar. Cover it loosely and allow it to cool to room temperature, then transfer it to the refrigerator to chill completely for at least 2-3 hours, or preferably overnight. This step is absolutely critical. A warm or even slightly cool compote will melt your cream cheese frosting and make your cake assembly a messy disaster. We want a firm, cool filling that holds its shape.
Preparing the Black Velvet Cake
Now for the star of the show: the Black Velvet Cake itself! This isn’t just a chocolate cake; it’s a moist, tender, and deeply flavored creation with a stunning dark hue. We’re aiming for a truly amazing and ultimately satisfying result, so let’s pay attention to every detail.
Dry Ingredients Phase:
- Preheat and Prepare Pans: Before anything else, preheat your oven to 350°F (175°C). This ensures a consistent baking temperature from the moment your cake batter goes in. Grease and flour three 8-inch round cake pans, or line them with parchment paper circles on the bottom and spray the sides. I always prefer to use parchment; it’s a foolproof way to prevent sticking and makes removal much easier.
- Sift Dry Ingredients: In a large mixing bowl, sift together the all-purpose flour, granulated sugar, light brown sugar, unsweetened natural cocoa powder, baking soda, baking powder, and fine sea salt. Sifting is not just for eliminating lumps; it also aerates the dry ingredients, which contributes to a lighter, more tender cake texture. Using natural cocoa powder is important here, as its acidity reacts with the baking soda to create that signature lift and tender crumb.
- Whisk Thoroughly: Once sifted, use a whisk to thoroughly combine all the dry ingredients. Make sure there are no visible streaks of one ingredient and everything is evenly distributed. Set this bowl aside.
Wet Ingredients Phase:
- Cream Butter and Sugars: In the bowl of a stand mixer fitted with the paddle attachment (or using a large bowl and a hand mixer), beat the softened unsalted butter on medium speed until creamy, about 2 minutes. Gradually add the granulated sugar and light brown sugar, continuing to beat on medium-high speed for another 3-5 minutes. You’re looking for a mixture that is light in color and fluffy in texture. This creaming process incorporates air, which is essential for a light cake.
- Add Eggs One by One: Reduce the mixer speed to medium-low. Add the eggs one at a time, beating well after each addition until just combined. Scrape down the sides of the bowl as needed to ensure everything is incorporated. Adding eggs slowly allows them to emulsify properly with the butter and sugar, creating a stable batter.
- Introduce Liquids and Flavorings: In a separate medium bowl or large measuring cup, whisk together the buttermilk, cooled strong brewed coffee (or coffee with espresso powder), and pure vanilla extract. The coffee might seem unusual, but trust me, it doesn’t make the cake taste like coffee; instead, it deepens and enhances the chocolate flavor of our Black Velvet Cake beautifully. This is one of those secret ingredients that makes a world of difference.
- Add Black Gel Food Coloring (Optional but Recommended): If you want that dramatic, truly black velvet appearance that makes this cake so striking, now is the time to add the black gel food coloring to your wet ingredients mixture. Start with one tablespoon and add more if needed to achieve your desired intensity. Gel coloring is best as it won’t thin out your batter like liquid food coloring.
Combining and Baking Phase:
- Alternate Dry and Wet Ingredients: With the mixer on low speed, add about one-third of the dry ingredients to the wet ingredients in the stand mixer. Mix until just combined. Then, add half of the buttermilk and coffee mixture, mixing until just incorporated. Repeat this process: another third of the dry ingredients, then the remaining half of the wet mixture, and finally the last third of the dry ingredients. The key here is to mix until just combined after each addition. Overmixing will develop the gluten in the flour, resulting in a tough, dry cake.
- Final Mix: Once all ingredients are added, give the batter one final, very quick mix on low speed, then remove the bowl from the mixer. Use a rubber spatula to give the batter a final gentle fold by hand, ensuring there are no hidden pockets of unmixed ingredients at the bottom of the bowl. The batter will be thick, rich, and wonderfully dark.
- Divide Batter: Evenly divide the cake batter among your three prepared 8-inch cake pans. You can use a kitchen scale for precision if you want perfectly even layers, or simply eyeball it. Smooth the tops with an offset spatula.
- Bake: Transfer the cake pans to the preheated oven. Bake for 28-32 minutes, or until a wooden skewer or toothpick inserted into the center of a cake comes out with only a few moist crumbs attached, or clean. The exact baking time will vary depending on your oven, so keep an eye on them.
- Cooling Process: Once baked, remove the cakes from the oven and let them cool in their pans on a wire rack for about 15-20 minutes. This allows the cakes to firm up slightly before you attempt to remove them. After 15-20 minutes, carefully invert the cakes onto the wire rack, peel off the parchment paper (if used), and allow them to cool completely. This can take several hours. Attempting to frost warm cakes is a recipe for disaster, as the frosting will melt and slide off. Patience is a virtue here for the ultimate Black Velvet Cake experience.
Making the Cream Cheese Frosting
No Black Velvet Cake would be complete without a luscious, tangy cream cheese frosting. This frosting is notoriously delightful but requires a few specific steps to achieve that perfectly smooth, pipeable consistency. This is the velvet companion to our deep, dark cake.
- Beat Butter: In the bowl of a stand mixer fitted with the paddle attachment (or using a hand mixer), beat the softened unsalted butter on medium speed until it is light and fluffy, about 3-5 minutes. This aerates the butter, creating a wonderfully light base for our frosting.
- Add Cream Cheese: Add the chilled full-fat cream cheese to the whipped butter. This is a crucial step for cream cheese frosting stability. If your cream cheese is at room temperature, your frosting will likely be too soft and runny. Beat on medium-low speed until just combined and smooth. Do not overmix the cream cheese at this stage, as it can cause the frosting to become too runny. You want it just incorporated, with no large lumps of cream cheese.
- Incorporate Powdered Sugar: With the mixer on low speed, gradually add the sifted powdered sugar, about 1-2 cups at a time, beating until fully incorporated after each addition. Sifting the sugar is important to prevent a gritty frosting. Once all the sugar is in, increase the speed to medium-high and beat for another 2-3 minutes until the frosting is light, fluffy, and smooth. Scrape down the sides of the bowl as needed.
- Add Flavorings and Adjust Consistency: Beat in the pure vanilla extract and fine sea salt. If the frosting seems too thick, add heavy cream or milk one tablespoon at a time until you reach your desired pipeable and spreadable consistency. If it’s too thin, you can add a bit more sifted powdered sugar.
Assembling the Amazing Ultimate Black Velvet Cake
This is where all our hard work comes together! Assembling our Black Velvet Cake with Blackberry Compote is the grand finale, and with careful attention to detail, we’ll create a showstopper. Remember, patience, especially with cooling, is key to a beautiful finish.
- Level the Cakes: Once your cake layers are completely cool, use a serrated knife or a cake leveler to gently trim off any domed tops, creating flat, even layers. This ensures a stable and professional-looking cake. You can snack on the scraps, they’re delicious!
- First Layer and Frosting Dam: Place one leveled cake layer on your serving plate or cake stand. If using a turntable, place a small dollop of frosting on the stand before placing the cake to help secure it. Take about 1 cup of the cream cheese frosting and spread a thin, even layer over the top of the first cake layer, extending almost to the edge. Then, using a piping bag fitted with a round tip (or simply a Ziploc bag with the corner snipped off), pipe a dam of frosting around the very edge of this layer. This dam will hold our precious blackberry compote securely in place.
- Add Blackberry Compote: Spoon about half of the completely chilled blackberry compote into the center of the frosting dam. Gently spread it out evenly within the dam, being careful not to push it over the edge.
- Second Layer and Repeat: Carefully place the second cake layer on top of the compote and frosting. Repeat the frosting and compote steps: spread a thin layer of frosting, pipe a dam, then spoon in the remaining blackberry compote.
- Top Layer and Crumb Coat: Place the third and final cake layer on top. Now, it’s time for the crumb coat. This thin layer of frosting traps any loose crumbs, preventing them from mixing into your final decorative coat. Use an offset spatula to spread a very thin, even layer of cream cheese frosting all over the top and sides of the entire cake. Don’t worry about perfection here; it’s just a base.
- Chill the Crumb Coat: Transfer the crumb-coated cake to the refrigerator and chill for at least 20-30 minutes. This allows the crumb coat to firm up, making the final frosting application much smoother and neater.
- Final Frosting Layer: Once the crumb coat is firm, apply the remaining cream cheese frosting to the top and sides of the cake. Use your offset spatula or a bench scraper to create a smooth, even finish. You can go for a perfectly smooth look or create beautiful swirls and textures with your spatula. This is your chance to really showcase the beauty of this Black Velvet Cake with Blackberry Compote.
Finishing Touches and Serving
The very last steps to perfecting your creation and making it utterly irresistible. These final details truly make our Black Velvet Cake with Blackberry Compote an amazing, ultimate recipe.
- Final Chill: For the cleanest slices and to allow the frosting to fully set, I highly recommend chilling the decorated cake in the refrigerator for at least 1 hour before serving. This solidifies the frosting and makes cutting much easier.
- Garnish with Flair: Before serving, add your chosen garnishes. Fresh blackberries piled artfully on top, perhaps with a few delicate mint sprigs, not only add visual appeal but also hint at the delicious compote within. A sprinkle of chocolate shavings or curls can also add an extra touch of elegance and texture.
- Slice and Serve: Use a long, sharp knife, warming it with hot water between slices for the cleanest cuts, especially if the cake is chilled. Serve generous slices of your incredible Black Velvet Cake with Blackberry Compote to your eagerly awaiting guests. Each bite should be a delightful combination of moist, dark cake, tangy blackberry compote, and creamy, sweet-tart frosting.
Conclusion:
And there you have it, my friends! We’ve reached the sweet culmination of our journey, and I genuinely hope you’re as excited as I am about what we’ve created. This isn’t just another dessert; it’s an experience, a statement, and a true labor of love that promises to reward you with every single bite. After diving deep into its rich, dark crumb and experiencing the vibrant burst of the homemade blackberry compote, I can confidently say that this cake stands head and shoulders above many others. It’s the kind of showstopper that not only tantalizes the taste buds but also captivates the eyes, making it perfect for any celebration, or simply as an indulgent treat to brighten an ordinary day. The deep, almost mysterious hue of the cake, paired with the jewel-toned compote and the creamy tang of the frosting, creates a symphony of textures and flavors that is truly unforgettable.
I truly believe that making this cake is an act of self-care, a delicious project that yields immense satisfaction. There’s something incredibly therapeutic about mixing, baking, and assembling such a magnificent creation, knowing that the final outcome will bring smiles and joy. The delicate balance of the slightly bitter cocoa, the subtle sweetness of the cake itself, and the bright, fruity counterpoint of the compote makes for a dessert that’s complex yet incredibly approachable. It’s rich without being overly heavy, and sophisticated without being intimidating. This, for me, is why the Black Velvet Cake With Blackberry Compote An Amazing Ultimate Recipe truly earns its title as a must-try. It transforms simple ingredients into something truly extraordinary, proving that a little effort in the kitchen can lead to truly spectacular rewards. It’s a testament to the fact that some recipes are more than just food; they are memories in the making.
Serving Suggestions & Delightful Variations:
Once your masterpiece is ready, the fun doesn’t have to stop! While this cake is absolutely divine on its own, there are so many ways to elevate the experience further or tailor it to your personal preferences. For a truly classic presentation, I love to serve a generous slice with an extra dollop of fresh blackberry compote on the side, perhaps even a scattering of fresh blackberries or a sprig of mint for an added touch of elegance and freshness. A light dusting of powdered sugar over the top can also add a delicate finish, highlighting the beautiful dark contrast of the cake.
If you’re feeling adventurous, consider pairing a warm slice with a scoop of premium vanilla bean ice cream; the melting ice cream creates an incredibly luxurious sauce that complements the cake beautifully. Alternatively, a dollop of lightly sweetened whipped cream or even a mascarpone cream can provide a lovely, airy contrast to the dense cake. For those who love a bit more chocolate, a drizzle of dark chocolate ganache over individual slices before serving would be utterly decadent. Don’t be afraid to experiment with the compote either! While blackberries are truly magical here, you could easily swap them for raspberries, cherries, or a mix of forest berries to create a slightly different flavor profile. Imagine a tart raspberry compote cutting through the richness, or a sweet cherry compote adding a touch of sophisticated fruitiness. You could even infuse your compote with a hint of orange zest or a splash of kirsch for an adult twist. This cake also lends itself beautifully to being served with a good cup of coffee, a robust espresso, or even a glass of your favorite port wine or sparkling rosé for a truly sophisticated dessert course. For smaller gatherings or party favors, baking this as cupcakes with a swirl of frosting and a blackberry on top makes for equally stunning individual servings!
Your Culinary Adventure Awaits!
Now, it’s your turn! I’ve shared my secrets, my tips, and my immense passion for this incredible dessert, and I genuinely cannot wait for you to experience the magic for yourselves. Don’t be intimidated by the layers or the compote; each step is straightforward and incredibly rewarding. Embrace the process, savor the aromas that will fill your kitchen, and most importantly, enjoy the triumphant moment when you slice into your very own homemade Black Velvet Cake With Blackberry Compote. This isn’t just about following a recipe; it’s about creating something memorable, something that will impress your loved ones and delight your own palate.
I wholeheartedly encourage you to roll up your sleeves, gather your ingredients, and embark on this delicious baking adventure. And once you’ve tasted the glory, I would absolutely love to hear about your experience! Please share your photos, your triumphs, any variations you tried, or even just your thoughts on how this cake brightened your day in the comments below or on social media. Your feedback and creativity inspire me, and I cherish seeing how these recipes come to life in your kitchens. Thank you for joining me on this culinary journey. Happy baking, and enjoy every single incredible bite!
Black Velvet Cake With Blackberry Compote An Amazing Ultimate Recipe
A dramatic and sophisticated Black Velvet Cake featuring a profoundly moist, tender crumb with deep cocoa notes, beautifully contrasted by a vibrant, slightly tart, and lusciously sweet homemade blackberry compote, all enrobed in a tangy cream cheese frosting.
Ingredients
Instructions
Important Information
Nutrition Facts (Per Serving)
It is important to consider this information as approximate and not to use it as definitive health advice.
Allergy Information
Please check ingredients for potential allergens and consult a health professional if in doubt.

Leave a Comment