

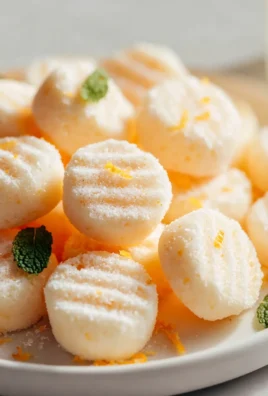
Vanilla Pecan Pralines are a true Southern delight, offering a symphony of sweet, creamy, and crunchy textures in every bite. Imagine a confection so utterly irresistible, it transports you straight to a sun-drenched veranda, sipping sweet tea. That’s the magic of these exquisite treats, and I am thrilled to share with you a recipe that captures their authentic charm and flavor.
A Sweet Journey: From French Courts to Southern Kitchens
The history of pralines is as rich and delightful as the candy itself. Originating in 17th-century France, where sugar-coated almonds were created for Marshal du Plessis-Praslin, these sophisticated confections traveled across the Atlantic to become a beloved staple in New Orleans. There, with the abundant availability of pecans and the culinary ingenuity of Creole cooks, the almond was replaced, and the distinctively creamy, distinctively Southern praline we know and adore today was born. My recipe for Vanilla Pecan Pralines embraces this cherished heritage, blending tradition with the comforting essence of warm vanilla for an unforgettable experience that honors its sweet lineage.
People absolutely adore this dish for countless reasons that extend beyond its nostalgic appeal. It’s the perfect harmony of textures—the delicate crispness of the candy shell giving way to a luscious, melt-in-your-mouth creaminess, generously studded with perfectly toasted pecans. The rich, buttery flavor, beautifully enhanced by the aromatic notes of vanilla, makes them an ideal dessert, a thoughtful homemade gift, or simply a luxurious personal indulgence. They are surprisingly straightforward to prepare, yet yield results that taste incredibly gourmet, making them a fantastic and rewarding addition to any home baker’s repertoire.

Ingredients:
Making delicious, melt-in-your-mouth Vanilla Pecan Pralines is a true labor of love, but oh, is it worth every moment! The key to success lies in quality ingredients and careful measurements. Here’s what you’ll need to gather:
- 2 cups granulated sugar: This forms the foundational sweetness and structure of our pralines. I always opt for a good quality, fine-grain sugar for consistent results.
- 1 cup packed light brown sugar: The brown sugar adds a wonderful depth of flavor, a hint of molasses, and contributes to the praline’s characteristic chewiness and richness. Make sure it’s packed tightly for an accurate measurement.
- 1/2 cup (1 stick) unsalted butter: I prefer unsalted butter so I can control the salt content myself. Cut it into a few pieces to help it melt more evenly and quickly in the pan. Butter lends a creamy texture and rich flavor that is essential for authentic Vanilla Pecan Pralines.
- 1/2 cup heavy cream: This is where much of the pralines’ creaminess comes from. Don’t skimp on the fat content; heavy cream (at least 36% milk fat) is crucial for a smooth, tender praline.
- 1/4 cup whole milk: Whole milk adds a touch more liquid and creaminess without making the mixture too rich or heavy.
- 1/4 teaspoon baking soda: This might seem like an unusual addition for candy, but it plays a vital role. Baking soda helps prevent crystallization and gives the pralines a slightly lighter texture, ensuring they aren’t overly hard. It also reacts with the acidic components in the sugars, creating a delicate airiness.
- 1 teaspoon pure vanilla extract: This is absolutely non-negotiable for our Vanilla Pecan Pralines! Use a good quality pure vanilla extract, not imitation. The vanilla flavor is paramount, especially since it’s highlighted in the name. Add it towards the end of the cooking process to preserve its delicate aroma and taste.
- 3 cups pecan halves: These are the star nuts of our pralines! I recommend using fresh, high-quality pecan halves. You can lightly toast them beforehand if you like, to enhance their nutty flavor even further, but it’s not strictly necessary as they will cook slightly in the hot candy mixture.
- Pinch of salt (optional, but recommended): Just a tiny pinch can enhance all the other flavors, balancing the sweetness beautifully. I usually add it when I add the sugars.
Equipment You’ll Need:
Having the right tools ready before you start will make the whole process smoother and more enjoyable. Trust me, with candy making, preparation is half the battle!
- Heavy-bottomed saucepan (4-quart or larger): A heavy bottom is crucial for even heat distribution, preventing scorching on the bottom, which is a common pitfall in candy making. A larger size helps prevent boil-overs.
- Candy thermometer: This is your best friend for accurate candy making. An instant-read thermometer can also work, but a clip-on candy thermometer is ideal for continuous monitoring without holding it. Precision with temperature is key for the perfect Vanilla Pecan Pralines.
- Wooden spoon or heatproof spatula: For stirring. Metal spoons can sometimes conduct heat too quickly and potentially encourage crystallization.
- Parchment paper or silicone baking mats: Absolutely essential for lining your baking sheets. This prevents the pralines from sticking, making removal easy and mess-free.
- Two large baking sheets: You’ll need plenty of space to drop your pralines without crowding them.
- Measuring cups and spoons: For precise ingredient measurements.
- Cooling rack: For setting the pralines after they’ve been dropped.
Preparation is Key: Setting Up for Success
Before you even think about turning on the stove, let’s get everything in order. This phase is critical for success with Vanilla Pecan Pralines, as candy making moves quickly once it starts, and you won’t have time to scramble for ingredients or equipment.
- Gather and Measure All Ingredients: First things first, get all your ingredients out and measure them precisely. This practice, known as “mise en place,” is absolutely invaluable when making candy. You’ll thank yourself later when the syrup is bubbling, and you don’t have to stop to measure milk or chop butter. Have your sugars, butter, cream, milk, baking soda, vanilla, and pecans all ready to go.
- Prepare Your Baking Sheets: Line two large baking sheets with parchment paper or silicone baking mats. I always make sure they’re completely covered so I have ample space to drop the pralines. This step is crucial because once the praline mixture is ready, it sets very quickly, and you need to be able to drop them without any sticking issues.
- Optional: Toast Your Pecans: While not strictly necessary, lightly toasting your pecan halves can elevate the flavor of your Vanilla Pecan Pralines to another level. Spread the pecans in a single layer on a separate baking sheet and toast in a preheated oven at 350°F (175°C) for about 5-7 minutes, or until fragrant. Be vigilant, as nuts can burn quickly! Let them cool completely before adding them to the praline mixture. This step deepens their inherent nuttiness and provides a more robust flavor profile in the finished candy.
- Get Your Candy Thermometer Ready: If using a clip-on candy thermometer, attach it to the side of your heavy-bottomed saucepan, ensuring the tip doesn’t touch the bottom of the pan. The tip should be submerged in the candy mixture once it starts to cook, but not scraping the bottom, which can give an inaccurate reading. Calibrate your thermometer if you haven’t recently by placing it in boiling water (should read 212°F or 100°C at sea level).
- Create a Clean Work Surface: Have a clean, heat-safe surface ready for pouring and dropping your pralines. Make sure it’s free of drafts, as sudden temperature changes can sometimes affect crystallization.
Why is this initial setup so important for Vanilla Pecan Pralines?
It’s because candy making is a science. Temperatures, timing, and precision are paramount. By having everything ready, you minimize stress, reduce the chance of errors, and ensure a smooth process from start to finish. You want to focus on the cooking, not on finding ingredients!
Crafting the Perfect Vanilla Pecan Praline Base: The Syrup
Now, let’s get cooking! This stage is about carefully combining and heating your ingredients to create the foundational syrup for our heavenly Vanilla Pecan Pralines. Patience and attention to temperature are your allies here.
- Combine Wet and Dry Ingredients (Initial Mix): In your prepared heavy-bottomed saucepan, combine the granulated sugar, light brown sugar, butter (cut into pieces), heavy cream, whole milk, and the pinch of salt (if using). Give it a good stir with your wooden spoon or heatproof spatula until all the ingredients are well incorporated. You want to ensure the sugars are moistened by the liquids.
- Gentle Heat and Dissolving Sugars: Place the saucepan over medium heat. Stir constantly but gently, until the butter is completely melted and the sugars are fully dissolved. You’ll be able to tell the sugar is dissolved when the mixture looks smooth and there are no gritty sugar crystals clinging to the sides of the pan or at the bottom. This usually takes about 5-7 minutes.
Why is this initial stirring and dissolving so crucial?
Because undissolved sugar crystals can lead to a grainy praline texture later on. We want smooth, creamy Vanilla Pecan Pralines, not sugary rocks! - Introduce the Baking Soda: Once the sugars are dissolved and the mixture is warm, stir in the baking soda. You might notice a slight fizzing or bubbling reaction, which is completely normal. The baking soda will help ensure a smoother, less prone-to-crystallization praline.
- Bring to a Boil and Stop Stirring: Increase the heat slightly to medium-high and bring the mixture to a rolling boil. Once it starts boiling vigorously, stop stirring completely. Stirring past this point can encourage sugar crystals to form on the sides of the pan, which can then fall back into the syrup and initiate crystallization, resulting in grainy pralines.
- The Critical Temperature Watch – First Stage: Insert your candy thermometer (if it wasn’t already in place). Let the mixture boil, without stirring, until the thermometer reaches 235°F (113°C). This temperature corresponds to the “soft ball” stage in candy making. At this point, if you were to drop a small amount of the hot syrup into cold water, it would form a soft, pliable ball that can be flattened between your fingers. It’s important not to rush this stage; let the thermometer do its job.
During this phase, you’ll notice the mixture starting to thicken and change color slightly, deepening to a lovely caramel hue. The aroma will begin to fill your kitchen, a delightful preview of the Vanilla Pecan Pralines to come.
The Critical Cooking Phase: Achieving That Signature Texture
We’ve reached the first temperature milestone! Now, the real magic happens as we continue to cook the syrup to its optimal consistency for perfect Vanilla Pecan Pralines. This stage is all about precision and preventing graininess.
- Add the Vanilla Extract: As soon as your thermometer hits 235°F (113°C), carefully remove the saucepan from the heat. This is the moment to stir in your pure vanilla extract. Adding it now, off the heat, preserves its delicate flavor and aroma, which can dissipate if cooked for too long at high temperatures. Give it a gentle stir to combine, but try not to scrape the sides of the pan.
- Return to Heat and Continue Cooking: Place the saucepan back over medium heat. Again, do not stir from this point onward. Let the mixture continue to boil, monitoring your candy thermometer very closely. We are aiming for a final temperature of 240°F (116°C) to 242°F (117°C). This is known as the “firm ball” stage. If you test it in cold water, it should form a firm but still pliable ball.
- Watch for the Target Temperature: This final ascent in temperature usually happens quite quickly, so stay vigilant! Once the thermometer hits your target of 240-242°F, immediately remove the saucepan from the heat.
Why is this temperature so precise?
This temperature range is crucial for the perfect consistency of Vanilla Pecan Pralines. Too low, and they’ll be too soft and sticky; too high, and they’ll be crumbly or hard. - Let it Rest (briefly): Once removed from the heat, set the pan aside on a heatproof surface for about 1-2 minutes. Do not stir it during this brief rest. This allows the mixture to settle slightly and helps distribute the heat evenly before the next critical step.
During this stage, the syrup will continue to deepen in color and smell even more intensely of caramel and butter. The surface might develop a slight skin or froth, which is normal. The key is to trust your thermometer and resist the urge to stir. Stirring at high temperatures, especially during the non-stirring phase, almost guarantees crystallization and a grainy texture for your Vanilla Pecan Pralines.
The Transformation: Beating and Adding Pecans
This is where the magic really happens, transforming that hot, clear syrup into the opaque, creamy delight we know as Vanilla Pecan Pralines. This step requires quick action and keen observation.
- Cooling the Mixture (Slightly): After removing the pan from the heat and letting it rest for a minute or two, let the mixture cool undisturbed for another 5-10 minutes. The exact cooling time can vary based on your kitchen’s temperature and humidity. You’re looking for the temperature to drop slightly, ideally to around 200°F (93°C).
Why this cooling?
Beating the candy when it’s too hot can lead to a crumbly, dry texture. Cooling it slightly allows the sugar crystals to begin to form in a more controlled, smaller fashion, resulting in a creamier praline. - The Crucial Beating Process: Once slightly cooled, it’s time to beat! Using your wooden spoon, begin stirring the mixture vigorously and continuously. You’ll notice a remarkable transformation starting to occur. At first, it will be shiny and translucent. As you beat, it will gradually become thicker, opaque, and lose its gloss. It will transition from a dark caramel color to a lighter, creamy, almost fudge-like consistency.
- Add the Pecan Halves: Continue beating until the mixture starts to thicken considerably and shows signs of losing its glossy sheen, just before it becomes truly stiff. This is the perfect moment to quickly stir in your 3 cups of pecan halves. Incorporate them thoroughly so every praline gets a good amount of nuts. The addition of the pecans often helps to further cool and thicken the mixture.
- Look for the Right Consistency: Keep beating the mixture with the pecans until it looks creamy, opaque, and no longer shiny. It should be thick enough to hold its shape when dropped from a spoon, but still pliable enough to work with. If it becomes too stiff, it will be hard to drop onto your parchment paper. This beating process typically takes anywhere from 3 to 8 minutes, depending on the initial temperature and how vigorously you beat. The consistency should resemble that of a thick peanut butter or very soft fudge. When you lift your spoon, it should be able to hold a mound of the praline mixture.
Understanding the Beating Phase:
This is perhaps the most critical step for achieving the distinctive texture of Vanilla Pecan Pralines. Beating incorporates air and encourages the formation of tiny sugar crystals. These small crystals create the smooth, creamy, melt-in-your-mouth texture that pralines are famous for. If you don’t beat it enough, your pralines might be too sticky or not set properly. If you overbeat, they can become crumbly or sugary. Practice makes perfect here!
Shaping Your Vanilla Pecan Pralines: The Final Touch
Once you’ve achieved that perfect creamy, thick praline consistency, it’s a race against time to get your Vanilla Pecan Pralines onto the parchment paper before they set up completely. Speed and efficiency are key here!
- Work Quickly: Have your prepared baking sheets with parchment paper ready and close by. Using a clean tablespoon or a small cookie scoop, quickly drop spoonfuls of the praline mixture onto the parchment paper. Aim for uniform sizes, roughly 2-3 inches in diameter, but don’t obsess over perfection; rustic charm is part of their appeal!
- Give Them Space: Leave about 1 to 2 inches between each praline to prevent them from merging as they settle. The mixture will spread slightly as it cools, so adequate spacing is important.
- Maintain Consistency: As you continue to drop the pralines, you might notice the mixture in the saucepan starting to stiffen up. If it becomes too firm to drop easily, you can gently place the saucepan back over very low heat for just a few seconds, stirring constantly, to warm it slightly and make it more pliable again. Be very careful not to overheat it, or you risk changing the texture. Alternatively, you can add another tablespoon of hot water or milk and stir it in quickly to loosen it up. This trick should be used sparingly, however, and only if absolutely necessary to save the remaining mixture.
- Final Dropping Tips: For neat, round pralines, you can use the back of a second spoon to help push the mixture off the first spoon. Some people prefer to use two spoons, one to scoop and one to scrape. The goal is to get the mixture onto the paper as efficiently as possible.
Don’t be discouraged if your first few aren’t perfectly round; you’ll get the hang of it quickly. The main objective is to get the Vanilla Pecan Pralines portioned out before the mixture sets too much in the pan. Embrace the slightly irregular shapes – it’s a sign of homemade goodness!
Cooling, Storing, and Enjoying Your Homemade Vanilla Pecan Pralines
You’ve done the hard work! Now comes the easy part: letting your delicious Vanilla Pecan Pralines cool and planning how to savor them.
- Allow to Cool Completely: Let the pralines cool undisturbed on the parchment-lined baking sheets at room temperature. Depending on the humidity in your kitchen, this can take anywhere from 30 minutes to a couple of hours.
Patience is key here!
Resist the urge to touch or move them while they’re still warm, as they will be fragile and sticky. They need to firm up completely to achieve their characteristic texture. - Remove from Parchment: Once completely cool and firm, gently peel the Vanilla Pecan Pralines off the parchment paper. They should come off easily without sticking. If any are a little stubborn, use a thin spatula to help lift them.
- Storing Your Pralines: Store your homemade Vanilla Pecan Pralines in an airtight container at room temperature. If you layer them, place a piece of parchment paper between layers to prevent sticking. They typically stay fresh and delicious for up to 1-2 weeks. Avoid refrigerating them, as the moisture and cold can make them sticky or alter their texture. In humid environments, they might soften slightly over time, but their flavor will remain delightful.
- Enjoy! Now, the best part – enjoy your hard work! These creamy, nutty Vanilla Pecan Pralines are perfect as a dessert, a sweet snack, or a thoughtful homemade gift. Pair them with a cup of coffee or tea for a truly indulgent treat.
There’s nothing quite like the satisfaction of biting into a perfectly crafted praline that you made yourself. The creamy texture, the sweet vanilla, and the crunchy pecans all come together in a symphony of flavor. Share them, or keep them all to yourself – I won’t tell!
Troubleshooting Common Vanilla Pecan Praline Woes:
Candy making can sometimes feel like a delicate dance, and even experienced cooks can run into snags. Don’t despair if your first batch isn’t absolutely perfect. Here are some common issues you might encounter with Vanilla Pecan Pralines and how to troubleshoot them for future success:
- Pralines are Too Crumbly or Dry:
- Cause: Most likely, the mixture was cooked to too high a temperature (above 242°F / 117°C) or it was beaten for too long, causing too many sugar crystals to form.
- Solution: For your next batch, be extremely precise with your candy thermometer. Remove the pan immediately once it hits 240-242°F. Also, watch the beating stage closely; stop beating as soon as the mixture becomes opaque and loses its sheen, but before it gets too stiff and sandy. Remember, we’re aiming for creamy Vanilla Pecan Pralines, not brittle!
- Pralines are Too Sticky or Don’t Set:
- Cause: The mixture wasn’t cooked to a high enough temperature (below 240°F / 116°C), or your humidity is extremely high.
- Solution: Ensure your candy thermometer is accurate by calibrating it. Next time, cook the mixture for an extra minute or two, ensuring it reaches the full 240-242°F. High humidity can be a real enemy of candy; try making pralines on a dry day if possible. If they are slightly soft, you can sometimes place them in an airtight container with a desiccant packet for a day or two, but it’s not a guaranteed fix.
- Pralines are Grainy or Sugary:
- Cause: This is a common issue and usually points to crystallization. It can happen if sugar crystals cling to the sides of the pan and fall back into the syrup during boiling, if the initial sugar wasn’t fully dissolved, or if the mixture was stirred too much after boiling began.
- Solution:
- Initial Dissolving: Make sure to stir well at the beginning until all sugar crystals are dissolved before the mixture comes to a boil.
- No Stirring During Boil: Once the syrup boils, absolutely resist the urge to stir until it’s off the heat and slightly cooled for the beating phase.
- Washing Down the Sides: A trick many professional candy makers use is to “wash down the sides” of the pan. Dip a pastry brush in clean water and gently brush down any sugar crystals clinging to the sides of the pan above the boiling liquid. Do this early in the boiling process.
- Baking Soda: The baking soda in this recipe is specifically included to help prevent crystallization, so ensure you don’t omit it!
- Pralines Don’t Spread Properly When Dropped:
- Cause: The mixture was beaten too long and became too stiff before dropping, or it cooled too much in the pan.
- Solution: You need to work quickly during the dropping phase. If the mixture starts to get too firm in the pan, you can very gently and briefly reheat it over very low heat for a few seconds, stirring constantly, to loosen it slightly. Alternatively, you can add a tablespoon of hot water or milk, stir quickly, and then immediately drop the remaining pralines.
- Pralines Are Uneven in Size and Shape:
- Cause: Just a matter of technique and speed!
- Solution: Practice makes perfect! Use a consistent spoon size (like a tablespoon) and try to scoop and drop with the same motion each time. Don’t worry too much about absolute perfection; homemade pralines have character!
Remember, making Vanilla Pecan Pralines is an art and a science. Don’t be afraid to experiment a little and learn from each batch. The reward of a perfectly creamy, melt-in-your-mouth praline is well worth the effort!
Tips for Perfect Vanilla Pecan Pralines Every Time:
To ensure your journey to making incredible Vanilla Pecan Pralines is as smooth and successful as possible, here are some invaluable tips gathered from years of candy-making experience:
- Invest in a Reliable Candy Thermometer: I cannot stress this enough! A good quality, accurately calibrated candy thermometer is your most important tool. Without precise temperature readings, achieving the correct candy stage (soft ball, firm ball) is pure guesswork. Calibrate your thermometer occasionally by placing it in boiling water; it should read 212°F (100°C) at sea level. If it’s off, adjust your target temperatures accordingly.
- Humidity Matters:
Be mindful of the weather!
Candy making, especially with sugar-based recipes like Vanilla Pecan Pralines, is highly sensitive to humidity. On high-humidity or rainy days, sugar absorbs moisture from the air, making it harder for the candy to set properly. If you must make them on a humid day, you might need to cook the mixture 1-2 degrees Fahrenheit higher than specified to compensate for the extra moisture. The best results are always on a dry, low-humidity day. - Prep Everything Before You Start: The concept of “mise en place” (everything in its place) is absolutely essential. Once the cooking process begins, it moves quickly, and you won’t have time to measure ingredients or line baking sheets. Having everything ready—measured, buttered, lined—will save you stress and prevent critical errors.
- Use a Heavy-Bottomed Pan: A heavy-bottomed saucepan distributes heat more evenly, which is crucial for preventing scorching on the bottom of the candy mixture. Scorched sugar tastes bitter and can ruin an entire batch of Vanilla Pecan Pralines.
- Resist the Urge to Over-Stir (During Boiling): After the sugar has dissolved and the mixture comes to a boil, stop stirring! Stirring can agitate developing sugar crystals on the sides of the pan, causing them to fall back into the syrup and initiate premature crystallization, leading to grainy pralines.
- Watch the Beating Process Closely: This is the transformation stage. Beat vigorously but pay close attention to the texture. You’re looking for the moment it loses its glossiness and becomes opaque and creamy. Stop beating just before it gets too stiff. Over-beating leads to crumbly pralines; under-beating leads to sticky ones.
- Work Quickly During Dropping: Once the mixture is beaten and the pecans are incorporated, it will set up fast. Have your lined baking sheets ready and work with speed and confidence to drop your Vanilla Pecan Pralines before the mixture becomes too firm to handle.
- Patience During Cooling: Don’t try to move or touch the pralines before they are completely cool and firm. They are fragile when warm and need time to fully set and achieve their desired texture.
- Cleanliness is Next to Godliness: Ensure your saucepan, wooden spoon, and thermometer are impeccably clean. Even tiny sugar crystals or residue can act as “seed crystals” and cause your entire batch of Vanilla Pecan Pralines to crystallize and become grainy.
- Don’t Scrape the Pan: When transferring the mixture to the pan or dropping the pralines, try not to scrape the bottom or sides of the saucepan too vigorously, especially the parts where cooked sugar might have adhered and dried slightly. These pieces can be “seed crystals” that initiate unwanted crystallization.
With these tips in mind, you’re well-equipped to create magnificent, creamy, and irresistible Vanilla Pecan Pralines that will impress everyone fortunate enough to try them!

Welcome to the final thoughts on what I truly believe will become a cherished recipe in your kitchen! Having walked you through the steps, it’s time to reiterate why this particular treat isn’t just another recipe; it’s an experience waiting to happen. From the very first batch I made, I knew this wasn’t just a sweet confection; it was a bite of pure joy, a culinary hug that warms you from the inside out. The irresistible combination of textures – that perfect, slightly crisp exterior giving way to a wonderfully creamy, melt-in-your-mouth center – is something truly special. And the flavor, oh, the flavor! It’s a symphony of rich, buttery notes, perfectly complemented by the earthy crunch of pecans and that subtle, elegant hint of vanilla. It’s comforting, sophisticated, and utterly delightful all at once. If you’re looking for a dessert that consistently wows without being overly complicated, something that brings a smile to every face, then this recipe is an absolute must-try. It has a magical way of making any moment feel a little more festive, a little more indulgent, and a lot more memorable.
The beauty of these delectable treats extends beyond their incredible taste; it’s also in their wonderful versatility and the sheer pleasure they bring. Imagine the aroma filling your home as they set – it’s an invitation to warmth and happiness. This isn’t just a recipe for a quick dessert; it’s an opportunity to create something truly magnificent, whether you’re a seasoned baker or just starting out. The process itself is immensely rewarding, and the end result is nothing short of spectacular. They encapsulate everything wonderful about home baking: simple ingredients transformed into something extraordinary through a little love and care. When I think of ultimate comfort food, or a sweet escape from the everyday, my mind instantly drifts to the profound deliciousness of these particular creations. You’ll find yourself reaching for them again and again, not just for special occasions, but simply to brighten an ordinary afternoon. They are, in every sense, a truly exquisite indulgence that you deserve to experience.
Now, let’s talk about how you can best enjoy these wonders. While they are absolutely phenomenal all on their own, perhaps with a cup of freshly brewed coffee or a soothing mug of tea, their potential doesn’t stop there. Consider breaking them into smaller pieces and sprinkling them over a scoop of creamy vanilla bean ice cream for an instant upgrade to a classic dessert. The contrast of the cool ice cream with the rich, slightly chewy pieces is simply divine. Or, for a truly decadent breakfast, crumble a few over plain Greek yogurt with a drizzle of honey – it transforms a simple meal into something luxurious. They also make magnificent gifts! Package them beautifully in a decorative box or a clear cellophane bag tied with a ribbon, and you have a thoughtful, homemade present that will be deeply appreciated by friends, family, or even colleagues. Imagine the joy on their faces as they unwrap a box filled with your homemade creations. They are perfect for holiday platters, potlucks, or simply to have on hand for when a sweet craving strikes. Their versatility truly makes them a star in any culinary context.
Feeling adventurous? While the classic recipe is perfect as is, there are always ways to put your own unique spin on things. For a different nutty profile, you could experiment with toasted walnuts or even a mix of nuts, though I find the pecans really sing in this recipe. A tiny pinch of sea salt sprinkled over the top just before they fully set can elevate the flavor profile, adding a wonderful counterpoint to the sweetness. If you’re a fan of a little spice, a whisper of cinnamon or nutmeg could be folded into the mixture, though I personally adore the pure, unadulterated flavor of the vanilla and pecans. For those who love a bit of a kick, a very small amount of finely ground espresso powder can deepen the flavor without making it taste overtly like coffee. Don’t be afraid to play around! The core recipe is so robust and forgiving that it lends itself well to minor adaptations. However you choose to personalize them, remember that the true essence of these delightful Vanilla Pecan Pralines lies in their simple, yet profoundly satisfying, combination of flavors and textures.
So, there you have it. My heartfelt plea to you: please, please give this recipe a try. I promise you, it’s worth every moment spent in the kitchen. There’s something incredibly satisfying about creating something so delicious with your own hands, and the smiles it brings to others are truly priceless. Don’t let the simplicity of the ingredients fool you; the results are anything but ordinary. This isn’t just a recipe; it’s an invitation to create memories and indulge in pure, unadulterated sweetness. Once you’ve made them, I would absolutely love to hear about your experience. Did you share them? Did you keep them all to yourself? What variations did you try? Please feel free to share your thoughts, tips, and photos with me. Your culinary adventures inspire me, and I can’t wait to hear how these wonderful treats bring joy to your home. Happy baking, my friends!
Vanilla Pecan Pralines Recipe: Easy & Sweet Southern Treat!
Vanilla Pecan Pralines are a true Southern delight, featuring sweet, creamy, and crunchy textures. This recipe blends traditional heritage with warm vanilla for an unforgettable gourmet experience that’s surprisingly straightforward to prepare.
Ingredients
Instructions
Important Information
Nutrition Facts (Per Serving)
It is important to consider this information as approximate and not to use it as definitive health advice.
Allergy Information
Please check ingredients for potential allergens and consult a health professional if in doubt.

Leave a Comment