

Thanksgiving Deviled Eggs are about to become your new favorite holiday appetizer, transforming a timeless classic into a festive showstopper that will have your guests raving! Imagine the familiar comfort of perfectly prepared deviled eggs, now infused with the warm, inviting flavors of autumn, designed specifically to complement your grand Thanksgiving feast. While deviled eggs have graced tables for centuries, evolving from ancient Roman origins to becoming a ubiquitous potluck favorite across America, this rendition specifically tailors that beloved creaminess to the rich, earthy flavors of the holiday season.
What makes this dish so utterly irresistible? It’s the perfect harmony of incredibly creamy yolks, a subtle tangy mustard, and a hint of autumnal spices, all nestled within a perfectly cooked egg white. They’re incredibly convenient to prepare ahead of time, freeing up valuable oven space and your precious attention on the big day. Their delightful bite-sized nature makes them an ideal finger food to kick off your holiday celebration, offering a burst of flavor without overwhelming the palate before the main event. People adore them for their nostalgic comfort combined with a fresh, seasonal twist that truly elevates the appetizer course. The familiar texture and delightful burst of flavor make these Thanksgiving Deviled Eggs an absolute must-have addition to your holiday spread this year.

Ingredients:
Gathering the right ingredients is the first step to creating truly memorable Thanksgiving Deviled Eggs. I always say, the quality of your base ingredients makes all the difference, especially when you’re aiming for a dish that feels both comforting and a little bit special for the holidays. Here’s what you’ll need to whip up about 24 halves of these delightful bites:
- 12 large eggs: Look for eggs that are a few days old if possible. Fresher eggs tend to cling to their shells a bit more fiercely, making them harder to peel cleanly.
- ½ cup good quality mayonnaise: This is the creamy heart of our deviled eggs. I prefer a full-fat, tangy mayonnaise for the best flavor and texture. Brands that use real eggs and oil make a noticeable difference.
- 1 ½ tablespoons Dijon mustard: The subtle spice and tang of Dijon are absolutely essential. It adds a sophisticated depth that plain yellow mustard just can’t quite achieve.
- 1 tablespoon apple cider vinegar (or white wine vinegar): A touch of acidity brightens the entire filling, cutting through the richness and adding a lovely zing.
- ¼ teaspoon fine sea salt: We’ll season to taste, but this is a good starting point.
- ⅛ teaspoon freshly ground black pepper: Freshly ground makes a huge difference in aroma and flavor compared to pre-ground.
- 2 slices thick-cut bacon, cooked crispy and crumbled: This is where we start bringing in that delightful Thanksgiving savoriness! Make sure it’s very crispy for the best texture contrast.
- 2 tablespoons finely chopped fresh chives: For a delicate oniony freshness and a beautiful speckle of green.
- ½ teaspoon smoked paprika: This is my secret weapon for a festive, autumnal flavor. It adds warmth and a subtle smoky undertone that evokes cozy holiday meals. Don’t confuse it with sweet or hot paprika; smoked is key here.
- Optional Garnishes: A few extra chives or a light sprinkle of smoked paprika for dusting. Sometimes, I even add a tiny, almost imperceptible pinch of ground sage or thyme to the filling if I’m feeling extra festive, but let’s keep it classic for this recipe.
Perfecting Your Hard-Boiled Eggs
The foundation of any great deviled egg recipe is, undoubtedly, a perfectly cooked and easily peelable hard-boiled egg. This might sound simple, but there are a few tricks I’ve learned over the years to ensure beautifully smooth whites every single time. This first step is crucial for the visual appeal and overall success of your Thanksgiving Deviled Eggs.
- Prepare for Boiling: Carefully place your 12 large eggs in a single layer at the bottom of a large saucepan. I always recommend using a pot large enough so the eggs aren’t crowded, which helps prevent cracking. Gently add cold water to the pot until the eggs are covered by about one inch of water. Adding the eggs to cold water and bringing it up to temperature slowly helps prevent the shells from cracking due prematurely to thermal shock.
- Bring to a Gentle Boil: Place the saucepan over high heat and bring the water to a rolling boil. As soon as the water reaches a full, vigorous boil, immediately remove the pot from the heat. Don’t let it boil for extended periods, as this can lead to rubbery whites and that unappealing greenish ring around the yolk.
- Let Them Sit: Cover the pot with a tight-fitting lid and let the eggs sit in the hot water, off the heat, for exactly 12 minutes. For large eggs, I’ve found 12 minutes to be the magic number for a firm, fully cooked yolk without overcooking. If you’re using medium eggs, 10-11 minutes might suffice; for extra-large, you might push it to 13 minutes. Precision here makes a big difference!
- The Ice Bath is Your Friend: While the eggs are sitting, prepare a large bowl filled with ice water. This ice bath is perhaps the most critical step for easy peeling. As soon as the 12 minutes are up, use a slotted spoon to transfer the eggs from the hot water directly into the ice bath. Let them cool in the ice bath for at least 10-15 minutes, or until they are completely chilled. The rapid temperature change causes the egg white to contract, separating it from the shell membrane, which makes peeling significantly easier. Seriously, do not skip the ice bath! It’s the secret to pristine, smooth egg whites for your deviled eggs.
- Gentle Peeling Technique: Once thoroughly chilled, it’s time to peel. Gently tap each egg on a hard surface, like your countertop, to create small cracks all over the shell. Then, roll the egg between your hands to further shatter the shell. Start peeling from the wider end of the egg, where the air pocket usually is. Peel under cool running water, as this helps to wash away any tiny shell fragments and can make the membrane easier to separate from the egg white. Be patient and gentle; we want those whites to be perfectly intact and smooth for our Thanksgiving Deviled Eggs. Any bits of shell left behind or torn whites will detract from the final presentation.
Crafting the Creamy Filling
Now that we have beautifully cooked and peeled eggs, it’s time for the fun part: making that irresistibly rich and flavorful filling! This is where we infuse our deviled eggs with all those wonderful Thanksgiving-inspired tastes. The balance of flavors and textures in the filling is what will elevate these from good to absolutely outstanding.
- Halve and Scoop: Carefully slice each peeled hard-boiled egg lengthwise, from top to bottom, using a sharp knife. A quick tip for a clean cut is to wipe your knife clean between each slice. Gently scoop out the bright yellow yolks into a medium-sized mixing bowl. Try to keep the egg white halves as intact and pristine as possible; these will be our little edible cups for the delicious filling. Set the hollowed-out egg white halves aside on a platter or serving tray.
- Mash the Yolks: Using a fork or a potato masher, thoroughly mash the egg yolks until they are completely smooth and free of any large lumps. I like to get them as fine as possible at this stage, as it contributes to a wonderfully creamy filling later on. If you prefer a slightly chunkier texture, you can leave a few small pieces, but for most deviled eggs, smooth is the way to go.
- Add the Base Flavorings: To the mashed yolks, add the mayonnaise, Dijon mustard, apple cider vinegar, fine sea salt, and freshly ground black pepper. These are the core flavor components that give deviled eggs their classic tang and richness.
- Introduce Thanksgiving Flavors: Now, for our holiday twist! Gently fold in the crumbled crispy bacon, the finely chopped fresh chives, and the smoked paprika. The bacon adds a fantastic salty crunch and a savory depth that screams “holiday,” while the chives offer a fresh, mild oniony bite and a pop of color. The smoked paprika? That’s for warmth, a subtle earthiness, and a beautiful reddish hue that looks particularly appealing for a fall feast. I find the smoky notes truly transform the dish into something special for Thanksgiving.
- Mix Until Smooth and Creamy: Using your fork or a rubber spatula, mix all the ingredients together thoroughly. Continue mixing until the filling is completely smooth and wonderfully creamy, with no dry spots or unmixed pockets. If the mixture seems a little too thick, you can add another tiny splash of apple cider vinegar or a touch more mayonnaise, a quarter teaspoon at a time, until you reach your desired consistency. It should be soft enough to pipe or scoop easily, but firm enough to hold its shape.
- Taste and Adjust: This is arguably the most important step in crafting any dish, especially something like deviled eggs where balance is key. Take a small spoonful of the filling and taste it. Does it need more salt? A pinch more pepper? Perhaps a tiny bit more Dijon for an extra kick? Or maybe a touch more vinegar to brighten it up? Don’t be shy here! Adjust the seasonings to your personal preference. Remember, you want a harmonious blend of creamy, tangy, savory, and just a hint of that smoky bacon and paprika.
Assembling Your Thanksgiving Deviled Eggs
With our perfectly prepared egg whites and our incredibly flavorful filling, it’s time to bring it all together. This stage is all about presentation, making these deviled eggs look as appealing as they taste, especially for a special occasion like Thanksgiving. A beautiful presentation makes these holiday appetizers even more inviting.
- Filling the Whites – The Piping Method (Recommended): For that classic, elegant deviled egg look, I highly recommend using a pastry bag fitted with a star tip (like an Ateco 826 or Wilton 1M). This creates beautiful, uniform swirls of filling. Spoon all of your prepared yolk mixture into the pastry bag. If you don’t have a pastry bag, a large resealable plastic bag with one corner snipped off will work just as well, though it won’t give you the decorative tip. Pipe the filling neatly into each hollowed-out egg white half, creating a lovely mound that’s both appealing to the eye and generous with flavor. Start piping from the outside edge and work your way in, creating a spiral or a pleasing dome.
- Filling the Whites – The Spoon Method (Simple): If you prefer a more rustic look or are short on time, you can simply use a small spoon to carefully scoop the filling into each egg white half. Try to create a small mound for a nice presentation, even without the fancy piping. Ensure each half gets a generous amount of that delicious filling.
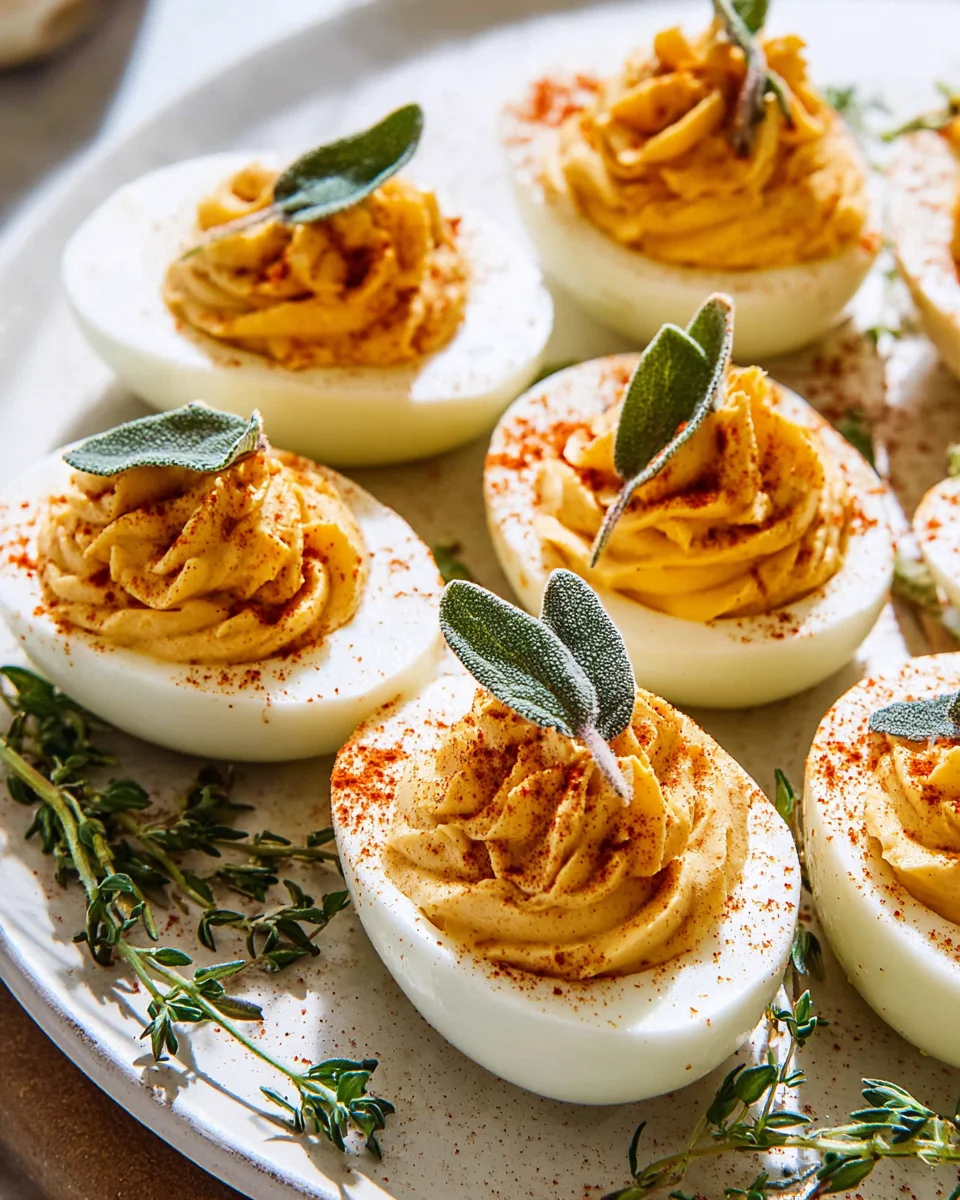
- Garnish for the Holidays: Once all your egg white halves are filled, it’s time for the final festive touches. Lightly sprinkle the tops of your Thanksgiving Deviled Eggs with a bit more smoked paprika for a warm color and an extra hint of smoky flavor. Then, artfully scatter the remaining finely chopped fresh chives over them. These garnishes not only add visual appeal, making them pop on your holiday spread, but also contribute to the overall flavor experience. The vibrant green of the chives against the creamy filling and reddish paprika is simply stunning.
Serving and Storage Tips
Your beautiful Thanksgiving Deviled Eggs are now ready to be the star of your holiday appetizer table! Knowing how to properly serve and store them ensures they remain fresh and delicious for your guests. Proper handling will keep your deviled eggs tasting their best.
- Immediate Serving: Deviled eggs are best enjoyed fresh, ideally within an hour or two of being assembled. The filling is at its creamiest, and the textures are optimal. Arrange them artfully on a serving platter. A deviled egg platter with indentations is ideal for keeping them from sliding around, especially during transport or if you’re serving a crowd.
- Chilling for Later: If you need to make them ahead of time, which is often the case with holiday cooking, you can prepare the hard-boiled eggs and the filling separately. Store the egg white halves in an airtight container in the refrigerator. Place the filling in an airtight container or keep it sealed in your piping bag (without the tip attached) in the refrigerator for up to 24 hours. I wouldn’t recommend making the filling more than a day in advance, as the texture and freshness of the chives and bacon bits are best enjoyed closer to preparation.
- Assembly Just Before Serving: For the best results, assemble your Thanksgiving Deviled Eggs no more than 2-3 hours before you plan to serve them. This prevents the whites from drying out and the filling from weeping or becoming too firm. Once assembled, cover them lightly with plastic wrap (taking care not to smash the piped filling) and keep them chilled in the refrigerator until ready to serve.
- Food Safety First: Since deviled eggs contain mayonnaise and are a dairy product, it’s crucial to keep them refrigerated. They should not be left at room temperature for more than 2 hours. If you’re serving them outdoors or at a buffet, consider placing the serving platter on a bed of ice to keep them cool, especially on a warm Thanksgiving day.
- Leftovers (if any!): While they’re always best fresh, any leftover deviled eggs can be stored in an airtight container in the refrigerator for up to 1-2 days. However, the texture of the filling and the whites might change slightly, becoming a bit drier. They rarely last that long in my house, though!
Conclusion:
And there you have it, my friends! We’ve journeyed through the creation of a truly special appetizer, one that I genuinely believe will become a staple in your culinary repertoire. This isn’t just another deviled egg recipe; it’s a carefully crafted experience designed to delight the senses and bring a unique flair to any gathering. What makes this recipe an absolute must-try, you ask? It’s the harmonious blend of familiar comfort with a surprising depth of flavor that sets it apart. The creamy, rich filling, perfectly seasoned and boasting that irresistible tang, is a testament to how simple ingredients can come together to create something extraordinary. It’s light enough not to spoil anyone’s appetite before the main course but flavorful enough to leave a lasting impression. Trust me, these are the kind of bites that disappear first from any platter, sparking conversations and requests for the recipe.
The beauty of this particular rendition lies not only in its unparalleled taste but also in its versatility and ease of preparation, which is a significant win, especially during busy holiday seasons. Imagine the relief of having a show-stopping appetizer that takes minimal effort to assemble, freeing you up to focus on other aspects of your meal or, better yet, to simply enjoy the company of your loved ones. This recipe delivers on all fronts: flavor, presentation, and convenience. It’s truly a game-changer for anyone looking to elevate their appetizer spread without adding undue stress to their cooking schedule. Whether you’re a seasoned chef or a kitchen novice, you’ll find joy and success in preparing these delightful treats. They offer a delightful contrast of textures and a vibrant burst of flavor that awakens the palate, making them an ideal start to any feast, big or small. The simple act of creating these delectable morsels is a rewarding experience in itself.
Elevate Your Serving Experience
When it comes to serving these delectable creations, presentation can certainly enhance the enjoyment. For a classic touch, a dusting of vibrant smoked paprika or a sprinkle of finely chopped chives adds both color and a subtle aromatic lift. For those who appreciate a bit more zest, a tiny sliver of pickled jalapeño or a few capers atop each egg can introduce an exciting burst of briny flavor. Consider arranging them artfully on a large platter lined with fresh lettuce leaves or a bed of microgreens for an elegant display. If you’re feeling extra festive, you could even use a small piping bag with a star tip to create beautiful, swirled mounds of the filling, making each egg a miniature work of art. These are fantastic alongside a crisp green salad, a charcuterie board, or as a vibrant starter before a hearty meal. And while they shine as the perfect companion for a holiday meal, don’t limit them to special occasions; they make an excellent contribution to potlucks, picnics, or even as a sophisticated snack for an afternoon tea. Their portable nature makes them ideal for any gathering where finger foods are appreciated.
Unleash Your Creativity with Variations
One of my favorite things about deviled eggs is how easily they adapt to different flavor profiles, and this recipe is no exception. While the base is undeniably perfect as is, feel free to experiment and make it your own! For a smoky twist, try adding a pinch of chipotle powder to the filling or garnishing with crispy crumbled bacon bits. If you’re a fan of herbaceous notes, finely minced dill, parsley, or tarragon can be folded into the mixture for a fresh, aromatic kick. Want to dial up the heat? A dash of your favorite hot sauce or a tiny bit of cayenne pepper will do the trick. For a richer, more umami-driven variation, a tablespoon of finely grated Parmesan cheese can be incorporated into the filling. You could even explore different mustards – a coarse-grain mustard could add a lovely textural element and a different kind of sharpness. Imagine a batch with a hint of roasted garlic or caramelized onion; the possibilities are truly endless! These variations ensure that your Thanksgiving Deviled Eggs can be tailored to suit any palate or dietary preference, making them incredibly versatile and enjoyable for everyone at your table.
So, what are you waiting for? I wholeheartedly encourage you to give this recipe a try. Dive into your kitchen, gather your ingredients, and experience the joy of creating these utterly irresistible deviled eggs. You’ll be amazed at how such a seemingly simple dish can bring so much joy and flavor. Once you’ve whipped up your batch and perhaps even experimented with your own unique twist, I would absolutely love to hear about your experience! Did you stick to the original recipe, or did you venture into exciting new flavor territory? What garnishes did you choose? Please, don’t be shy – share your thoughts, your successes, and even your creative variations in the comments below. Snap a picture and share it on your social media, tagging us so we can all celebrate your culinary triumph. Let’s create a community of delicious deviled egg enthusiasts! Happy cooking, and even happier eating!
Thanksgiving Deviled Eggs
Thanksgiving Deviled Eggs are a festive twist on a classic, featuring creamy yolks infused with autumnal spices, tangy mustard, and savory beef bits, all nestled in perfectly cooked egg whites. This irresistible, easy-to-prepare holiday appetizer is designed to complement your Thanksgiving feast.
Ingredients
Instructions
Important Information
Nutrition Facts (Per Serving)
It is important to consider this information as approximate and not to use it as definitive health advice.
Allergy Information
Please check ingredients for potential allergens and consult a health professional if in doubt.


Leave a Comment