

Olive Salad With Black Eyed Peas is more than just a dish; it’s a vibrant celebration on a plate that promises both exquisite flavor and a touch of good fortune! I’m thrilled to share with you a recipe that truly stands out from the crowd.
While black eyed peas famously usher in good luck and prosperity, particularly in Southern American traditions when served on New Year’s Day, this salad takes them on an exciting journey far beyond the ordinary. Forget the usual heavy preparations; here, they’re transformed into a bright, zesty, and utterly delightful creation. It’s a modern twist on a beloved tradition, bringing freshness and flair to your table in the most delicious way.
What truly makes this dish so beloved is its incredible balance and versatility. Imagine the earthy heartiness of black eyed peas perfectly complemented by the tangy, briny burst of olives, all tossed with crisp, fresh vegetables and a bright, herbaceous dressing. It’s a symphony of textures and flavors – savory, fresh, and utterly addictive. This isn’t just a side dish; it’s a versatile star, perfect for a light lunch, a stunning potluck contribution, or even a unique addition to your holiday spread, proving that healthy can be incredibly satisfying.
Whether you’re seeking a fresh take on a classic ingredient or simply craving something irresistibly delicious, this Olive Salad With Black Eyed Peas is guaranteed to become a new favorite in your culinary repertoire. Its ease of preparation and impressive results make it a winning choice for any occasion, ensuring you have a flavorful and nutritious option ready to enjoy.

Ingredients:
- For the Black Eyed Peas:
- 1 cup (about 180g) dry black eyed peas
- 6 cups (about 1.4 liters) cold water, plus more for soaking
- 1 teaspoon salt, or to taste (added after cooking)
- For the Olive Salad Base:
- 1 cup (about 150g) pitted green olives (such as Manzanilla or Castelvetrano), roughly chopped
- 1/2 cup (about 75g) pitted Kalamata olives, roughly chopped
- 1 medium red bell pepper, finely diced
- 1 medium green bell pepper, finely diced
- 2 celery stalks, finely diced
- 1/2 small red onion, very finely minced
- 2 cloves garlic, minced
- 1/4 cup fresh flat-leaf parsley, finely chopped
- For the Vinaigrette Dressing:
- 1/2 cup (120ml) extra virgin olive oil, a good quality one that you love
- 3 tablespoons red wine vinegar
- 1 tablespoon fresh lemon juice
- 1 teaspoon Dijon mustard (this helps with emulsification!)
- 1/2 teaspoon dried oregano
- 1/4 teaspoon black pepper, freshly ground, or to taste
- 1/4 teaspoon salt, or to taste
- Pinch of sugar (optional, helps balance acidity)
- Pinch of red pepper flakes (optional, for a little kick)
Equipment You’ll Need:
- Large mixing bowl
- Sharp chef’s knife
- Cutting board
- Small whisk
- Measuring cups and spoons
- Large pot with a lid (for cooking peas)
- Colander or fine-mesh sieve
- Airtight container for chilling
Phase 1: Preparing the Black Eyed Peas
Properly cooked black eyed peas are the heart and soul of this “Olive Salad With Black Eyed Peas.” While you could use canned peas in a pinch, cooking them from dry really does make a world of difference in terms of texture and flavor, absorbing all the goodness we’ll be adding later. Trust me, it’s worth the extra effort!
- Rinse and Sort: First things first, spread your dry black eyed peas out on a light-colored surface, like a baking sheet or a clean kitchen towel. Carefully pick through them, removing any tiny stones, debris, or shriveled peas that might have snuck in there. Once sorted, give them a good rinse under cold running water in a colander.
- Soak the Peas (Crucial Step!): Soaking isn’t just about reducing cooking time; it also helps the peas cook more evenly and makes them easier to digest. You have two main options here:
- Overnight Soak (Recommended): Place the rinsed black eyed peas in a large bowl and cover them with at least 4-6 cups of cold water. Make sure there’s plenty of extra water, as they will expand significantly. Let them soak at room temperature for a minimum of 8 hours, or ideally overnight.
- Quick Soak Method: If you’re short on time, you can do a quick soak. Place the rinsed peas in a large pot and cover them with water (again, plenty of it, about 3 inches above the peas). Bring the water to a rolling boil over high heat, then boil for 2 minutes. Remove the pot from the heat, cover it with a lid, and let the peas stand for 1 hour. This method works well to hydrate them quickly.
- Drain and Rinse Again: Whichever soaking method you choose, once the soaking time is complete, drain the peas thoroughly in a colander. Give them another quick rinse under cold water. You’ll notice they’ve plumped up considerably, almost doubling in size. This step is important for removing any starches released during soaking.
- Cook the Black Eyed Peas: Transfer the drained and rinsed black eyed peas to a large, heavy-bottomed pot. Add 6 cups of fresh cold water. Bring the water to a boil over medium-high heat. Once boiling, reduce the heat to low, cover the pot with a lid, and let them simmer gently. The cooking time will vary depending on the age of your peas and how long they were soaked, but it usually takes between 45 minutes to 1 hour and 15 minutes.
- Check for Doneness: The peas are ready when they are tender but still hold their shape. You don’t want them mushy, as they’ll be tossed in a salad and need some integrity. Taste one occasionally to check for the desired texture.
- Salt at the End: It’s important to add salt after the peas are cooked, or at least towards the end of their cooking time. Adding salt too early can toughen the skin of the peas and prevent them from becoming tender. Once cooked to your liking, drain any remaining cooking liquid from the pot. Stir in 1 teaspoon of salt (or to taste) into the warm peas.
- Cool Completely: Transfer the cooked, seasoned black eyed peas to a large, shallow dish or baking sheet to help them cool down quickly. It’s essential that they are completely cooled to room temperature before mixing them into the salad. If you add warm peas to your dressing and other ingredients, it can affect the texture of the vegetables and even compromise the dressing. You can gently spread them out and even pop them in the fridge for 15-20 minutes to speed up the cooling process once they’ve reached room temp.
Phase 2: Crafting the Olive Salad Base
This is where our “Olive Salad With Black Eyed Peas” truly comes to life! The combination of briny olives and crisp, vibrant vegetables creates a fantastic textural contrast and an explosion of flavor. Precision in chopping here makes a big difference in the overall experience of the salad.
- Prepare the Olives: Take your pitted green and Kalamata olives. I like to roughly chop them, aiming for pieces that are still discernible but not so large that they overwhelm a single bite. A good guide is to cut them into halves or quarters, or a little smaller if they are particularly large. The mix of green and Kalamata olives offers a wonderful depth of flavor and color – the green ones often provide a brighter, brinier note, while Kalamata olives bring a richer, fruitier, more savory profile.
- Dice the Bell Peppers: Wash and core your red and green bell peppers. Dice them finely, aiming for pieces about 1/4-inch square. Consistency in size is key here for an aesthetically pleasing salad and ensuring that every forkful has a balanced mix of ingredients. The red pepper adds sweetness and color, while the green pepper contributes a slightly more herbaceous, crisp bite.
- Dice the Celery: Wash your celery stalks and finely dice them, similar in size to your bell peppers. Celery adds a fantastic crunch and a subtle, refreshing bitterness that complements the other ingredients beautifully. Make sure to trim off any tough ends or stringy bits before dicing.
- Mince the Red Onion: Red onion provides a wonderful sharp tang, but too much can be overpowering. For this reason, I recommend very finely mincing half of a small red onion. If you find raw red onion too strong, a little trick is to rinse the minced onion under cold water for a minute or two, then pat it very dry with a paper towel. This helps to mellow its pungency without losing its flavor.
- Mince the Garlic: Peel and finely mince two cloves of fresh garlic. Fresh garlic is absolutely essential here; it provides an aromatic foundation that dried garlic simply cannot replicate. If you have a garlic press, feel free to use it for convenience.
- Chop the Parsley: Wash and thoroughly dry your fresh flat-leaf parsley. Finely chop it, including most of the tender stems, which carry a lot of flavor. Parsley adds a fresh, herbaceous note that brightens the entire salad.
Phase 3: Whisking the Vinaigrette Dressing
The dressing is the binding element that brings all the beautiful components of our “Olive Salad With Black Eyed Peas” together. A well-made vinaigrette should be vibrant, balanced, and complement rather than overpower the other flavors.
- Combine Acid and Mustard: In a small bowl, combine the red wine vinegar, fresh lemon juice, and Dijon mustard. The Dijon mustard isn’t just for flavor; it acts as an emulsifier, helping the oil and vinegar stay together beautifully rather than separating. Whisk these ingredients together vigorously until well combined.
- Add Dried Seasonings: To the vinegar mixture, add the dried oregano, black pepper, and salt. If you’re using the optional pinch of sugar, add it now to help balance the acidity of the vinegar and lemon juice. Whisk everything again until the salt and sugar (if used) have dissolved.
- Slowly Emulsify with Olive Oil: This is the key step for a smooth, cohesive vinaigrette. While continuously whisking the vinegar mixture with one hand, slowly drizzle in the extra virgin olive oil in a thin, steady stream with your other hand. Continue whisking until the dressing thickens slightly and becomes beautifully emulsified – meaning the oil and vinegar are completely blended into a creamy, uniform consistency. Take your time with this step; it makes a big difference.
- Taste and Adjust: Always, always taste your dressing! Dip a spoon into the vinaigrette and give it a try. Does it need more salt? A little more pepper? Perhaps a touch more lemon juice for brightness, or another pinch of sugar to mellow the acidity? If you like a little heat, now is the time to whisk in those red pepper flakes. Adjust the seasonings until you are happy with the balance. This custom adjustment is what makes your dressing uniquely delicious.
Phase 4: Assembling the “Olive Salad With Black Eyed Peas”
Now for the exciting part – bringing all of our carefully prepared components together to form the ultimate “Olive Salad With Black Eyed Peas”!
- Combine Solid Ingredients: In your large mixing bowl, gently add the completely cooled black eyed peas, the chopped green and Kalamata olives, the finely diced red and green bell peppers, the finely diced celery, the minced red onion, and the minced garlic.
- Add the Fresh Parsley: Sprinkle the finely chopped fresh parsley over the ingredients in the bowl. This is best added at this stage to maintain its vibrant color and fresh aroma.
- Dress the Salad: Pour the freshly whisked vinaigrette dressing over the entire mixture in the bowl.
- Toss Gently to Combine: Using two large spoons or tongs, gently toss all the ingredients together. The goal is to ensure every pea, every olive, and every piece of vegetable is evenly coated with that delicious vinaigrette, without mashing the delicate black eyed peas. Take your time to fold everything together carefully. You want a harmonious blend where all the flavors can mingle.
Phase 5: Chilling and Serving
Patience is a virtue, especially when it comes to developing flavors in a salad like this. Chilling is not just about temperature; it’s about allowing all the wonderful ingredients to get to know each other.
- Chill for Flavor Development: Once assembled, cover the bowl tightly with plastic wrap or transfer the “Olive Salad With Black Eyed Peas” into an airtight container. Place it in the refrigerator to chill for at least 2 hours. Ideally, I recommend chilling it for a minimum of 4 hours, or even better, overnight. This resting period allows the flavors to meld and deepen, transforming from a collection of individual ingredients into a cohesive and incredibly delicious salad. The vegetables will soften just slightly, and the peas will soak up even more of that tangy, savory dressing.
- Serve and Enjoy: Before serving, give the salad another gentle stir. If it seems a little too thick or dry after chilling, you can always add another tiny splash of olive oil or lemon juice and stir it in. This salad is fantastic served chilled or at cool room temperature.
Tips for Success and Variations:
Here are some extra tips and ideas to make your “Olive Salad With Black Eyed Peas” truly spectacular and tailored to your tastes:
Make Ahead Magic:
One of the best things about this “Olive Salad With Black Eyed Peas” is that it’s an absolute superstar make-ahead dish. As mentioned, the flavors only improve with time as they meld in the refrigerator. I often prepare it a full day in advance for gatherings or for weekly meal prep. This allows all the vibrant flavors from the fresh herbs, crisp vegetables, and tangy dressing to really infuse into the black eyed peas and olives, creating a much richer and more harmonious taste profile. Just be sure to give it a good stir before serving, as some of the dressing might settle at the bottom.
Olive Selection Pointers:
Don’t limit yourself to just Manzanilla and Kalamata olives, although they are a fantastic combination for this “Olive Salad With Black Eyed Peas.” Feel free to experiment with other types of briny, flavorful olives. For instance, bright green Castelvetrano olives offer a buttery, mild flavor that is incredibly pleasant. Picholine olives are another excellent choice, providing a firm texture and a nutty, fruity taste. If you enjoy a bit of a kick, consider adding some spicy Calabrian olives. The key is to choose good quality, pitted olives that you enjoy eating on their own, as they are a starring component of this dish. A mix of different textures and briny notes can elevate the salad significantly.
Vegetable Customization:
While the core vegetables of bell pepper, celery, and red onion are perfect, this salad is quite forgiving and open to customization. Consider adding other finely diced vegetables for extra crunch and nutrition. Some of my favorite additions include:
- Cucumber: Diced English cucumber, with its seeds removed, adds a refreshing, cool element.
- Cherry or Grape Tomatoes: Halved or quartered, they bring bursts of juicy sweetness and acidity.
- Artichoke Hearts: Quartered marinated artichoke hearts (drained well) add a lovely tang and unique texture.
- Sun-Dried Tomatoes: Finely chopped oil-packed sun-dried tomatoes offer a concentrated, sweet-tart flavor.
- Pickled Okra: For a true Southern twist, finely chop some pickled okra and add it to the mix for an extra vinegary tang and crunch.
Herbaceous Variations:
Fresh parsley is wonderful, but feel free to explore other fresh herbs to complement your “Olive Salad With Black Eyed Peas.” A tablespoon or two of fresh dill, finely chopped, adds a lovely, slightly anisy freshness. Fresh basil, torn or chiffonaded, can lend a sweet, peppery note. Even a small amount of fresh mint, finely chopped, can provide an unexpected, bright lift, especially if you’re serving it on a particularly warm day. Don’t be shy about playing with different combinations to find your favorite.
Boosting with Protein or Cheese:
To transform this side dish into a more substantial meal, consider adding some protein. Flaked canned tuna (drained well) or shredded cooked chicken breast would be excellent. For a vegetarian option, crumbled feta cheese adds a salty, tangy creaminess that pairs beautifully with the olives and peas. Alternatively, small cubes of fresh mozzarella (bocconcini) could add a mild, milky counterpoint.
Spice It Up:
If you like your “Olive Salad With Black Eyed Peas” with a bit more zing, don’t hesitate to increase the red pepper flakes in the dressing, or even add a dash of your favorite hot sauce. A tiny pinch of cayenne pepper in the dressing can also provide a subtle, sustained warmth. Taste as you go to hit your preferred level of heat.
Serving Suggestions Beyond the Bowl:
While fantastic on its own as a side dish or appetizer with crackers or crostini, this “Olive Salad With Black Eyed Peas” is incredibly versatile. Here are some ideas:
- Salad Topper: Spoon it over a bed of fresh mixed greens for a light and satisfying lunch.
- Sandwich or Wrap Filler: It makes a fantastic, flavorful filling for pita bread, wraps, or even as a unique topping for a crusty baguette.
- Mezze Platter Component: Add it to a Mediterranean-inspired mezze platter alongside hummus, tzatziki, pita bread, and other dips.
- Grilled Main Accompaniment: It pairs beautifully with grilled chicken, fish, or even a hearty vegetarian steak.
Quality of Ingredients Matters:
Since this “Olive Salad With Black Eyed Peas” relies on simple, fresh ingredients, the quality of each component really shines through. Use a good quality extra virgin olive oil and red wine vinegar – it makes a noticeable difference in the dressing. Freshly ground black pepper is always superior to pre-ground, and fresh garlic and herbs are non-negotiable for the best flavor.
Enjoy crafting and savoring your delicious “Olive Salad With Black Eyed Peas”! It’s a dish that’s bursting with vibrant flavors and textures, perfect for any occasion.
Conclusion:
This recipe, my friends, is more than just a dish; it’s a vibrant celebration of flavors and textures that I genuinely believe will become a cherished staple in your kitchen. We’ve explored how simple, wholesome ingredients can come together to create something truly extraordinary. Its unique blend of briny olives, tender black-eyed peas, crisp, fresh vegetables, and a bright, zesty dressing creates a symphony for the palate that is both refreshing and deeply satisfying. I can’t stress enough how much joy I find in preparing and sharing this particular salad. It’s light yet hearty, perfect for a myriad of occasions, and absolutely packed with incredible taste. If you’re looking for a dish that offers both convenience and gourmet appeal, you’ve certainly found it here. The delightful simplicity of its preparation belies the impressive complexity of its flavor profile, making it a true culinary gem for home cooks of all skill levels, from beginners to seasoned enthusiasts.
What makes this particular concoction stand out is its incredible balance. The delightful saltiness from the olives, the earthy goodness of the black-eyed peas, and the bright acidity of the dressing all harmonise beautifully, creating a truly memorable experience with every bite. It’s a revelation how these simple components, when combined with care and attention, elevate a humble legume into something so special. I’ve seen countless people try this for the first time and be utterly surprised by its depth, character, and sheer deliciousness. It truly embodies that perfect combination of fresh, wholesome ingredients delivering maximum flavor impact. This isn’t just another side dish; it has the incredible potential to steal the show, whether it’s at a casual family dinner, a festive potluck, or even a sophisticated brunch. When I think of a dish that perfectly encapsulates a lively, unpretentious elegance, my mind immediately goes to this wonderful concoction. Trust me when I say, once you taste the delightful medley that is this Olive Salad With Black Eyed Peas, you’ll understand why I’m so enthusiastic about it. It’s not merely a recipe; it’s an experience waiting to happen in your kitchen.
Now, let’s talk about how to truly enjoy this versatile masterpiece. While it shines brightly as a standalone salad, perfect for a light lunch, it’s also incredibly adaptable as an accompaniment. I love serving it as a fantastic side dish to grilled chicken or fish, where its vibrant flavors cut through the richness of the main protein beautifully, adding a much-needed freshness. Imagine it alongside a perfectly seared salmon fillet or a juicy grilled steak – it adds that much-needed freshness and tangy counterpoint. It’s also sensational spooned onto warm, crusty bread, toasted baguette slices, or even crisp crackers for a quick, sophisticated appetizer that will impress your guests. For a more substantial meal, why not stuff it into warm pita bread or crisp lettuce cups, perhaps with some crumbled feta or creamy goat cheese? It makes for an incredibly satisfying and healthy lunch option. I’ve even enjoyed it as a vibrant and unexpected topping for baked potatoes or sweet potatoes, creating an utterly delicious and inventive twist. Don’t limit yourself to just one way of enjoying it; let your culinary imagination be your guide. It also makes for an excellent, flavor-packed base for a more elaborate grain bowl, perhaps with fluffy quinoa or hearty farro, and a generous sprinkle of fresh herbs.
Part of the undeniable joy of cooking is making a recipe your own, and this one is wonderfully adaptable to your preferences and what you have on hand. If you’re a fan of a little extra heat, consider adding a pinch of red pepper flakes or a finely diced jalapeño to the dressing for an exciting kick. For an extra layer of savory depth, some crumbled sun-dried tomatoes or marinated artichoke hearts would be an incredible and welcome addition, enhancing the Mediterranean flair. Feel free to play with your choice of crisp vegetables; while I love the crunchiness of bell peppers, finely chopped English cucumber or even some blanched green beans could work wonderfully, adding different textures. For a touch of bright freshness, a handful of chopped fresh parsley, aromatic cilantro, or fragrant dill will undeniably elevate the aroma and overall flavor profile. If you’re looking to make it a bit creamier, a small dollop of Greek yogurt or a swirl of tahini in the dressing can introduce a delightful richness without overwhelming the core, vibrant flavors. Vegetarians and vegans will deeply appreciate its inherent plant-based goodness, but if you’re feeling adventurous, some crispy bacon bits or crumbled, cooked sausage could add a smoky and savory dimension that’s truly indulgent. Don’t be afraid to experiment with different types of olives either – a harmonious mix of briny Kalamata and buttery Castelvetrano can offer a lovely contrast in texture and saltiness, making each bite more interesting.
So, my dear food lovers, there you have it. My heartfelt plea for you to give this incredible recipe a try. I promise you, it won’t disappoint. It’s truly a dish that brings smiles to faces, satisfies cravings, and impresses guests with minimal effort, making you look like a culinary genius. I wholeheartedly encourage you to step into your kitchen, gather these simple ingredients, and experience the magic for yourself. And when you do, please, please share your culinary adventures with me and our community! I absolutely adore seeing your creative interpretations and hearing about your delightful experiences. Did you add a special ingredient that became a game-changer? Did you serve it in an unexpected, yet brilliant way? Your feedback, your shared joy, and your unique twists are what make this cooking community so incredibly special and inspiring. Let’s spread the deliciousness far and wide, one incredible salad at a time. Happy cooking, and I can’t wait to hear all about your triumphs with this phenomenal salad!
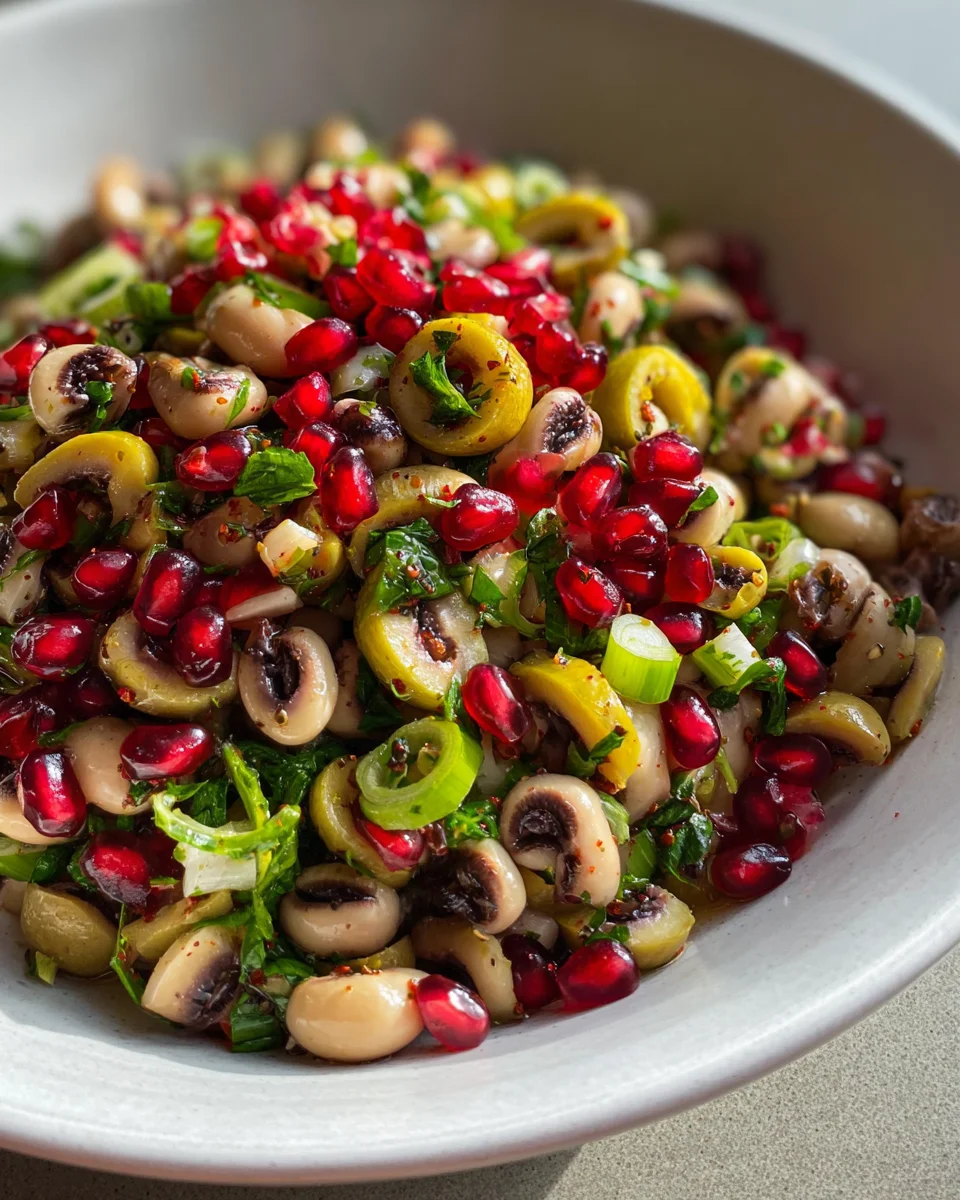
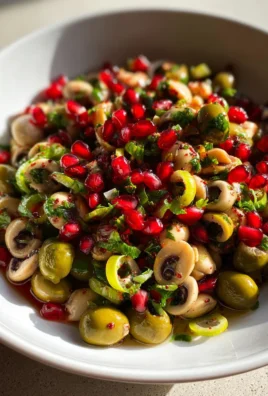
Olive Salad with Black Eyed Peas
A vibrant and delicious Olive Salad With Black Eyed Peas that promises exquisite flavor and a touch of good fortune. This versatile dish features the earthy heartiness of black eyed peas perfectly complemented by tangy, briny olives, fresh components, and a bright, herbaceous dressing, making it a modern twist on a beloved tradition.
Ingredients
Instructions
Important Information
Nutrition Facts (Per Serving)
It is important to consider this information as approximate and not to use it as definitive health advice.
Allergy Information
Please check ingredients for potential allergens and consult a health professional if in doubt.

Leave a Comment