

Red Velvet Cheesecake Layer Cake Recipe
Welcome to a dessert lover’s paradise with my Red Velvet Cheesecake Layer Cake Recipe! If you’ve ever found yourself torn between the rich, velvety goodness of red velvet cake and the creamy indulgence of cheesecake, this recipe is your dream come true. Imagine sinking your fork into layers of moist, vibrant red velvet cake, lovingly layered with luscious cheesecake filling, all topped off with a smooth cream cheese frosting. It’s the ultimate showstopper for any occasion, whether you’re celebrating a birthday, hosting a holiday gathering, or simply treating yourself to something special.
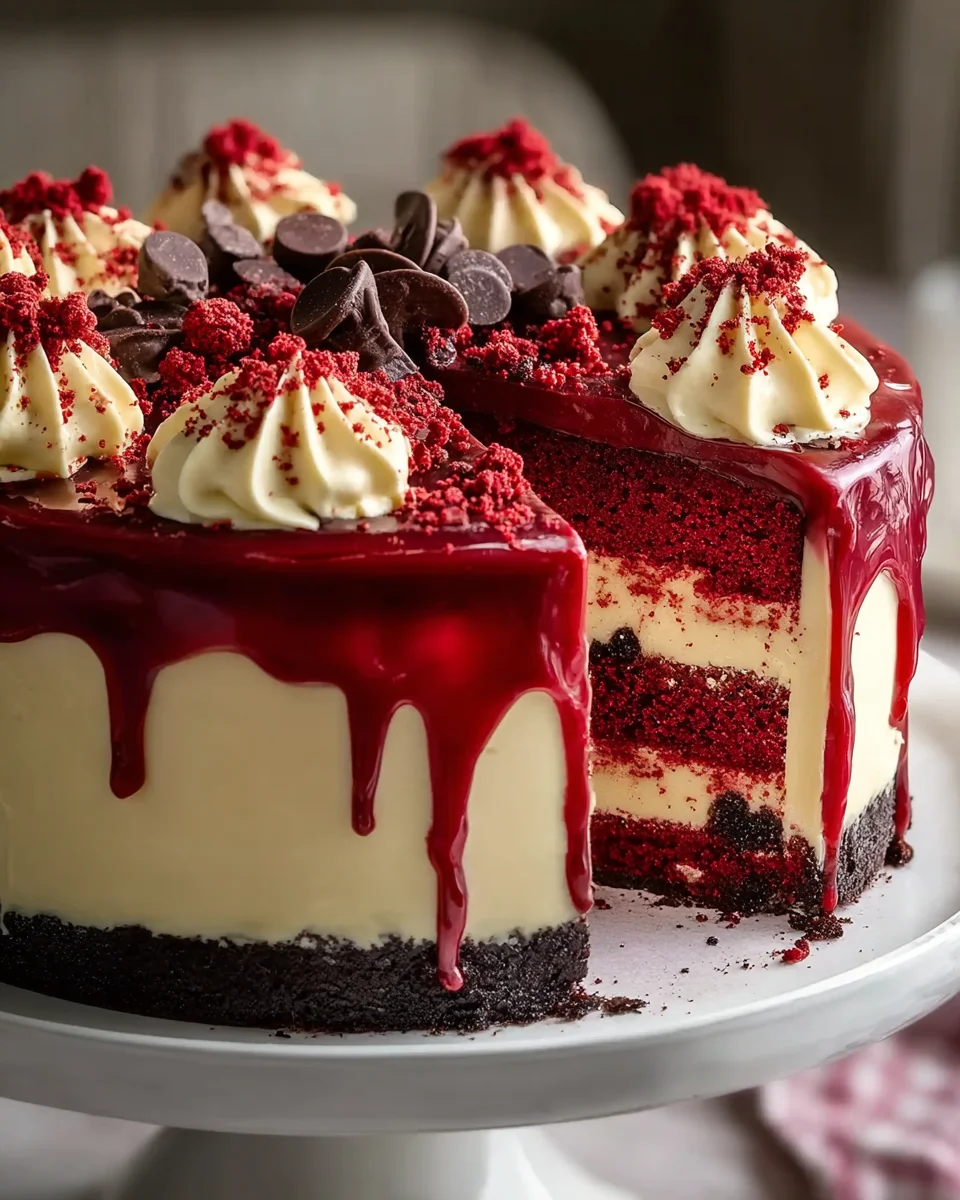
What makes this cake truly special is the harmonious blend of flavors and textures. The cocoa and buttermilk in the red velvet cake provide a subtle richness, while the cheesecake layer adds a delightful creaminess that balances everything perfectly. As you slice through this stunning cake, the vibrant red layers and creamy white filling create a visual feast that is just as delightful as it is delicious. Trust me, once you serve this cake, it will quickly become a favorite among friends and family. So, grab your mixer and let’s dive into this decadent journey of flavor together!

Ingredient Notes
Creating a delicious Red Velvet Cheesecake Layer Cake starts with gathering the right ingredients. Here’s what you’ll need:
- Red Velvet Cake Mix: You can use a box mix for convenience or make your own from scratch with flour, cocoa powder, baking soda, and buttermilk. If you prefer a dye-free option, natural red food coloring or beet juice can be used.
- Cream Cheese: This is essential for the cheesecake layer. Use full-fat cream cheese for a rich texture. If you’re looking for a lighter option, you can substitute with reduced-fat cream cheese, though the flavor and consistency may vary slightly.
- Sour Cream: This adds moisture and tang to the cake. Greek yogurt can be a great substitute if you’re aiming for a healthier twist.
- Granulated Sugar: Regular sugar works best, but you can also use a sugar substitute if you want to cut down on calories.
- Eggs: These provide structure to both the cake and cheesecake layers. If you need an egg substitute, consider using applesauce or a flaxseed mixture (1 tablespoon flaxseed meal + 2.5 tablespoons water = 1 egg).
- Vanilla Extract: For flavoring, pure vanilla extract is preferable. You can also use a non-alcoholic vanilla flavoring.
- Butter: Unsalted butter is ideal for baking. If you need a dairy-free option, you can use a plant-based butter alternative.
Step-by-Step Instructions
Now that you have your ingredients ready, let’s bring this Red Velvet Cheesecake Layer Cake to life!
For the Red Velvet Cake:
- Preheat your oven to 350°F (175°C). Grease and flour two 9-inch round cake pans.
- In a large mixing bowl, combine the red velvet cake ingredients as per your recipe or box mix instructions. Be sure to mix until well combined but do not overmix.
- Divide the batter evenly between the prepared cake pans. Smooth the tops with a spatula.
- Bake for 25-30 minutes, or until a toothpick inserted into the center comes out clean. Allow to cool in the pans for 10 minutes, then transfer to a wire rack to cool completely.
For the Cheesecake Layer:
- While the cakes are cooling, prepare the cheesecake filling. In a medium mixing bowl, beat the cream cheese until smooth and creamy.
- Add in the granulated sugar and mix until combined. Then, add the sour cream or Greek yogurt, eggs, and vanilla extract. Beat until everything is well incorporated.
- Pour the cheesecake mixture into a greased 9-inch springform pan. Bake at 325°F (160°C) for 50-60 minutes, or until the center is set but still slightly jiggly. Turn off the oven and leave the cheesecake inside for an additional hour to cool slowly. This helps prevent cracks.
- Once cooled, chill the cheesecake in the refrigerator for at least 4 hours, preferably overnight, to allow it to firm up.
Assembling the Cake:
- Once the cheesecake and cakes are completely cooled, it’s time to assemble. Level the tops of the red velvet cakes with a serrated knife if necessary.
- Place one layer of red velvet cake on a serving plate. Spread a generous layer of cheesecake on top.
- Carefully place the second layer of red velvet cake on top of the cheesecake. Press down gently to ensure it adheres.
- Frost the entire cake with your choice of cream cheese frosting or whipped cream for a lighter option.
- Decorate with additional red velvet cake crumbs or chocolate shavings for a beautiful finish.
Tips & Suggestions
Here are some tips to ensure your Red Velvet Cheesecake Layer Cake turns out perfectly:
- Make sure all your ingredients are at room temperature before you start mixing. This helps everything combine more easily.
- Don’t skip the chilling time for the cheesecake. It’s crucial for achieving the right texture and preventing cracks.
- Use a serrated knife to cut the layers for a clean, even finish. It makes a world of difference in presentation.
- If you’re feeling adventurous, consider adding chocolate chips to the cheesecake layer for extra indulgence.
Storage
To keep your Red Velvet Cheesecake Layer Cake fresh:
- Store leftovers in an airtight container in the refrigerator for up to 5 days. The flavors only get better with time!
- If you want to keep it longer, you can freeze individual slices. Wrap them tightly in plastic wrap and then foil. They can last for up to 3 months in the freezer.
- When ready to eat, thaw the frozen slices in the refrigerator overnight before serving.
Enjoy your baking adventure with this delightful Red Velvet Cheesecake Layer Cake. It’s sure to impress at any gathering, and I hope you’ll love it as much as I do!
Final Thoughts
If you’re looking for a show-stopping dessert that perfectly balances rich flavor and stunning presentation, then the Red Velvet Cheesecake Layer Cake Recipe is an absolute must-try! This delightful cake combines the iconic richness of red velvet with the creamy indulgence of cheesecake, creating a dessert that’s not only visually striking but also a treat for your taste buds. Whether you’re celebrating a special occasion or simply want to impress friends and family, this recipe is sure to become a beloved favorite. So go ahead, roll up your sleeves, and dive into the deliciousness of the Red Velvet Cheesecake Layer Cake Recipe. You won’t regret it!
Decadent Red Velvet Cheesecake Layer Cake Recipe to Impress!
- Total Time: 8 minute
- Yield: 12 servings
Description
This Red Velvet Cheesecake Layer Cake combines the rich flavors of red velvet cake with a creamy cheesecake filling, making it a showstopper for any occasion. Perfect for birthdays, holidays, or just a special treat, this cake is sure to impress your guests!
Ingredients
- Red Velvet Cake Mix
- Flour
- Cocoa Powder
- Baking Soda
- Buttermilk
- Natural Red Food Coloring or Beet Juice
- Cream Cheese
- Sour Cream
- Greek Yogurt
- Granulated Sugar
- Eggs
- Vanilla Extract
- Butter
- Unsalted Butter
- Plant-Based Butter Alternative
Instructions
- Preheat your oven to 350°F (175°C). Grease and flour two 9-inch round cake pans.
- In a large mixing bowl, combine the red velvet cake ingredients as per your recipe or box mix instructions. Be sure to mix until well combined but do not overmix.
- Divide the batter evenly between the prepared cake pans. Smooth the tops with a spatula.
- Bake for 25-30 minutes, or until a toothpick inserted into the center comes out clean. Allow to cool in the pans for 10 minutes, then transfer to a wire rack to cool completely.
- While the cakes are cooling, prepare the cheesecake filling. In a medium mixing bowl, beat the cream cheese until smooth and creamy.
- Add in the granulated sugar and mix until combined. Then, add the sour cream or Greek yogurt, eggs, and vanilla extract. Beat until everything is well incorporated.
- Pour the cheesecake mixture into a greased 9-inch springform pan. Bake at 325°F (160°C) for 50-60 minutes, or until the center is set but still slightly jiggly. Turn off the oven and leave the cheesecake inside for an additional hour to cool slowly. This helps prevent cracks.
- Once cooled, chill the cheesecake in the refrigerator for at least 4 hours, preferably overnight, to allow it to firm up.
- Once the cheesecake and cakes are completely cooled, it’s time to assemble. Level the tops of the red velvet cakes with a serrated knife if necessary.
- Place one layer of red velvet cake on a serving plate. Spread a generous layer of cheesecake on top.
- Carefully place the second layer of red velvet cake on top of the cheesecake. Press down gently to ensure it adheres.
- Frost the entire cake with your choice of cream cheese frosting or whipped cream for a lighter option.
- Decorate with additional red velvet cake crumbs or chocolate shavings for a beautiful finish.
- Prep Time: 30 mins
- Cook Time: 1 hr 30 mins
- Category: Dessert
- Method: Baking
- Cuisine: American
Nutrition
- Serving Size: 1 slice
- Calories: 450
- Sugar: 35 g
- Sodium: 300 mg
- Fat: 25 g
- Saturated Fat: 15 g
- Unsaturated Fat: 5 g
- Trans Fat: 0 g
- Carbohydrates: 45 g
- Fiber: 2 g
- Protein: 6 g
- Cholesterol: 80 mg
Keywords: Make sure all your ingredients are at room temperature before you start mixing. Don’t skip the chilling time for the cheesecake. Use a serrated knife to cut the layers for a clean, even finish. If you're feeling adventurous, consider adding chocolate chips to the cheesecake layer for extra indulgence.


Leave a Comment