

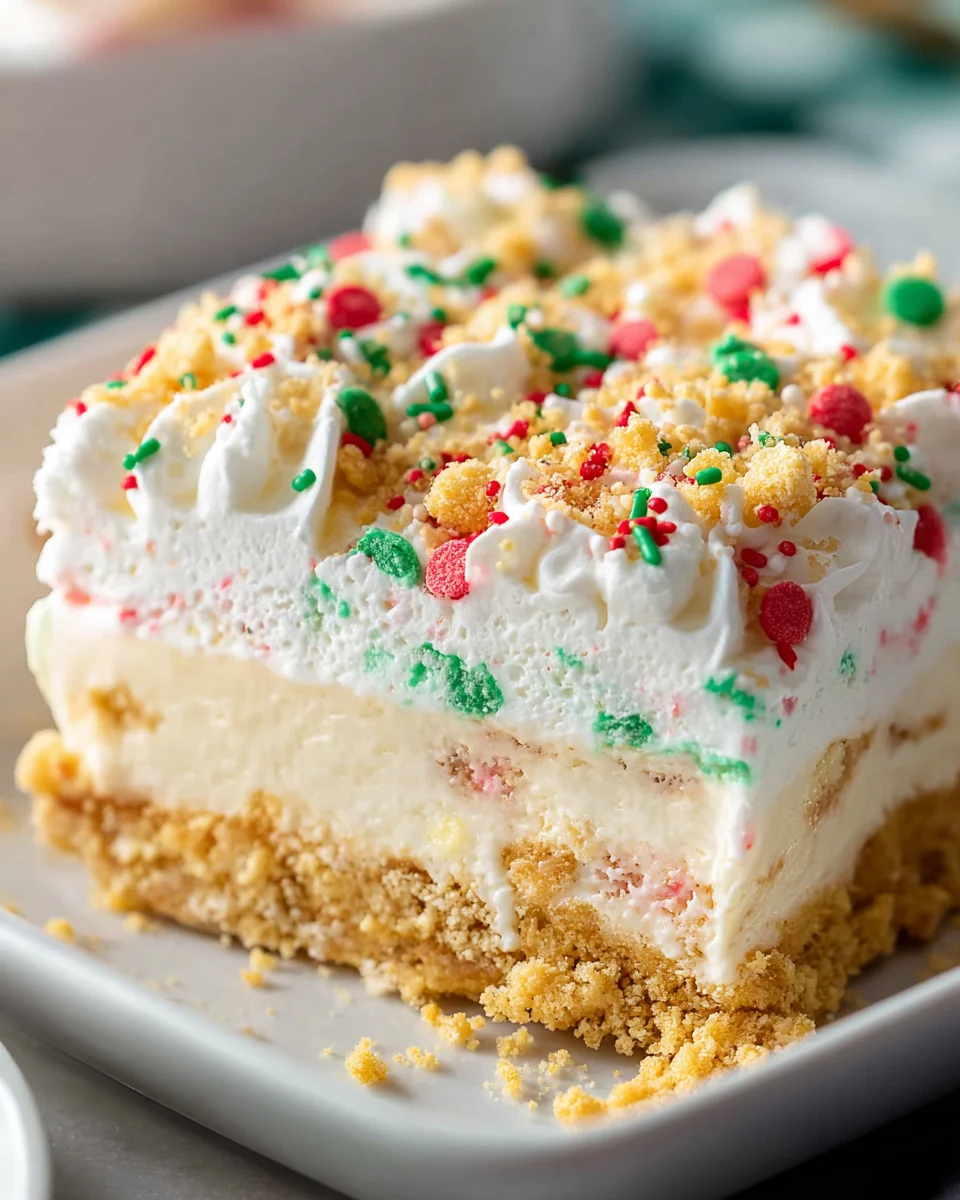
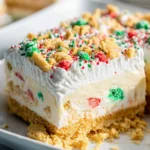
Christmas Cookie Lush
Oh my goodness, friends, get ready for a holiday dessert that’s going to steal the show without you even breaking a sweat! I’m so excited to share my recipe for Christmas Cookie Lush with you because it truly is something special. What makes it so incredible? Well, imagine all the festive joy of your favorite Christmas cookies, but transformed into a creamy, dreamy, no-bake layered dessert. It’s the ultimate answer to holiday dessert dilemmas – impressive enough for any gathering, but unbelievably easy to put together.
You’re going to absolutely adore this because it brings together the best of both worlds: the nostalgic flavors of the holiday season and the convenience of a chill-and-serve treat. Who doesn’t love that during the busy holidays? This delightful dish starts with a rich, buttery crust made from your favorite crushed Christmas cookies, creating a wonderful foundation. On top of that, we layer a sweet and tangy cream cheese mixture, followed by a luscious, festive pudding, all crowned with a light and fluffy whipped topping. It’s cool, creamy, and packed with holiday cheer in every single bite. Trust me, this will become your new go-to holiday dessert!

Ingredient Notes
Creating our Christmas Cookie Lush is like assembling a holiday dream, layer by delicious layer! The beauty of this dessert lies in its simplicity and the festive twist we give it with our ingredient choices. Here’s a closer look at what you’ll need and some thoughts on substitutions.
For the Christmas Cookie Crust:
- Christmas Cookies: This is where the magic begins! I love using a mix of festive sugar cookies (especially the ones with red and green sprinkles!), gingerbread snaps, or even shortbread cookies. The goal is a sweet, crumbly base that screams holiday cheer. You’ll need about 12-14 ounces, which is typically one standard package.
- Melted Butter: Unsalted is my go-to, as it gives me control over the saltiness. It binds our cookie crumbs together beautifully.
Substitutions for the Crust: If you can’t find specific Christmas cookies, regular vanilla wafers, graham crackers, or even gingersnaps (for a spicier kick) would work well. Just make sure they’re fairly firm so they can hold up in the crust.
For the Cream Cheese Layer:
- Cream Cheese: Full-fat cream cheese, softened to room temperature, is essential for that rich, tangy, and irresistibly smooth texture. Trust me, it makes all the difference!
- Powdered Sugar: Also known as confectioners’ sugar, this fine sugar dissolves easily, ensuring a silky-smooth cream cheese layer without any grittiness.
- Whipped Topping (thawed): A tub of thawed whipped topping, like Cool Whip, lightens the cream cheese mixture and makes it wonderfully airy.
- Vanilla Extract: Pure vanilla extract is my preference for that classic, comforting flavor.
Substitutions for the Cream Cheese Layer: You can use reduced-fat cream cheese if you prefer, but be aware it might slightly alter the texture. For a homemade touch, you could whip heavy cream until stiff peaks form and gently fold it into the cream cheese mixture instead of using store-bought whipped topping.
For the Pudding Layer:
- Instant Pudding Mix: I typically reach for two small (3.4 oz each) boxes of instant vanilla or white chocolate pudding mix. These flavors are wonderfully versatile and complement the other components without overpowering them. For an extra festive touch, sometimes I’ll use instant cheesecake or even a peppermint-flavored pudding if I can find it around the holidays!
- Cold Milk: Whole milk works best for a thick, creamy pudding, but 2% milk is also perfectly fine. Ensure it’s very cold, as this helps the pudding set quickly and properly.
Substitutions for the Pudding Layer: Feel free to get creative with your pudding flavors! Butterscotch, pistachio (for a green holiday color!), or even a chocolate pudding would be delightful. You could also try adding a few drops of food coloring to a vanilla pudding to make it red or green for extra holiday flair.
For the Topping & Garnish:
- Whipped Topping: Another tub of thawed whipped topping provides the light and fluffy crown for our lush.
- Christmas Sprinkles or Crushed Candy Canes: These are purely for festive decoration! A generous sprinkle of red, green, and white sprinkles, or crushed peppermint candies, really makes the dessert pop and ties into the Christmas theme.
Substitutions for Topping & Garnish: Chocolate shavings, a drizzle of caramel sauce, or a dusting of cocoa powder could also be lovely. Get creative and make it your own!
Step-by-Step Instructions
Alright, let’s get hands-on and bring this delightful Christmas Cookie Lush to life! It’s a no-bake wonder, meaning less oven time and more holiday cheer. The key to a beautiful lush is patience between layers – chilling is your friend here.
- Prepare the Crust:
- First things first, let’s get our cookies ready. In a food processor, pulse your Christmas cookies until fine crumbs form. If you don’t have a food processor, you can place the cookies in a large Ziploc bag and crush them with a rolling pin.
- Melt your butter and add it to the cookie crumbs. Mix thoroughly until the crumbs are evenly moistened.
- Press this mixture firmly and evenly into the bottom of a 9×13 inch baking dish. Use the back of a spoon or your clean hands to compact it well.
- Pop the dish into the refrigerator for at least 30 minutes to let the crust firm up while you prepare the next layer. This prevents a soggy crust!
- Create the Cream Cheese Layer:
- In a large mixing bowl, beat the softened cream cheese with an electric mixer until it’s smooth and creamy, with no lumps.
- Gradually add the powdered sugar, continuing to beat until the mixture is light and fluffy. Stir in the vanilla extract.
- Gently fold in about half of your thawed whipped topping until just combined. Be careful not to overmix; we want to keep it airy.
- Carefully spread this luscious cream cheese mixture evenly over your chilled cookie crust.
- Return the dish to the refrigerator for another 30 minutes to allow this layer to set up.
- Whip Up the Pudding Layer:
- In another mixing bowl, combine the instant pudding mixes with the cold milk.
- Whisk vigorously for about 2-3 minutes, or until the pudding begins to thicken considerably. Don’t worry if it seems a little loose at first; it will continue to set.
- Carefully spoon and spread the thickened pudding mixture over the cream cheese layer. Try to be gentle to avoid disturbing the layer beneath.
- Place the dish back in the refrigerator for at least 1-2 hours, or until the pudding layer is completely set. This is a crucial step for clean layers!
- Add the Final Topping & Garnish:
- Once the pudding layer is fully set, spread the remaining thawed whipped topping evenly over the top of the dessert.
- Now for the fun part – decorating! Generously sprinkle your Christmas sprinkles, crushed candy canes, or any other festive garnishes over the whipped topping. This instantly makes it look like a holiday masterpiece!
- Chill & Serve:
- For the best results and easiest slicing, allow the Christmas Cookie Lush to chill in the refrigerator for at least 4 hours, or ideally, overnight. This really lets all the flavors meld and the layers firm up beautifully.
- When you’re ready to serve, use a sharp knife (running it under hot water between slices can help with clean cuts) to cut the lush into squares. Enjoy your festive creation!
Tips & Suggestions
Making a Christmas Cookie Lush is incredibly rewarding, and with a few insider tips, you can elevate your dessert from great to absolutely unforgettable. I’ve learned these tricks over many holiday seasons, and I’m excited to share them with you!
- Patience with Chilling: I cannot stress this enough – chilling time is your best friend when making any layered lush dessert. Each layer needs adequate time to firm up before the next is added. Rushing this step often leads to messy, melded layers rather than the distinct, beautiful strata we’re aiming for. An extra 30 minutes in the fridge can make all the difference for a clean slice!
- Softened Cream Cheese is Key: Ensure your cream cheese is at room temperature before you start. This makes it much easier to beat smooth and prevents lumps in your cream cheese layer. Take it out of the fridge at least 30 minutes to an hour before you plan to mix.
- Don’t Overmix the Whipped Topping: When folding the whipped topping into the cream cheese mixture, be gentle. Overmixing can deflate the air, making your layer less light and fluffy. Fold until just combined.
- For Cleaner Slices: Before slicing and serving, dip your knife in hot water and wipe it clean between each cut. This simple trick helps create perfectly neat squares, showcasing those lovely layers.
- Get Festive with Food Coloring: For an extra splash of Christmas cheer, try adding a few drops of red or green food coloring to your cream cheese layer or even the vanilla pudding layer. Just a little bit can transform the look of your dessert!
- Flavor Variations are Welcome:
- Spice it Up: If you love the taste of gingerbread, consider adding a pinch of ground ginger, cinnamon, and nutmeg to your cream cheese layer.
- Minty Fresh: For peppermint lovers, substitute vanilla extract in the cream cheese layer with peppermint extract (start with a small amount, like 1/4 teaspoon, and taste), and definitely top with crushed candy canes.
- Non-Alcohol Alternatives: If you’re looking for sophisticated flavors without alcohol, a few drops of rum extract or brandy extract can give you that warm, festive essence in your cream cheese or pudding layer. Almond extract is also wonderful for a subtle, nutty twist.
- Make Ahead Magic: This Christmas Cookie Lush is a fantastic make-ahead dessert! In fact, it often tastes even better the next day once all the flavors have had ample time to meld together. Prepare it the day before your holiday gathering, and you’ll have one less thing to worry about on the big day.
- Crust Thickness Preference: If you prefer a thicker crust, simply use a few extra ounces of cookies and a little more melted butter. Adjust to your personal taste!
Storage
Once you’ve indulged in the first glorious slices of your Christmas Cookie Lush, you’ll want to make sure you store any leftovers properly to maintain their freshness and deliciousness. Here’s what I recommend:
- Refrigeration is Essential: Because this dessert contains dairy products like cream cheese, milk, and whipped topping, it absolutely needs to be stored in the refrigerator. Do not leave it out at room temperature for extended periods.
- Airtight is Best: Cover the baking dish tightly with plastic wrap or aluminum foil. Alternatively, if you’ve transferred individual slices to plates, cover those as well. An airtight seal prevents the dessert from absorbing odors from other foods in the fridge and helps keep the layers from drying out.
- How Long it Lasts: When properly stored in the refrigerator, your Christmas Cookie Lush will stay fresh and delightful for up to 3-4 days. The cookie crust will soften slightly over time, but the overall texture and flavor will still be wonderful. I find it’s often best within the first 2-3 days for peak enjoyment, especially for the crispness of the topping.
- Freezing (Generally Not Recommended): While technically you can freeze this dessert, I generally don’t recommend it for optimal quality. Freezing can alter the texture of the cream cheese and pudding layers, making them a bit watery or grainy upon thawing. The whipped topping may also separate, and the cookie crust can become very soft. If you absolutely must freeze it, do so without the final garnish of sprinkles or candy canes, and allow it to thaw slowly in the refrigerator before adding fresh toppings.
My advice is to enjoy this festive treat within a few days of making it. It’s so delicious, I doubt it will last much longer than that anyway!
Final Thoughts
I truly hope you’ve enjoyed discovering the magic behind this incredible dessert! What makes Christmas Cookie Lush an absolute must-try for your holiday season is its truly perfect balance. It’s not just a dessert; it’s a delightful experience, bringing together the comforting crunch of your favorite Christmas cookies with layers of smooth, rich creaminess that simply melts in your mouth.
I find that Christmas Cookie Lush effortlessly captures the festive spirit. It’s wonderfully easy to prepare, meaning less stress for you during the busy holidays, but it delivers an impressive, show-stopping presentation that will wow all your guests. I just know that every spoonful offers a taste of holiday joy, making it the perfect centerpiece for any gathering.
So, whether you’re starting a new tradition or simply looking for a decadent treat that embodies all the cheer of the season, I confidently recommend Christmas Cookie Lush. It’s a sweet, blissful indulgence that I’m sure will become a cherished part of your celebrations for years to come. Happy holidays, and happy indulging!
Easy Christmas Cookie Lush: Festive No-Bake Holiday Dessert
- Total Time: 30 minutes
- Yield: 12 servings 1x
Description
This Christmas Cookie Lush is a creamy, dreamy no-bake layered dessert that captures the festive joy of your favorite Christmas cookies. It’s the ultimate holiday treat that is both impressive and easy to prepare.
Ingredients
- 12–14 ounces Christmas Cookies (a mix of festive sugar cookies, gingerbread snaps, or shortbread cookies)
- 1/2 cup Melted Butter (unsalted)
- 8 ounces Cream Cheese (full-fat, softened to room temperature)
- 1 cup Powdered Sugar (confectioners' sugar)
- 1 tub Whipped Topping (thawed, like Cool Whip)
- 1 teaspoon Vanilla Extract (pure)
- 2 small boxes Instant Pudding Mix (3.4 oz each, vanilla or white chocolate)
- 2 cups Cold Milk (whole or 2%)
- 1 tub Whipped Topping (thawed, for topping)
- Christmas Sprinkles or Crushed Candy Canes (for garnish)
Instructions
- Prepare the Crust: In a food processor, pulse your Christmas cookies until fine crumbs form. Melt your butter and add it to the cookie crumbs. Mix thoroughly until the crumbs are evenly moistened. Press this mixture firmly and evenly into the bottom of a 9×13 inch baking dish. Pop the dish into the refrigerator for at least 30 minutes to let the crust firm up.
- Create the Cream Cheese Layer: In a large mixing bowl, beat the softened cream cheese with an electric mixer until smooth and creamy. Gradually add the powdered sugar, continuing to beat until light and fluffy. Stir in the vanilla extract. Gently fold in about half of your thawed whipped topping until just combined. Carefully spread this mixture evenly over your chilled cookie crust. Return the dish to the refrigerator for another 30 minutes.
- Whip Up the Pudding Layer: In another mixing bowl, combine the instant pudding mixes with the cold milk. Whisk vigorously for about 2-3 minutes, or until the pudding begins to thicken. Carefully spoon and spread the thickened pudding mixture over the cream cheese layer. Place the dish back in the refrigerator for at least 1-2 hours, or until the pudding layer is completely set.
- Add the Final Topping & Garnish: Once the pudding layer is set, spread the remaining thawed whipped topping evenly over the top of the dessert. Generously sprinkle your Christmas sprinkles, crushed candy canes, or any other festive garnishes over the whipped topping.
- Chill & Serve: Allow the Christmas Cookie Lush to chill in the refrigerator for at least 4 hours, or ideally, overnight. When ready to serve, use a sharp knife to cut the lush into squares.
- Prep Time: 30 mins
- Cook Time: 0 mins
- Category: Dessert
- Method: No-Bake
- Cuisine: American
Nutrition
- Serving Size: 1 square
- Calories: 320
- Sugar: 25 g
- Sodium: 180 mg
- Fat: 18 g
- Saturated Fat: 10 g
- Unsaturated Fat: 6 g
- Trans Fat: 0 g
- Carbohydrates: 36 g
- Fiber: 1 g
- Protein: 3 g
- Cholesterol: 30 mg
Keywords: Chilling time is crucial for clean layers. Ensure your cream cheese is at room temperature for easy mixing. Be gentle when folding in whipped topping to maintain airiness. For cleaner slices, dip your knife in hot water before cutting.

Leave a Comment