

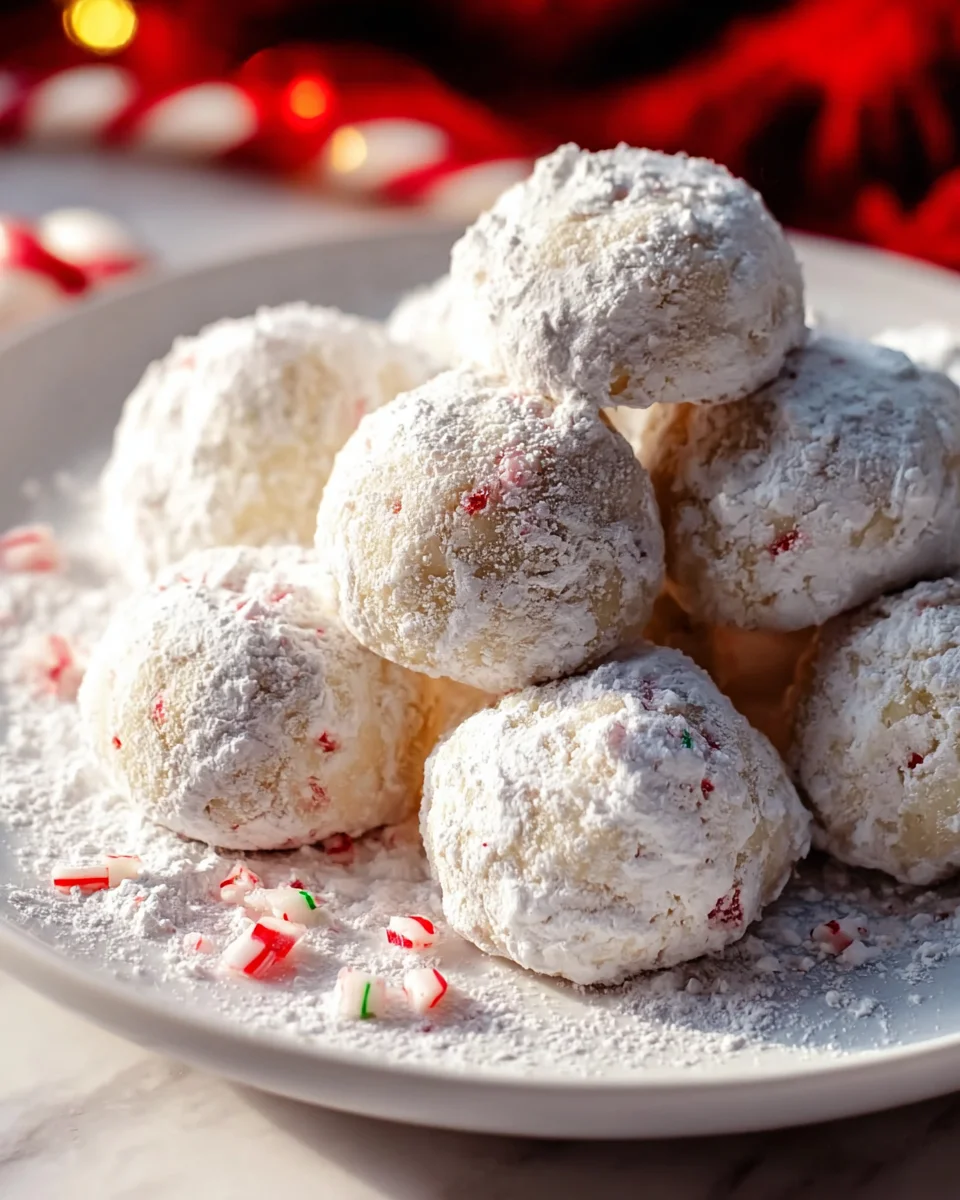
Peppermint Snowball Cookies
There’s something truly magical about the holiday season, and for me, it always involves baking! Peppermint Snowball Cookies are an absolute dream come true, especially when you’re looking for that perfect blend of festive cheer and melt-in-your-mouth deliciousness. What makes these little gems so special, you ask? It’s that delicate, crumbly texture that practically dissolves on your tongue, paired with a cool, invigorating burst of peppermint that instantly transports you to a winter wonderland. I promise, you’re going to fall head over heels for how incredibly easy they are to whip up, yet they look so elegant with their snowy powdered sugar coating. These delightful cookies are essentially small, buttery shortbread-like balls, often studded with finely chopped nuts (like pecans or walnuts), generously infused with peppermint, and then rolled in a cloud of powdered sugar. They’re perfect for cookie exchanges, gifting to loved ones, or simply enjoying with a hot cup of cocoa by the fire. Get ready to add a new favorite to your holiday baking repertoire!

Ingredient Notes
Crafting the perfect Peppermint Snowball Cookies truly hinges on a few key players. Each ingredient contributes to that delightful melt-in-your-mouth texture and festive flavor. Here’s a breakdown of what you’ll need and why:
- Unsalted Butter: This is the foundation of our cookies, giving them their rich, tender, shortbread-like texture. Make sure it’s at room temperature, softened but not melted. This is crucial for creaming properly with the sugar, creating a light and airy base. If you need a dairy-free alternative, a good quality vegan butter stick can be substituted, though the final texture might be slightly different.
- Powdered Sugar (Confectioners’ Sugar): You’ll need this in two capacities – for the cookie dough itself and, most importantly, for that iconic “snowball” coating. In the dough, it contributes to the tender crumb. For the coating, it provides that beautiful, delicate outer layer that melts on your tongue. There’s no good substitute for powdered sugar here; granulated sugar won’t give you the same fine texture.
- All-Purpose Flour: Simple and effective. This provides the structure for our cookies. I always recommend measuring flour by weight if possible for accuracy, but if using cups, spoon and level to avoid a dense cookie.
- Peppermint Extract: The star of the show! This is where that wonderful, cool peppermint flavor comes from. Make sure you’re using peppermint extract, not spearmint, as they have distinct flavor profiles. A little goes a long way, so start with the recommended amount and adjust to your preference.
- Vanilla Extract: Just a touch of vanilla helps to round out the flavor profile and complement the vibrant peppermint, preventing it from being too overpowering.
- Finely Crushed Peppermint Candies (Candy Canes): These are essential for both flavor and a delightful textural crunch. I like to crush mine in a food processor until they’re a mix of fine powder and small, noticeable bits. This ensures you get that burst of peppermint in every bite.
- Optional: Finely Chopped Pecans or Walnuts: While traditional snowball cookies often include nuts, for this peppermint version, they’re optional. If you love the classic nutty crunch, feel free to fold in about a half cup of finely chopped pecans or walnuts with your crushed candy canes. They add another layer of texture and flavor that some find irresistible!
Step-by-Step Instructions
Get ready to create some holiday magic! These Peppermint Snowball Cookies are surprisingly simple to make, but follow these steps closely for the best results.
- Prepare Your Workspace: First things first, preheat your oven to 325°F (160°C). Line two baking sheets with parchment paper or silicone mats. This helps prevent sticking and makes cleanup a breeze. While the oven preheats, take a moment to finely crush your peppermint candies. I usually pop them in a food processor for a quick pulse, or if you’re feeling a bit more old-school, a Ziploc bag and a rolling pin work wonders.
- Cream the Butter and Sugar: In a large mixing bowl, using an electric mixer, beat the softened unsalted butter and 1/2 cup of the powdered sugar together. You’ll want to cream these until the mixture is light, fluffy, and pale in color. This usually takes about 2-3 minutes. Don’t rush this step, as it incorporates air, which contributes to the tender texture of the cookies.
- Add the Extracts: Once your butter and sugar mixture is beautifully creamy, beat in the peppermint extract and vanilla extract. Mix until they are just combined and fragrant.
- Incorporate Dry Ingredients: With the mixer on low speed, gradually add the all-purpose flour to the wet ingredients. Mix only until the flour is just incorporated and no dry streaks remain. Overmixing can lead to tough cookies, and we definitely want these to be melt-in-your-mouth tender!
- Fold in the Peppermint: Gently fold in your finely crushed peppermint candies (and the optional chopped nuts, if you’re using them) using a spatula. Make sure they are evenly distributed throughout the dough.
- Chill the Dough (Optional but Recommended): For easier handling and to help prevent spreading, I like to chill the dough in the refrigerator for about 15-20 minutes. This isn’t strictly necessary if your kitchen is cool, but it makes rolling much simpler.
- Form the Cookies: Scoop out small portions of dough, about 1 to 1.5 tablespoons each. Roll them between your palms to form smooth, uniform balls. Place them about 1 inch apart on your prepared baking sheets. Aim for consistency in size so they bake evenly.
- Bake to Perfection: Transfer the baking sheets to your preheated oven and bake for 12-15 minutes. The exact time will depend on your oven and the size of your cookies. You’re looking for the edges to be set and very lightly golden on the bottom, but the tops should still be pale. Remember, we don’t want to overbake these delicate cookies!
- First Powdered Sugar Roll: Here’s where the “snowball” magic truly begins! While the cookies are still warm from the oven (but not piping hot, as the sugar would melt completely), gently transfer them to a bowl containing the remaining 1 cup of powdered sugar. Roll each cookie generously in the sugar until it’s completely coated. The warmth helps the sugar adhere beautifully.
- Cool and Second Roll: Place the sugar-coated cookies on a wire rack to cool completely. Once they are fully cool, roll them a second time in the powdered sugar. This double coating creates that gorgeous, thick, snowy finish that these cookies are famous for. It ensures they look like perfect little snowballs!
Tips & Suggestions
To ensure your Peppermint Snowball Cookies are absolutely perfect, I’ve gathered some of my favorite tips and tricks:
- Don’t Overbake! Seriously: This is perhaps the most crucial tip for snowball cookies. They should be set but still look quite pale on top. The moment you see any significant browning on top, they’re likely overbaked, and you’ll lose that signature melt-in-your-mouth tenderness.
- Room Temperature Butter is Key: I can’t stress this enough! Softened butter creams properly with the sugar, incorporating air and creating a light, delicate dough. If your butter is too cold, it won’t cream properly; if it’s too warm or melted, your cookies might spread too much.
- Chill Your Dough: While optional, a quick 15-20 minute chill in the fridge makes the dough much easier to handle and roll into perfect balls. It also helps prevent the cookies from spreading excessively in the oven.
- The Double Powdered Sugar Roll is Essential: The first roll, while the cookies are still warm, allows the sugar to slightly melt and adhere to the cookie, creating a base layer. The second roll, once the cookies are completely cool, provides that beautiful, fresh, snowy “snowball” appearance and texture. Don’t skip it!
- Crushing Peppermint Candies: For the best texture, I prefer a mix of fine powder and small, irregular bits. This gives you bursts of peppermint flavor and a nice crunch. A food processor works great, but a Ziploc bag and a rolling pin give you more control over the texture.
- Uniformity Matters: Use a small cookie scoop or a measuring spoon (like a 1.5 tablespoon spoon) to portion out your dough. This ensures all your cookies are roughly the same size, leading to even baking and a prettier presentation.
- Adjust Peppermint Flavor: Peppermint extract can be quite potent. Feel free to adjust the amount slightly to your personal taste. If you’re unsure, start with the recommended amount and remember you can always add a touch more next time if you prefer a stronger kick.
Storage
Once you’ve made these delightful Peppermint Snowball Cookies, you’ll want to ensure they stay fresh and delicious. Here’s how I recommend storing them:
- At Room Temperature: Store your fully cooled Peppermint Snowball Cookies in an airtight container at room temperature. They will stay fresh and tender for up to 5-7 days. I like to place a piece of parchment paper between layers of cookies to prevent the powdered sugar from rubbing off too much.
- Freezing Baked Cookies: These cookies freeze beautifully! Once completely cooled and double-coated in powdered sugar, arrange them in a single layer on a baking sheet and freeze until solid (about 1-2 hours). Then, transfer the frozen cookies to an airtight freezer-safe container or bag, separating layers with parchment paper. They can be frozen for up to 2-3 months. To thaw, simply take them out of the freezer and let them come to room temperature. You might want to give them an additional roll in fresh powdered sugar after thawing, as some of the original coating can get absorbed.
- Freezing Dough: You can also freeze the unbaked cookie dough. After forming the dough balls, arrange them on a baking sheet and freeze until firm. Then, transfer the frozen dough balls to an airtight freezer-safe bag. When you’re ready to bake, you can bake them directly from frozen, adding a minute or two to the baking time, or let them thaw slightly in the refrigerator first.
- Keep Separate from Other Flavors: If you’re storing these with other types of cookies, be mindful that the strong peppermint flavor can sometimes transfer. It’s best to store them in their own container if possible.
Final Thoughts
And there you have it – your very own batch of delightful Peppermint Snowball Cookies! I truly believe this recipe is a must-try for anyone looking to add a touch of magic to their holiday season or simply enjoy a wonderfully comforting treat. The way these Peppermint Snowball Cookies melt in your mouth, combined with the refreshing burst of cool peppermint and that irresistible snowy powdered sugar coating, makes them absolutely perfect. They’re not just cookies; they’re tiny moments of festive joy, ready to be shared and savored. I promise, once you experience the simple pleasure of these elegant, melt-in-your-mouth morsels, you’ll want to make them again and again. Happy baking!
Peppermint Snowball Cookies: Festive & Easy Holiday Treat
- Total Time: 35 minutes
- Yield: 24 cookies 1x
Description
These Peppermint Snowball Cookies are a delightful blend of festive cheer and melt-in-your-mouth deliciousness. Perfect for cookie exchanges or enjoying by the fire, they are sure to become a holiday favorite!
Ingredients
- 1 cup Unsalted Butter, softened
- 1 1/2 cups Powdered Sugar (Confectioners' Sugar), divided
- 2 cups All-Purpose Flour
- 1 teaspoon Peppermint Extract
- 1 teaspoon Vanilla Extract
- 1/2 cup Finely Crushed Peppermint Candies (Candy Canes)
- Optional: 1/2 cup Finely Chopped Pecans or Walnuts
Instructions
- Preheat your oven to 325°F (160°C) and line two baking sheets with parchment paper or silicone mats.
- In a large mixing bowl, beat the softened unsalted butter and 1/2 cup of the powdered sugar together until light, fluffy, and pale in color, about 2-3 minutes.
- Beat in the peppermint extract and vanilla extract until just combined.
- Gradually add the all-purpose flour to the wet ingredients with the mixer on low speed, mixing until just incorporated.
- Gently fold in the finely crushed peppermint candies and the optional chopped nuts using a spatula.
- Chill the dough in the refrigerator for about 15-20 minutes for easier handling.
- Scoop out small portions of dough, about 1 to 1.5 tablespoons each, and roll them into smooth balls.
- Place the dough balls about 1 inch apart on the prepared baking sheets.
- Bake for 12-15 minutes until the edges are set and very lightly golden, but the tops are still pale.
- While the cookies are still warm, roll them in the remaining 1 cup of powdered sugar until completely coated.
- Place the sugar-coated cookies on a wire rack to cool completely, then roll them a second time in powdered sugar.
- Prep Time: 20 mins
- Cook Time: 15 mins
- Category: Dessert
- Method: Baking
- Cuisine: American
Nutrition
- Serving Size: 1 cookie
- Calories: 120
- Sugar: 10 g
- Sodium: 50 mg
- Fat: 7 g
- Saturated Fat: 4 g
- Unsaturated Fat: 2 g
- Trans Fat: 0 g
- Carbohydrates: 14 g
- Fiber: 0 g
- Protein: 1 g
- Cholesterol: 20 mg
Keywords: Ensure your butter is at room temperature for proper creaming. Don't overbake the cookies; they should be set but pale on top. Chilling the dough makes it easier to handle, and the double powdered sugar roll is essential for that snowy appearance.


Leave a Comment