

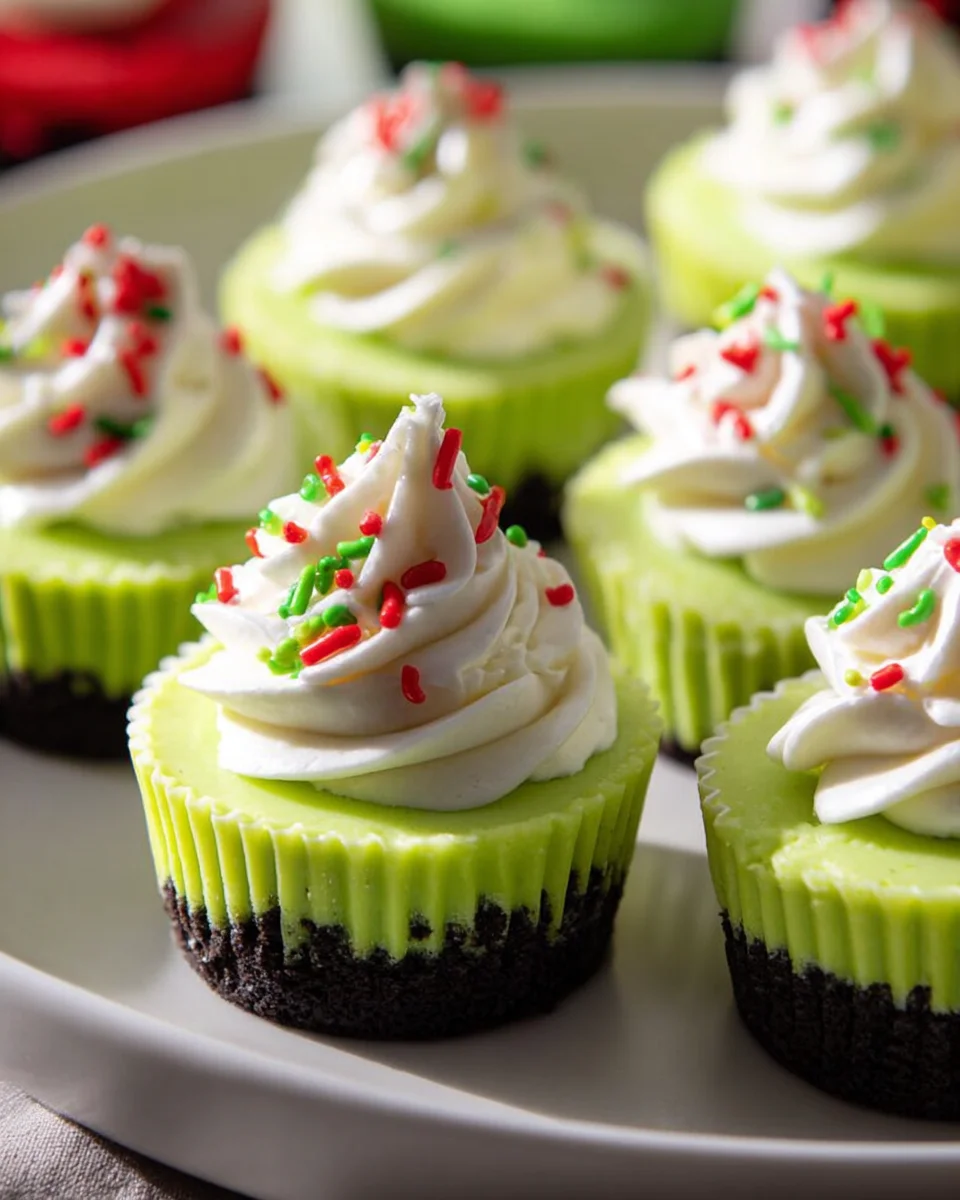
Grinch Mini Cheesecakes
Oh boy, have I got a treat for you that’s going to make your heart grow three sizes this holiday season! We’re diving headfirst into the festive spirit with my delightful Grinch Mini Cheesecakes. What makes these little guys so incredibly special, you ask? Well, it’s not just that they’re individual portions of creamy, dreamy cheesecake – it’s their undeniable Grinchy charm! Each mini cheesecake boasts a vibrant, whimsical green hue, perfect for channeling our favorite green grump, and they’re often crowned with a fluffy dollop of whipped cream and a tiny red candy heart, symbolizing the Grinch’s softening spirit. Trust me, these aren’t just desserts; they’re conversation starters and a guaranteed smile-inducer at any holiday gathering.
You’ll absolutely adore making and sharing these because they’re surprisingly simple to put together, yet they look like you’ve spent hours slaving away. The rich, tangy cheesecake filling sits on a perfect graham cracker crust, offering that classic textural contrast we all love. They’re bite-sized portions of pure joy, making them ideal for parties, potlucks, or just a fun, festive treat for yourself. Get ready to impress everyone with these adorable, delicious, and perfectly themed Grinch Mini Cheesecakes – they’re sure to steal the show (and maybe a few hearts!) without stealing any presents.

Ingredient Notes
Creating these delightful Grinch Mini Cheesecakes is such a joy, and getting the right ingredients can make all the difference. Here’s what I find works best, along with some handy alternatives!
Cheesecake Base Essentials
- Cream Cheese: This is the star of our show! I always recommend using full-fat block cream cheese, softened to room temperature. It yields the creamiest, richest texture. Please avoid the cream cheese in a tub, as it has a higher water content and won’t set as beautifully. If you’re looking for a dairy-free option, there are some excellent plant-based cream cheeses available now that work surprisingly well in cheesecake, though the texture might be slightly different.
- Granulated Sugar: Standard white sugar is perfect here. It provides sweetness and helps with the cheesecake’s structure. For a slightly less sweet cheesecake, you can reduce the amount by a couple of tablespoons, but don’t cut too much or it might affect the texture.
- Eggs: Large eggs are what I use. They act as a binder, giving our mini cheesecakes their smooth, custard-like consistency. Make sure they are at room temperature, as this helps them incorporate better into the batter without overmixing.
- Vanilla Extract: A good quality vanilla extract really enhances the flavor. I’m quite generous with mine! If you happen to have vanilla bean paste, it’s an amazing substitution that adds beautiful little flecks of vanilla.
- Sour Cream: This is my secret weapon for super creamy cheesecakes. It adds a subtle tang and helps create that signature smooth texture. Full-fat sour cream is best. If you don’t have sour cream, plain full-fat Greek yogurt is an excellent substitute, offering a similar tang and richness.
The Grinchy Details
- Green Food Coloring: To get that iconic Grinch green, gel food coloring is absolutely essential. Liquid food coloring often requires a lot more to achieve a vibrant hue and can thin out your batter. A few drops of a good quality gel coloring (like forest green or leaf green) will give you a stunning, deep color without affecting the consistency.
- Cookie Crumbs for the Crust: I love using chocolate sandwich cookies (like Oreos, with the cream filling removed, or even kept in for extra sweetness) for a dark, contrasting crust that makes the green pop. Graham crackers are also a classic choice and taste wonderful. For a gluten-free option, many brands now offer gluten-free chocolate sandwich cookies or graham crackers that work just as well.
- Melted Butter: Unsalted butter is my go-to for the crust. It binds the crumbs together perfectly. If you only have salted butter, just reduce any additional salt in the recipe (though typically there isn’t any for the crust).
- Red Candy Hearts or Frosting: To truly capture the Grinch’s spirit, a small red candy heart placed on top of each cheesecake after it’s chilled is perfect! Alternatively, a tiny dab of red frosting piped into a heart shape works just as well.
Remember, the fresher your ingredients, the better your cheesecakes will taste. Have fun with it!
Step-by-Step Instructions
Alright, let’s get these adorable Grinch Mini Cheesecakes made! Follow these steps, and you’ll have a batch of festive treats in no time.
- Prep Your Muffin Tin: First things first, preheat your oven to 325°F (160°C). Line a standard 12-cup muffin tin with paper liners. I find that using foil liners works even better for cheesecakes, as they help hold their shape and are easier to peel away.
- Make the Crust: In a medium bowl, combine your finely crushed cookie crumbs with the melted butter. Mix until the crumbs are evenly moistened. Spoon about 1 tablespoon of the mixture into the bottom of each prepared muffin liner. Use the back of a spoon or your fingers to firmly press the crumbs into an even layer. This creates a solid base for your mini cheesecakes.
- Pre-Bake the Crust (Optional but Recommended): For a sturdier crust, you can bake it for 5-7 minutes. This helps prevent it from becoming soggy. If you’re short on time, you can skip this step, but I really think it makes a difference! Let it cool slightly once baked.
- Prepare the Cheesecake Filling: In a large bowl, using an electric mixer (stand or hand-held) on medium speed, beat the softened cream cheese until it’s completely smooth and creamy, with no lumps. This is crucial for a smooth cheesecake.
- Add Sweetness and Flavor: Gradually add the granulated sugar to the cream cheese, beating on low speed until just combined. Don’t overmix! Then, beat in the sour cream and vanilla extract until smooth.
- Incorporate the Eggs: Add the eggs one at a time, mixing on low speed after each addition just until combined. Stop mixing as soon as the yolk disappears. Overmixing at this stage can incorporate too much air, which can lead to cracks in your cheesecakes.
- Get Your Grinch Green On: Now for the fun part! Add your green gel food coloring, starting with a few drops, and mix on low speed until the desired vibrant green color is achieved. Add more coloring if needed, a drop at a time, until you’re happy with the shade.
- Fill the Liners: Divide the green cheesecake batter evenly among the prepared muffin liners, filling each about two-thirds full. A small cookie scoop or an ice cream scoop works wonderfully for this, ensuring even portions.
- Bake ‘Em Up!: Carefully transfer the muffin tin to your preheated oven. Bake for 18-22 minutes, or until the edges are just set and the centers have a slight jiggle when you gently shake the pan. Don’t overbake, as they will continue to set as they cool.
- Cool Down Slowly: Turn off the oven, prop the door open slightly, and let the cheesecakes cool inside the oven for about 15-20 minutes. This slow cooling process helps prevent cracking.
- Chill Out: Remove the muffin tin from the oven and let the mini cheesecakes cool completely on a wire rack at room temperature. Once cooled, transfer the muffin tin to the refrigerator and chill for at least 3-4 hours, or preferably overnight, before serving. Chilling is essential for them to firm up properly.
- Decorate with a Heart: Just before serving, carefully peel away the paper liners. Place a small red candy heart or a tiny piped red frosting heart on top of each green cheesecake to give them that unmistakable Grinch touch!
And there you have it! Beautiful, delicious, and perfectly Grinchy mini cheesecakes ready to steal hearts (in a good way!).
Tips & Suggestions
Making Grinch Mini Cheesecakes is a festive treat, and with a few extra tips, you can ensure yours are absolutely perfect. Here are my go-to suggestions:
For the Perfect Grinchy Look & Feel
- Achieve Vibrant Green: As mentioned in ingredients, gel food coloring is your best friend. To get that truly bright Grinch green, I often use a mix of a standard green gel with a tiny touch of yellow gel coloring. This can brighten up the green and prevent it from looking too dull or blue-ish. Experiment with a small portion of batter first!
- Prevent Cracks: While mini cheesecakes are less prone to cracking than full-sized ones, overmixing the batter (especially after adding eggs) and sudden temperature changes are the main culprits. Mix on low speed, just until ingredients are combined. The slow cooling process in the oven is also key to preventing sudden temperature shifts.
- Smooth Tops: After pouring the batter into the liners, gently tap the muffin tin on the counter a few times. This helps release any air bubbles trapped in the batter, leading to smoother tops on your finished cheesecakes.
- Easy Liner Removal: If you’re having trouble removing the paper liners, try using foil liners as they peel away much cleaner. Alternatively, give the cheesecakes a quick freeze for 15-20 minutes after they’ve chilled – the liners often come off more easily when the cheesecake is firmer.
Flavor & Presentation Variations
- Crust Alternatives: Beyond chocolate sandwich cookies or graham crackers, consider using vanilla wafers or even shortbread cookies for your crust. For a festive twist, a gingersnap crust would be delightful, especially around the holidays.
- Topping Ideas: While the red candy heart is classic, you could also pipe a swirl of whipped cream on top before adding the heart, creating a little “Santa hat” effect. A sprinkle of edible glitter or some festive sprinkles could add extra sparkle.
- Flavor Boost: For an extra layer of flavor, consider adding a tiny amount of peppermint extract (about 1/4 teaspoon) to the cheesecake batter along with the vanilla. Peppermint and chocolate (from the crust) are a fantastic combination that screams holiday!
- Serving Suggestions: These mini cheesecakes are perfect on their own, but they also pair wonderfully with a light dusting of powdered sugar, a drizzle of chocolate sauce, or a fresh raspberry or two on the side.
Don’t be afraid to get creative and make these your own. The most important thing is to have fun with it!
Storage
Once you’ve made these adorable Grinch Mini Cheesecakes, proper storage is key to keeping them fresh and delicious for as long as possible. Here’s how I like to store mine:
- Refrigeration: These mini cheesecakes must be stored in the refrigerator. After they are completely chilled and decorated (if using non-perishable decor), place them in an airtight container. This prevents them from drying out and absorbing odors from other foods in your fridge. They will stay fresh and delicious for up to 4-5 days when stored this way.
- Freezing (Without Topping): If you want to make these ahead or have leftovers you won’t eat within a few days, mini cheesecakes freeze beautifully! I recommend freezing them without the red candy heart or any whipped cream topping, as these may not thaw well.
- To freeze, ensure the cheesecakes are fully chilled. Place them on a baking sheet lined with parchment paper, making sure they don’t touch. Freeze for 1-2 hours, or until solid.
- Once frozen solid, transfer the individual cheesecakes to a freezer-safe airtight container or a heavy-duty freezer bag. Layer them with parchment paper in between to prevent sticking.
- They can be stored in the freezer for up to 1-2 months.
- Thawing Frozen Cheesecakes: When you’re ready to enjoy a frozen Grinch Mini Cheesecake, simply transfer it from the freezer to the refrigerator and let it thaw overnight, or for at least 4-6 hours. Once thawed, you can add your red candy heart or other fresh decorations just before serving.
- Serving Temperature: While they need to be stored cold, I find that mini cheesecakes often taste best when allowed to sit at room temperature for about 15-20 minutes before serving. This slightly softens them, enhancing their creamy texture and flavor.
Following these storage tips will ensure your Grinch Mini Cheesecakes remain a delightful treat whenever you’re ready for them!
Final Thoughts
And there you have it! I truly believe these Grinch Mini Cheesecakes are an absolute must-try for your holiday season. They’re not just incredibly charming with their vibrant green and pop of red, but they also bring a delightful burst of creamy, tangy flavor that everyone adores. I love how these Grinch Mini Cheesecakes perfectly capture the festive spirit in such an easy-to-make package. They’re sure to be the star of any dessert table and will definitely put a smile on everyone’s face. Get ready to spread some Grinchy cheer!
Festive Grinch Mini Cheesecakes: Easy Holiday Treat Recipe!
- Total Time: 42 minutes
- Yield: 12 servings 1x
Description
These delightful Grinch Mini Cheesecakes are individual portions of creamy cheesecake with a vibrant green hue, perfect for the holiday season. Topped with a fluffy dollop of whipped cream and a tiny red candy heart, they are sure to bring smiles to any gathering.
Ingredients
- 8 oz Cream Cheese, softened to room temperature
- 1/2 cup Granulated Sugar
- 2 Large Eggs, at room temperature
- 1 tsp Vanilla Extract
- 1/2 cup Sour Cream
- Green Food Coloring (gel)
- 1 1/2 cups Cookie Crumbs for the Crust (chocolate sandwich cookies or graham crackers)
- 1/4 cup Melted Butter (unsalted)
- Red Candy Hearts or Frosting for decoration
Instructions
- Preheat your oven to 325°F (160°C) and line a standard 12-cup muffin tin with paper liners.
- In a medium bowl, combine finely crushed cookie crumbs with melted butter until evenly moistened. Spoon about 1 tablespoon of the mixture into the bottom of each prepared muffin liner and press firmly to create a solid base.
- Optionally, bake the crust for 5-7 minutes to prevent sogginess, then let it cool slightly.
- In a large bowl, beat the softened cream cheese with an electric mixer on medium speed until smooth and creamy.
- Gradually add granulated sugar to the cream cheese, beating on low speed until just combined. Then, beat in sour cream and vanilla extract until smooth.
- Add the eggs one at a time, mixing on low speed after each addition until just combined.
- Add green gel food coloring starting with a few drops, mixing on low speed until the desired color is achieved.
- Divide the green cheesecake batter evenly among the prepared muffin liners, filling each about two-thirds full.
- Bake for 18-22 minutes, or until the edges are set and the centers have a slight jiggle.
- Turn off the oven, prop the door open slightly, and let the cheesecakes cool inside for 15-20 minutes.
- Remove from the oven and let cool completely on a wire rack. Chill in the refrigerator for at least 3-4 hours or overnight.
- Before serving, carefully peel away the paper liners and place a small red candy heart or piped red frosting heart on top of each cheesecake.
- Prep Time: 20 mins
- Cook Time: 22 mins
- Category: Dessert
- Method: Baking
- Cuisine: American
Nutrition
- Serving Size: 1 mini cheesecake
- Calories: 150
- Sugar: 10 g
- Sodium: 150 mg
- Fat: 9 g
- Saturated Fat: 5 g
- Unsaturated Fat: 3 g
- Trans Fat: 0 g
- Carbohydrates: 14 g
- Fiber: 1 g
- Protein: 2 g
- Cholesterol: 40 mg
Keywords: For a dairy-free option, use plant-based cream cheese. To achieve a vibrant green color, use gel food coloring instead of liquid. If you want to prevent cracks, avoid overmixing and cool the cheesecakes slowly.


Leave a Comment