

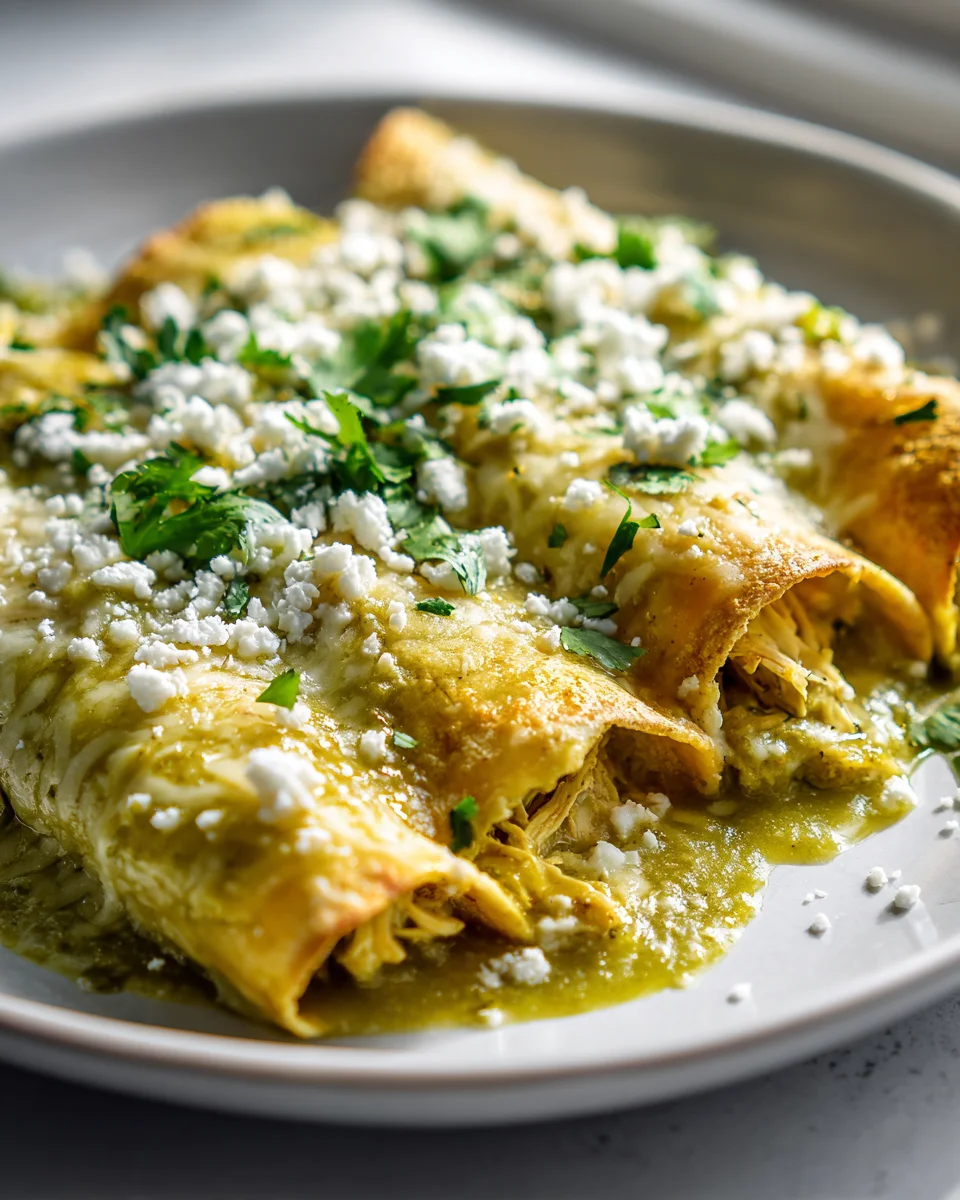
Green Chile Chicken Enchiladas
Oh, Green Chile Chicken Enchiladas! If there’s one dish that truly speaks to my soul with its incredible comfort and explosive flavor, it’s this one. There’s something undeniably special about the way the smoky, earthy warmth of roasted green chiles melts into a creamy, savory sauce, creating a vibrant base that blankets tender shredded chicken and soft corn tortillas. You, my friend, are going to absolutely adore these enchiladas because they deliver on every front: a symphony of incredible flavor, a truly comforting warmth that feels like a hug in a dish, and pure, unadulterated satisfaction. Imagine perfectly seasoned, succulent shredded chicken nestled in soft corn tortillas, all generously smothered in that signature vibrant, zesty green chile sauce, then crowned with a glorious blanket of gooey, melty cheese and baked until it’s bubbly, golden, and irresistible. It’s a taste of pure culinary bliss that transports you straight to a cozy kitchen, and I promise, every single bite is a little piece of heaven.

Ingredient Notes
Creating truly incredible Green Chile Chicken Enchiladas starts with understanding the star players in this dish. Each ingredient plays a crucial role in building layers of flavor that transport you straight to the Southwest.
The Chicken
For the chicken, I almost always opt for convenience without sacrificing flavor. A store-bought rotisserie chicken is my secret weapon here – it’s already cooked, seasoned, and incredibly tender. Shredding it is a breeze, saving you precious time. If you prefer to cook your own, boneless, skinless chicken breasts or thighs work beautifully. Poach them gently in chicken broth until cooked through, then shred them with two forks. The key is tender, shredded chicken that can absorb all the delicious green chile flavors.
Green Chiles – The Heart of the Dish
This dish wouldn’t be “green chile” enchiladas without them! My absolute preference is roasted Hatch green chiles, especially when they’re in season. Their smoky, earthy, and sometimes fiery flavor is unmatched. If you can’t get fresh Hatch chiles, good quality canned diced green chiles are an excellent substitute. Look for brands that offer a choice between mild, medium, or hot, so you can tailor the spice level to your liking. Don’t drain them completely; a little of that liquid adds extra flavor to the filling. Alternatively, you can roast poblano peppers at home for a milder, earthy green chile flavor.
Tortillas
Traditionally, enchiladas are made with corn tortillas, and for good reason! They offer a distinct flavor and texture that truly defines the dish. They become wonderfully soft when baked, absorbing the sauce beautifully. However, some people find corn tortillas a bit fragile and prone to tearing. If you prefer, or if you’re looking for a slightly different texture, flour tortillas can be used. They’ll result in a softer, more casserole-like enchilada. My personal tip for corn tortillas: a quick dip in warm enchilada sauce or a brief sauté in a lightly oiled pan makes them pliable and less likely to crack when rolled.
Cheese, Glorious Cheese!
You can’t have enchiladas without a generous amount of melty cheese! For green chile enchiladas, I love using a combination. Monterey Jack is a fantastic base for its incredible melting properties and mild flavor. Adding a touch of Oaxaca cheese (if you can find it) provides a lovely stretch, while a sharp cheddar or a Mexican blend can enhance the overall flavor profile. Always grate your own cheese from a block – it melts smoother and tastes so much better than pre-shredded varieties, which often contain anti-caking agents.
Green Enchilada Sauce
While making your own green enchilada sauce from scratch is incredibly rewarding, a good quality store-bought green enchilada sauce is perfectly acceptable and a fantastic time-saver. Look for one with a robust flavor and a good consistency – not too watery, not too thick. If you’re going homemade, you’ll typically use roasted chiles, chicken broth, aromatics like onion and garlic, and a touch of flour or cornstarch for thickening. A splash of lime juice or a little ground cumin can really elevate a store-bought sauce.
Aromatics and Seasonings
Simple aromatics like yellow onion and garlic form the foundation of flavor for the chicken filling. Don’t skip them! For seasonings, ground cumin is essential for that authentic Southwestern warmth. A pinch of dried oregano, salt, and freshly ground black pepper will round out the flavors beautifully. Sometimes, I like to add a touch of smoked paprika for an extra layer of depth.
Step-by-Step Instructions
Let’s get cooking! Making Green Chile Chicken Enchiladas is a fun and surprisingly straightforward process. Here’s how I bring this comforting dish to life:
Step 1: Prepare Your Ingredients
- Preheat your oven to 375°F (190°C).
- Lightly grease a 9×13-inch baking dish.
- If using a rotisserie chicken, shred all the meat and set aside. If cooking your own chicken, make sure it’s shredded.
- Finely dice your onion and mince your garlic.
- If using fresh green chiles, roast, peel, and chop them. If using canned, drain them (reserving a tiny bit of liquid if desired for the filling).
- Grate all your cheese and divide it: about two-thirds for the filling and topping, and one-third for the final sprinkle.
Step 2: Make the Flavorful Chicken Filling
- In a large skillet or pot, heat a tablespoon of olive oil over medium heat. Add the diced onion and cook until softened and translucent, about 5-7 minutes.
- Stir in the minced garlic and cook for another minute until fragrant. Be careful not to burn it!
- Add the shredded chicken to the skillet. Stir in the chopped green chiles, ground cumin, dried oregano, salt, and black pepper. Mix well to combine everything.
- Pour in about 1/2 cup of the green enchilada sauce (or a splash of chicken broth) into the chicken mixture. This helps to moisten the filling and infuse it with more flavor. Cook for a few minutes, allowing the liquid to be absorbed and the flavors to meld.
- Remove the skillet from the heat and stir in about two-thirds of the grated cheese into the chicken mixture. This makes the filling extra creamy and binds it together.
Step 3: Prepare the Tortillas
- This is a crucial step to prevent tearing! You have a few options:
- Quick Fry: In a separate small skillet, heat a thin layer of vegetable oil over medium heat. Quickly dip each corn tortilla for 10-15 seconds per side, just until it’s softened and pliable. Don’t let it get crispy! Place on a paper towel to drain excess oil.
- Sauce Dip: Alternatively, you can quickly dip each corn tortilla into warm enchilada sauce. This softens them nicely and adds flavor.
- Microwave (for flour tortillas): For flour tortillas, stack them and microwave for 30 seconds to 1 minute, until warm and flexible.
Step 4: Assemble the Enchiladas
- Pour about 1/2 cup of green enchilada sauce into the bottom of your prepared baking dish, spreading it evenly. This prevents the enchiladas from sticking and adds moisture.
- Take one softened tortilla. Place a generous spoonful (about 1/4 to 1/3 cup) of the chicken and cheese filling in a line down the center of the tortilla.
- Roll the tortilla up tightly and place it seam-side down in the prepared baking dish.
- Repeat this process with the remaining tortillas and filling, arranging them snugly in the baking dish. You might need two dishes depending on the size of your tortillas and how many enchiladas you make.
Step 5: Sauce and Bake!
- Once all the enchiladas are rolled and in the dish, pour the remaining green enchilada sauce evenly over the top, making sure to cover them completely.
- Sprinkle the remaining one-third of the grated cheese over the sauced enchiladas.
- Cover the baking dish loosely with aluminum foil.
- Bake for 20 minutes with the foil on. Then, remove the foil and bake for another 10-15 minutes, or until the cheese is melted, bubbly, and slightly golden, and the enchiladas are heated through.
Step 6: Serve and Enjoy!
- Carefully remove the enchiladas from the oven. Let them rest for 5-10 minutes before serving. This allows the flavors to settle and makes them easier to scoop out.
- Serve hot with your favorite toppings!
Tips & Suggestions
To truly master your Green Chile Chicken Enchiladas and make them outstanding every time, I’ve gathered a few of my favorite tips and suggestions:
Don’t Skimp on Roasting Chiles
If you have the time and access to fresh Hatch chiles, take the extra step to roast, peel, and chop them yourself. The flavor difference between freshly roasted chiles and canned ones is truly noticeable. Roasting brings out their smoky sweetness and deepens their unique green chile flavor. It’s a bit of work, but so worth it for an authentic taste.
The Tortilla Softening Technique is Key
This is probably the most common sticking point for new enchilada makers! If you don’t soften your corn tortillas, they will crack and tear as you try to roll them. My preferred method is a quick dip in warm oil (just 10-15 seconds per side) – it makes them pliable and also gives them a richer flavor. If you’re health-conscious, a quick dip in warm enchilada sauce or even a steamy microwave session can also work, though they might not be quite as sturdy.
Customize Your Heat Level
Green chiles come in various heat levels. If you love a spicy kick, seek out hot Hatch chiles or add a pinch of cayenne pepper to your chicken filling. For a milder dish, stick with mild green chiles or mix them with some roasted poblano peppers. Remember, you can always add more heat at the table with hot sauce, but it’s harder to take it away!
Enhance the Filling’s Flavor
Beyond the basic seasonings, consider adding a squeeze of fresh lime juice to your chicken filling – it brightens all the flavors. A spoonful of sour cream or cream cheese stirred into the filling can also make it incredibly creamy and rich. Some finely chopped fresh cilantro in the filling adds a lovely freshness too.
Make Ahead for Easy Weeknight Meals
Enchiladas are fantastic for meal prep! You can assemble the entire dish up to the point of baking, cover it tightly, and refrigerate it for up to 24 hours. When you’re ready to bake, you might need to add an extra 5-10 minutes to the baking time since it will be going into the oven cold. You can also prepare the chicken filling a day or two in advance and store it in an airtight container in the fridge.
Serving Suggestions
These Green Chile Chicken Enchiladas are hearty on their own, but they really shine with a few fresh accompaniments. I love to serve them with a dollop of sour cream or plain Greek yogurt, a sprinkle of fresh cilantro, diced avocado or a scoop of guacamole, and sometimes a simple side salad. A side of refried beans or Mexican rice completes the meal perfectly.
Storage
Green Chile Chicken Enchiladas make excellent leftovers, and they’re also a fantastic dish for meal prepping and freezing!
Refrigeration
Once your enchiladas have cooled down, transfer any leftovers to an airtight container. They will keep beautifully in the refrigerator for up to 3-4 days. To reheat, you can either pop individual portions in the microwave until heated through, or for a crispier result, cover the baking dish loosely with foil and reheat in a 350°F (175°C) oven for about 20-30 minutes, or until bubbly and hot in the center.
Freezing – Baked or Unbaked!
To Freeze Unbaked Enchiladas: This is my preferred method for future meals. Assemble the enchiladas in an oven-safe, freezer-safe baking dish as directed, but do not bake them. Cover the dish tightly with a layer of plastic wrap, then a layer of aluminum foil. Label with the date. They can be frozen for up to 2-3 months. When you’re ready to bake, remove the plastic wrap, cover with foil, and bake from frozen at 375°F (190°C) for about 45-60 minutes, then remove the foil and bake for another 15-20 minutes, or until heated through and the cheese is bubbly. Exact baking time will depend on your oven and the thickness of the enchiladas.
To Freeze Baked Enchiladas: If you have leftovers from a baked batch, allow them to cool completely. You can freeze them as a whole dish, or portion them out into individual freezer-safe containers for quick lunches. Cover tightly with plastic wrap and foil for the dish, or just seal the individual containers. They will last for up to 2-3 months. To reheat, thaw overnight in the refrigerator if possible, then reheat as described above for refrigerated leftovers. If reheating from frozen, it’s best to use the oven method for the entire dish to ensure even heating, which will take longer, around 45-60 minutes covered.
Whether fresh or frozen, these Green Chile Chicken Enchiladas are always a comforting and satisfying meal!
Final Thoughts
There you have it! We’ve journeyed through the steps, and I truly hope you’re as excited as I am about the result. These Green Chile Chicken Enchiladas are more than just a meal; they’re a warm, comforting hug in a dish. The tender, seasoned chicken perfectly complements the vibrant, tangy kick of the green chiles, all wrapped in soft tortillas and smothered in gooey, melted cheese. It’s a symphony of flavors that manages to be both deeply satisfying and incredibly fresh.
I promise you, making these Green Chile Chicken Enchiladas will bring a burst of authentic, homemade goodness to your table. Whether you’re sharing them with loved ones or enjoying a quiet moment of culinary bliss, this recipe is destined to become a beloved favorite. So go ahead, savor every bite, and let the magic of those green chiles transport you straight to comfort food heaven. I can’t wait for you to experience them!

Delicious Green Chile Chicken Enchiladas – Must Try!
- Total Time: 1 hour
- Yield: 4 servings 1x
Description
These Green Chile Chicken Enchiladas are a comforting dish filled with tender shredded chicken and a vibrant green chile sauce. Topped with gooey cheese and baked to perfection, they are a must-try for any comfort food lover!
Ingredients
- 1 store-bought rotisserie chicken (or boneless, skinless chicken breasts or thighs)
- Roasted Hatch green chiles (or canned diced green chiles)
- Corn tortillas (or flour tortillas)
- Monterey Jack cheese
- Oaxaca cheese (if available)
- Sharp cheddar cheese or Mexican blend cheese
- Green enchilada sauce
- 1 yellow onion
- 3 cloves garlic
- 1 tablespoon olive oil
- 1/2 cup green enchilada sauce (for filling)
- Ground cumin
- Dried oregano
- Salt
- Freshly ground black pepper
- Smoked paprika (optional)
- Vegetable oil (for frying tortillas, if using the quick fry method)
Instructions
- Preheat your oven to 375°F (190°C).
- Lightly grease a 9×13-inch baking dish.
- If using a rotisserie chicken, shred all the meat and set aside. If cooking your own chicken, make sure it’s shredded.
- Finely dice your onion and mince your garlic.
- If using fresh green chiles, roast, peel, and chop them. If using canned, drain them (reserving a tiny bit of liquid if desired for the filling).
- Grate all your cheese and divide it: about two-thirds for the filling and topping, and one-third for the final sprinkle.
- In a large skillet or pot, heat a tablespoon of olive oil over medium heat. Add the diced onion and cook until softened and translucent, about 5-7 minutes.
- Stir in the minced garlic and cook for another minute until fragrant.
- Add the shredded chicken to the skillet. Stir in the chopped green chiles, ground cumin, dried oregano, salt, and black pepper. Mix well to combine everything.
- Pour in about 1/2 cup of the green enchilada sauce into the chicken mixture. Cook for a few minutes, allowing the liquid to be absorbed and the flavors to meld.
- Remove the skillet from the heat and stir in about two-thirds of the grated cheese into the chicken mixture.
- To soften the tortillas, heat a thin layer of vegetable oil in a small skillet over medium heat. Quickly dip each corn tortilla for 10-15 seconds per side, or alternatively, dip them into warm enchilada sauce.
- Pour about 1/2 cup of green enchilada sauce into the bottom of your prepared baking dish.
- Take one softened tortilla and place a generous spoonful of the chicken and cheese filling in a line down the center.
- Roll the tortilla up tightly and place it seam-side down in the prepared baking dish.
- Repeat this process with the remaining tortillas and filling, arranging them snugly in the baking dish.
- Once all the enchiladas are rolled and in the dish, pour the remaining green enchilada sauce evenly over the top.
- Sprinkle the remaining one-third of the grated cheese over the sauced enchiladas.
- Cover the baking dish loosely with aluminum foil.
- Bake for 20 minutes with the foil on. Then, remove the foil and bake for another 10-15 minutes, or until the cheese is melted, bubbly, and slightly golden.
- Carefully remove the enchiladas from the oven and let them rest for 5-10 minutes before serving.
- Prep Time: 30 mins
- Cook Time: 30 mins
- Category: Dinner
- Method: Baking
- Cuisine: Mexican
Nutrition
- Serving Size: 1 enchilada
- Calories: 350
- Sugar: 2 g
- Sodium: 800 mg
- Fat: 18 g
- Saturated Fat: 9 g
- Unsaturated Fat: 7 g
- Trans Fat: 0 g
- Carbohydrates: 30 g
- Fiber: 3 g
- Protein: 20 g
- Cholesterol: 60 mg
Keywords: For the best flavor, use freshly roasted green chiles if possible. Ensure to soften the tortillas to prevent tearing when rolling. Customize the heat level of the dish by choosing mild or hot green chiles.
Leave a Comment