

One of my favorite memories is a cozy Friday night spent at home, the aroma of baked chicken wafting through the kitchen as I prepped for our taco night. It was a chilly evening, and I could hear the rain tapping gently against the window. I had just come back from the store, bags in hand, excited to experiment with a twist on our traditional taco night. As I layered shredded chicken, zesty spices, and gooey cheese into crispy taco shells, I felt a warmth that only home-cooked meals can bring.
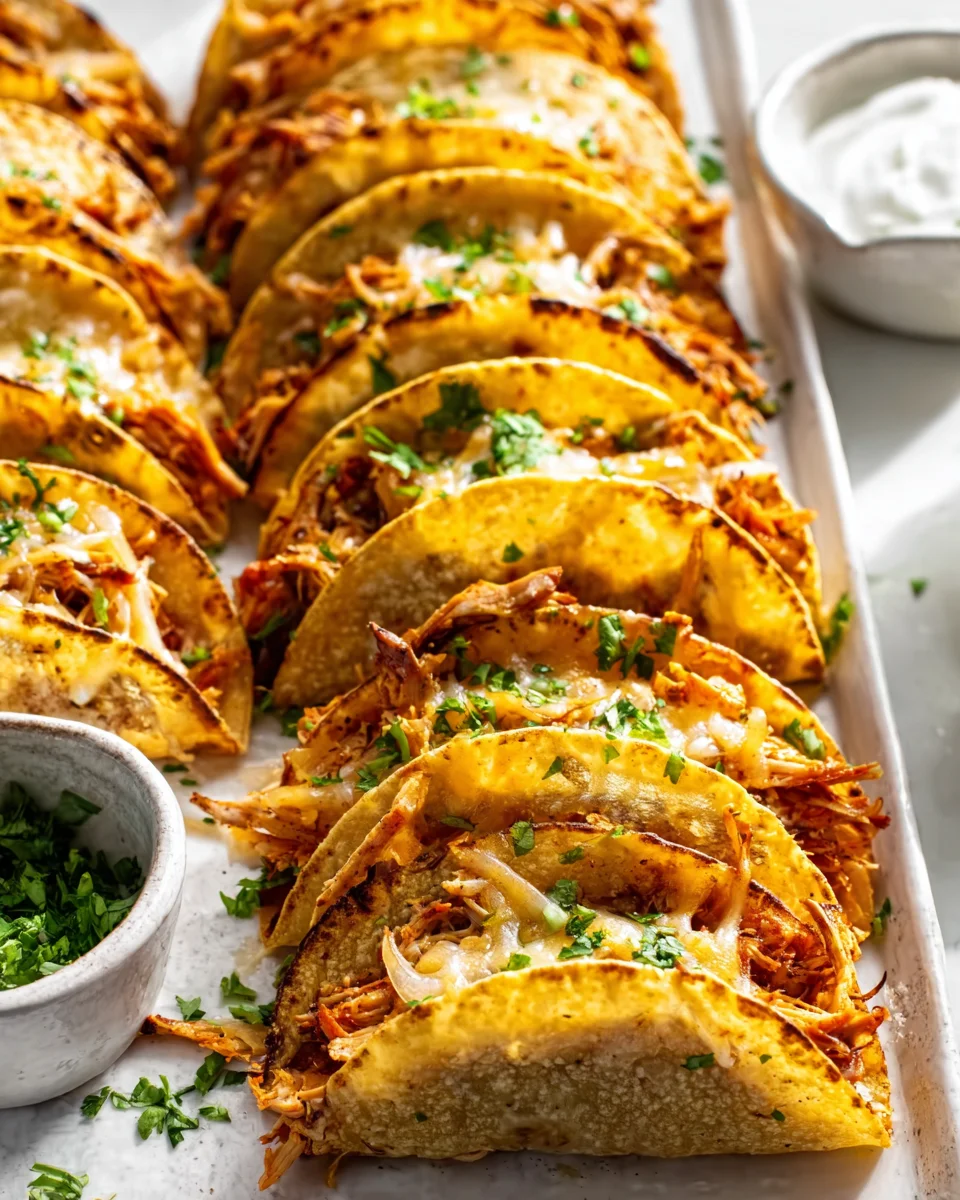
When I pulled those baked chicken tacos out of the oven, the golden-brown shells were bursting with flavor. The melted cheese was bubbling, and the vibrant colors of fresh toppings—crisp lettuce, juicy tomatoes, and a sprinkle of cilantro—made them a feast for the eyes. The first bite was pure bliss: the crunch of the taco shell combined with the tender chicken and a hint of spice danced on my palate. Each taco felt like a warm hug, comforting and satisfying.
This recipe is special to me because it strikes the perfect balance between convenience and flavor. Instead of frying, we bake the tacos, making them a healthier option without sacrificing that delightful crunch. Plus, the customizable toppings mean everyone can build their perfect bite. Let me show you exactly how to make it.

Why You’ll Love This Recipe
- Ready in just 20 minutes, making it a perfect option for busy weeknight dinners.
- Each taco has a delightful crispy texture thanks to the baking method, creating a satisfying crunch with every bite.
- Budget-friendly, using only a handful of ingredients while serving up to 24 tacos, perfect for parties or family gatherings.
- Versatile and customizable — you can easily swap ingredients to suit dietary preferences or use leftovers creatively.
- Minimal cleanup required with only one baking sheet needed, so you can spend more time enjoying your meal!
Ingredients
- 1 lb. cooked shredded seasoned chicken breast (3-4 cups shredded chicken breast see notes for cooking options)
- 8 oz. shredded colby jack cheese
- 20-24 street taco corn tortillas
- olive oil or cooking spray
- sour cream
- salsa
- fresh chopped cilantro
When it comes to making Baked Chicken Tacos, the ingredients you choose can elevate the dish significantly. The cooked shredded seasoned chicken breast is the star of the show, providing both flavor and protein. You can use rotisserie chicken for convenience, but if you’re cooking from scratch, adding your own spices like cumin and paprika can really enhance the taste.
The shredded colby jack cheese adds a creamy, melty texture that perfectly complements the crunchy tortillas. For a different flavor profile, consider mixing in some pepper jack cheese for a spicy kick or using cheddar cheese for a classic taste.
Lastly, the street taco corn tortillas are essential for holding all the goodness together. They are smaller and thicker than regular tortillas, which allows them to hold up well to baking. If you prefer a gluten-free option, look for corn tortillas that are specifically labeled as gluten-free to ensure everyone can enjoy them.
Step-by-Step Instructions
- Preheat your oven to 425°F (220°C). This temperature is key for achieving crispy tacos. While the oven heats, gather all your ingredients.
- Next, prepare your baking sheet by lining it with parchment paper or lightly greasing it with olive oil or cooking spray. This prevents sticking and makes cleanup easier.
- Arrange the street taco corn tortillas on the baking sheet, ensuring they are not overlapping. You may need a second baking sheet if you’re making a large batch.
- Brush or spray both sides of each tortilla with olive oil. This step is crucial for getting that golden, crispy texture. Be generous, but don’t soak them!
- Now, add a heaping tablespoon of the shredded seasoned chicken to the center of each tortilla. Make sure not to overfill them; too much filling can make folding difficult.
- Top each chicken-filled tortilla with a heaping tablespoon of shredded colby jack cheese. The more cheese, the better, but keep in mind that too much can lead to a gooey mess when folding.
- Place the baking sheet in the preheated oven and bake for 2 minutes or until the cheese starts to melt. You’ll know they’re ready when you see the cheese bubbling.
- Carefully remove the baking sheet from the oven. Using a spatula, gently fold each tortilla in half, pressing them together to form a taco shape. Be careful as the cheese can still be very hot.
- Return the folded tacos to the oven and bake for an additional 12-15 minutes. You’re looking for a crispy exterior and a warm filling. Keep an eye on them to prevent burning — the edges should be golden brown.
- Once crispy, remove the tacos from the oven and let them cool for a minute. This helps the cheese set slightly, making them easier to handle.
- Serve warm with your choice of sour cream, salsa, and fresh chopped cilantro. The combination of flavors really brings these tacos to life!
Pro Tips for the Best Baked Chicken Tacos
- Don’t skip the oil! Brushing or spraying the tortillas with olive oil not only helps with crispiness but also adds a rich flavor. A common mistake is neglecting this step, leading to soggy tortillas.
- If you want perfectly shaped tacos, consider using a taco rack. This will help keep the tortillas upright while baking, ensuring they hold their shape and crisp evenly.
- For the best flavor, use seasoned chicken. You can easily customize your seasoning, but a blend of taco seasoning and a splash of lime juice can make a world of difference.
- Be mindful of your cheese-to-chicken ratio. Too much cheese can cause the tacos to be overly gooey and hard to fold, while too little can make them dry. A good rule of thumb is one tablespoon of each per taco.
- Experiment with toppings! Fresh toppings not only add color but also enhance the flavor. Consider adding diced tomatoes or sliced jalapeños for an extra punch.
Variations & Serving Ideas
For a fun twist on your Baked Chicken Tacos, try these variations:
- BBQ Chicken Tacos: Substitute the seasoned chicken with shredded BBQ chicken for a smoky flavor.
- Vegetarian Tacos: Use black beans, corn, and diced bell peppers instead of chicken for a hearty meat-free option.
- Spicy Tacos: Add sliced jalapeños or use spicy cheese to kick up the heat.
- Breakfast Tacos: Swap the chicken for scrambled eggs and add diced avocado and salsa for a delicious breakfast variation.
Pair your Baked Chicken Tacos with these sides for a complete meal:
- Mexican Rice: Fluffy rice seasoned with cumin and lime complements the flavors of the tacos beautifully.
- Guacamole: Creamy avocado dip adds richness and a fresh taste that contrasts nicely with the crispy tacos.
- Refried Beans: A classic Mexican side that provides extra protein and fiber, making your meal heartier.
Storage, Make-Ahead & Reheating
To store your Baked Chicken Tacos, place them in an airtight container in the refrigerator for up to 3 days. They can also be frozen for up to 2 months; just wrap each taco tightly in plastic wrap and place them in a freezer-safe bag.
When reheating, the best method is to place them on a baking sheet in a 350°F (175°C) oven for about 10-15 minutes. This will help restore their crispy texture. Interestingly, these tacos often taste even better the next day, as the flavors have time to meld together, creating a more robust taste profile.
Frequently Asked Questions
Can I make Baked Chicken Tacos ahead of time?
Yes — in fact, they taste even better when made ahead! Prepare the tacos, then store them in the refrigerator and bake them just before serving to retain their crispiness.
What can I use instead of chicken?
You can substitute the chicken with shredded beef, turkey, or even a mix of black beans and corn for a vegetarian option. Each choice provides a different flavor profile while keeping the dish satisfying.
How do I prevent the tortillas from breaking?
To prevent breakage, ensure you warm the tortillas slightly before filling them. This makes them more pliable. Additionally, avoid overfilling them, as too much stuffing can cause them to tear.
Can I freeze Baked Chicken Tacos?
Yes, you can freeze them! Wrap each taco tightly in plastic wrap and then in aluminum foil before placing them in a freezer bag. They will keep well for up to 2 months.
What toppings do you recommend for Baked Chicken Tacos?
Popular toppings include sour cream, salsa, fresh cilantro, diced tomatoes, and avocado. These add flavor, creaminess, and freshness, enhancing the overall taco experience.
Final Thoughts
These Baked Chicken Tacos are truly a delightful treat, combining tender, flavorful chicken with the satisfying crunch of baked tortillas. The blend of spices and toppings creates a comforting meal that’s perfect for any night of the week.
This is the kind of recipe I come back to again and again, especially when I want something quick yet wholesome for my family. They’re not just delicious; they’re also a fun way to get everyone involved in the kitchen. I encourage you to give them a try! Don’t hesitate to share your own variations or let me know how they turned out for you. Enjoy the deliciousness!

Crispy Baked Chicken Tacos Delight
- Total Time: 25 minutes
- Yield: 24 tacos 1x
Description
These Crispy Baked Chicken Tacos are a delightful twist on traditional tacos, featuring tender shredded chicken and gooey cheese in a crispy shell. Perfect for busy weeknight dinners, they are customizable and budget-friendly.
Ingredients
- 1 lb. cooked shredded seasoned chicken breast (3–4 cups shredded chicken breast)
- 8 oz. shredded colby jack cheese
- 20–24 street taco corn tortillas
- olive oil or cooking spray
- sour cream
- salsa
- fresh chopped cilantro
Instructions
- Preheat your oven to 425°F (220°C). This temperature is key for achieving crispy tacos. While the oven heats, gather all your ingredients.
- Next, prepare your baking sheet by lining it with parchment paper or lightly greasing it with olive oil or cooking spray. This prevents sticking and makes cleanup easier.
- Arrange the street taco corn tortillas on the baking sheet, ensuring they are not overlapping. You may need a second baking sheet if you're making a large batch.
- Brush or spray both sides of each tortilla with olive oil. This step is crucial for getting that golden, crispy texture. Be generous, but don’t soak them!
- Now, add a heaping tablespoon of the shredded seasoned chicken to the center of each tortilla. Make sure not to overfill them; too much filling can make folding difficult.
- Top each chicken-filled tortilla with a heaping tablespoon of shredded colby jack cheese. The more cheese, the better, but keep in mind that too much can lead to a gooey mess when folding.
- Place the baking sheet in the preheated oven and bake for 2 minutes or until the cheese starts to melt. You’ll know they’re ready when you see the cheese bubbling.
- Carefully remove the baking sheet from the oven. Using a spatula, gently fold each tortilla in half, pressing them together to form a taco shape. Be careful as the cheese can still be very hot.
- Return the folded tacos to the oven and bake for an additional 12-15 minutes. You’re looking for a crispy exterior and a warm filling. Keep an eye on them to prevent burning — the edges should be golden brown.
- Once crispy, remove the tacos from the oven and let them cool for a minute. This helps the cheese set slightly, making them easier to handle.
- Serve warm with your choice of sour cream, salsa, and fresh chopped cilantro. The combination of flavors really brings these tacos to life!
- Prep Time: 10 mins
- Cook Time: 15 mins
- Category: Dinner
- Method: Baking
- Cuisine: Mexican
Nutrition
- Serving Size: 1 taco
- Calories: 150
- Sugar: 1 g
- Sodium: 300 mg
- Fat: 7 g
- Saturated Fat: 3 g
- Unsaturated Fat: 4 g
- Trans Fat: 0 g
- Carbohydrates: 15 g
- Fiber: 1 g
- Protein: 10 g
- Cholesterol: 30 mg
Keywords: Don’t skip the oil! Brushing or spraying the tortillas with olive oil not only helps with crispiness but also adds a rich flavor. A common mistake is neglecting this step, leading to soggy tortillas.


Leave a Comment