

Air Fried Apple Wedges are a delightful twist on a classic snack that brings together the natural sweetness of apples with a crispy, golden exterior. As someone who has always cherished the comforting taste of baked apples, discovering the air fryer has transformed my approach to this beloved treat. The air fryer not only reduces the cooking time but also enhances the flavor, making it a healthier alternative without sacrificing taste.
Historically, apples have been a staple in many cultures, symbolizing health and prosperity. From the ancient Greeks to modern-day kitchens, they have been celebrated in various forms, and air fried apple wedges are a contemporary take that pays homage to this fruit’s rich legacy. People love this dish for its perfect balance of sweetness and crunch, making it an ideal snack for both kids and adults. Plus, the convenience of preparing air fried apple wedges means you can whip them up in no time, satisfying your cravings without the guilt. Join me in exploring this simple yet delicious recipe that is sure to become a favorite in your home!

Ingredients:
- 4 medium-sized apples (I prefer Granny Smith or Honeycrisp for their tartness)
- 2 tablespoons of brown sugar
- 1 teaspoon of cinnamon
- 1 tablespoon of lemon juice
- 1 tablespoon of melted butter (or coconut oil for a dairy-free option)
- 1/4 teaspoon of nutmeg (optional)
- Pinch of salt
- Cooking spray or additional oil for greasing the air fryer basket
Preparing the Apples
First things first, let’s get our apples ready. I love the crunch and flavor of fresh apples, and they are the star of this dish!
- Start by washing the apples thoroughly under running water to remove any wax or pesticides.
- Once they are clean, dry them with a kitchen towel.
- Next, core the apples using an apple corer or a knife. If you don’t have an apple corer, you can cut the apples into quarters and remove the seeds manually.
- After coring, slice each apple into wedges. Aim for about 8 wedges per apple, but you can adjust based on your preference for thickness. I like mine about 1/2 inch thick for a nice balance of crispiness and tenderness.
Flavoring the Wedges
Now that we have our apple wedges, it’s time to add some delicious flavor!
- In a large mixing bowl, combine the brown sugar, cinnamon, nutmeg (if using), and a pinch of salt. This mixture will give the apples a warm, sweet flavor.
- Drizzle the lemon juice over the apple wedges. This not only adds flavor but also helps prevent the apples from browning.
- Pour the melted butter over the apple wedges as well. This will help the sugar and spices stick to the apples and create a lovely caramelization.
- Now, sprinkle the sugar and spice mixture over the apple wedges. Using your hands or a spatula, gently toss the wedges until they are evenly coated with the mixture. Make sure every wedge gets a good amount of flavor!
Preparing the Air Fryer
While the apple wedges are soaking up all that deliciousness, let’s prepare the air fryer.
- Preheat your air fryer to 350°F (175°C). This usually takes about 3-5 minutes, depending on your model.
- While it’s preheating, lightly spray the air fryer basket with cooking spray or brush it with a little oil to prevent sticking.
Cooking the Apple Wedges
Now comes the exciting part—cooking the apple wedges!
- Once the air fryer is preheated, carefully place the apple wedges in the basket. Make sure to arrange them in a single layer for even cooking. If you have a lot of wedges, you may need to cook them in batches.
- Set the timer for 10 minutes. Halfway through the cooking time, around the 5-minute mark, pause the air fryer and shake the basket gently to ensure even cooking.
- After 10 minutes, check the apple wedges. They should be tender and slightly caramelized. If you prefer them a bit more crispy, you can add an additional 2-3 minutes, but keep an eye on them to prevent burning.
Assembling and Serving
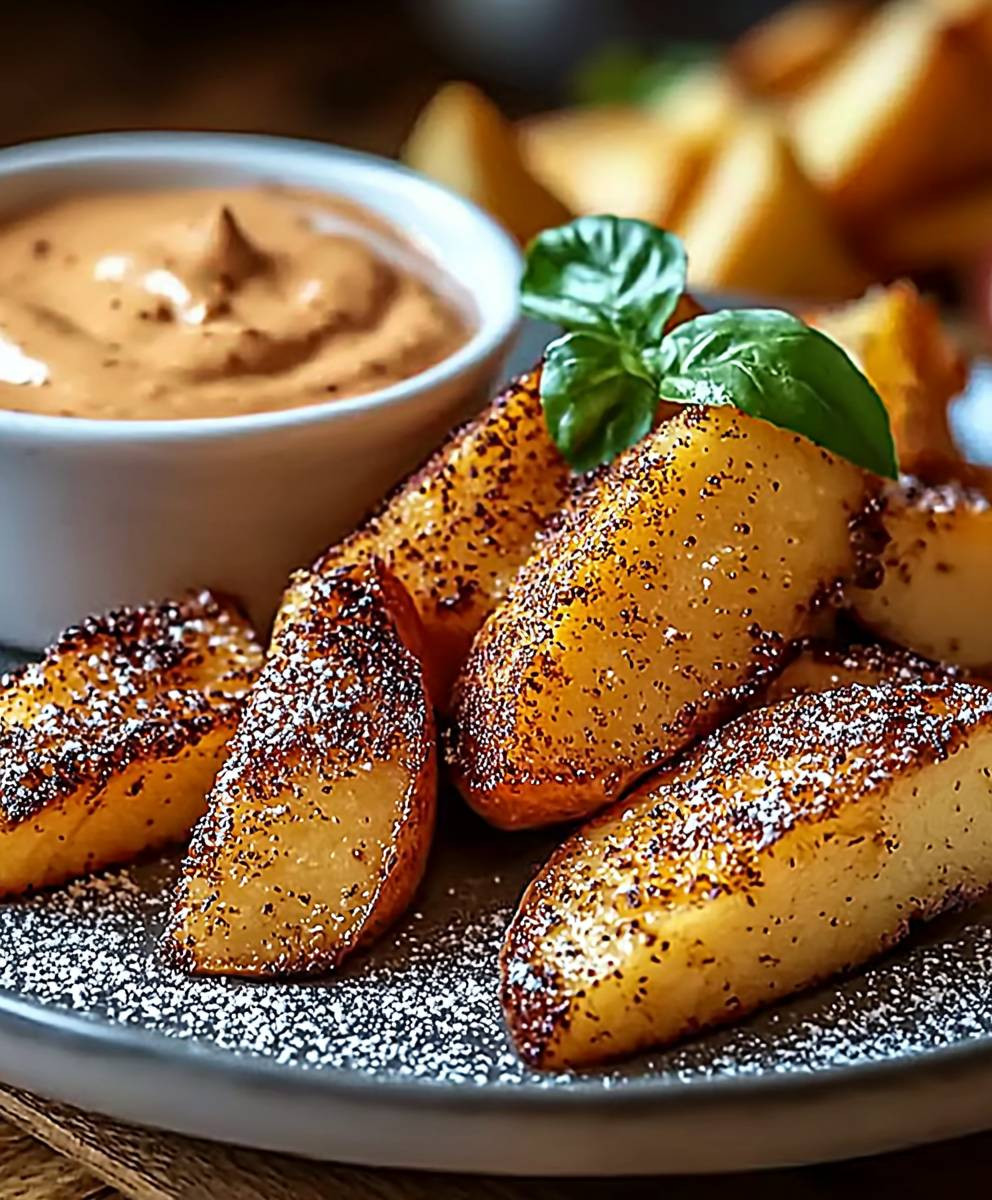
Once the apple wedges are perfectly cooked, it’s time to serve them up!
- Carefully remove the apple wedges from the air fryer using tongs or a spatula. They will be hot, so be cautious!
- Transfer the wedges to a serving platter. You can sprinkle a little extra cinnamon or brown sugar on top if you like.
- These air-fried apple wedges are delicious on their own, but you can also serve them with a scoop of vanilla ice cream, a dollop of whipped cream, or even a drizzle of caramel sauce for an extra treat.
- Enjoy your warm, crispy apple wedges! They make a fantastic snack, dessert, or even a side dish for your meals.
- Total Time: 20-23 minutes
- Yield: 4 servings (approximately 32 apple wedges) 1x
- 4 medium-sized apples (preferably Granny Smith or Honeycrisp)
- 2 tablespoons of brown sugar
- 1 teaspoon of cinnamon
- 1 tablespoon of lemon juice
- 1 tablespoon of melted butter (or coconut oil for a dairy-free option)
- 1/4 teaspoon of nutmeg (optional)
- Pinch of salt
- Cooking spray or additional oil for greasing the air fryer basket
- Wash the apples thoroughly under running water to remove any wax or pesticides.
- Dry the apples with a kitchen towel.
- Core the apples using an apple corer or a knife. Alternatively, cut the apples into quarters and remove the seeds manually.
- Slice each apple into wedges, aiming for about 8 wedges per apple, approximately 1/2 inch thick.
- In a large mixing bowl, combine the brown sugar, cinnamon, nutmeg (if using), and a pinch of salt.
- Drizzle the lemon juice over the apple wedges to add flavor and prevent browning.
- Pour the melted butter over the apple wedges to help the sugar and spices stick.
- Sprinkle the sugar and spice mixture over the apple wedges and gently toss until evenly coated.
- Preheat your air fryer to 350°F (175°C) for about 3-5 minutes.
- Lightly spray the air fryer basket with cooking spray or brush it with oil to prevent sticking.
- Place the apple wedges in the preheated air fryer basket in a single layer. Cook in batches if necessary.
- Set the timer for 10 minutes. At the 5-minute mark, pause the air fryer and shake the basket gently for even cooking.
- After 10 minutes, check the apple wedges. If you prefer them crispier, add an additional 2-3 minutes, watching closely to prevent burning.
- Carefully remove the apple wedges from the air fryer using tongs or a spatula.
- Transfer the wedges to a serving platter and sprinkle with extra cinnamon or brown sugar if desired.
- Serve warm, either on their own or with vanilla ice cream, whipped cream, or caramel sauce for an extra treat.
- For a dairy-free option, substitute melted butter with coconut oil.
- Feel free to adjust the sweetness by adding more or less brown sugar according to your taste.
- Prep Time: 10 minutes
- Cook Time: 10-13 minutes
Conclusion:
In summary, these Air Fried Apple Wedges are an absolute must-try for anyone looking to enjoy a delicious and healthier snack option. The combination of sweet, tender apples with a crispy exterior makes for a delightful treat that can be enjoyed at any time of the day. Whether you’re serving them as a side dish for a family dinner, a fun snack for the kids, or even as a topping for your morning oatmeal or yogurt, these apple wedges are incredibly versatile. Feel free to get creative with your serving suggestions! You can sprinkle them with cinnamon for an extra flavor boost, drizzle some honey or maple syrup for added sweetness, or even pair them with a scoop of vanilla ice cream for a delightful dessert. If you’re feeling adventurous, try using different types of apples to see which variety you prefer, or add a dash of nutmeg or ginger for a unique twist. I encourage you to give this recipe a try and experience the joy of making your own Air Fried Apple Wedges. Once you do, I would love to hear about your experience! Share your thoughts, any variations you tried, or even a photo of your delicious creation. Let’s spread the love for this simple yet satisfying recipe together! Happy cooking! Print
Air Fried Apple Wedges: A Healthy and Delicious Snack Recipe
Description
Enjoy the crispy, warm delight of air-fried apple wedges seasoned with cinnamon and brown sugar. This simple recipe transforms fresh apples into a tasty snack or dessert, perfect for any occasion.


Leave a Comment