

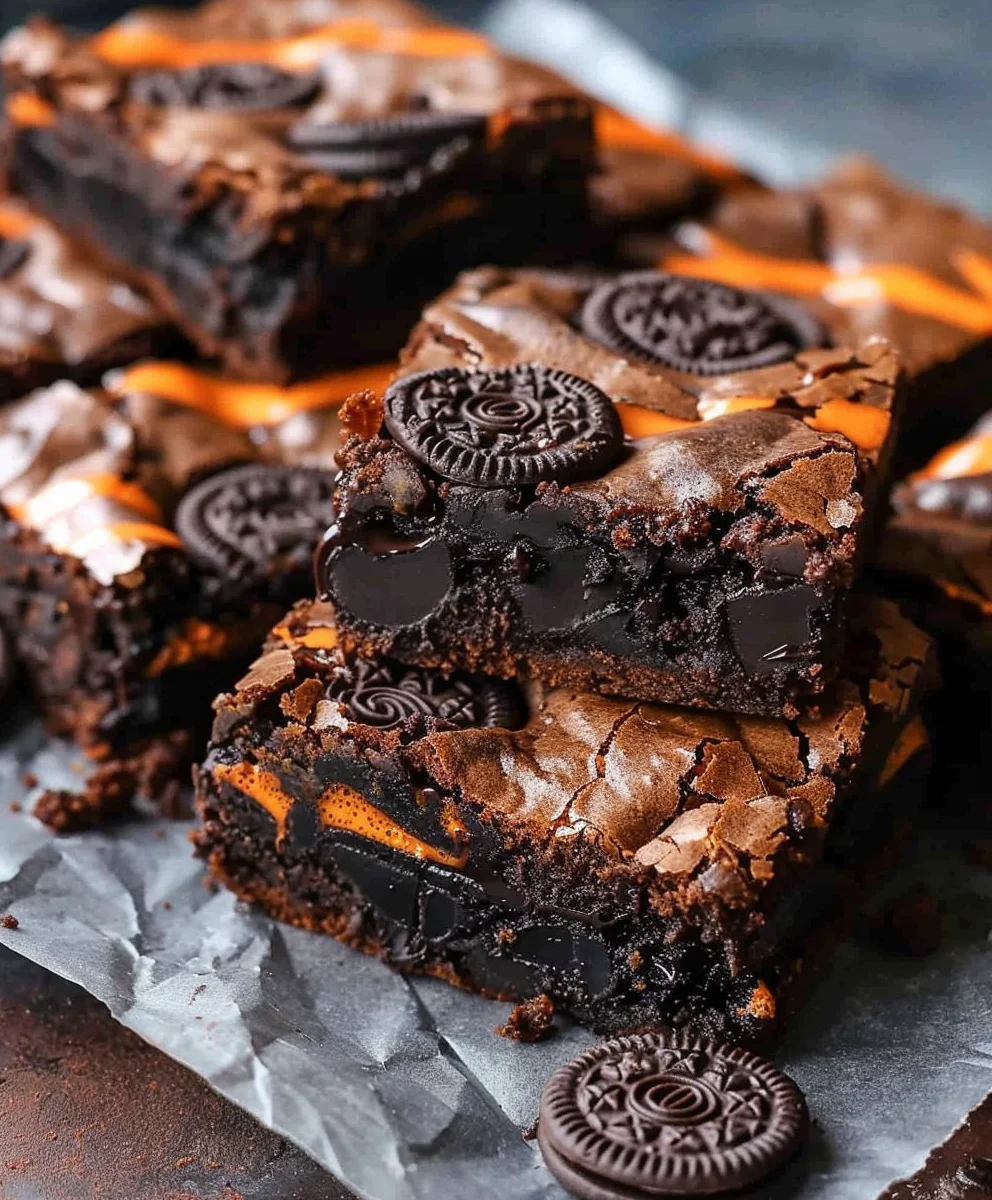
Halloween Oreo Brownies are more than just a dessert; I truly believe they are an essential part of the spooky season’s enchantment. Imagine sinking your teeth into a rich, fudgy brownie, only to discover pockets of creamy Oreo filling and delightful cookie crunch with every single bite. It is a truly magical experience that brings together two beloved treats into one irresistible package, perfectly suited for the most haunted night of the year.
Historically, Halloween has always been a time for gathering, storytelling, and, crucially, sharing delicious food. While the tradition of trick-or-treating for candy is well-established, homemade treats hold a special place in our hearts, adding a personal touch to the festivities. Brownies themselves boast a rich American heritage, celebrated for their deep chocolate flavor and comforting texture. When paired with the iconic Oreo cookie, a staple in snack history, they transcend mere dessert status, becoming a festive staple for autumn celebrations. I find that people adore this dish because it masterfully blends the intense chocolate satisfaction of a perfectly fudgy brownie with the beloved crunch and sweet creaminess of an Oreo. The contrasting textures and complementary flavors create an explosion of delight on the palate, making these Halloween Oreo Brownies an instant crowd-pleaser. They are incredibly easy to customize with spooky decorations, making them not only a treat for the taste buds but also a feast for the eyes at any Halloween party or cozy night in.

Ingredients:
- For the Fudgy Oreo Brownie Base:
- 1 cup (2 sticks or 226g) unsalted butter, melted
- 2 cups (400g) granulated sugar
- 4 large eggs, at room temperature
- 1 teaspoon vanilla extract (the good stuff, it makes a difference!)
- 1 cup (100g) unsweetened cocoa powder, Dutch-processed for a darker, richer brownie
- 1 cup (125g) all-purpose flour
- ½ teaspoon baking powder
- ½ teaspoon salt
- 1 ½ cups (about 18-20 cookies) Oreo cookies, roughly chopped into ½ to ¾-inch pieces
- For the Spooky Halloween Frosting and Decoration:
- 1 cup (2 sticks or 226g) unsalted butter, softened to room temperature
- 4 cups (480g) powdered sugar (confectioners’ sugar), sifted to remove lumps
- ½ teaspoon vanilla extract
- ¼ cup (60ml) heavy cream or milk, adjust as needed for consistency
- Pinch of salt
- Gel food coloring: orange, black, green (or colors of your choice for a festive Halloween theme)
- 12-15 whole Oreo cookies (for topping)
- Various Halloween sprinkles, candy eyes, mini chocolate chips, or other spooky candies for decoration
Preparing the Fudgy Oreo Brownie Batter
Alright, let’s get started on these incredible Halloween Oreo Brownies! This first phase is all about creating that rich, fudgy brownie base that everyone adores. Trust me, the aroma alone will start getting you into the Halloween spirit!
- First things first, let’s get our oven ready. Preheat your oven to 350°F (175°C). You’ll also want to prepare a 9×13 inch baking pan. Line it with parchment paper, leaving an overhang on the sides – this will be your secret weapon for easily lifting the cooled brownies out of the pan. Give it a light spray with non-stick cooking spray for good measure.
- In a large, microwave-safe bowl or a saucepan over low heat, melt your 1 cup (2 sticks) of unsalted butter. Once it’s completely melted, remove it from the heat and stir in the 2 cups of granulated sugar. Whisk these two together until they are well combined and smooth. The sugar might not dissolve completely, and that’s perfectly fine at this stage.
- Now, we’re going to add our eggs. Add the 4 large eggs, one at a time, whisking vigorously after each addition until fully incorporated. This is a crucial step for achieving that signature fudgy texture, so don’t rush it! Keep whisking for about 1-2 minutes after the last egg is added. The mixture should become lightened in color and slightly thickened. This process helps to aerate the batter and create a crackly top on your brownies.
- Stir in the 1 teaspoon of vanilla extract. Oh, that wonderful scent! It adds such a depth of flavor to our chocolatey base.
- In a separate medium bowl, whisk together your dry ingredients: the 1 cup of unsweetened cocoa powder, 1 cup of all-purpose flour, ½ teaspoon of baking powder, and ½ teaspoon of salt. Make sure there are no lumps in the cocoa powder, as this can affect the final texture.
- Gradually add the dry ingredient mixture to the wet butter-sugar-egg mixture. Mix on low speed with an electric mixer or by hand with a spatula until just combined. Be careful not to overmix! Overmixing develops the gluten in the flour, leading to a tougher, cake-like brownie, and we are definitely aiming for fudgy perfection for our Halloween Oreo Brownies. Stop mixing as soon as you no longer see streaks of dry flour.
- Finally, it’s time for the stars of the show (besides the brownies themselves!): the Oreos! Gently fold in the 1 ½ cups of roughly chopped Oreo cookies into the brownie batter. Distribute them evenly throughout. These will provide an amazing crunch and extra chocolatey goodness in every bite.
Baking the Brownies to Perfection
You’ve done the hard part, now let the oven do its magic! Getting the bake right is key to those wonderfully gooey, fudgy brownies. You want them just right – not underbaked and not overbaked. These will form the foundation for our incredible Halloween Oreo Brownies.
- Pour the glorious brownie batter evenly into your prepared 9×13 inch baking pan. Use a spatula to spread it smoothly into all corners. You want an even thickness across the pan for uniform baking.
- Place the pan into your preheated 350°F (175°C) oven. Now, the baking time can vary depending on your oven, so keep an eye on them. Bake for approximately 25-30 minutes.
- How do you know when they’re done? This is where a little careful observation comes in handy. You want the edges to look set, and a toothpick inserted into the center should come out with moist crumbs, but not wet batter. If it comes out completely clean, your brownies might be on the drier, more cake-like side, which is still tasty but not the ultimate fudgy experience we’re going for. A little fudginess in the center is what gives these Halloween Oreo Brownies their incredible texture.
- Once baked to perfection, carefully remove the pan from the oven. This part requires patience, but it’s essential! Allow the brownies to cool completely in the pan on a wire rack for at least 1 to 2 hours. Resist the urge to cut into them while they’re warm, as they will be too gooey and won’t hold their shape properly. Cooling them fully allows them to set up and become perfectly dense and fudgy.
- Once fully cooled, use the parchment paper overhang to carefully lift the entire slab of brownies out of the pan and transfer it to a cutting board or another wire rack. At this point, you can even pop them in the fridge for about 30 minutes to an hour if you’re in a hurry to get them extra firm for frosting.
Preparing the Spooky Halloween Frosting and Decorations
This is where we really bring the “Halloween” to our Halloween Oreo Brownies! We’ll make a delightful buttercream frosting and get creative with some spooky decorations. This part is super fun, especially if you have little helpers!
- While your brownies are cooling, let’s make some luscious buttercream frosting. In a large mixing bowl, using an electric mixer (either a stand mixer with a paddle attachment or a hand mixer), beat the 1 cup of softened unsalted butter on medium-high speed for about 2-3 minutes until it’s light and fluffy. This step is important for getting a smooth, airy frosting.
- Gradually add the 4 cups of sifted powdered sugar to the butter, a cup at a time, beating well after each addition. Start on low speed to avoid a cloud of sugar dust, then increase to medium. Once all the sugar is incorporated, the mixture will be quite thick and crumbly.
- Now, add the ½ teaspoon of vanilla extract, the pinch of salt, and about half of the ¼ cup of heavy cream or milk. Beat on medium-high speed for another 3-5 minutes, adding more cream/milk a tablespoon at a time until you reach your desired frosting consistency. You want it smooth, spreadable, and light, but not too thin.
- Once your frosting is perfect, divide it into separate bowls based on how many colors you want to use for your Halloween theme. I usually go for orange, black, and maybe a vibrant green. Use gel food coloring for the best, most intense colors without thinning your frosting too much. Mix each color thoroughly until you achieve your desired spooky shade.
- Now for the individual Oreo decorations! This is a fantastic step for adding a personalized touch to your Halloween Oreo Brownies.
- Mummy Oreos: Take a whole Oreo cookie. Melt a small amount of white chocolate (or use a bit of your white frosting) and use it to attach two candy eyes to the top of each cookie. Once the eyes are secure, transfer a portion of your white (or orange) frosting into a piping bag fitted with a small round tip or a ziploc bag with the corner snipped off. Pipe thin lines back and forth across the cookie, leaving gaps for the eyes, to create a “mummy wrap” effect.
- Spiderweb Oreos: You’ll need black frosting for the base and a contrasting color (like white or orange) for the web. Frost a whole Oreo cookie smoothly with black frosting. While the black frosting is still wet, pipe concentric circles of white or orange frosting on top. Then, drag a toothpick from the center of the cookie outwards through the circles to create a spiderweb design.
- Monster Oreos: Use green or orange frosting to spread on a whole Oreo. Attach candy eyes, and use mini chocolate chips or a tiny bit of black frosting to create a mouth or other monster features. Get creative!
Set your decorated Oreos aside on a plate lined with parchment paper to slightly set, or pop them in the fridge for 10-15 minutes if you want them to firm up quicker.
Assembling and Decorating Your Ultimate Halloween Oreo Brownies
We’re in the home stretch! This is where all your hard work comes together to create a show-stopping treat that’s perfect for any Halloween gathering. Get ready to impress with these spectacular Halloween Oreo Brownies!
- Ensure your cooled brownie slab is on a flat surface, like a cutting board. Take your main batch of colored frosting (perhaps orange or black for a base layer) and spread it evenly over the entire surface of the cooled brownies. Use an offset spatula or the back of a spoon to create a smooth or artfully swirled finish. Don’t be shy; a good layer of frosting makes these brownies extra indulgent.
- Once the base frosting layer is applied, it’s time to arrange your beautifully decorated Halloween Oreo cookies. Carefully place them on top of the frosted brownies. You can arrange them in neat rows, a playful scattered pattern, or even design a spooky scene. I usually place them somewhat symmetrically so each slice of brownie gets a delightful topping.
- Now, for the final flourish! Sprinkle additional Halloween sprinkles, candy corn, mini pumpkin candies, or any other festive decorations you have around the edges or in between the Oreo cookies. This adds extra color, texture, and a truly festive touch to your Halloween Oreo Brownies. This is your chance to make them uniquely yours and extra spooky!
- If you wish, you can use any leftover colored frosting in a piping bag to add small piped details, borders, or even write “Happy Halloween!” on your brownies. This is completely optional but can add a professional finish.
- Finally, with all the decorations in place, your magnificent Halloween Oreo Brownies are ready to be served! Use a sharp knife to cut them into squares. For clean cuts, wipe your knife with a warm, damp cloth between each slice. This makes for beautiful, picture-perfect brownie squares. These brownies are perfect for a Halloween party, a school treat, or just a fun family dessert. Store any leftovers in an airtight container at room temperature for up to 3-4 days, or in the refrigerator for up to a week. Enjoy every decadent, spooky bite!
Conclusion:
And there you have it, my dear fellow bakers! We’ve journeyed through the simple yet incredibly rewarding process of creating what I truly believe are some of the most delightful and undeniably addictive treats you’ll ever pull from your oven. These brownies aren’t just another dessert; they are a celebration of rich, fudgy chocolate, perfectly complemented by the iconic crunch and creamy filling of America’s favorite cookie. They are, in every sense of the word, a triumph of texture and taste, guaranteed to bring a smile to anyone’s face. If you’re looking for a dessert that’s easy to make, hard to resist, and impressive to serve, then this recipe is an absolute must-try. The beauty of these brownies lies in their perfect balance – the intense chocolate flavor of the brownie base provides a wonderful counterpoint to the sweetness and distinct crunch of the Oreo layers, creating a truly harmonious bite every single time.
I can confidently say that once you take that first bite, you’ll understand why I’m so enthusiastic about them. The aroma alone, as they bake, is enough to get anyone excited, filling your home with that comforting, nostalgic scent of chocolate goodness. But it’s the eating experience that truly seals the deal: a moist, dense, incredibly fudgy interior, studded with softened Oreo pieces, topped with another layer of perfectly baked cookie. It’s pure bliss, a textural wonderland that delights with every mouthful.
Now, while these brownies are utterly magnificent on their own, don’t hesitate to elevate them further with some serving suggestions and variations. Imagine a warm square of these decadent delights, straight from the oven, topped with a scoop of vanilla bean ice cream that slowly melts into the warm chocolate – pure indulgence! A drizzle of hot fudge or a dollop of freshly whipped cream would also not go amiss. For those cooler evenings, they pair beautifully with a tall glass of cold milk or a steaming mug of coffee or hot chocolate, making for the perfect cozy treat. And for an extra festive touch, especially if you’re making these as Halloween Oreo Brownies, consider adding some themed sprinkles on top just after they come out of the oven, or even a playful spiderweb design using white chocolate drizzle once they’ve cooled. You could also experiment with different Oreo flavors – mint, peanut butter, or even seasonal varieties can add an exciting twist to the classic recipe, offering a whole new flavor profile to explore. Don’t be afraid to get creative and make them truly your own!
For those who love a bit of crunch, why not fold in some chopped nuts, like walnuts or pecans, into the brownie batter? Or perhaps a handful of chocolate chips for an even more intense chocolate experience? You could even make a cream cheese swirl by gently spooning dollops of sweetened cream cheese mixture over the brownie batter before baking and swirling it with a knife for a beautiful marbling effect. These small additions can transform an already incredible dessert into something uniquely yours, catering to specific tastes and preferences. The possibilities for customization are truly endless. And if you’re planning to give these as gifts, wrap individual squares in cellophane bags with a festive ribbon – they make a wonderful homemade present that friends and family are sure to adore, showcasing your baking prowess with a touch of personal flair.
So, what are you waiting for? Dust off your apron, preheat your oven, and embark on this delicious baking adventure. I wholeheartedly encourage you to give this recipe a try. I promise you won’t be disappointed. Once you’ve baked these beauties, I would absolutely love to hear about your experience. Did you add any unique twists? What did your family and friends think? Did they disappear as quickly in your house as they do in mine? Please share your photos and stories with me! Your feedback and creative variations inspire me and fellow bakers in our community. Let’s celebrate the joy of baking together!

Halloween Oreo Brownies
Rich, fudgy brownies with creamy Oreo filling and delightful cookie crunch, perfect for Halloween festivities.
Ingredients
-
2/3 cup butter
-
1/4 cup vegetable oil
-
1 cup granulated sugar
-
1/3 cup brown sugar
-
2/3 cup cocoa powder
-
2 eggs, cold
-
1 tsp vanilla extract
-
1/2 tsp salt
-
1/2 cup all-purpose flour
-
15 Oreos (10-12 chopped for batter, 3-5 whole for topping)
Instructions
-
Step 1
Preheat oven to 350°F (175°C). Line a 9×13 inch baking pan with parchment paper, leaving an overhang for easy lifting. -
Step 2
In a large bowl, melt 2/3 cup butter. Stir in 1/4 cup vegetable oil, 1 cup granulated sugar, and 1/3 cup brown sugar until well combined. Whisk in 2 cold eggs, one at a time, until fully incorporated. Stir in 1 tsp vanilla extract. -
Step 3
In a separate medium bowl, whisk together 2/3 cup unsweetened cocoa powder, 1/2 cup all-purpose flour, and 1/2 tsp salt. -
Step 4
Gradually add the dry ingredient mixture to the wet mixture. Mix until just combined; be careful not to overmix. Gently fold in 10-12 roughly chopped Oreo cookies (from your total 15) into the brownie batter, distributing them evenly. -
Step 5
Pour the glorious brownie batter evenly into your prepared pan. Bake for approximately 25-30 minutes, or until a toothpick inserted into the center comes out with moist crumbs (not wet batter). -
Step 6
Remove from oven and allow the brownies to cool completely in the pan on a wire rack for at least 1.5 hours. Once fully cooled, use the parchment paper overhang to carefully lift the entire slab of brownies out of the pan. -
Step 7
To make frosting, beat 1 cup softened unsalted butter until light and fluffy. Gradually add 4 cups sifted powdered sugar, 1/2 tsp vanilla extract, 1/4 cup heavy cream, and a pinch of salt; beat until smooth and spreadable. Divide and color portions of the frosting with gel food coloring (e.g., orange, black, green) for Halloween theme. -
Step 8
Use the remaining 3-5 whole Oreo cookies. Decorate them into mummy, spiderweb, or monster designs using the colored frosting, candy eyes, and sprinkles as desired. Set aside to firm slightly. -
Step 9
Spread a base layer of colored frosting evenly over the cooled brownies. Arrange your beautifully decorated Halloween Oreo cookies on top. Add extra Halloween sprinkles, candy corn, or other festive decorations for a final touch. -
Step 10
Cut the brownies into squares using a sharp knife (wipe the knife with a warm, damp cloth between cuts for clean slices). Your magnificent Halloween Oreo Brownies are ready to be served! Store leftovers in an airtight container at room temperature for up to 3-4 days, or in the refrigerator for up to a week.
Important Information
Nutrition Facts (Per Serving)
It is important to consider this information as approximate and not to use it as definitive health advice.
Allergy Information
Please check ingredients for potential allergens and consult a health professional if in doubt.


Leave a Comment