

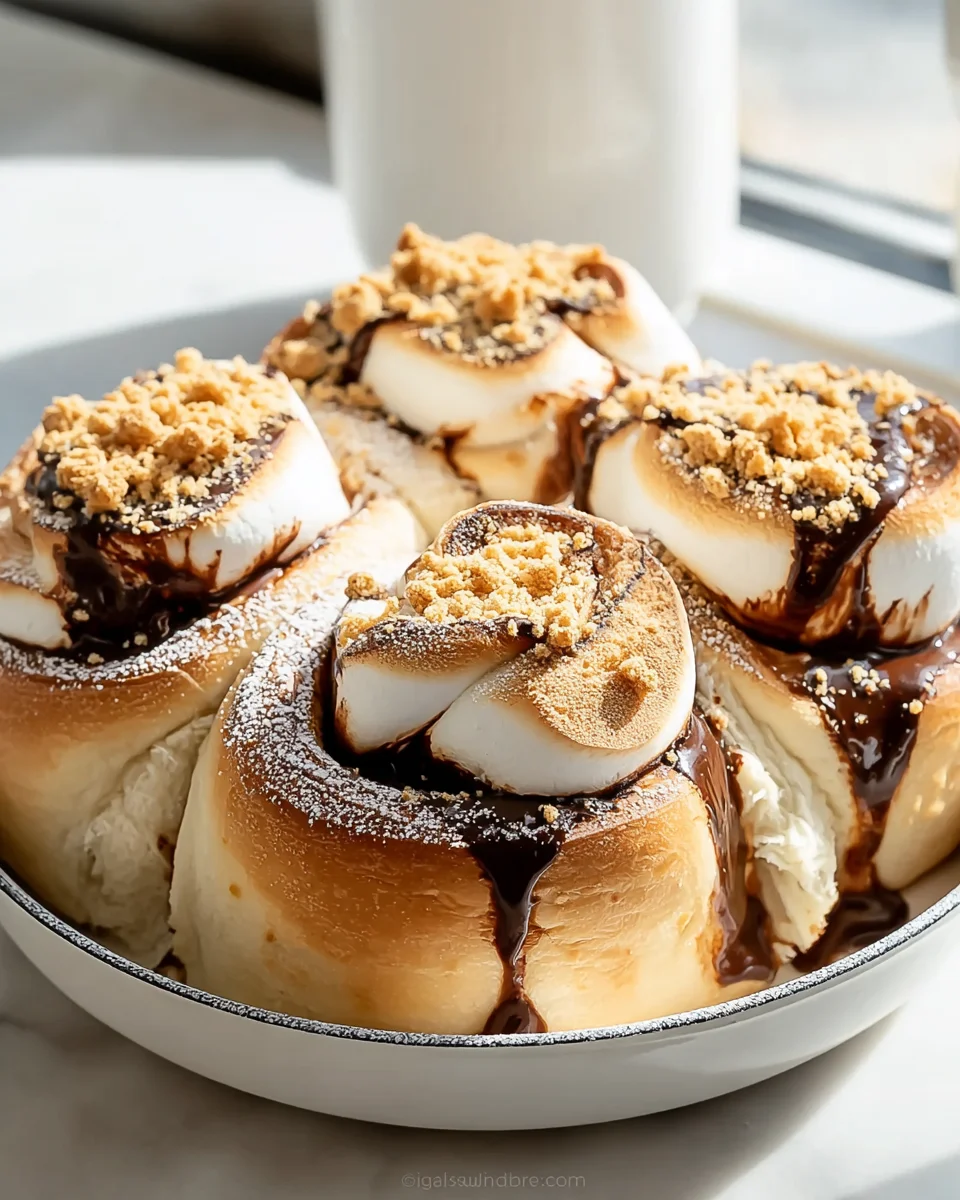
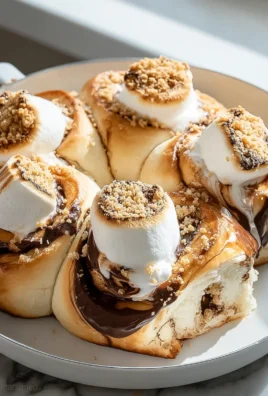
S’mores Rolls are about to revolutionize your dessert game, transforming a beloved campfire classic into an utterly irresistible, convenient, and incredibly fun treat that you can enjoy anytime, anywhere. I am absolutely thrilled to share this delightful recipe with you!
Who doesn’t adore the timeless magic of s’mores? That perfect trifecta of toasted marshmallow, melted chocolate, and crisp graham cracker has been the quintessential taste of summer nights, scouting adventures, and backyard bonfires for generations. While the exact origins are a bit hazy, the first recorded recipe for “some mores” appeared in a 1927 Girl Scout handbook, cementing its place in American culinary history as the ultimate gooey, sweet indulgence. However, I think we can all agree that the traditional method, while charming, can be a tad messy and often requires a fire pit.
That’s precisely where these delightful S’mores Rolls step in!
Why You’ll Fall in Love with S’mores Rolls
I find that people absolutely adore this recipe not just for the incredible nostalgia it evokes, but for its ingenious simplicity and undeniable deliciousness. Imagine sinking your teeth into a warm, golden-brown roll, where the outer pastry gives way to a luxurious torrent of gooey, toasted marshmallow and rich, melted chocolate, all perfectly balanced by the subtle crunch of graham cracker. It’s all the joy of a s’more, neatly contained and utterly mess-free. Whether you’re making them for a cozy family night, a sophisticated dessert for guests, or a quick pick-me-up, these rolls offer all the beloved flavors without the need for a roaring fire. Get ready to experience your favorite campfire treat in a whole new, wonderfully convenient way!

Ingredients:
-
For the Dough:
- 1 cup (240ml) warm whole milk (about 105-115°F / 40-46°C) – The warmth is crucial for activating the yeast, but too hot will kill it!
- 2 ¼ teaspoons active dry yeast (one standard packet)
- ¼ cup (50g) granulated sugar, plus a pinch for the yeast
- 1 large egg, at room temperature – Room temperature eggs incorporate better into dough.
- ½ cup (113g) unsalted butter, melted and slightly cooled
- 1 teaspoon vanilla extract
- 4 cups (480g) all-purpose flour, plus more for dusting
- 1 teaspoon salt
-
For the S’mores Filling:
- ½ cup (113g) unsalted butter, melted
- ¾ cup (150g) light brown sugar, packed – The molasses in brown sugar adds a lovely depth of flavor.
- 1 ½ cups (about 10-12 full sheets) graham cracker crumbs – Crush them finely for the best texture in your S’mores Rolls.
- 1 ½ cups (about 170g) milk chocolate chips or chopped milk chocolate – I prefer chopped good quality chocolate for a better melt.
- 1 ½ cups mini marshmallows – Mini marshmallows melt beautifully inside the rolls.
-
For the Glaze:
- 2 cups (240g) powdered sugar, sifted
- ¼ cup (60ml) whole milk (or heavy cream for a richer glaze)
- 1 teaspoon vanilla extract
Preparing the Dough
- Activate the Yeast: In a large mixing bowl, or the bowl of a stand mixer fitted with a dough hook attachment, combine the warm milk, a pinch of granulated sugar, and the active dry yeast. Give it a gentle stir. Let this mixture sit for 5-10 minutes. You’ll know your yeast is alive and well when it becomes foamy and frothy on top. This is a crucial first step; if it doesn’t foam, your yeast might be old or the milk too hot/cold, and you’ll need to start again. Trust me, it’s worth the wait for perfectly risen S’mores Rolls!
- Add Wet Ingredients: To the foamy yeast mixture, add the remaining ¼ cup granulated sugar, the room temperature egg, the melted and slightly cooled butter, and the vanilla extract. Whisk everything together until it’s well combined. The mixture should look smooth and slightly milky.
- Combine Dry Ingredients: In a separate bowl, whisk together the 4 cups of all-purpose flour and the 1 teaspoon of salt. This ensures the salt is evenly distributed throughout the dough, which is important for flavor and yeast activity.
- Mix the Dough: Gradually add the dry flour mixture to the wet ingredients, about a cup at a time, mixing on low speed with the dough hook (or with a sturdy spoon if mixing by hand). Continue mixing until a shaggy dough forms and all the flour is incorporated. The dough will look a bit sticky at this stage, but don’t worry, that’s perfectly normal.
-
Knead the Dough:
For Stand Mixer:
Increase the mixer speed to medium-low and knead the dough for 7-10 minutes. The dough will become smoother, more elastic, and less sticky, pulling away from the sides of the bowl. It should pass the “windowpane test,” meaning you can stretch a small piece of dough thin enough to see light through it without tearing. This indicates proper gluten development, which gives your S’mores Rolls their wonderful chewy texture.
For Hand Kneading:
Turn the dough out onto a lightly floured surface. Knead the dough vigorously for 10-15 minutes, pushing it away with the heels of your hands, then folding it back over, rotating, and repeating. It’s a bit of a workout, but incredibly satisfying! You’ll feel the dough transform from shaggy and sticky to smooth and elastic. Add just a tiny bit of flour if it’s too sticky, but resist adding too much, as it can make the dough tough.
- First Rise (Bulk Fermentation): Lightly grease a clean large bowl with a little oil or cooking spray. Place the kneaded dough into the bowl, turning it once to coat the top. Cover the bowl tightly with plastic wrap or a clean kitchen towel. Let the dough rise in a warm, draft-free place for 1 to 1 ½ hours, or until it has doubled in size. A good test is to gently press two fingers into the dough; if the indentations remain, it’s ready! I often use my oven with just the light on as a warm spot.
Making the S’mores Filling
- Prepare Graham Cracker Crumbs: If you haven’t already, crush your graham crackers. You can do this by placing them in a large zip-top bag and crushing them with a rolling pin until fine, or by pulsing them in a food processor. Aim for a fine, sand-like consistency, but a few slightly larger pieces add nice texture to your S’mores Rolls.
- Mix the Filling Base: In a medium bowl, combine the melted butter and the packed light brown sugar. Stir until the sugar is fully incorporated and the mixture is smooth. This creates a sticky, sweet base for our S’mores magic.
- Add Graham Crumbs: Stir in the graham cracker crumbs until everything is well combined. This forms the primary part of your S’mores Rolls filling. Set aside the chocolate chips/chopped chocolate and mini marshmallows for later. We want to add these after spreading the butter mixture to ensure they are evenly distributed and don’t get lost in the initial mix.
Assembling the S’mores Rolls
- Prepare Baking Pan: Lightly grease a 9×13-inch baking pan with butter or cooking spray. You can also line it with parchment paper for easier cleanup, leaving an overhang on the sides. This will make lifting the warm S’mores Rolls out a breeze.
- Roll Out the Dough: Once the dough has doubled in size, gently punch it down to release the air. Turn the dough out onto a lightly floured surface. Using a rolling pin, roll the dough into a large rectangle, approximately 18 inches long by 12 inches wide, and about ¼ inch thick. Try to keep the edges as straight as possible, which will make for neat S’mores Rolls.
- Spread the Filling: Evenly spread the brown sugar and graham cracker mixture over the entire surface of the rolled-out dough, leaving about a ½-inch border along one of the long edges clean. This clean edge will help seal the roll.
- Add Chocolate and Marshmallows: Sprinkle the milk chocolate chips (or chopped chocolate) evenly over the graham cracker filling. Then, scatter the mini marshmallows over the chocolate. Don’t be shy here; this is where the S’mores magic truly happens!
- Roll the Dough: Starting from one of the long edges (the one opposite the clean border), carefully and tightly roll the dough into a log. A tight roll is key for well-shaped S’mores Rolls that hold together. Take your time to ensure an even roll.
- Slice the Rolls: Once you have a tight log, it’s time to slice! For perfectly even S’mores Rolls, I highly recommend using a piece of unflavored dental floss. Slide a piece of floss under the log, cross the ends over the top, and pull to cut through the dough. This creates clean, un-smashed slices. If using a sharp knife, use a gentle sawing motion rather than pressing straight down. Aim for 12 even slices, each about 1 ½ inches thick.
- Arrange in Pan: Place the sliced S’mores Rolls cut-side down into your prepared 9×13-inch baking pan. They should fit snugly but not be overly crowded. Leave a little space for them to expand during the second rise and baking.
Baking the S’mores Rolls
- Second Rise (Proofing): Cover the baking pan loosely with plastic wrap or a clean kitchen towel. Let the S’mores Rolls rise in a warm, draft-free place for another 30-45 minutes, or until they look visibly puffy and have nearly doubled in size again. This final rise ensures light and airy rolls. While they’re rising, preheat your oven to 375°F (190°C).
- Bake the Rolls: Once risen, remove the cover and place the pan in the preheated oven. Bake for 20-25 minutes, or until the tops are golden brown, the filling is bubbly, and the rolls are cooked through. You’ll notice the marshmallows get gooey and slightly toasted, and the chocolate will be wonderfully melted. If the tops are browning too quickly, you can loosely tent the pan with aluminum foil for the last 5-10 minutes of baking.
- Cool Slightly: Remove the pan from the oven and let the S’mores Rolls cool in the pan on a wire rack for about 10-15 minutes. This cooling period is important; it allows the filling to set slightly and prevents the rolls from falling apart when you try to lift them out. They’ll still be wonderfully warm for the glaze.
Finishing Touches: The Glaze and Serving
- Make the Glaze: While the S’mores Rolls are cooling, prepare the glaze. In a medium bowl, whisk together the sifted powdered sugar, whole milk (or heavy cream), and vanilla extract until smooth and free of lumps. You want a consistency that’s thick enough to cling to the rolls but thin enough to drizzle. If it’s too thick, add a tiny bit more milk, a teaspoon at a time. If it’s too thin, add a bit more sifted powdered sugar.
- Glaze the S’mores Rolls: Drizzle or spread the glaze generously over the warm S’mores Rolls in the pan. The warmth of the rolls will help the glaze melt slightly and seep into all the nooks and crannies, creating an irresistible finish. This is my favorite part – watching that sweet glaze cascade over the rolls is truly magical!
- Serve Warm: For the ultimate S’mores Rolls experience, serve them warm, directly from the pan. The melted chocolate and gooey marshmallows combined with the soft dough and sweet glaze are just heavenly. These are best enjoyed fresh, when the textures are at their peak.
- Storage (if any leftovers!): If by some miracle you have any S’mores Rolls left, store them in an airtight container at room temperature for up to 2 days. For best results, you can gently reheat them in the microwave for 10-15 seconds to bring back that delightful warmth and gooeyness. Enjoy every single bite of these homemade S’mores Rolls!
Conclusion:
Well, my friends, we’ve reached the sweet end of our culinary journey with this incredible recipe, and I truly hope you’re as excited as I am about what we’ve just explored. This isn’t just another dessert; it’s an experience, a memory waiting to be made, and a delightful twist on a beloved classic. I wholeheartedly believe this recipe is an absolute must-try for anyone who appreciates the comforting, nostalgic flavors of a campfire treat, but perhaps without the need for a roaring fire or sticky fingers from melting marshmallows and chocolate directly onto your hands. It captures that magical essence perfectly, delivering it in a wonderfully portable and supremely satisfying package.
What makes these so utterly irresistible? For starters, it’s the sheer ingenuity of taking those iconic s’mores components – the gooey marshmallow, the rich, melting chocolate, and the crisp graham cracker – and encasing them in a soft, golden-brown dough. Every single bite is a symphony of textures and tastes: the slight pull of the warm, stretchy marshmallow, the velvety melt of the chocolate, and the subtle crunch and honeyed sweetness of the graham cracker bits, all enveloped in a tender, slightly sweet roll. It’s comforting, it’s decadent, and it’s surprisingly elegant in its rustic charm. These are the kinds of treats that disappear faster than you can say “more, please!” at any gathering, from casual brunches to cozy evening desserts. They evoke smiles, spark conversations, and undeniably create a happy atmosphere wherever they’re served.
Now, let’s talk about making these delightful creations truly your own! While the classic rendition is absolutely divine, there are so many ways you can customize your S’mores Rolls to suit your taste or the occasion. For an extra layer of decadence, consider swapping out some of the milk chocolate for dark chocolate chips or even chopped peanut butter cups – imagine that salty-sweet explosion! White chocolate chunks could also offer a beautiful contrast, both visually and in flavor. If you’re feeling adventurous, a sprinkle of sea salt over the top before baking can really amplify the chocolate notes and cut through the sweetness, offering a gourmet touch. For a fruity twist, a very thin layer of raspberry jam or some finely diced fresh strawberries could be added along with the chocolate, creating a delightful berry-s’mores fusion that’s utterly unexpected and delicious. Or, for a nutty crunch, a scattering of chopped pecans or walnuts within the filling would be fantastic. You could even experiment with different spice blends in the dough itself, perhaps a touch of cinnamon or nutmeg, to give it an autumnal warmth. And when it comes to serving, while they are absolutely perfect straight from the oven, warm and gooey, don’t underestimate the power of a scoop of vanilla bean ice cream melting alongside, or a drizzle of homemade caramel sauce. They also pair wonderfully with a hot cup of coffee, a rich hot chocolate, or a cold glass of milk, making them ideal for any time of day.
Seriously, you HAVE to try this recipe!
I truly hope I’ve convinced you to roll up your sleeves and give this recipe a go. There’s something incredibly satisfying about creating these in your own kitchen, filling your home with the intoxicating aroma of baking dough, chocolate, and toasted marshmallow. It’s a project that promises immense reward for minimal effort, resulting in a treat that’s both familiar and excitingly new. Don’t hesitate to dive in and experience the joy of these incredible S’mores Rolls for yourself. They are truly something special.
Share Your Sweet Success!
And when you do bake them, please, please share your experience! I’d love to hear about your baking adventures, any variations you tried, and especially how much you and your loved ones enjoyed them. Snap some photos, tell us your favorite part, or simply let us know how quickly they disappeared! Your feedback and shared moments are what make this community so wonderful. Happy baking, my friends, and get ready for a truly unforgettable treat!
S’mores Rolls
Revolutionize your dessert game with these S’mores Rolls, transforming a beloved campfire classic into an irresistible, convenient, and fun treat you can enjoy anytime, anywhere.
Ingredients
Instructions
Important Information
Nutrition Facts (Per Serving)
It is important to consider this information as approximate and not to use it as definitive health advice.
Allergy Information
Please check ingredients for potential allergens and consult a health professional if in doubt.


Leave a Comment