

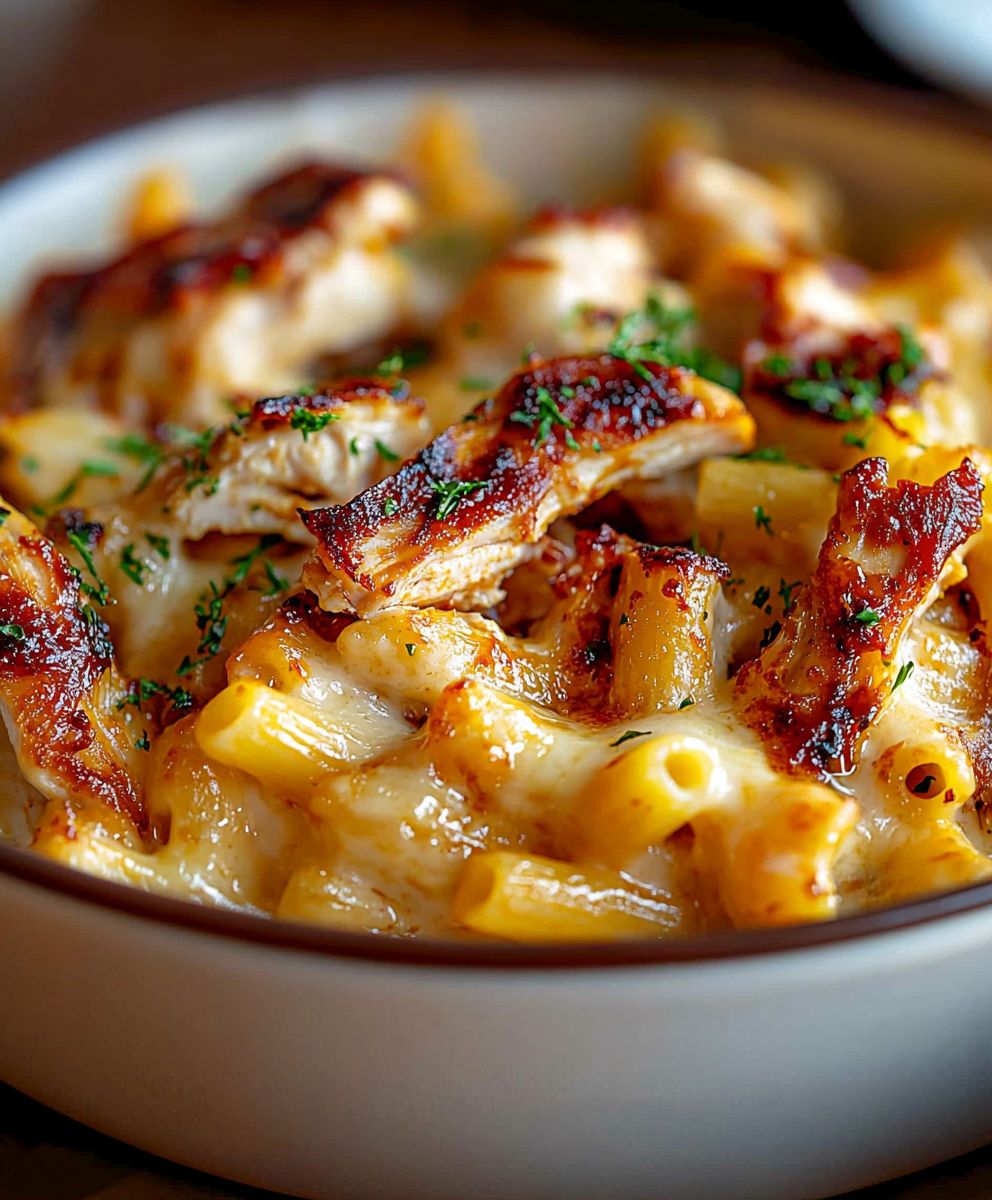
BBQ Chicken Mac and Cheese is a delightful fusion of flavors that brings comfort food to a whole new level. Imagine creamy, cheesy pasta intertwined with tender pieces of BBQ chicken, all topped with a crispy layer of breadcrumbs. This dish not only satisfies your cravings but also warms your heart with every bite. Originating from the classic American comfort food, mac and cheese, this recipe adds a smoky twist that has become a favorite at family gatherings and summer barbecues.
People love BBQ Chicken Mac and Cheese for its perfect balance of taste and texture. The richness of the cheese sauce complements the tangy BBQ sauce, while the pasta provides a satisfying chew. Plus, it’s incredibly convenient to prepare, making it an ideal choice for busy weeknights or casual get-togethers. Whether you’re a fan of BBQ or just looking for a new twist on a classic dish, BBQ Chicken Mac and Cheese is sure to become a staple in your kitchen!

Ingredients:
- 1 pound elbow macaroni
- 2 cups cooked chicken, shredded (I like to use rotisserie chicken for convenience)
- 1 cup BBQ sauce (your favorite brand or homemade)
- 4 tablespoons unsalted butter
- 1/4 cup all-purpose flour
- 3 cups milk (whole milk works best for creaminess)
- 2 cups shredded sharp cheddar cheese
- 1 cup shredded mozzarella cheese
- 1 teaspoon garlic powder
- 1 teaspoon onion powder
- 1/2 teaspoon smoked paprika
- Salt and pepper to taste
- 1/2 cup breadcrumbs (optional, for topping)
- 2 tablespoons olive oil (if using breadcrumbs)
- Chopped green onions or parsley for garnish (optional)
Preparing the Pasta
- Start by bringing a large pot of salted water to a boil. I usually add about a tablespoon of salt to enhance the flavor of the pasta.
- Once the water is boiling, add the elbow macaroni and cook according to the package instructions until al dente, usually around 7-8 minutes.
- Once cooked, drain the pasta in a colander and set it aside. I like to rinse it briefly with cold water to stop the cooking process and prevent it from sticking together.
Making the Cheese Sauce
- In a large saucepan, melt the butter over medium heat. I love the smell of butter melting; it’s the perfect start to any dish!
- Once the butter is melted, whisk in the flour to create a roux. Cook this mixture for about 1-2 minutes, stirring constantly until it’s bubbly and slightly golden. This step is crucial as it helps thicken the cheese sauce.
- Gradually pour in the milk while whisking continuously to avoid lumps. Keep whisking until the mixture is smooth and starts to thicken, which should take about 5-7 minutes.
- Once the sauce has thickened, reduce the heat to low and stir in the garlic powder, onion powder, smoked paprika, salt, and pepper. I usually taste it at this point to adjust the seasoning to my liking.
- Now, it’s time to add the cheese! Gradually stir in the shredded cheddar and mozzarella cheese until melted and creamy. This is the moment when your kitchen starts to smell heavenly!
Combining the Ingredients
- In a large mixing bowl, combine the cooked pasta, shredded chicken, and BBQ sauce. I like to use a spatula to gently fold everything together, ensuring the pasta and chicken are well coated with the sauce.
- Next, pour the cheese sauce over the pasta mixture. Gently fold everything together until the pasta, chicken, and cheese sauce are evenly mixed. This is where the magic happens, and you can see how creamy and delicious it looks!
Assembling the Dish
- Preheat your oven to 350°F (175°C). While the oven is heating, I like to prepare my baking dish.
- Grease a 9×13 inch baking dish with a little butter or cooking spray to prevent sticking.
- Pour the BBQ chicken mac and cheese mixture into the prepared baking dish, spreading it out evenly.
- If you’re using breadcrumbs for a crunchy topping, mix them with olive oil in a small bowl until they’re well coated. Then, sprinkle the breadcrumb mixture evenly over the top of the mac and cheese. This adds a delightful crunch that contrasts beautifully with the creamy pasta.
Baking the Dish
- Place the baking dish in the preheated oven and bake for about 25-30 minutes, or until the top is golden and bubbly. I usually check it around the 20-minute mark to make sure it’s not browning too quickly.
- Once it’s done, remove it from the oven and let it sit for about 5-10 minutes before serving. This resting time allows the dish to set a bit, making it easier to serve.
- 1 pound elbow macaroni
- 2 cups cooked chicken, shredded (preferably rotisserie chicken)
- 1 cup BBQ sauce (your favorite brand or homemade)
- 4 tablespoons unsalted butter
- 1/4 cup all-purpose flour
- 3 cups milk (whole milk recommended for creaminess)
- 2 cups shredded sharp cheddar cheese
- 1 cup shredded mozzarella cheese
- 1 teaspoon garlic powder
- 1 teaspoon onion powder
- 1/2 teaspoon smoked paprika
- Salt and pepper to taste
- 1/2 cup breadcrumbs (optional, for topping)
- 2 tablespoons olive oil (if using breadcrumbs)
- Chopped green onions or parsley for garnish (optional)
- Bring a large pot of salted water to a boil (about 1 tablespoon of salt).
- Add the elbow macaroni and cook according to package instructions until al dente (7-8 minutes).
- Drain the pasta and rinse briefly with cold water to stop the cooking process. Set aside.
- In a large saucepan, melt the butter over medium heat.
- Whisk in the flour to create a roux, cooking for 1-2 minutes until bubbly and slightly golden.
- Gradually pour in the milk while whisking continuously to avoid lumps. Cook until the mixture thickens (about 5-7 minutes).
- Reduce heat to low and stir in garlic powder, onion powder, smoked paprika, salt, and pepper. Adjust seasoning to taste.
- Gradually stir in the shredded cheddar and mozzarella cheese until melted and creamy.
- In a large mixing bowl, combine the cooked pasta, shredded chicken, and BBQ sauce. Gently fold together.
- Pour the cheese sauce over the pasta mixture and fold until evenly mixed.
- Preheat your oven to 350°F (175°C).
- Grease a 9×13 inch baking dish with butter or cooking spray.
- Pour the BBQ chicken mac and cheese mixture into the prepared baking dish, spreading it evenly.
- If using breadcrumbs, mix them with olive oil and sprinkle over the top.
- Bake in the preheated oven for 25-30 minutes, or until the top is golden and bubbly. Check around the 20-minute mark.
- Remove from the oven and let sit for 5-10 minutes before serving.
- For added flavor, consider using a smoked BBQ sauce.
- Feel free to customize the cheese blend to your liking.
- This dish can be made ahead of time and stored in the refrigerator before baking.
Conclusion:
In conclusion, this BBQ Chicken Mac and Cheese is an absolute must-try for anyone looking to elevate their comfort food game. The combination of creamy, cheesy goodness with the smoky, tangy flavors of BBQ chicken creates a dish that is not only satisfying but also incredibly delicious. Whether you’re serving it at a family gathering, a casual get-together with friends, or simply enjoying a cozy night in, this recipe is sure to impress.
For serving suggestions, consider topping your BBQ Chicken Mac and Cheese with crispy fried onions or a sprinkle of fresh parsley for a pop of color and added texture. You can also experiment with variations by adding your favorite vegetables, such as sautéed bell peppers or corn, to give it an extra nutritional boost. If you’re feeling adventurous, try swapping out the chicken for pulled pork or even a vegetarian option with jackfruit for a delightful twist.
I encourage you to give this BBQ Chicken Mac and Cheese a try and make it your own! Don’t forget to share your experience and any creative variations you come up with. I would love to hear how it turns out for you! So grab your ingredients, get cooking, and enjoy every cheesy, BBQ-infused bite of this fantastic dish. Happy cooking!
BBQ Chicken Mac and Cheese: A Delicious Twist on a Classic Comfort Food
This BBQ Chicken Mac and Cheese is a creamy and cheesy dish featuring tender elbow macaroni, shredded chicken, and tangy BBQ sauce, all baked with a crunchy breadcrumb topping. It's a comforting meal perfect for family dinners or gatherings.

Leave a Comment