

Hello fellow food lovers! Are you ready to become the MVP of your next game night or potluck? Because I’m about to share the secret sauce with my collection of
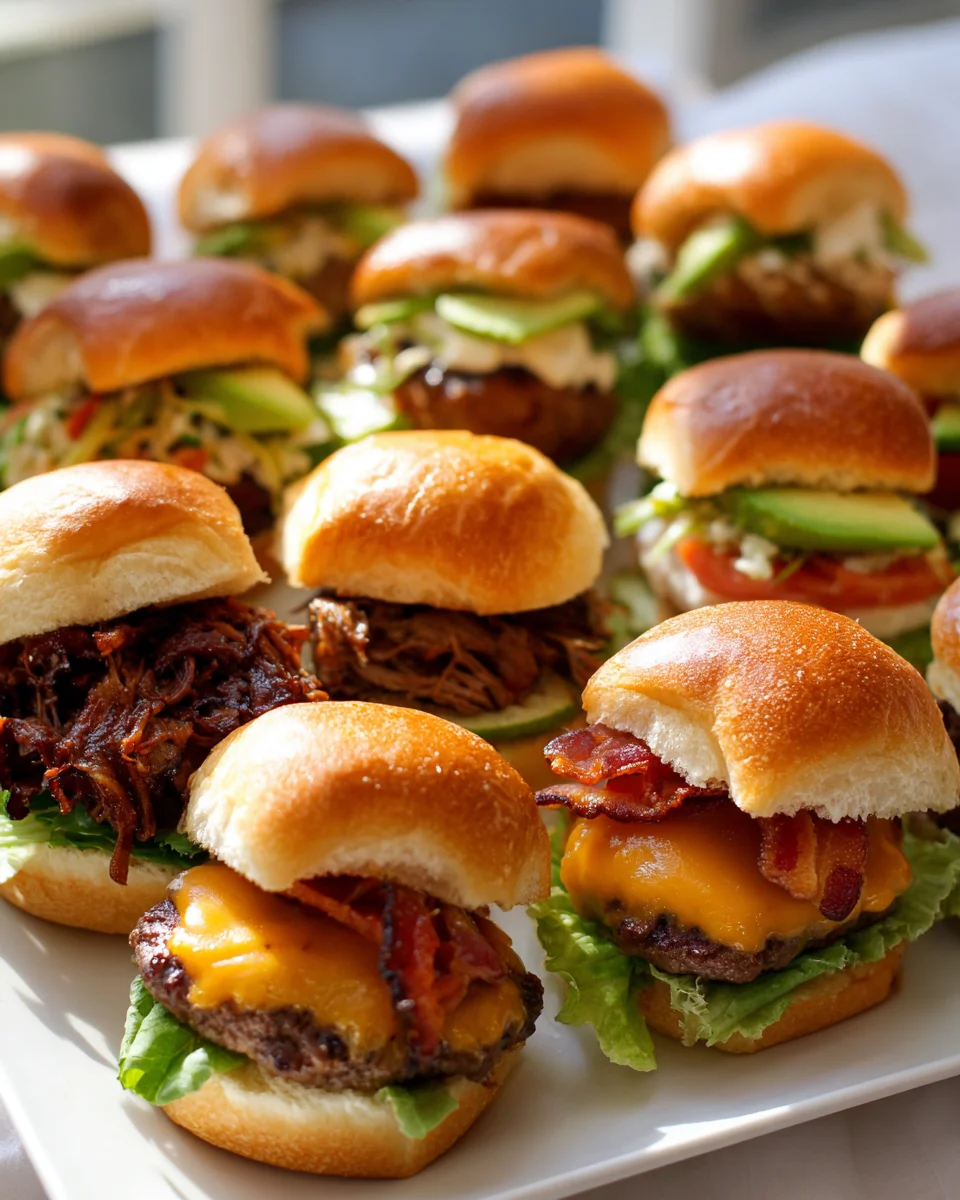
Slider Recipes For A Crowd (game Night + Potluck Winners)
What makes these tiny titans so special? Well, for starters, they’re designed with ultimate crowd-pleasing in mind. Forget fussy individual portions; these sliders are all about easy assembly, effortless serving, and maximum flavor impact. You’ll love them because they take the stress out of feeding a hungry horde, allowing you to actually enjoy the party! Imagine an array of perfectly portioned, delicious mini sandwiches, ready to be devoured without needing a fork or a plate – just grab and go.
This collection isn’t just one recipe; it’s a treasure trove of ideas, ensuring there’s a slider for every taste bud in your group. We’re talking about incredibly satisfying little bites, from savory beef options to creative vegetarian twists, all nestled in soft buns. These recipes are quick to prepare in bulk, incredibly versatile, and always disappear first from any spread. Get ready to win hearts (and appetites!) with these guaranteed crowd-pleasers!

Ingredient Notes
When it comes to crafting a winning array of sliders for your game night or potluck, the ingredients are your canvas! I’ve found that the beauty of sliders lies in their adaptability, allowing you to mix and match flavors to suit any taste. Here’s a breakdown of the key components I rely on, along with my favorite substitutions to keep things interesting and inclusive.
Buns
- The Foundation: For a crowd, I always reach for those delightful 12-count packages of Hawaiian sweet rolls, potato rolls, or classic dinner rolls. They’re perfectly sized, hold up well to fillings, and the slight sweetness of Hawaiian rolls often adds a fantastic counterpoint to savory fillings.
- Substitution Fun: Don’t limit yourself! Mini brioche buns or even gluten-free slider buns work wonderfully if you’re catering to specific dietary needs. Sometimes I even use sliced hot dog buns if I’m really in a pinch and just need that slider shape.
Proteins
- Ground Beef Goodness: A classic choice! I often use lean ground beef, seasoned well with my favorite blend of garlic powder, onion powder, salt, and pepper. It cooks quickly and is super versatile for everything from mini cheeseburgers to seasoned beef sliders.
- Shredded Beef Magic: For a more gourmet touch, I love using slow-cooked shredded beef, perhaps from a chuck roast, seasoned with BBQ sauce or a savory gravy. This provides incredible tenderness and flavor without much fuss.
- Deli Meats: Don’t underestimate the power of good quality sliced deli meats. Roast beef, ham, or turkey breast layered with cheese are instant crowd-pleasers.
- Chicken Varieties: Shredded chicken (rotisserie chicken is a shortcut hero!), grilled chicken breast slices, or even ground chicken patties can be fantastic. Think BBQ chicken sliders or buffalo chicken sliders!
- Substitution Fun: Beyond the beef and chicken, consider plant-based ground “meat” alternatives for your vegetarian friends, or even a hearty mushroom and black bean patty.
Cheeses
- Melty Marvels: My go-to cheeses are always those that melt beautifully. Slices of provolone, cheddar, Swiss, pepper jack, or American cheese are perfect. They create that irresistible gooey layer that binds everything together.
- Substitution Fun: Feel free to experiment with smoked gouda, havarti, or even a dairy-free cheese alternative if needed.
Sauces & Spreads
- The Flavor Boosters: A good sauce can transform a slider. BBQ sauce (sweet, smoky, or spicy), honey mustard, a creamy garlic aioli, marinara for Italian-inspired sliders, or even a zesty pesto are all in my rotation.
- Substitution Fun: Get creative! Ranch dressing, sriracha mayo, a homemade relish, or a simple butter and garlic spread brushed over the buns before baking can add incredible depth.
Toppings & Extras
- Crunch & Zest: Pickles, caramelized onions, pickled jalapeños, crispy fried onions, or thinly sliced bell peppers add texture and zing.
- The Glaze: For that irresistible golden-brown crust and extra flavor, I always brush the tops of my assembled sliders with melted butter mixed with seasonings. Common additions include garlic powder, onion flakes, dried parsley, poppy seeds, or sesame seeds.
Step-by-Step Instructions
Making sliders for a crowd might seem daunting, but I promise you, it’s one of the easiest ways to feed a hungry group with minimal stress. My secret is assembling them all at once on a baking sheet, then baking them until they’re warm, gooey, and utterly delicious. Here’s my general approach, which you can adapt to almost any slider combination:
1. Prep Your Protein & Toppings
- Cook Ground Beef (if using): In a large skillet over medium-high heat, I’ll brown my ground beef, breaking it up as it cooks. Once no longer pink, I drain any excess fat. Then, I season it generously with salt, pepper, garlic powder, and onion powder, or a dash of my favorite seasoning blend.
- Prepare Other Proteins: If I’m using pre-cooked shredded beef, deli meats, or rotisserie chicken, I’ll shred or slice them as needed and set them aside. If they need warming or saucing (like BBQ shredded beef), I’ll do that now.
- Ready Your Toppings: Slice any onions, pickles, or peppers you plan to include. Caramelize onions ahead of time if you’re going that route – they add so much flavor!
2. Slice the Buns
- This is a game-changer! I carefully slice the entire slab of slider buns horizontally through the middle, keeping them connected. This creates a giant “bottom bun” and a giant “top bun.”
3. Assemble the Sliders
- Bottom Layer: I place the entire bottom slab of buns into a 9×13-inch baking dish or onto a foil-lined baking sheet.
- First Filling Layer: If I’m using a sauce or spread, like a thin layer of mustard or mayonnaise, I spread it evenly over the bottom buns.
- Protein Power: Next comes the protein. I evenly distribute my cooked ground beef, shredded beef, or deli meats over the bottom buns. I make sure to cover the surface as much as possible for consistent filling.
- Cheese Please: I generously layer slices of cheese over the protein. For 12 sliders, I typically use 6-8 slices, tearing them in half if needed to get good coverage. Don’t be shy with the cheese – it’s crucial for that gooey factor!
- Optional Toppings: Now’s the time for any additional toppings like caramelized onions, jalapeños, or pickles.
- Top Buns: Finally, I carefully place the top slab of buns over all the fillings.
4. Prepare and Apply the Glaze
- In a small microwave-safe bowl, I melt about 1/2 cup of unsalted butter.
- To the melted butter, I stir in about 1-2 teaspoons of Worcestershire sauce (for a savory kick), a teaspoon of garlic powder, a teaspoon of dried parsley, and a pinch of salt. Sometimes I’ll add poppy seeds or sesame seeds for extra texture and visual appeal.
- Using a pastry brush, I generously brush this melted butter mixture all over the tops and sides of the assembled slider buns. This glaze is what gives them that beautiful golden-brown finish and amazing flavor!
5. Bake to Perfection
- I cover the baking dish or sheet loosely with aluminum foil. This helps the cheese melt and the fillings warm through without the buns browning too quickly.
- Bake in a preheated oven (usually 350°F / 175°C) for about 15-20 minutes.
- Then, I remove the foil and bake for an additional 5-10 minutes, or until the tops of the buns are golden brown and the cheese is bubbly and melted.
6. Serve!
- Once out of the oven, I let the sliders rest for a few minutes. Then, I use a large knife to cut along the lines of the individual buns, separating them into ready-to-grab sliders.
- Arrange them on a platter, and watch them disappear!
Tips & Suggestions
I’ve learned a few tricks over the years to make my slider game truly next-level, especially when cooking for a crowd. These tips will help you streamline your process, offer variety, and ensure your sliders are the undeniable winners of any game night or potluck.
Prep Ahead is Your Best Friend
- Fillings Ready to Go: I often cook my ground beef, shred my chicken or beef, and caramelize onions a day or two in advance. Store these components separately in airtight containers in the fridge. This way, assembly on game day is a breeze!
- Buns and Glaze: You can even mix your butter glaze components (minus the melted butter) ahead of time. Just melt the butter and combine right before brushing.
- Partial Assembly: For some slider types (especially cold deli meat ones), you can assemble them fully, cover, and refrigerate for a few hours before baking. Just add an extra 5-10 minutes to the baking time if starting from cold.
Offer a Slider Bar for Ultimate Customization
- Instead of making one kind, I love setting up a “slider bar” with different proteins (e.g., seasoned ground beef, BBQ shredded beef, deli ham), various cheeses, and an assortment of toppings and sauces. This allows everyone to build their perfect mini sandwich.
- Condiment Variety: Always have a selection of ketchup, mustard (Dijon, yellow, honey), hot sauce, and perhaps a special aioli or relish available.
Creative Flavor Combinations I Love
- Classic Beef & Cheddar: Seasoned ground beef, cheddar cheese, a touch of ketchup or BBQ sauce.
- Italian Roast Beef: Thinly sliced roast beef, provolone cheese, a dollop of marinara sauce, and a sprinkle of dried oregano.
- “Reuben-ish” Sliders: Sliced deli roast beef, Swiss cheese, a good sauerkraut (drained well), and a drizzle of thousand island dressing.
- Breakfast Sliders: Scrambled eggs, cooked beef sausage patties, and cheddar cheese. Perfect for a brunch potluck!
- Sweet & Savory: Sliced ham, Swiss cheese, and a honey mustard glaze on Hawaiian rolls. A timeless favorite.
Keep Them Warm
- If you’re making multiple batches or need to transport them, a slow cooker set to the “warm” setting is your ally. Arrange the sliders in a single layer (or stack slightly) and cover. They’ll stay warm and moist for a couple of hours.
- For shorter periods, a serving tray with a dome lid or covering them with foil will suffice.
Serving Suggestions
- Sliders are often a meal in themselves, but they pair wonderfully with simple sides. I often serve them with a big bowl of potato salad, a fresh green salad, coleslaw, or even some sturdy potato chips.
- Don’t forget the pickles! Extra pickle slices on the side are always appreciated.
Storage
Inevitably, even the most delicious sliders can sometimes have leftovers (though it’s rare when I’m cooking for a crowd!). Here’s how I handle storage to keep them tasting great for another round.
Unbaked Sliders (Pre-Assembly)
- If you’ve prepped your components (cooked protein, sliced cheese, etc.) but haven’t assembled the sliders, store each ingredient separately in airtight containers in the refrigerator.
- Cooked ground beef or shredded beef will last for 3-4 days. Sliced deli meats are good until their package expiration date.
Baked Sliders
- Refrigeration: Once baked and cooled completely, I transfer any leftover sliders to an airtight container. They’ll keep well in the refrigerator for up to 2-3 days. To prevent them from getting soggy, I sometimes place a paper towel at the bottom of the container.
- Freezing (Not Recommended for Best Quality): While technically you can freeze fully baked sliders, I generally don’t recommend it as the buns can become quite soggy and the texture of the fillings might change upon thawing and reheating. If you absolutely must, wrap individual sliders tightly in plastic wrap, then aluminum foil, and store in a freezer-safe bag for up to 1 month. Thaw in the refrigerator overnight before reheating.
Reheating Baked Sliders
- Oven/Toaster Oven: My preferred method for reheating! I preheat my oven or toaster oven to 300°F (150°C). I place the sliders on a baking sheet, cover them loosely with foil (to prevent the tops from over-browning), and bake for 10-15 minutes, or until warmed through and the cheese is melty again. This helps crisp up the buns nicely.
- Microwave (for a quick fix): If you’re in a hurry, you can microwave individual sliders for 20-30 seconds, or until warm. Be warned, though, that the buns might become a little soft, and the cheese might not be as gooey as from the oven.
Final Thoughts
And there you have it! My absolute favorite collection for making any gathering a delicious success. What I love most about Slider Recipes For A Crowd (game Night + Potluck Winners) is its incredible versatility and the undeniable joy it brings to any table. Whether you’re whipping up savory beef sliders with a delectable glaze, or exploring other creative fillings, these recipes are designed for ease, variety, and maximum flavor impact.
Forget the stress of elaborate, time-consuming meals; with these ideas, you can effortlessly cater to diverse tastes, ensuring every single guest finds a new favorite. From classic beef combinations to exciting new twists, incorporating flavorful beef and innovative non-alcohol infused sauces, these sliders are guaranteed to be the stars of your next game night or potluck. I truly believe that once you dive into these recipes, you’ll understand why they’re such a winning formula for feeding a hungry crowd with minimal fuss and maximum deliciousness. So go ahead, pick your favorites, and get ready to impress everyone!

Beef Slider Recipes For A Crowd: Game Night & Potluck Winners
- Total Time: 1 hour
- Yield: 12 sliders 1x
Description
These beef sliders are the ultimate crowd-pleasers, perfect for game nights and potlucks. Easy to assemble and packed with flavor, they are sure to be a hit at your next gathering!
Ingredients
- 12-count package of Hawaiian sweet rolls, potato rolls, or classic dinner rolls
- Lean ground beef
- Garlic powder
- Onion powder
- Salt
- Pepper
- Slow-cooked shredded beef (from a chuck roast)
- BBQ sauce or savory gravy
- Sliced deli meats (roast beef, ham, turkey breast)
- Shredded chicken (or rotisserie chicken)
- Grilled chicken breast slices
- Ground chicken patties
- Plant-based ground 'meat' alternatives
- Hearty mushroom and black bean patty
- Provolone cheese
- Cheddar cheese
- Swiss cheese
- Pepper jack cheese
- American cheese
- Smoked gouda
- Havarti cheese
- Dairy-free cheese alternative
- BBQ sauce (sweet, smoky, or spicy)
- Honey mustard
- Creamy garlic aioli
- Marinara sauce
- Zesty pesto
- Ranch dressing
- Sriracha mayo
- Homemade relish
- Butter
- Garlic powder (for glaze)
- Onion flakes
- Dried parsley
- Poppy seeds
- Sesame seeds
- Pickles
- Caramelized onions
- Pickled jalapeños
- Crispy fried onions
- Thinly sliced bell peppers
- Worcestershire sauce
Instructions
- In a large skillet over medium-high heat, brown the ground beef, breaking it up as it cooks. Once no longer pink, drain any excess fat and season generously with salt, pepper, garlic powder, and onion powder.
- If using pre-cooked shredded beef, deli meats, or rotisserie chicken, shred or slice them as needed and set aside. Warm or sauce them if necessary.
- Slice any onions, pickles, or peppers you plan to include. Caramelize onions ahead of time if desired.
- Carefully slice the entire slab of slider buns horizontally through the middle, keeping them connected.
- Place the bottom slab of buns into a 9×13-inch baking dish or onto a foil-lined baking sheet.
- Spread any sauce or spread evenly over the bottom buns.
- Evenly distribute the cooked ground beef, shredded beef, or deli meats over the bottom buns.
- Layer slices of cheese over the protein, using 6-8 slices for 12 sliders.
- Add any additional toppings like caramelized onions, jalapeños, or pickles.
- Carefully place the top slab of buns over all the fillings.
- In a small microwave-safe bowl, melt about 1/2 cup of unsalted butter. Stir in 1-2 teaspoons of Worcestershire sauce, a teaspoon of garlic powder, a teaspoon of dried parsley, and a pinch of salt.
- Using a pastry brush, generously brush the melted butter mixture over the tops and sides of the assembled slider buns.
- Cover the baking dish or sheet loosely with aluminum foil and bake in a preheated oven at 350°F (175°C) for about 15-20 minutes.
- Remove the foil and bake for an additional 5-10 minutes, or until the tops of the buns are golden brown and the cheese is bubbly and melted.
- Let the sliders rest for a few minutes, then cut along the lines of the individual buns to separate them.
- Arrange the sliders on a platter and serve.
- Prep Time: 30 mins
- Cook Time: 30 mins
- Category: Appetizer
- Method: Baking
- Cuisine: American
Nutrition
- Serving Size: 1 slider
- Calories: 250
- Sugar: 3 g
- Sodium: 400 mg
- Fat: 12 g
- Saturated Fat: 5 g
- Unsaturated Fat: 6 g
- Trans Fat: 0 g
- Carbohydrates: 28 g
- Fiber: 1 g
- Protein: 12 g
- Cholesterol: 40 mg
Keywords: Prep ahead by cooking proteins and caramelizing onions a day or two in advance. Consider a slider bar for customization with various proteins, cheeses, and toppings.
Leave a Comment