

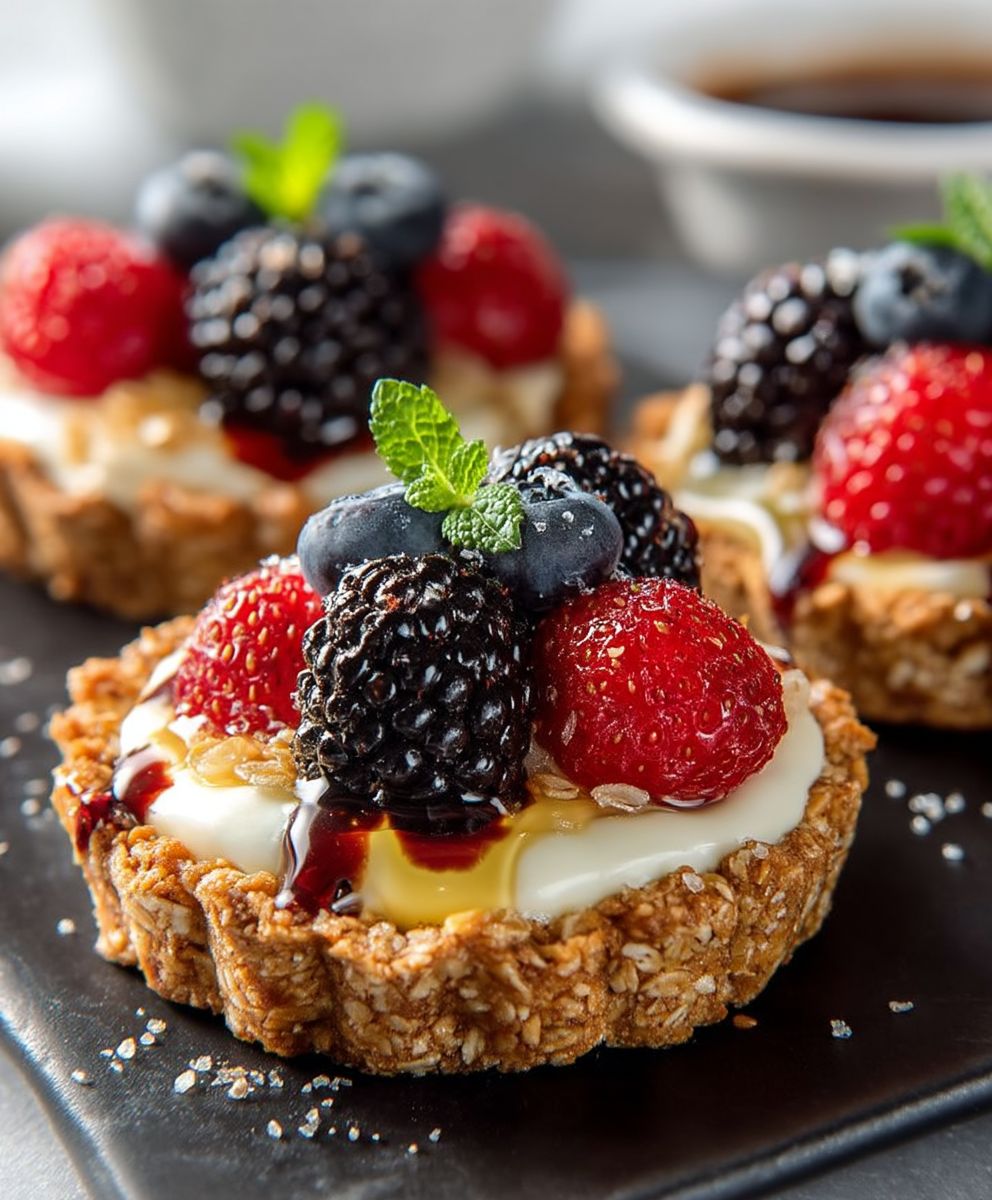
Breakfast Fruit Tarts: the delightful morning treat that will transform your breakfast routine from mundane to magnificent! Imagine biting into a crisp, buttery pastry shell, filled with a creamy, luscious custard, and topped with a vibrant array of fresh, juicy fruits. Sounds heavenly, doesn’t it?
While the exact origins of fruit tarts are debated, their lineage can be traced back to ancient Rome, where early forms of pastry were enjoyed with fruits and honey. Over centuries, these simple creations evolved into the elegant and sophisticated tarts we know and love today. In many cultures, fruit tarts are not just a breakfast item but also a symbol of celebration and abundance, often featured at festive gatherings and special occasions.
What makes Breakfast Fruit Tarts so irresistible? It’s the perfect combination of textures and flavors. The flaky crust provides a satisfying crunch, the smooth custard offers a creamy indulgence, and the fresh fruit bursts with natural sweetness and a refreshing tang. Plus, they are incredibly versatile! You can customize them with your favorite fruits, making them a delightful treat year-round. Whether you’re looking for a quick and easy breakfast option or an impressive dish to serve to guests, these tarts are guaranteed to be a crowd-pleaser. So, let’s get baking and create some breakfast magic!

Ingredients:
- For the Crust:
- 1 1/2 cups all-purpose flour
- 1/2 cup (1 stick) unsalted butter, cold and cubed
- 1/4 cup granulated sugar
- 1/4 teaspoon salt
- 4-6 tablespoons ice water
- For the Pastry Cream Filling:
- 2 cups whole milk
- 1/2 cup granulated sugar
- 1/4 cup cornstarch
- 1/4 teaspoon salt
- 4 large egg yolks
- 2 tablespoons unsalted butter
- 1 teaspoon vanilla extract
- For the Fruit Topping:
- 1 cup fresh strawberries, hulled and sliced
- 1 cup fresh blueberries
- 1 cup fresh raspberries
- 1 kiwi, peeled and sliced
- 1/2 cup mandarin orange segments, drained
- 1/4 cup apricot jam, for glazing
- 2 tablespoons water, for glazing
Preparing the Crust:
- Combine Dry Ingredients: In a large bowl, whisk together the flour, sugar, and salt. This ensures that the salt and sugar are evenly distributed throughout the flour, which is crucial for a consistent crust.
- Cut in the Butter: Add the cold, cubed butter to the flour mixture. Using a pastry blender or your fingertips (work quickly to prevent the butter from melting), cut the butter into the flour until the mixture resembles coarse crumbs. You should still see small pieces of butter throughout. These small pieces of butter will create flaky layers in the crust as they melt during baking.
- Add Ice Water: Gradually add the ice water, one tablespoon at a time, mixing gently after each addition. Continue adding water until the dough just comes together. Be careful not to overmix, as this will develop the gluten in the flour and result in a tough crust. The dough should be slightly shaggy but hold together when pressed.
- Form the Dough: Turn the dough out onto a lightly floured surface and gently form it into a disc. Wrap the disc tightly in plastic wrap and refrigerate for at least 30 minutes, or up to 2 hours. This chilling period allows the gluten to relax, making the dough easier to roll out and preventing it from shrinking during baking.
- Roll Out the Dough: On a lightly floured surface, roll out the chilled dough to about 1/8 inch thickness. You want it thin enough to be delicate but not so thin that it tears easily.
- Cut and Shape the Tart Shells: Using a cookie cutter or a sharp knife, cut out circles slightly larger than the tart pans you’ll be using. Gently press the dough circles into the tart pans, making sure to press the dough firmly against the bottom and sides. Trim any excess dough from the edges.
- Dock the Crusts: Use a fork to prick the bottom of each tart shell several times. This prevents the crust from puffing up during baking.
- Chill Again: Place the tart shells in the refrigerator for another 15 minutes. This helps the crusts hold their shape during baking.
Baking the Crusts:
- Preheat Oven: Preheat your oven to 375°F (190°C).
- Blind Bake: Line each tart shell with parchment paper and fill with pie weights or dried beans. This will prevent the crust from puffing up and losing its shape.
- Bake: Bake for 15-20 minutes, or until the edges are lightly golden brown.
- Remove Weights: Carefully remove the parchment paper and pie weights.
- Continue Baking: Return the tart shells to the oven and bake for another 5-10 minutes, or until the bottoms are golden brown. This ensures that the crust is fully cooked and won’t be soggy.
- Cool Completely: Remove the tart shells from the oven and let them cool completely in the pans before filling.
Preparing the Pastry Cream Filling:
- Infuse the Milk: In a medium saucepan, combine the milk and half of the sugar (1/4 cup). Heat over medium heat until the mixture is simmering, stirring occasionally to dissolve the sugar. Do not let it boil.
- Whisk Egg Yolks and Sugar: In a separate bowl, whisk together the egg yolks, remaining sugar (1/4 cup), cornstarch, and salt until the mixture is pale and smooth. This step is crucial for preventing lumps in the pastry cream.
- Temper the Egg Yolks: Slowly pour a small amount of the hot milk mixture into the egg yolk mixture, whisking constantly. This process, called tempering, gradually raises the temperature of the egg yolks and prevents them from scrambling when added to the hot milk.
- Combine and Cook: Pour the tempered egg yolk mixture back into the saucepan with the remaining milk. Cook over medium heat, whisking constantly, until the mixture thickens and comes to a boil. Continue whisking for 1-2 minutes after it boils to ensure the cornstarch is fully cooked and the pastry cream is stable.
- Remove from Heat: Remove the saucepan from the heat and stir in the butter and vanilla extract. The butter adds richness and shine to the pastry cream, while the vanilla extract enhances the flavor.
- Cool and Chill: Pour the pastry cream into a clean bowl. Press a piece of plastic wrap directly onto the surface of the pastry cream to prevent a skin from forming. Refrigerate for at least 2 hours, or until completely chilled. This chilling period allows the pastry cream to thicken further and develop its flavor.
Assembling the Fruit Tarts:
- Fill the Tart Shells: Once the tart shells and pastry cream are completely cooled, spoon the pastry cream into the cooled tart shells, filling them evenly.
- Arrange the Fruit: Arrange the fresh fruit on top of the pastry cream in a decorative pattern. You can create a simple design or get creative with your arrangement. Consider using different colors and textures to make the tarts visually appealing.
- Prepare the Glaze: In a small saucepan, combine the apricot jam and water. Heat over low heat, stirring constantly, until the jam is melted and smooth.
- Glaze the Fruit: Brush the melted apricot jam glaze over the fruit. This will give the fruit a beautiful shine and help to preserve it.
- Chill (Optional): Refrigerate the assembled fruit tarts for at least 30 minutes before serving. This will allow the pastry cream to firm up even more and the flavors to meld together.
- Serve: Serve the fruit tarts chilled and enjoy! These tarts are best enjoyed within a day or two of being made.
Conclusion:
And there you have it! These Breakfast Fruit Tarts are truly a must-try recipe, and I’m confident they’ll become a staple in your breakfast rotation. The combination of the buttery, slightly sweet crust, the creamy, vanilla-infused filling, and the burst of fresh fruit is simply irresistible. They’re elegant enough for a special brunch, yet easy enough to whip up on a weekend morning. What’s not to love?
But the best part? These tarts are incredibly versatile! Feel free to get creative with your fruit selection. While I’ve suggested berries, kiwi, and mango, don’t hesitate to experiment with other seasonal favorites like peaches, plums, or even figs. Imagine a late-summer tart bursting with juicy peaches and a hint of cinnamon – pure perfection!
Serving Suggestions and Variations
Beyond the fruit, you can also play around with the filling. For a richer, more decadent treat, try adding a tablespoon of mascarpone cheese to the cream cheese mixture. Or, if you’re looking for a lighter option, you can substitute Greek yogurt for some of the cream cheese. A squeeze of lemon juice in the filling will also brighten the flavors and add a touch of tanginess.
For a truly indulgent experience, consider drizzling the finished tarts with a little bit of honey or maple syrup. A sprinkle of chopped nuts, like almonds or pistachios, would also add a delightful crunch. And if you’re feeling extra fancy, you could even dust them with a little bit of powdered sugar.
These tarts are also fantastic served with a dollop of whipped cream or a scoop of vanilla ice cream. They make a wonderful dessert as well as a delightful breakfast treat. I’ve even been known to pack them in my lunchbox for a mid-afternoon pick-me-up!
Why You Should Make These Breakfast Fruit Tarts
Honestly, these Breakfast Fruit Tarts are more than just a recipe; they’re an experience. They’re a celebration of fresh, vibrant flavors and a testament to the simple joy of baking. They’re a way to show your loved ones that you care, and they’re a guaranteed crowd-pleaser.
So, what are you waiting for? Gather your ingredients, preheat your oven, and get ready to create some magic in the kitchen. I promise you won’t regret it!
I’m so excited for you to try this recipe and experience the deliciousness for yourself. Once you’ve made these tarts, I’d love to hear about your experience! Did you try any variations? What fruits did you use? What did your family and friends think?
Please, share your photos and stories in the comments below. I can’t wait to see your creations and hear all about your baking adventures. Happy baking, and enjoy every delicious bite of these delightful Breakfast Fruit Tarts! I am sure that you will love this recipe as much as I do.
Breakfast Fruit Tarts: A Delicious & Easy Recipe
Delicate mini fruit tarts with a buttery crust, creamy pastry filling, and a vibrant assortment of fresh fruit, glazed to perfection.
Ingredients
Instructions
Recipe Notes
- For the flakiest crust, ensure the butter and water are very cold.
- Do not overmix the dough, as this will result in a tough crust.
- Blind baking the crust is essential to prevent a soggy bottom.
- Press plastic wrap directly onto the surface of the pastry cream while chilling to prevent a skin from forming.
- Get creative with your fruit arrangement!

Leave a Comment