

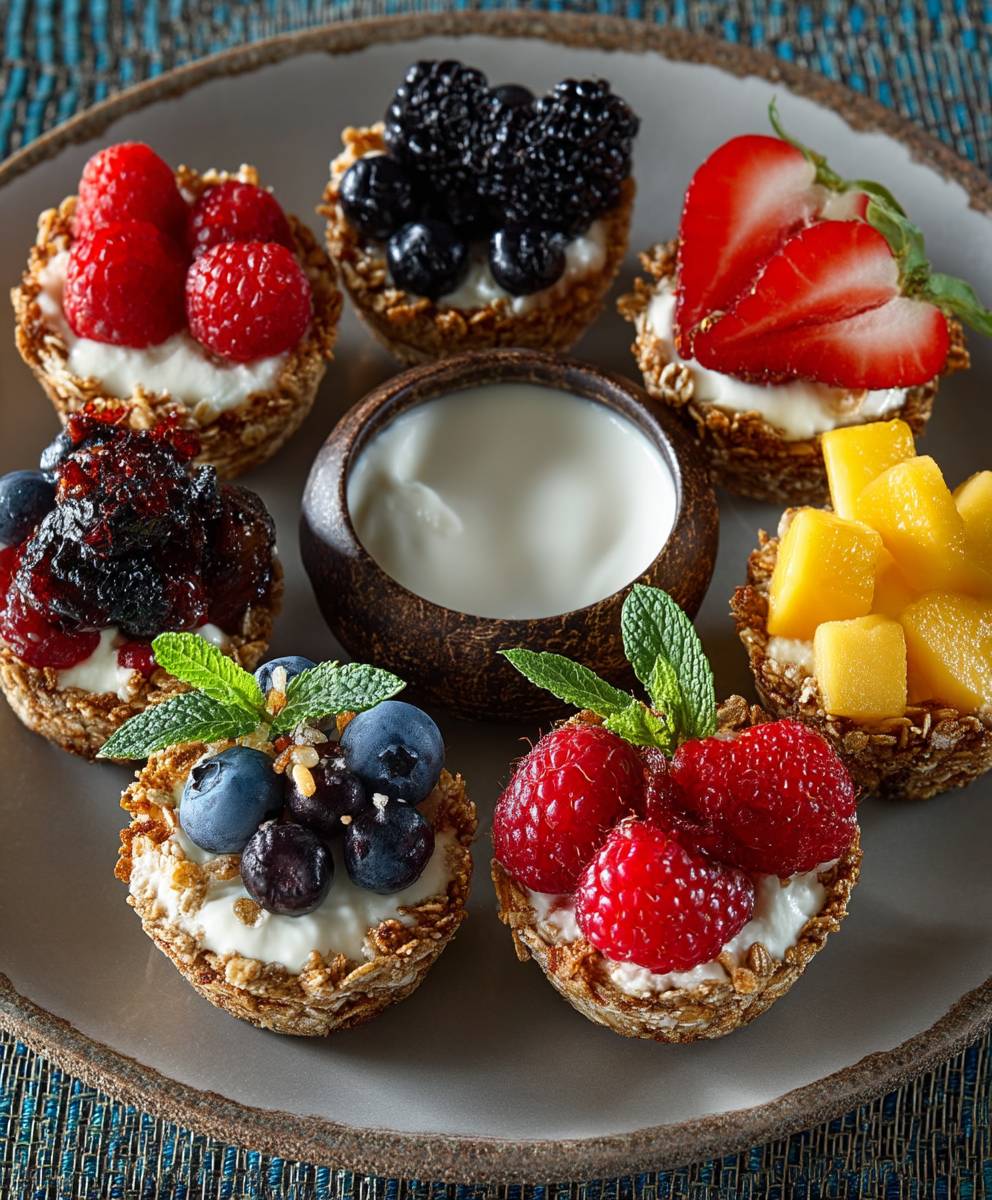
Breakfast granola cups: the perfect grab-and-go breakfast solution you’ve been searching for! Imagine starting your day with a delightful, crunchy, and subtly sweet treat that’s not only delicious but also packed with wholesome goodness. These aren’t your average sugary breakfast bars; we’re talking about homemade goodness that you can customize to your heart’s content.
While granola itself has a relatively modern history, emerging in the late 19th century as a health food alternative, the concept of combining grains, nuts, and sweeteners for a convenient and nutritious meal dates back much further. Think of ancient travelers carrying mixtures of dried fruits and grains for sustenance. Our breakfast granola cups take that time-tested idea and elevate it to a new level of deliciousness and portability.
So, why are these little cups so beloved? It’s simple! They offer a fantastic combination of textures – the satisfying crunch of the granola, the chewy sweetness of dried fruit, and the creamy richness of optional additions like yogurt or nut butter. Plus, they’re incredibly convenient. Make a batch on Sunday, and you’ll have a week’s worth of healthy and delicious breakfasts ready to go. Forget those rushed mornings and unhealthy fast-food options. These granola cups are your ticket to a happy and energized start to the day. Let’s get baking!

Ingredients:
- For the Granola Cups:
- 3 cups rolled oats (not instant)
- 1 cup chopped nuts (almonds, pecans, walnuts, or a mix)
- 1/2 cup shredded coconut (unsweetened)
- 1/4 cup seeds (pumpkin, sunflower, chia, or flax)
- 1/4 teaspoon salt
- 1/2 cup honey or maple syrup
- 1/4 cup coconut oil, melted
- 1 teaspoon vanilla extract
- For the Filling:
- 1 cup Greek yogurt (plain or vanilla)
- 1/2 cup mixed berries (strawberries, blueberries, raspberries)
- Optional: a drizzle of honey or maple syrup for extra sweetness
- Optional: a sprinkle of granola for topping
Preparing the Granola Mixture:
- Preheat your oven and prepare your muffin tin. I like to start by preheating my oven to 325°F (160°C). While the oven is heating up, grease a 12-cup muffin tin really well. You can use cooking spray or melted coconut oil. This is crucial to prevent the granola cups from sticking! Alternatively, you can use silicone muffin liners, which make removal even easier.
- Combine the dry ingredients. In a large bowl, combine the rolled oats, chopped nuts, shredded coconut, seeds, and salt. Make sure everything is evenly distributed. I usually give it a good toss with a large spoon. This ensures that each cup will have a good mix of all the ingredients.
- Mix the wet ingredients. In a separate, smaller bowl, whisk together the honey (or maple syrup), melted coconut oil, and vanilla extract. Whisk until everything is well combined and the mixture looks smooth.
- Combine wet and dry. Pour the wet ingredients over the dry ingredients in the large bowl. Use a spatula or spoon to mix everything together until the dry ingredients are completely coated. Make sure there are no dry patches of oats or nuts. The mixture should be evenly moistened and slightly sticky.
Forming and Baking the Granola Cups:
- Press the mixture into the muffin tin. Spoon about 1/4 cup of the granola mixture into each muffin cup. Use your fingers or the back of a spoon to firmly press the mixture into the bottom and up the sides of each cup, creating a well-like shape. The firmer you press, the better the cups will hold their shape. Make sure the bottom and sides are evenly thick.
- Bake the granola cups. Place the muffin tin in the preheated oven and bake for 18-22 minutes, or until the granola cups are golden brown and firm to the touch. Keep a close eye on them, as baking times can vary depending on your oven. You want them to be nicely browned but not burnt.
- Cool completely. Once the granola cups are baked, remove the muffin tin from the oven and let it cool completely on a wire rack. This is important because the granola cups will firm up as they cool. Don’t try to remove them while they’re still warm, or they might crumble. I usually let them cool for at least 30 minutes.
- Remove the granola cups. Once the granola cups are completely cool, gently loosen the edges with a thin knife or spatula. Carefully lift each cup out of the muffin tin. If you used silicone liners, simply pop them out.
Assembling the Breakfast Granola Cups:
- Prepare the filling. While the granola cups are cooling, prepare your filling. In a bowl, combine the Greek yogurt and mixed berries. If you want a little extra sweetness, you can drizzle a bit of honey or maple syrup over the berries.
- Fill the granola cups. Spoon the yogurt and berry mixture into the cooled granola cups. Fill them generously, but be careful not to overfill them, or the yogurt might spill over.
- Add toppings (optional). If desired, sprinkle a little extra granola over the top of the yogurt and berries for added crunch and visual appeal. You can also add a few extra berries or a drizzle of honey.
- Serve immediately or store. Serve the breakfast granola cups immediately for the best taste and texture. If you’re not serving them right away, you can store them in the refrigerator for up to 2 days. Keep in mind that the granola cups might soften slightly as they sit in the refrigerator.
Tips and Variations:
Nut Variations:
Feel free to experiment with different types of nuts in your granola cups. Almonds, pecans, walnuts, cashews, and macadamia nuts all work well. You can also use a mix of different nuts for a more complex flavor.
Seed Variations:
You can also use different types of seeds in your granola cups. Pumpkin seeds, sunflower seeds, chia seeds, flax seeds, and hemp seeds are all great options. Each type of seed will add a slightly different flavor and nutritional profile.
Sweetener Variations:
If you don’t have honey or maple syrup, you can use other sweeteners like agave nectar, brown rice syrup, or even a sugar-free sweetener. Just keep in mind that the flavor and texture of the granola cups might be slightly different depending on the sweetener you use.
Fruit Variations:
Instead of mixed berries, you can use other types of fruit in your filling. Sliced bananas, peaches, mangoes, or kiwi all work well. You can also use dried fruit like raisins, cranberries, or apricots.
Yogurt Variations:
If you don’t have Greek yogurt, you can use other types of yogurt like regular yogurt, Icelandic yogurt (Skyr), or even a dairy-free yogurt alternative like coconut yogurt or almond yogurt.
Chocolate Chips:
For a sweeter treat, add 1/2 cup of mini chocolate chips to the granola mixture before baking. This will add a delicious chocolatey flavor to the cups.
Spice it up:
Add 1/2 teaspoon of cinnamon or nutmeg to the dry ingredients for a warm, spiced flavor.
Make it vegan:
Substitute the honey with maple syrup or agave. Ensure your yogurt alternative is plant-based.
Storage Tips:
Store unfilled granola cups in an airtight container at room temperature for up to a week. Filled granola cups should be stored in the refrigerator for up to 2 days.
Make Ahead:
The granola cups can be made ahead of time and stored until you’re ready to fill them. This is a great option if you want to have a quick and easy breakfast or snack on hand.
Serving Suggestions:
These granola cups are perfect for breakfast, a snack, or even dessert. They’re also great for packing in lunchboxes or taking on the go.
Troubleshooting:
Granola cups are too crumbly: Make sure you’re pressing the granola mixture firmly into the muffin tin. You can also add a little more honey or maple syrup to help bind the ingredients together.
Granola cups are sticking to the muffin tin: Make sure you’re greasing the muffin tin really well. You can also use silicone muffin liners to prevent sticking.
Granola cups are burning: Reduce the oven temperature slightly and check the granola cups more frequently.
Conclusion:
So, there you have it! These breakfast granola cups are more than just a recipe; they’re a passport to a brighter morning. I truly believe this is a must-try recipe for anyone looking to add a little joy and convenience to their breakfast routine. They’re quick to prepare, endlessly customizable, and, most importantly, utterly delicious. The combination of crunchy granola, creamy yogurt, and burst of fresh fruit is simply irresistible.
But why are these little cups so special? Well, beyond the incredible taste, they’re incredibly versatile. Need a grab-and-go breakfast for a busy weekday? These are your answer. Looking for a healthy and satisfying snack to tide you over between meals? Look no further. Want to impress your brunch guests with a beautiful and effortless dish? These breakfast granola cups will do the trick every time.
And the possibilities don’t stop there! Feel free to get creative with your fillings and toppings. For a decadent treat, try layering in a spoonful of Nutella or peanut butter. If you’re a chocolate lover, add some mini chocolate chips or a drizzle of melted dark chocolate. For a tropical twist, use coconut yogurt and top with mango and pineapple. If you’re watching your sugar intake, opt for plain Greek yogurt and use berries as your primary sweetener. You can even add a sprinkle of chia seeds or flaxseed meal for an extra boost of nutrients.
Serving suggestions are just as flexible. Enjoy them straight from the fridge for a refreshing treat, or let them sit at room temperature for a few minutes to soften the granola slightly. For a more substantial breakfast, pair them with a hard-boiled egg or a slice of whole-wheat toast. They’re also fantastic served alongside a cup of coffee or tea.
Variations to Explore:
* Peanut Butter Banana: Use peanut butter flavored granola, add a layer of peanut butter, and top with sliced bananas.
* Chocolate Chip Cookie Dough: Mix mini chocolate chips into the granola and yogurt, and add a sprinkle of brown sugar.
* Berry Blast: Use a mix of your favorite berries, such as strawberries, blueberries, raspberries, and blackberries.
* Tropical Paradise: Use coconut yogurt and top with mango, pineapple, and shredded coconut.
* Apple Cinnamon: Use apple cinnamon granola and top with diced apples and a sprinkle of cinnamon.
I’m so confident that you’ll love these breakfast granola cups as much as I do. They’ve become a staple in my household, and I can’t imagine starting my day without them. The best part is that they’re so easy to make, even on the busiest mornings.
So, what are you waiting for? Grab your ingredients, preheat your oven (if you’re making your own granola), and get ready to create some breakfast magic. I promise you won’t be disappointed.
And once you’ve tried them, I’d love to hear about your experience! Share your photos and variations on social media using #BreakfastGranolaCups and tag me so I can see your creations. I’m always looking for new and exciting ways to enjoy this versatile recipe. Happy breakfasting! I can’t wait to see what delicious combinations you come up with. Let me know in the comments below what your favorite variation is!
Breakfast Granola Cups: Easy Recipe & Healthy Options
Crunchy homemade granola cups filled with creamy Greek yogurt and fresh berries. A healthy and delicious breakfast or snack!
Ingredients
Instructions
Recipe Notes
- Nut Variations: Almonds, pecans, walnuts, cashews, and macadamia nuts all work well.
- Seed Variations: Pumpkin seeds, sunflower seeds, chia seeds, flax seeds, and hemp seeds are all great options.
- Sweetener Variations: Agave nectar, brown rice syrup, or even a sugar-free sweetener can be used.
- Fruit Variations: Sliced bananas, peaches, mangoes, or kiwi all work well. You can also use dried fruit like raisins, cranberries, or apricots.
- Yogurt Variations: Regular yogurt, Icelandic yogurt (Skyr), or even a dairy-free yogurt alternative like coconut yogurt or almond yogurt.
- Chocolate Chips: Add 1/2 cup of mini chocolate chips to the granola mixture before baking.
- Spice it up: Add 1/2 teaspoon of cinnamon or nutmeg to the dry ingredients for a warm, spiced flavor.
- Make it vegan: Substitute the honey with maple syrup or agave. Ensure your yogurt alternative is plant-based.
- Storage Tips: Store unfilled granola cups in an airtight container at room temperature for up to a week. Filled granola cups should be stored in the refrigerator for up to 2 days.
- Make Ahead: The granola cups can be made ahead of time and stored until you’re ready to fill them.
- Serving Suggestions: These granola cups are perfect for breakfast, a snack, or even dessert. They’re also great for packing in lunchboxes or taking on the go.
- Troubleshooting:
- Granola cups are too crumbly: Make sure you’re pressing the granola mixture firmly into the muffin tin. You can also add a little more honey or maple syrup to help bind the ingredients together.
- Granola cups are sticking to the muffin tin: Make sure you’re greasing the muffin tin really well. You can also use silicone muffin liners to prevent sticking.
- Granola cups are burning: Reduce the oven temperature slightly and check the granola cups more frequently.


Leave a Comment