

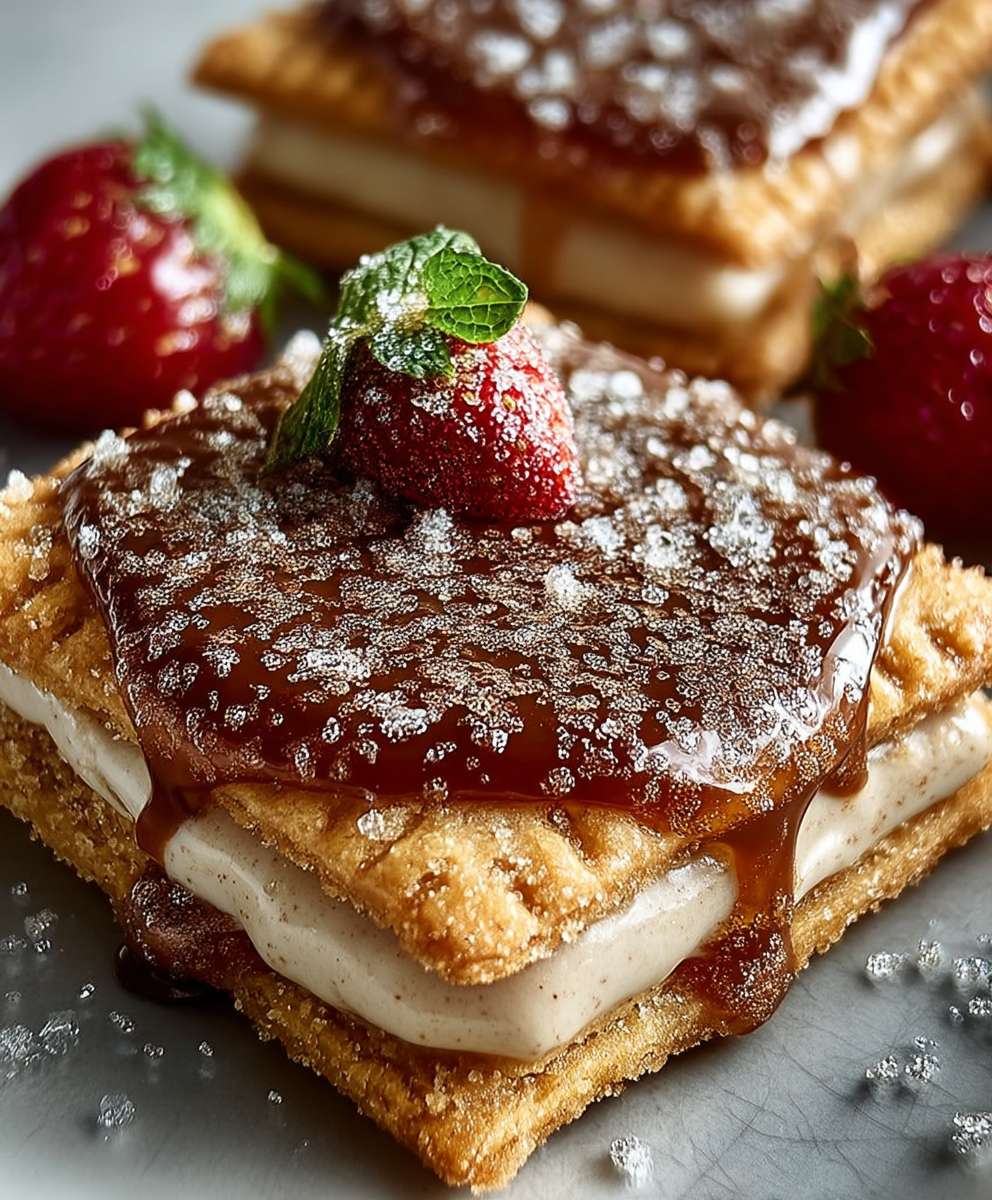
Brown Sugar Pop Tart Cookies: Prepare to be transported back to your childhood with a sophisticated twist! Remember the joy of unwrapping a warm, frosted Pop-Tart? Now, imagine that same comforting flavor baked into a soft, chewy cookie. These aren’t your average cookies; they’re a nostalgic hug in every bite.
While the classic Pop-Tart emerged in the 1960s as a convenient breakfast treat, its essence – a sweet, filled pastry – has roots in much older baking traditions. Think of the hand pies and filled biscuits enjoyed for generations. We’ve taken that timeless concept and reimagined it into a delightful cookie form.
What makes these Brown Sugar Pop Tart Cookies so irresistible? It’s the perfect combination of textures: a soft, slightly chewy cookie base, a gooey brown sugar filling that melts in your mouth, and a sweet glaze that adds just the right amount of sugary goodness. People adore them because they’re easy to make, incredibly satisfying, and offer a unique flavor profile that’s both familiar and exciting. They’re perfect for a quick dessert, a lunchbox treat, or a fun baking project with the family. Get ready to create some sweet memories!

Ingredients:
- For the Cookie Dough:
- 2 ½ cups all-purpose flour, plus more for dusting
- 1 teaspoon baking powder
- ½ teaspoon baking soda
- ½ teaspoon salt
- 1 cup (2 sticks) unsalted butter, softened
- ¾ cup granulated sugar
- ¾ cup packed light brown sugar
- 2 large eggs
- 1 teaspoon vanilla extract
- For the Brown Sugar Filling:
- ½ cup (1 stick) unsalted butter, softened
- 1 cup packed light brown sugar
- 2 tablespoons all-purpose flour
- 1 tablespoon milk
- ½ teaspoon ground cinnamon
- ¼ teaspoon salt
- For the Glaze:
- 2 cups powdered sugar
- 4-6 tablespoons milk, or more as needed
- ½ teaspoon vanilla extract
- Optional Sprinkles:
- Your favorite sprinkles for decorating
Preparing the Cookie Dough
- Combine Dry Ingredients: In a medium bowl, whisk together the flour, baking powder, baking soda, and salt. This ensures that the leavening agents are evenly distributed throughout the dough, resulting in a consistent texture. Set aside for later.
- Cream Butter and Sugars: In a large bowl (or the bowl of a stand mixer), cream together the softened butter, granulated sugar, and brown sugar until light and fluffy. This process usually takes about 3-5 minutes. The mixture should be pale and airy, indicating that the sugar has properly aerated the butter. This step is crucial for creating a tender cookie.
- Add Eggs and Vanilla: Beat in the eggs one at a time, mixing well after each addition. Then, stir in the vanilla extract. Make sure the eggs are fully incorporated before adding the next one to prevent the batter from curdling. The vanilla extract enhances the overall flavor profile of the cookies.
- Gradually Add Dry Ingredients: Gradually add the dry ingredients to the wet ingredients, mixing on low speed until just combined. Be careful not to overmix the dough, as this can develop the gluten in the flour and result in tough cookies. Mix until you no longer see streaks of flour.
- Chill the Dough: Divide the dough in half, flatten each half into a disc, wrap tightly in plastic wrap, and refrigerate for at least 1 hour, or preferably 2 hours. Chilling the dough allows the gluten to relax, making it easier to roll out and preventing the cookies from spreading too much during baking. It also helps the flavors meld together.
Making the Brown Sugar Filling
- Combine Filling Ingredients: In a medium bowl, combine the softened butter, brown sugar, flour, milk, cinnamon, and salt. Mix well until smooth and creamy. The filling should be thick enough to hold its shape but still spreadable.
- Adjust Consistency (if needed): If the filling seems too thick, add a tiny bit more milk, a teaspoon at a time, until you reach the desired consistency. If it’s too thin, add a little more flour, half a teaspoon at a time.
Assembling and Baking the Cookies
- Preheat Oven and Prepare Baking Sheets: Preheat your oven to 350°F (175°C). Line two baking sheets with parchment paper. Parchment paper prevents the cookies from sticking and makes cleanup easier.
- Roll Out the Dough: On a lightly floured surface, roll out one disc of dough to about ⅛-inch thickness. Use a 3-inch cookie cutter (round or rectangular) to cut out cookies. Place the cookies on the prepared baking sheets, leaving about 1 inch between each cookie.
- Repeat with Second Dough Disc: Repeat the rolling and cutting process with the second disc of dough. These will be the tops of your pop tart cookies.
- Apply Filling: Spread a thin layer of the brown sugar filling onto half of the cookies (the bottoms). Leave a small border around the edge. Don’t overfill, or the filling will ooze out during baking.
- Top with Second Cookie: Gently place the remaining cookies (the tops) over the filled cookies, aligning the edges as closely as possible.
- Seal the Edges: Use a fork to crimp the edges of each cookie, sealing the top and bottom layers together. This helps to prevent the filling from leaking out and gives the cookies a classic pop tart look.
- Poke Holes (Important!): Use a toothpick or skewer to poke a few small holes in the top of each cookie. This allows steam to escape during baking, preventing the cookies from puffing up too much and potentially bursting.
- Bake: Bake for 10-12 minutes, or until the edges are lightly golden brown. Keep a close eye on them, as they can burn easily.
- Cool: Let the cookies cool on the baking sheets for a few minutes before transferring them to a wire rack to cool completely.
Making the Glaze and Decorating
- Prepare the Glaze: In a medium bowl, whisk together the powdered sugar, milk, and vanilla extract until smooth. Add more milk, one tablespoon at a time, until you reach your desired consistency. The glaze should be thick enough to coat the cookies but thin enough to drizzle easily.
- Glaze the Cookies: Once the cookies are completely cool, drizzle the glaze over the top of each cookie. You can dip the cookies into the glaze or use a spoon to drizzle it on.
- Add Sprinkles (Optional): Immediately sprinkle your favorite sprinkles over the glaze before it sets. This will ensure that the sprinkles adhere properly.
- Let the Glaze Set: Allow the glaze to set completely before serving or storing the cookies. This usually takes about 30 minutes to an hour.
Tips for Success:
- Use Room Temperature Ingredients: Using room temperature butter and eggs ensures that they emulsify properly, creating a smooth and even batter.
- Don’t Overmix the Dough: Overmixing develops the gluten in the flour, resulting in tough cookies. Mix until just combined.
- Chill the Dough: Chilling the dough is crucial for preventing the cookies from spreading too much during baking.
- Seal the Edges Well: Make sure to crimp the edges of the cookies tightly to prevent the filling from leaking out.
- Poke Holes: Don’t forget to poke holes in the top of the cookies to allow steam to escape.
- Cool Completely Before Glazing: Glazing warm cookies will cause the glaze to melt and run off.
Storage Instructions:
Store the cooled and glazed cookies in an airtight container at room temperature for up to 3-4 days. They can also be frozen for longer storage. To freeze, wrap the cookies individually in plastic wrap and then place them in a freezer-safe bag or container. Thaw at room temperature before serving.
Conclusion:
And there you have it! These Brown Sugar Pop Tart Cookies are truly a must-try for anyone who loves the nostalgic flavor of Pop-Tarts but craves a homemade, slightly more sophisticated treat. The soft, chewy cookie base, the gooey brown sugar filling, and that sweet, simple glaze – it all comes together in a symphony of deliciousness that will transport you right back to your childhood, but with a grown-up twist.
Why are these cookies so special? Because they capture the essence of a classic Pop-Tart without being overly processed or artificial. You control the ingredients, ensuring a higher quality and a more satisfying bite. Plus, the process of making them is surprisingly simple and fun, perfect for a weekend baking project or a special occasion.
But the best part? The versatility! While I’ve presented my favorite version, the possibilities are endless. Feeling adventurous? Try adding a pinch of cinnamon or nutmeg to the cookie dough for a warm, spiced flavor. Or, swap out the brown sugar filling for a homemade jam or even a Nutella swirl. For a truly decadent experience, consider dipping the finished cookies in melted chocolate and sprinkling them with chopped nuts or sprinkles.
Serving Suggestions: These Brown Sugar Pop Tart Cookies are fantastic on their own, enjoyed with a cold glass of milk or a warm cup of coffee. They also make a delightful addition to a dessert platter, a thoughtful homemade gift, or a crowd-pleasing treat for parties and gatherings. Imagine serving them warm from the oven with a scoop of vanilla ice cream – pure bliss! You can even crumble them over yogurt or oatmeal for a sweet and satisfying breakfast.
Variations to Explore: Don’t be afraid to experiment with different flavors and fillings. Consider using a different type of sugar in the cookie dough, such as turbinado sugar, for a slightly coarser texture and a hint of molasses flavor. You could also add chopped pecans or walnuts to the dough for a nutty crunch. For the filling, try using a combination of brown sugar and maple syrup for a richer, more complex flavor. And if you’re feeling really creative, you could even try making a savory version of these cookies, using a cheese-filled dough and a savory jam filling.
I truly believe that these cookies are a winner, and I can’t wait for you to try them! The recipe is straightforward, the ingredients are readily available, and the results are simply irresistible. So, gather your ingredients, preheat your oven, and get ready to bake up a batch of these delightful Brown Sugar Pop Tart Cookies.
Ready to bake? I’m confident you’ll love them as much as I do. And when you do, please share your experience! Leave a comment below, tag me in your photos on social media, and let me know what variations you tried. I’m always eager to hear your feedback and see your creative interpretations. Happy baking, and enjoy every delicious bite! I hope you find that this Brown Sugar Pop Tart Cookies recipe becomes a new favorite in your household.
Brown Sugar Pop Tart Cookies: The Ultimate Recipe Guide
Homemade pop tart cookies with brown sugar filling and sweet glaze. Perfect for a nostalgic snack or fun baking.
Ingredients
- 2 ½ cups all-purpose flour, plus more for dusting
- 1 teaspoon baking powder
- ½ teaspoon baking soda
- ½ teaspoon salt
- 1 cup (2 sticks) unsalted butter, softened
- ¾ cup granulated sugar
- ¾ cup packed light brown sugar
- 2 large eggs
- 1 teaspoon vanilla extract
- ½ cup (1 stick) unsalted butter, softened
- 1 cup packed light brown sugar
- 2 tablespoons all-purpose flour
- 1 tablespoon milk
- ½ teaspoon ground cinnamon
- ¼ teaspoon salt
- 2 cups powdered sugar
- 4-6 tablespoons milk, or more as needed
- ½ teaspoon vanilla extract
- Your favorite sprinkles for decorating
Instructions
- Combine Dry Ingredients: In a medium bowl, whisk together the flour, baking powder, baking soda, and salt. Set aside.
- Cream Butter and Sugars: In a large bowl (or the bowl of a stand mixer), cream together the softened butter, granulated sugar, and brown sugar until light and fluffy (3-5 minutes).
- Add Eggs and Vanilla: Beat in the eggs one at a time, mixing well after each addition. Then, stir in the vanilla extract.
- Gradually Add Dry Ingredients: Gradually add the dry ingredients to the wet ingredients, mixing on low speed until just combined. Be careful not to overmix the dough.
- Chill the Dough: Divide the dough in half, flatten each half into a disc, wrap tightly in plastic wrap, and refrigerate for at least 1 hour, or preferably 2 hours.
- Combine Filling Ingredients: In a medium bowl, combine the softened butter, brown sugar, flour, milk, cinnamon, and salt. Mix well until smooth and creamy.
- Adjust Consistency (if needed): If the filling seems too thick, add a tiny bit more milk, a teaspoon at a time, until you reach the desired consistency. If it’s too thin, add a little more flour, half a teaspoon at a time.
- Preheat Oven and Prepare Baking Sheets: Preheat your oven to 350°F (175°C). Line two baking sheets with parchment paper.
- Roll Out the Dough: On a lightly floured surface, roll out one disc of dough to about ⅛-inch thickness. Use a 3-inch cookie cutter (round or rectangular) to cut out cookies. Place the cookies on the prepared baking sheets, leaving about 1 inch between each cookie.
- Repeat with Second Dough Disc: Repeat the rolling and cutting process with the second disc of dough. These will be the tops of your pop tart cookies.
- Apply Filling: Spread a thin layer of the brown sugar filling onto half of the cookies (the bottoms). Leave a small border around the edge.
- Top with Second Cookie: Gently place the remaining cookies (the tops) over the filled cookies, aligning the edges as closely as possible.
- Seal the Edges: Use a fork to crimp the edges of each cookie, sealing the top and bottom layers together.
- Poke Holes (Important!): Use a toothpick or skewer to poke a few small holes in the top of each cookie.
- Bake: Bake for 10-12 minutes, or until the edges are lightly golden brown.
- Cool: Let the cookies cool on the baking sheets for a few minutes before transferring them to a wire rack to cool completely.
- Prepare the Glaze: In a medium bowl, whisk together the powdered sugar, milk, and vanilla extract until smooth. Add more milk, one tablespoon at a time, until you reach your desired consistency.
- Glaze the Cookies: Once the cookies are completely cool, drizzle the glaze over the top of each cookie.
- Add Sprinkles (Optional): Immediately sprinkle your favorite sprinkles over the glaze before it sets.
- Let the Glaze Set: Allow the glaze to set completely before serving or storing the cookies. This usually takes about 30 minutes to an hour.
Notes
- Use room temperature ingredients for the cookie dough.
- Don’t overmix the dough.
- Chilling the dough is crucial.
- Seal the edges well to prevent filling leakage.
- Poke holes to allow steam to escape.
- Cool completely before glazing.
- Store the cooled and glazed cookies in an airtight container at room temperature for up to 3-4 days. They can also be frozen for longer storage. To freeze, wrap the cookies individually in plastic wrap and then place them in a freezer-safe bag or container. Thaw at room temperature before serving.

Leave a Comment