

Cupcake Pull Apart Graduation Cap Cake
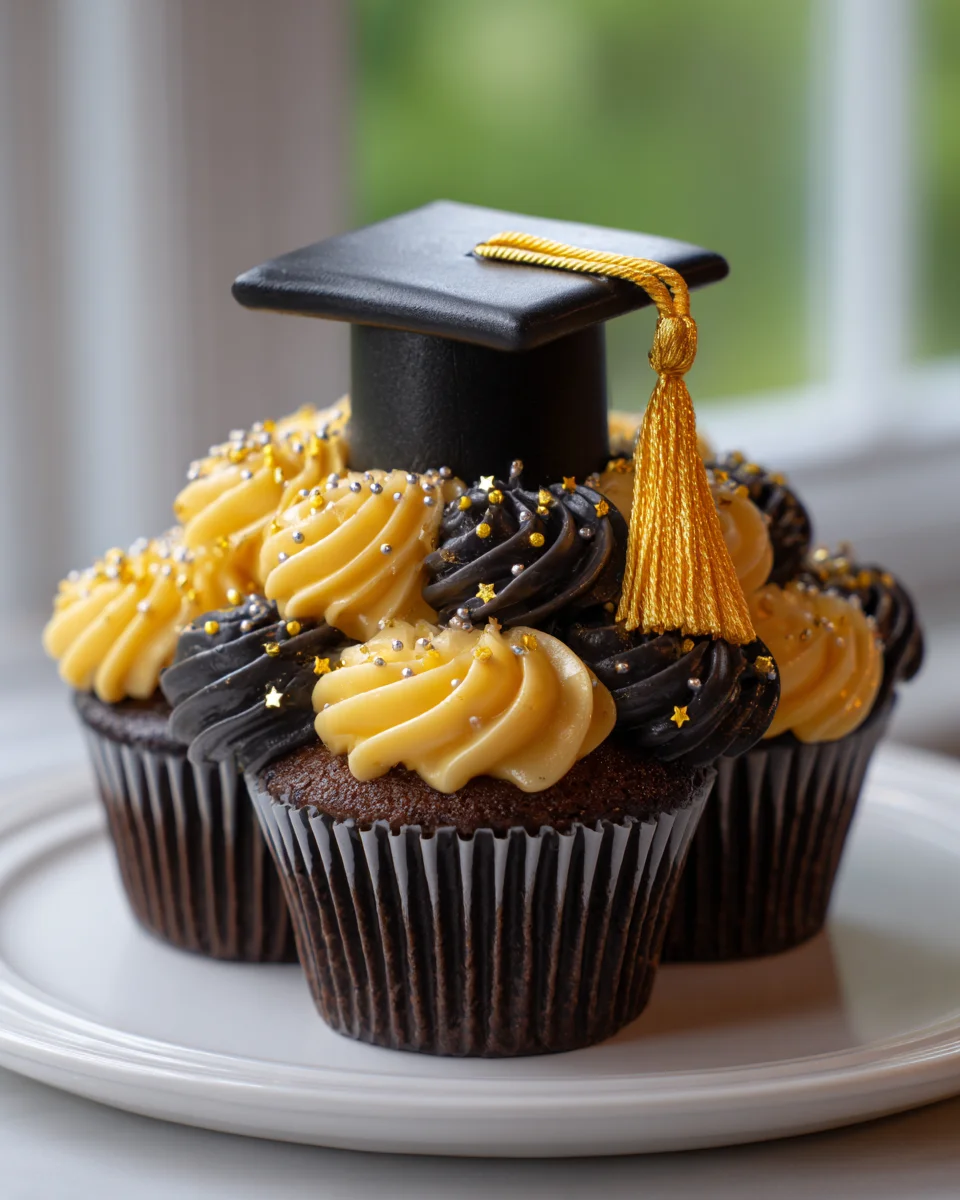
Oh, the graduation season! It’s a time for celebration, caps, gowns, and of course, delicious treats. And trust me, when it comes to marking such a momentous occasion, you’re going to absolutely adore my Cupcake Pull Apart Graduation Cap Cake! This isn’t just any cake; it’s a brilliant, no-fuss masterpiece that combines the festive spirit of graduation with the sheer genius of pull-apart cupcakes. Imagine a stunning graduation cap, complete with a tassel, that’s actually a collection of individual cupcakes cleverly arranged and frosted to look like one seamless cake. What makes this recipe so incredibly special, and why I know you’ll love it, is its dual charm: it’s visually spectacular, creating that “wow” factor for your graduate, and yet, it’s ridiculously easy to serve! No need for plates, forks, or a messy knife to cut slices – guests simply ‘pull apart’ their own cupcake, making cleanup and serving a breeze. I’m so excited for you to try this; it’s truly the perfect, celebratory centerpiece for any graduation party, ensuring smiles all around and a wonderfully sweet send-off for your grad!

Congratulations, future graduates (or proud parents of one)! Today, I’m thrilled to share how to create a truly show-stopping and delightfully easy dessert for your graduation celebration: the Cupcake Pull Apart Graduation Cap Cake. This isn’t just any cake; it’s a clever arrangement of individual cupcakes, frosted together to form the iconic shape of a graduation cap. It’s fantastic because there’s no slicing involved – guests simply “pull apart” their cupcake, making serving a breeze and ensuring everyone gets a perfect portion. Let’s dive in and make some sweet memories!
Ingredient Notes
To create our impressive Cupcake Pull Apart Graduation Cap Cake, you’ll need a few key ingredients. The beauty here is that you can adapt them to your taste and time constraints!
- Cupcakes: You’ll need about 20-24 standard-sized cupcakes. I often find it easiest to buy good quality store-bought vanilla or chocolate cupcakes to save time, especially during busy graduation season. However, if you love to bake, feel free to whip up your favorite homemade recipe! Vanilla is a classic choice, as it provides a neutral canvas, but chocolate, red velvet, or even lemon cupcakes would be delicious too. Just make sure they’re completely cooled before you start frosting.
- Buttercream Frosting: This is the glue that holds our “cake” together and gives it its beautiful finish. You’ll need a generous batch, about 4-5 cups. I recommend a sturdy homemade American buttercream recipe – it pipes beautifully and holds its shape well. You can also use good quality store-bought frosting if you’re short on time. For this cake, we’ll primarily be using black frosting for the cap itself, so make sure to have plenty of black gel food coloring on hand.
- Black Gel Food Coloring: Achieving a deep, true black can take a fair bit of gel coloring. Liquid food coloring won’t give you the same intense color without thinning out your frosting too much. I highly recommend a high-quality gel or paste food coloring.
- School Color Frosting (Optional): To add a pop of color and personalize your cap, have a small amount (about 1/2 to 1 cup) of frosting tinted in your graduate’s school colors. This is perfect for piping accents or the graduation year.
- Licorice Lace or Fruit Roll-Up Strips: This is for our iconic tassel! Black licorice lace works perfectly for a traditional look. If you prefer something fruitier or want to introduce another color, you can cut thin strips from a fruit roll-up.
- Mini Chocolate Squares or Mini Reese’s Peanut Butter Cups: This will be our “button” on top of the cap, where the tassel attaches. Mini chocolate squares (like those from a baking bar) or mini Reese’s cups are ideal for this. You could also use a large chocolate candy melt or a gumdrop.
- Sprinkles (Optional): Themed sprinkles in school colors, metallic gold, or silver can add an extra festive touch to the brim or around the edges of the cap.
Substitutions & Variations: Don’t be afraid to get creative! If you don’t like licorice, you can use thin strips of fondant or even edible string for the tassel. For the “button,” any small, flat, round candy will do. The core idea is the arrangement and frosting, so the flavors and small decorative elements are highly customizable to suit your graduate’s preferences!
Step-by-Step Instructions
Creating this Cupcake Pull Apart Graduation Cap Cake is easier than it looks, I promise! Just follow these steps, and you’ll have a stunning centerpiece for your celebration.
- Prepare Your Cupcakes: First, ensure all your cupcakes are completely cooled. If they are warm, the frosting will melt and slide right off. Remove them from their wrappers.
- Tint Your Frosting: Divide your buttercream. Tint the largest portion (about 3-4 cups) a deep, rich black using your gel food coloring. This can take a while, so be patient and add color gradually until you achieve the desired shade. If using, tint a smaller portion (about 1/2 to 1 cup) in your graduate’s school color. Keep a small amount of white frosting aside if you plan to pipe details like the year.
- Arrange the Cap Shape: This is the fun part! Find a large, sturdy platter, cake board, or serving tray that will accommodate your arrangement.
- For the “Mortarboard” (the top square): Arrange 16 cupcakes into a 4×4 square. Place them close enough so their edges are just touching.
- For the “Brim”: Below the center of your 4×4 square, arrange 4-5 cupcakes in a slightly curved line to form the brim of the cap. Again, ensure they are touching the square above and each other.
- You should have a total of around 20-21 cupcakes forming the cap shape.
- Crumb Coat (Optional, but Recommended for Dark Frosting): If you want to ensure a smooth, uniform black finish without any cupcake crumbs showing through, apply a thin layer of black frosting over the top and sides of all the arranged cupcakes, working them together. Chill for 15-20 minutes to set.
- Frost the Cap: Using a large offset spatula or a piping bag fitted with a large round tip (like an Ateco 808 or Wilton 1A), generously frost the entire graduation cap arrangement with your black buttercream. Smooth it out as best you can, making sure to fill in the gaps between the cupcakes so it looks like one cohesive cake. Don’t worry if it’s not absolutely perfect; the decorations will hide minor imperfections.
- Add the Tassel and Button:
- Place your mini chocolate square or mini Reese’s cup near the top center of the 4×4 mortarboard section. This is our “button.”
- Drape your licorice lace or fruit roll-up strips (your “tassel”) from the button, trailing down over the edge of the mortarboard. You can secure it slightly with a tiny dab of frosting under the button if needed.
- Decorate with School Colors (Optional): If you have frosting in school colors, now’s the time to personalize!
- Using a small round piping tip, pipe the graduation year onto the mortarboard.
- You can also pipe the graduate’s initials or a small decorative border along the edge of the brim.
- Add sprinkles in school colors around the edges of the cap or where the brim meets the mortarboard for extra flair.
- Chill (Optional): If you’re not serving immediately or need to transport the cake, a brief chill in the refrigerator (about 30 minutes) can help the frosting firm up, making it more stable.
Tips & Suggestions
I’ve made a few of these, and I’ve picked up some tricks along the way that I’m happy to share to make your Cupcake Pull Apart Graduation Cap Cake a huge success!
- Choose Your Platter Wisely: Select a serving platter or cake board that is sturdy and large enough to hold the entire cupcake arrangement without overcrowding. It also needs to be easy to transport if you’re taking it to a party.
- Cupcake Temperature is Key: Always, always ensure your cupcakes are completely cool. If they’re even slightly warm, your beautiful frosting will turn into a melty mess.
- Achieving True Black Frosting: Getting a really dark black can be tricky. Start with chocolate frosting if you can, as its natural brown base helps achieve black faster. Otherwise, for vanilla frosting, add generous amounts of black gel food coloring. Let the colored frosting sit for about 15-30 minutes; the color will deepen over time. If it still looks gray, add more color.
- Piping Bag for Easy Frosting: While an offset spatula works, I find using a piping bag (even with just the end snipped off, or with a large round tip) makes frosting the entire surface and filling the gaps between cupcakes much easier and neater.
- Prepare Ahead: You can bake (or buy) your cupcakes a day or two in advance. Store them in an airtight container at room temperature. The frosting can also be made a few days ahead and stored in the fridge. Bring it to room temperature and re-whip briefly before use. Assemble the cake the day of the event for freshest results.
- Personalize, Personalize, Personalize: This cake is such a wonderful canvas for personalization! Use school colors, pipe the graduation year, or even the graduate’s major-related symbols. It makes it extra special.
- Transporting Your Cake: If you need to transport your assembled cap cake, make sure it’s on a flat, stable surface. A non-slip mat under the platter in your car can be a lifesaver. Keep it cool to prevent the frosting from softening during transit.
- Don’t Stress Perfection: Remember, this is a fun, celebratory cake! The pull-apart nature means minor imperfections in frosting won’t be noticed once everyone starts grabbing their cupcake. Enjoy the process!
Storage
Proper storage will ensure your Cupcake Pull Apart Graduation Cap Cake stays fresh and delicious for the celebration and beyond, if there are any leftovers!
- Room Temperature: If your cake is made with a stable American buttercream (butter, powdered sugar, milk/cream), it can safely be stored at cool room temperature (below 75°F or 24°C) for up to 1-2 days. Make sure it’s covered loosely with plastic wrap or placed under a cake dome to prevent it from drying out or absorbing refrigerator odors.
- Refrigeration: If your frosting contains cream cheese or if your home is warm, or if you want to store it for longer, refrigerate the assembled cake. Loosely cover the entire platter with plastic wrap or aluminum foil to keep it fresh. When refrigerated, the cake will typically last for 3-4 days.
- Serving from the Fridge: If you’ve refrigerated the cake, I recommend taking it out about 30-60 minutes before serving. This allows the frosting and cupcakes to come closer to room temperature, which will improve their texture and flavor, making the buttercream softer and more enjoyable.
- Freezing (Not Recommended for Assembled Cake): While individual frosted cupcakes can often be frozen successfully, freezing the entire assembled pull-apart cake can be tricky due to its size and the potential for the decoration to get smudged. If you want to freeze, I’d recommend freezing unfrosted cupcakes, then thawing and assembling fresh.
Final Thoughts
Well, there you have it! My hope is that you’re now feeling inspired to create this truly special dessert. The Cupcake Pull Apart Graduation Cap Cake is an absolute winner for so many reasons. Not only does it look incredibly impressive and perfectly capture the spirit of graduation with its iconic cap shape, but it also offers the ultimate convenience. No messy slicing, no plates needed – just individual cupcakes ready to be pulled apart and enjoyed by every proud graduate and guest! It’s the kind of celebratory treat that makes everyone smile and simplifies serving, leaving you more time to cherish those precious moments. So go ahead, bake up this delightful Cupcake Pull Apart Graduation Cap Cake and make your graduation celebration unforgettable. You’ll be so glad you did!

Celebrate with a Pull Apart Graduation Cap Cupcake Cake!
- Total Time: 30 minutes
- Yield: 20-24 servings 1x
Description
This Cupcake Pull Apart Graduation Cap Cake is a stunning centerpiece for any graduation celebration, combining the fun of individual cupcakes with the iconic shape of a graduation cap. It’s easy to serve and sure to impress your guests!
Ingredients
- 20–24 standard-sized cupcakes (store-bought or homemade)
- 4–5 cups buttercream frosting
- Black gel food coloring
- 1/2 to 1 cup school color frosting (optional)
- Licorice lace or fruit roll-up strips (for tassel)
- Mini chocolate squares or mini Reese's Peanut Butter Cups (for button)
- Sprinkles in school colors, metallic gold, or silver (optional)
Instructions
- Prepare Your Cupcakes: First, ensure all your cupcakes are completely cooled. If they are warm, the frosting will melt and slide right off. Remove them from their wrappers.
- Tint Your Frosting: Divide your buttercream. Tint the largest portion (about 3-4 cups) a deep, rich black using your gel food coloring. This can take a while, so be patient and add color gradually until you achieve the desired shade. If using, tint a smaller portion (about 1/2 to 1 cup) in your graduate's school color. Keep a small amount of white frosting aside if you plan to pipe details like the year.
- Arrange the Cap Shape: Find a large, sturdy platter, cake board, or serving tray that will accommodate your arrangement. For the 'Mortarboard' (the top square): Arrange 16 cupcakes into a 4×4 square. Place them close enough so their edges are just touching. For the 'Brim': Below the center of your 4×4 square, arrange 4-5 cupcakes in a slightly curved line to form the brim of the cap. Again, ensure they are touching the square above and each other. You should have a total of around 20-21 cupcakes forming the cap shape.
- Crumb Coat (Optional, but Recommended for Dark Frosting): If you want to ensure a smooth, uniform black finish without any cupcake crumbs showing through, apply a thin layer of black frosting over the top and sides of all the arranged cupcakes, working them together. Chill for 15-20 minutes to set.
- Frost the Cap: Using a large offset spatula or a piping bag fitted with a large round tip (like an Ateco 808 or Wilton 1A), generously frost the entire graduation cap arrangement with your black buttercream. Smooth it out as best you can, making sure to fill in the gaps between the cupcakes so it looks like one cohesive cake. Don't worry if it's not absolutely perfect; the decorations will hide minor imperfections.
- Add the Tassel and Button: Place your mini chocolate square or mini Reese's cup near the top center of the 4×4 mortarboard section. This is our 'button.' Drape your licorice lace or fruit roll-up strips (your 'tassel') from the button, trailing down over the edge of the mortarboard. You can secure it slightly with a tiny dab of frosting under the button if needed.
- Decorate with School Colors (Optional): If you have frosting in school colors, now's the time to personalize! Using a small round piping tip, pipe the graduation year onto the mortarboard. You can also pipe the graduate's initials or a small decorative border along the edge of the brim. Add sprinkles in school colors around the edges of the cap or where the brim meets the mortarboard for extra flair.
- Chill (Optional): If you're not serving immediately or need to transport the cake, a brief chill in the refrigerator (about 30 minutes) can help the frosting firm up, making it more stable.
- Prep Time: 30 mins
- Cook Time: 0 mins
- Category: Dessert
- Method: Assembly
- Cuisine: American
Nutrition
- Serving Size: 1 cupcake
- Calories: 200
- Sugar: 20 g
- Sodium: 150 mg
- Fat: 8 g
- Saturated Fat: 5 g
- Unsaturated Fat: 2 g
- Trans Fat: 0 g
- Carbohydrates: 30 g
- Fiber: 1 g
- Protein: 2 g
- Cholesterol: 20 mg
Keywords: Choose a sturdy platter for transport and ensure cupcakes are completely cool before frosting. Personalize with school colors and decorations for a special touch.

Leave a Comment