

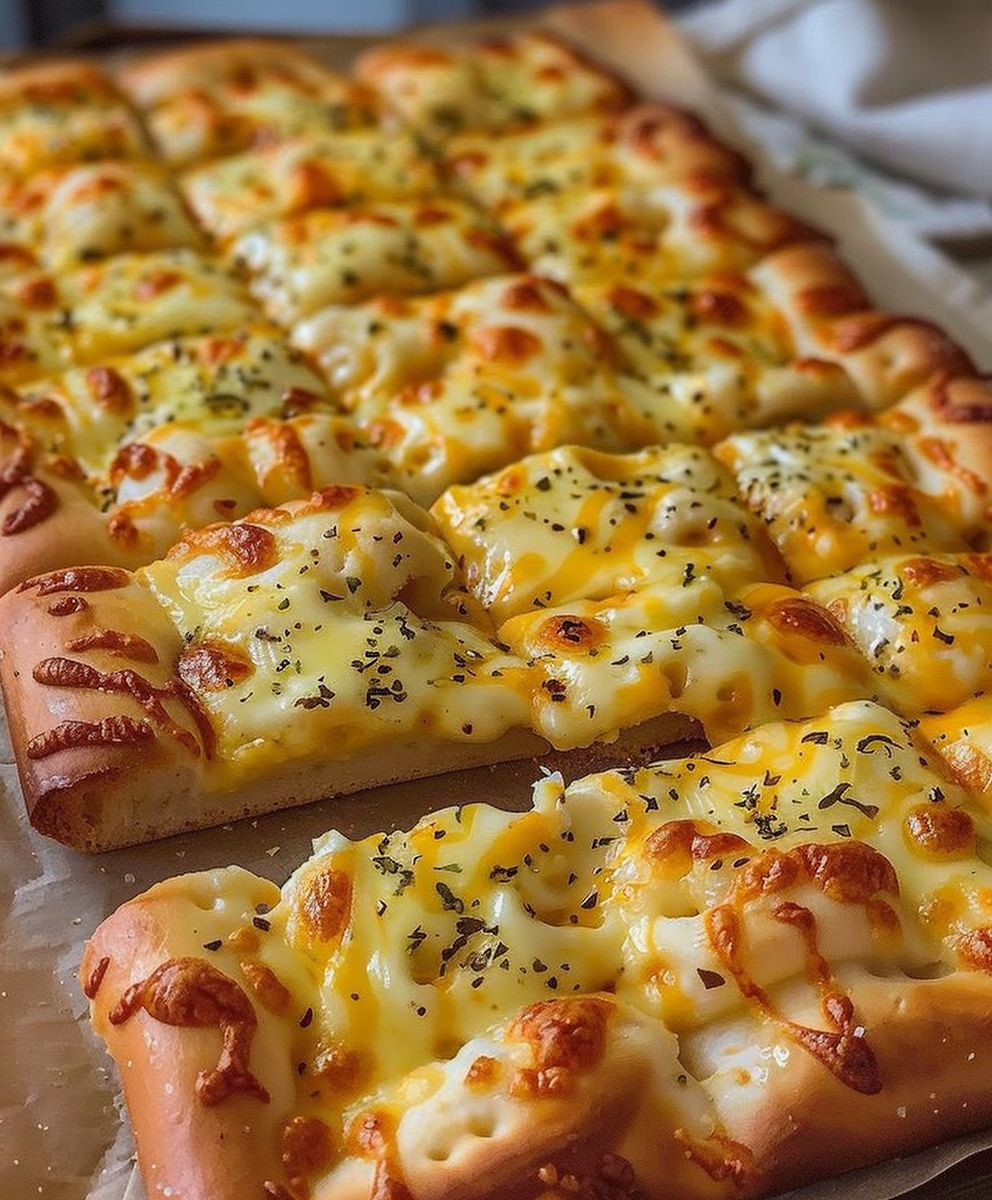
Cheesy Garlic Breadsticks: Is there anything more comforting than the aroma of warm garlic and melted cheese wafting through your kitchen? I think not! These aren’t just any breadsticks; they’re a symphony of flavors and textures that will have everyone reaching for seconds (and thirds!).
While the exact origins of garlic breadsticks are debated, their popularity exploded alongside the rise of Italian-American cuisine in the mid-20th century. They quickly became a staple appetizer, a perfect accompaniment to pasta dishes, and a beloved snack all on their own. The beauty of cheesy garlic breadsticks lies in their simplicity and versatility. They’re incredibly easy to make, requiring minimal ingredients and effort, yet they deliver maximum flavor.
People adore these breadsticks for a multitude of reasons. The crispy, golden-brown exterior gives way to a soft, pillowy interior, creating a delightful textural contrast. The pungent garlic, infused into the buttery base, is perfectly balanced by the rich, gooey cheese. Whether you’re serving them as a party appetizer, a side dish for a family dinner, or simply enjoying them as a late-night treat, cheesy garlic breadsticks are guaranteed to be a crowd-pleaser. So, let’s get baking and create some cheesy, garlicky magic!

Ingredients:
- 1 pound pizza dough (store-bought or homemade)
- 1/2 cup (1 stick) unsalted butter, melted
- 4 cloves garlic, minced
- 1 teaspoon dried Italian seasoning
- 1/2 teaspoon garlic powder
- 1/4 teaspoon salt
- 1/4 teaspoon black pepper
- 1 1/2 cups shredded mozzarella cheese
- 1/2 cup grated Parmesan cheese
- Optional: Fresh parsley, chopped, for garnish
- Optional: Marinara sauce, for dipping
Preparing the Garlic Butter:
Okay, let’s get started! The first thing we need to do is make our amazing garlic butter. This is what’s going to give our breadsticks that incredible flavor, so pay attention!
- Melt the butter: In a small, microwave-safe bowl, melt the butter. You can do this in the microwave in 30-second intervals, stirring in between, until it’s completely melted. Alternatively, you can melt it in a small saucepan over low heat on the stovetop. Just be careful not to burn it!
- Add the garlic and seasonings: Once the butter is melted, add the minced garlic, Italian seasoning, garlic powder, salt, and pepper. Stir everything together really well to combine. The heat from the melted butter will help to release the flavors of the garlic and herbs, making it even more aromatic.
- Let it infuse: Let the garlic butter mixture sit for about 5-10 minutes to allow the flavors to meld together. This step is important because it gives the garlic time to infuse the butter, resulting in a more flavorful breadstick. You’ll be amazed at the difference it makes!
Preparing the Dough:
Now that our garlic butter is ready, let’s move on to the dough. Whether you’re using store-bought or homemade, this part is pretty straightforward.
- Preheat the oven: Preheat your oven to 400°F (200°C). This is the ideal temperature for baking the breadsticks to a golden brown perfection.
- Prepare the baking sheet: Line a large baking sheet with parchment paper. This will prevent the breadsticks from sticking and make cleanup a breeze. If you don’t have parchment paper, you can lightly grease the baking sheet with cooking spray.
- Stretch or roll out the dough: On a lightly floured surface, stretch or roll out the pizza dough into a large rectangle, about 12×16 inches. The thickness should be about 1/4 inch. If you’re using store-bought dough, it might already be in a rectangular shape, which makes things even easier!
- Cut into strips: Using a pizza cutter or a sharp knife, cut the dough into strips that are about 1 inch wide and 6-8 inches long. These will be our breadsticks! Don’t worry if they’re not perfectly uniform; a little variation adds character.
- Arrange on the baking sheet: Place the breadsticks on the prepared baking sheet, leaving a little space between each one. This will allow them to bake evenly and prevent them from sticking together.
Assembling and Baking the Breadsticks:
This is where the magic happens! We’re going to combine the garlic butter, cheese, and dough to create those irresistible cheesy garlic breadsticks.
- Brush with garlic butter: Using a pastry brush, generously brush the garlic butter mixture over the breadsticks. Make sure to get every nook and cranny! You want each breadstick to be coated in that delicious garlic flavor.
- Sprinkle with cheese: Sprinkle the mozzarella and Parmesan cheese evenly over the breadsticks. Don’t be shy with the cheese! The more cheese, the better, in my opinion.
- Bake: Bake in the preheated oven for 12-15 minutes, or until the breadsticks are golden brown and the cheese is melted and bubbly. Keep a close eye on them, as baking times may vary depending on your oven. You want them to be perfectly cooked but not burnt.
- Cool slightly: Remove the breadsticks from the oven and let them cool on the baking sheet for a few minutes before transferring them to a serving platter. This will prevent them from sticking together and make them easier to handle.
- Garnish (optional): If desired, garnish with fresh parsley, chopped. This adds a pop of color and a fresh, herby flavor that complements the garlic and cheese perfectly.
- Serve: Serve the cheesy garlic breadsticks warm with marinara sauce for dipping, if desired. They’re also delicious on their own!
Tips and Variations:
Want to customize your cheesy garlic breadsticks? Here are a few ideas to get you started:
- Add some heat: Sprinkle a pinch of red pepper flakes over the breadsticks before baking for a little kick.
- Use different cheeses: Experiment with different types of cheese, such as provolone, cheddar, or asiago.
- Add herbs: Try adding other herbs, such as oregano, basil, or thyme, to the garlic butter mixture.
- Make them stuffed: Before baking, cut a slit down the center of each breadstick and stuff it with your favorite fillings, such as pepperoni, ham, or spinach.
- Use a different dough: If you don’t have pizza dough, you can use crescent roll dough or even French bread. Just adjust the baking time accordingly.
- Make them ahead of time: You can prepare the breadsticks ahead of time and bake them just before serving. Simply assemble them on the baking sheet, cover them with plastic wrap, and store them in the refrigerator for up to 24 hours. When you’re ready to bake, remove them from the refrigerator and let them come to room temperature for about 30 minutes before baking.
Serving Suggestions:
These cheesy garlic breadsticks are perfect as an appetizer, side dish, or even a snack. Here are a few serving suggestions:
- Serve them with marinara sauce, ranch dressing, or your favorite dipping sauce.
- Pair them with a bowl of soup or salad for a light and satisfying meal.
- Serve them alongside pasta dishes, such as spaghetti, lasagna, or fettuccine alfredo.
- Bring them to a potluck or party – they’re always a crowd-pleaser!
- Enjoy them as a late-night snack while watching your favorite movie.
Storing Leftovers:
If you happen to have any leftover cheesy garlic breadsticks (which is unlikely!), you can store them in an airtight container at room temperature for up to 2 days. To reheat them, simply pop them in the oven at 350°F (175°C) for a few minutes, or until they’re warm and crispy. You can also reheat them in the microwave, but they might not be as crispy.
Enjoy!
I hope you enjoy this recipe for cheesy garlic breadsticks as much as I do! They’re easy to make, incredibly delicious, and perfect for any occasion. So go ahead, give them a try, and let me know what you think!
Conclusion:
Okay, friends, let’s be honest: you’ve made it this far, and your stomach is probably already rumbling. And rightfully so! These Cheesy Garlic Breadsticks are more than just a side dish; they’re a warm, comforting hug in bread form, guaranteed to disappear faster than you can say “extra cheese.” I truly believe this recipe is a must-try because it’s ridiculously easy, incredibly flavorful, and endlessly customizable. It’s the kind of recipe that becomes a family favorite, passed down through generations (okay, maybe I’m getting ahead of myself, but seriously, they’re that good!).
Think about it: the aroma of garlic and melting cheese filling your kitchen, the soft, pillowy texture of the bread, and that satisfying cheesy pull with every bite. It’s pure bliss! And the best part? You probably already have most of the ingredients in your pantry. No fancy techniques, no complicated steps, just simple ingredients transformed into something truly special.
But don’t just take my word for it! I urge you to give these Cheesy Garlic Breadsticks a try. You won’t regret it.
Need some serving suggestions? These breadsticks are fantastic alongside a hearty bowl of pasta, a crisp salad, or even just enjoyed on their own as a snack. Imagine dipping them into marinara sauce, pesto, or even a creamy garlic aioli. The possibilities are endless!
Feeling adventurous? Here are a few variations to spice things up:
Spice It Up!
* Add a pinch of red pepper flakes to the garlic butter for a little kick.
* Sprinkle some Italian seasoning or dried oregano over the cheese before baking.
* Mix in some chopped sun-dried tomatoes or olives for a Mediterranean twist.
Cheese Lover’s Dream
* Use a blend of different cheeses, such as mozzarella, provolone, and parmesan.
* Add a layer of ricotta cheese under the mozzarella for extra creaminess.
* Sprinkle some crumbled feta cheese on top after baking for a salty tang.
Herb Garden Delight
* Use fresh herbs like parsley, basil, or chives in the garlic butter.
* Add a squeeze of lemon juice to the garlic butter for a bright, fresh flavor.
* Garnish with fresh herbs after baking for a beautiful presentation.
No matter how you choose to make them, I’m confident that these Cheesy Garlic Breadsticks will be a hit. They’re perfect for weeknight dinners, weekend gatherings, or even just a cozy night in.
So, what are you waiting for? Head to your kitchen, gather your ingredients, and get baking! And most importantly, don’t forget to share your experience with me. I’d love to hear how they turned out and what variations you tried. Tag me in your photos on social media – I can’t wait to see your cheesy creations! Happy baking, and enjoy every delicious bite! I am sure you will find that this is the best Cheesy Garlic Breadsticks recipe you have ever tried.
Cheesy Garlic Breadsticks: The Ultimate Guide to Baking Perfect Breadsticks
Easy and delicious cheesy garlic breadsticks, perfect as an appetizer, side dish, or snack! Made with simple ingredients and ready in under 30 minutes.
Ingredients
Instructions
Recipe Notes
- Add some heat: Sprinkle a pinch of red pepper flakes over the breadsticks before baking for a little kick.
- Use different cheeses: Experiment with different types of cheese, such as provolone, cheddar, or asiago.
- Add herbs: Try adding other herbs, such as oregano, basil, or thyme, to the garlic butter mixture.
- Make them stuffed: Before baking, cut a slit down the center of each breadstick and stuff it with your favorite fillings, such as pepperoni, ham, or spinach.
- Use a different dough: If you don’t have pizza dough, you can use crescent roll dough or even French bread. Just adjust the baking time accordingly.
- Make them ahead of time: You can prepare the breadsticks ahead of time and bake them just before serving. Simply assemble them on the baking sheet, cover them with plastic wrap, and store them in the refrigerator for up to 24 hours. When you’re ready to bake, remove them from the refrigerator and let them come to room temperature for about 30 minutes before baking.
- Serving Suggestions: Serve them with marinara sauce, ranch dressing, or your favorite dipping sauce. Pair them with a bowl of soup or salad for a light and satisfying meal. Serve them alongside pasta dishes, such as spaghetti, lasagna, or fettuccine alfredo. Bring them to a potluck or party – they’re always a crowd-pleaser! Enjoy them as a late-night snack while watching your favorite movie.
- Storing Leftovers: If you happen to have any leftover cheesy garlic breadsticks (which is unlikely!), you can store them in an airtight container at room temperature for up to 2 days. To reheat them, simply pop them in the oven at 350°F (175°C) for a few minutes, or until they’re warm and crispy. You can also reheat them in the microwave, but they might not be as crispy.

Leave a Comment