

Cherry Cheesecake Brownie Bars Recipe
Oh my goodness, do I have a treat for you today! If you’re anything like me, you probably struggle to choose between a rich, fudgy brownie and a creamy, tangy slice of cheesecake. Well, what if I told you that you don’t have to choose? That’s right! I’ve combined the best of both worlds into one absolutely irresistible dessert.
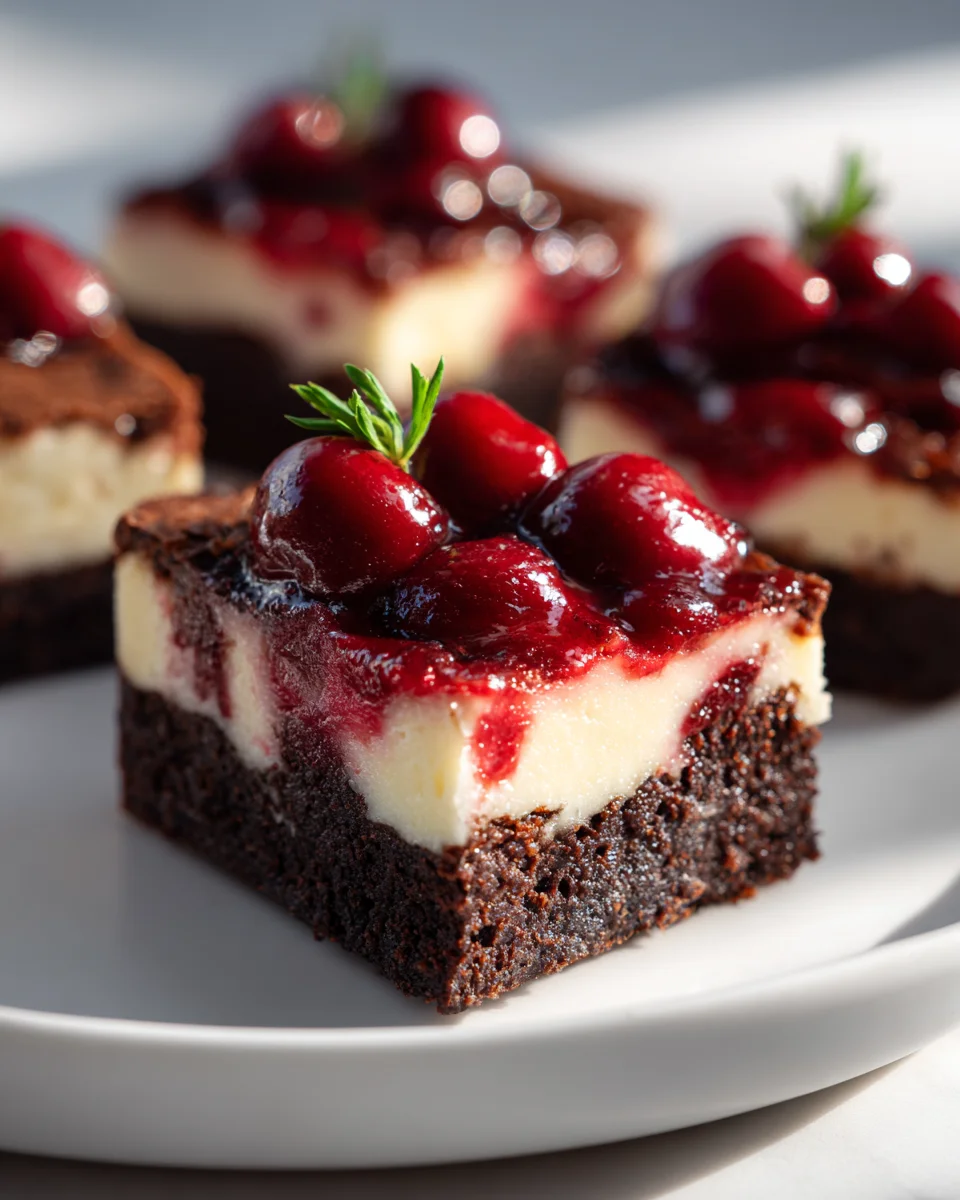
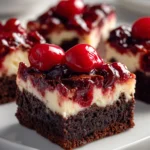
This isn’t just any dessert; it’s a symphony of textures and flavors that will have everyone begging for more. What makes these Cherry Cheesecake Brownie Bars so special, you ask? It’s that perfect harmony: the deep, chocolatey goodness of a classic brownie base, topped with a luscious, velvety cheesecake layer, and then crowned with a vibrant, sweet-tart cherry swirl. Every bite is an explosion of happiness!
You’re going to love making (and eating!) these because they’re surprisingly simple to put together, yet they look incredibly impressive. They’re perfect for sharing at a gathering, bringing to a potluck, or simply treating yourself and your loved ones to something extraordinary. Forget about complicated desserts – these bars deliver maximum flavor with minimal fuss. Get ready to experience dessert heaven in bar form!

Oh, prepare yourself for a truly decadent treat! These Cherry Cheesecake Brownie Bars are an absolute showstopper, combining the rich, fudgy goodness of a brownie with the creamy tang of cheesecake and a vibrant burst of cherry. They’re perfect for potlucks, parties, or simply to elevate your dessert game at home. I promise, they look impressive but are surprisingly straightforward to make. Let’s dive in!
Ingredient Notes
To make the most irresistible Cherry Cheesecake Brownie Bars, selecting the right ingredients is key. Here’s what I recommend and a few ideas for substitutions if you’re feeling adventurous!
- Unsalted Butter: I always go for unsalted butter when baking, as it gives me control over the salt content. You’ll melt this down for the brownie base. If you only have salted butter, just reduce the added salt in the brownie layer by about half.
- Granulated Sugar: Standard white sugar is perfect for both the brownie and cheesecake layers, providing sweetness and contributing to the texture.
- Large Eggs: You’ll need these for both layers. Make sure they are at room temperature for the cheesecake filling especially, as this helps it blend smoothly without lumps.
- Vanilla Extract: Don’t skimp on good quality vanilla! It truly enhances both the chocolate and cream cheese flavors. For a slight twist, you could try a hint of almond extract in the brownie or cheesecake, but vanilla is my go-to.
- All-Purpose Flour: My preferred flour for this recipe. Make sure to measure it correctly, either by weight or by spooning it into your measuring cup and leveling it off. Over-packed flour can lead to dry brownies.
- Unsweetened Cocoa Powder: This is where the rich chocolate flavor of your brownie comes from. I love a good quality Dutch-processed cocoa powder for a darker, less acidic brownie. However, natural unsweetened cocoa works beautifully too.
- Salt: Just a pinch in the brownie batter to balance the sweetness and bring out the chocolate flavor.
- Full-Fat Cream Cheese: This is crucial for a luscious, creamy cheesecake layer. I always recommend using full-fat brick-style cream cheese, not the spreadable kind from a tub, and make sure it’s softened to room temperature. This is essential for a smooth, lump-free cheesecake batter.
- Canned Cherry Pie Filling: The star of the show! A good quality canned cherry pie filling makes this recipe incredibly easy. If you’re feeling ambitious, you could make your own cherry topping from fresh or frozen cherries, sugar, and a little cornstarch slurry, but the canned version is perfect for convenience and consistency here.
- Optional Add-ins: Feel free to stir in a handful of chocolate chips or chopped walnuts into your brownie batter for extra texture and flavor!
Step-by-Step Instructions
Creating these delightful bars is a journey in three delicious layers. Follow these steps for perfect results every time:
- Preheat & Prepare: First things first, preheat your oven to 350°F (175°C). Line a 9×13 inch baking pan with parchment paper, leaving an overhang on the sides. This “sling” will make it super easy to lift the entire batch of bars out of the pan later for clean cutting. Lightly grease the parchment paper.
- Start the Brownie Base: In a medium microwave-safe bowl or a saucepan over low heat, melt the unsalted butter. Once melted, remove from heat and stir in the granulated sugar until well combined. The mixture should be warm, not hot.
- Wet Brownie Ingredients: To the butter and sugar mixture, whisk in two of the large eggs one at a time, ensuring each is fully incorporated before adding the next. Stir in 1 teaspoon of vanilla extract.
- Dry Brownie Ingredients: In a separate bowl, whisk together the all-purpose flour, unsweetened cocoa powder, and salt. Gradually add the dry ingredients to the wet ingredients, mixing until just combined. Be careful not to overmix; a few streaks of flour are fine. Overmixing can lead to tough brownies.
- First Bake of Brownie: Spread the brownie batter evenly into your prepared 9×13 inch pan. Bake for 15-18 minutes. The brownie should be partially set but still soft in the center. This partial bake prevents the cheesecake layer from sinking too much. While it’s baking, prepare your cheesecake filling.
- Prepare the Cheesecake Filling: In a large bowl, using an electric mixer, beat the softened full-fat cream cheese until smooth and creamy, about 2-3 minutes. Make sure there are no lumps.
- Add Remaining Cheesecake Ingredients: Gradually beat in 1/2 cup of granulated sugar until just combined. Then, beat in the remaining large egg and 1 teaspoon of vanilla extract until the mixture is smooth and lump-free. Again, avoid overmixing once the egg is added to prevent too much air from incorporating, which can cause cracks.
- Layer the Cheesecake: Carefully remove the partially baked brownie from the oven. Gently and evenly spoon the cheesecake mixture over the warm brownie layer. Spread it out to the edges.
- Add the Cherry Topping: Now for the vibrant cherry layer! Evenly spoon the entire can of cherry pie filling over the cheesecake layer. You don’t need to spread it perfectly; the cherries will settle a bit during baking.
- Final Bake: Return the pan to the oven and bake for an additional 30-35 minutes, or until the cheesecake layer is set. The center might still have a slight jiggle, but the edges should be firm.
- Cool Completely: This is a crucial step! Remove the pan from the oven and let it cool on a wire rack at room temperature for at least 2 hours.
- Chill Thoroughly: Once cooled, transfer the pan to the refrigerator and chill for at least 4 hours, or ideally overnight. Chilling is essential for the bars to set properly and for clean, neat slices.
- Slice and Serve: Once thoroughly chilled, use the parchment paper overhang to lift the entire slab of bars out of the pan. Place it on a cutting board. For the cleanest cuts, use a sharp knife warmed under hot water and wiped clean between each slice. Cut into squares or rectangles and enjoy!
Tips & Suggestions
Achieving the perfect Cherry Cheesecake Brownie Bar isn’t hard, but a few pointers can make all the difference for that bakery-quality result:
- Room Temperature Ingredients are Key: This applies especially to the cream cheese and eggs for the cheesecake layer. Cold ingredients won’t incorporate smoothly, leading to lumps in your cheesecake batter. Take them out of the fridge at least an hour before you plan to bake.
- Don’t Overmix: For both the brownie and cheesecake batters, overmixing can introduce too much air, which can lead to a tougher brownie and a cracked cheesecake. Mix just until ingredients are combined.
- Don’t Overbake the Brownie: The initial bake for the brownie is meant to be partial. If you bake it too long, it will become dry once it goes back in the oven with the cheesecake layer.
- Avoid a Cracked Cheesecake: Aside from not overmixing, ensuring your ingredients are at room temperature helps. Also, letting the bars cool gradually (first at room temperature, then in the fridge) helps prevent drastic temperature changes that can lead to cracking.
- Patience with Cooling and Chilling: I know it’s hard to wait, but seriously, don’t rush this step! The bars need ample time to cool completely and then chill in the refrigerator. This allows the cheesecake to firm up and the flavors to meld beautifully, making them much easier to cut into clean, attractive pieces.
- For the Perfect Slice: As mentioned in the instructions, a warm, sharp knife is your best friend. Run your knife under hot water for a few seconds, wipe it dry, and then make your cut. Clean the knife after each slice for the neatest presentation.
- Flavor Variations: Feel free to experiment with different fruit pie fillings! Blueberry, raspberry, or even apple pie filling would be delicious alternatives. You could also drizzle a little melted chocolate or a dusting of powdered sugar over the top before serving for an extra touch.
Storage
These Cherry Cheesecake Brownie Bars are fantastic for making ahead, and they store wonderfully:
- Refrigeration: Due to the cream cheese layer, these bars must be stored in the refrigerator. Place them in an airtight container for optimal freshness. They will keep well for 3-5 days.
- Freezing: Yes, you can freeze these! Once the bars are completely chilled and cut, wrap individual bars tightly in plastic wrap, then place them in an airtight freezer-safe container or freezer bag. They can be frozen for up to 1-2 months. Thaw them in the refrigerator overnight before serving.
Final Thoughts
Well, there you have it! I truly believe that the Cherry Cheesecake Brownie Bars Recipe is more than just a dessert; it’s an experience. The way the rich, fudgy brownie base perfectly complements the creamy, tangy cheesecake layer, all crowned with those vibrant, sweet-tart cherries, creates a symphony of flavors and textures in every single bite. I promise you, this isn’t just another treat to bake; it’s a showstopper that will have everyone asking for the recipe.
Whether you’re looking for the ultimate crowd-pleaser for your next gathering, a special dessert to brighten your day, or simply a delightful project for your kitchen, I wholeheartedly recommend giving the Cherry Cheesecake Brownie Bars Recipe a try. It’s comforting, indulgent, and undeniably delicious. So, go ahead, gather your ingredients, and prepare to fall in love with what I consider to be one of the most irresistible dessert bars you’ll ever make. Happy baking!
Cherry Cheesecake Brownie Bars Recipe – Easy & Delicious!
- Total Time: 1 hour 10 minutes
- Yield: 12 servings 1x
Description
Indulge in the perfect blend of rich, fudgy brownie and creamy cheesecake topped with sweet-tart cherries. These Cherry Cheesecake Brownie Bars are simple to make and sure to impress at any gathering!
Ingredients
- 1/2 cup Unsalted Butter
- 1 cup Granulated Sugar
- 3 Large Eggs
- 1 teaspoon Vanilla Extract
- 1 cup All-Purpose Flour
- 1/3 cup Unsweetened Cocoa Powder
- 1/4 teaspoon Salt
- 8 oz Full-Fat Cream Cheese
- 1/2 cup Granulated Sugar
- 1 teaspoon Vanilla Extract
- 1 can Canned Cherry Pie Filling
- Optional Add-ins: chocolate chips or chopped walnuts
Instructions
- Preheat your oven to 350°F (175°C). Line a 9×13 inch baking pan with parchment paper, leaving an overhang on the sides. Lightly grease the parchment paper.
- In a medium microwave-safe bowl or a saucepan over low heat, melt the unsalted butter. Once melted, remove from heat and stir in the granulated sugar until well combined.
- To the butter and sugar mixture, whisk in two of the large eggs one at a time, ensuring each is fully incorporated before adding the next. Stir in 1 teaspoon of vanilla extract.
- In a separate bowl, whisk together the all-purpose flour, unsweetened cocoa powder, and salt. Gradually add the dry ingredients to the wet ingredients, mixing until just combined.
- Spread the brownie batter evenly into your prepared 9×13 inch pan. Bake for 15-18 minutes until partially set but still soft in the center.
- In a large bowl, using an electric mixer, beat the softened full-fat cream cheese until smooth and creamy, about 2-3 minutes.
- Gradually beat in 1/2 cup of granulated sugar until just combined. Then, beat in the remaining large egg and 1 teaspoon of vanilla extract until smooth.
- Carefully remove the partially baked brownie from the oven. Spoon the cheesecake mixture over the warm brownie layer and spread it out to the edges.
- Spoon the entire can of cherry pie filling over the cheesecake layer.
- Return the pan to the oven and bake for an additional 30-35 minutes, or until the cheesecake layer is set.
- Remove the pan from the oven and let it cool on a wire rack at room temperature for at least 2 hours.
- Transfer the pan to the refrigerator and chill for at least 4 hours, or ideally overnight.
- Use the parchment paper overhang to lift the entire slab of bars out of the pan. Cut into squares or rectangles and enjoy!
- Prep Time: 20 mins
- Cook Time: 50 mins
- Category: Dessert
- Method: Baking
- Cuisine: American
Nutrition
- Serving Size: 1 bar
- Calories: 250
- Sugar: 20 g
- Sodium: 150 mg
- Fat: 12 g
- Saturated Fat: 7 g
- Unsaturated Fat: 3 g
- Trans Fat: 0 g
- Carbohydrates: 30 g
- Fiber: 2 g
- Protein: 4 g
- Cholesterol: 50 mg
Keywords: Ensure all ingredients are at room temperature for smooth incorporation. Avoid overmixing to prevent tough brownies and cracks in the cheesecake.
Leave a Comment