

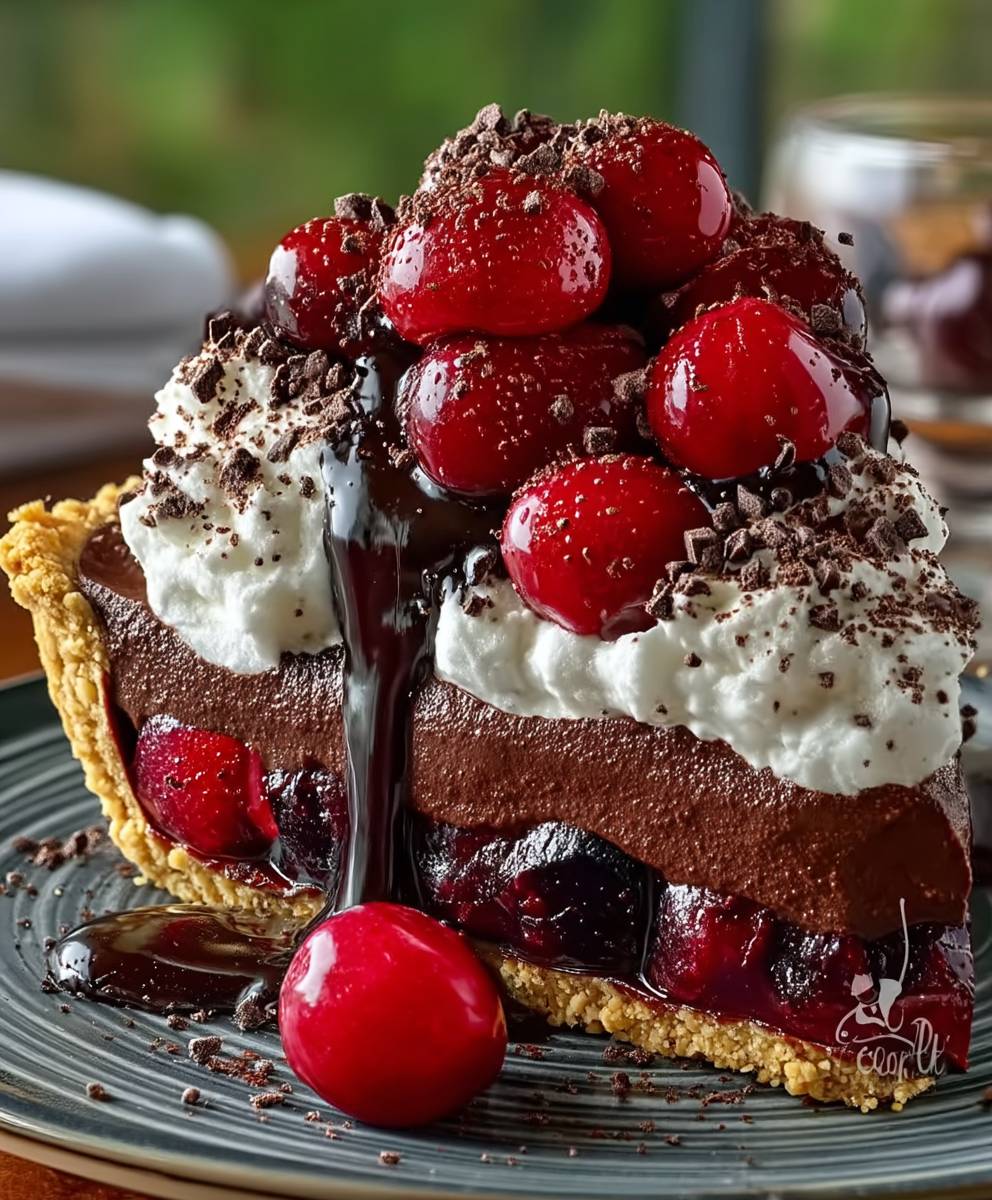
Chocolate Cherry Cream Pie: just the name alone conjures up images of decadent desserts and blissful indulgence, doesn’t it? Imagine sinking your fork into a slice of pure heaven, where the rich, dark chocolate meets the sweet, tangy burst of cherries, all enveloped in a cloud of creamy perfection. This isn’t just a pie; it’s an experience!
While the exact origins of combining chocolate and cherries in desserts are somewhat shrouded in mystery, the pairing has a long and celebrated history, particularly in European baking traditions. Think Black Forest Gateau, a German masterpiece that showcases the harmonious blend of these two flavors. Our Chocolate Cherry Cream Pie takes that classic combination and elevates it to new heights with its luscious cream filling and flaky crust.
But what is it about this pie that makes it so irresistible? It’s the symphony of textures and tastes, of course! The smooth, velvety chocolate cream contrasts beautifully with the juicy, slightly tart cherries. The buttery, crisp crust provides the perfect foundation for this delightful combination. Plus, let’s be honest, who can resist the allure of chocolate and cherries? It’s a match made in dessert heaven, perfect for special occasions or simply when you need a little something to brighten your day. Get ready to bake a pie that will have everyone begging for seconds!

Ingredients:
- For the Chocolate Crust:
- 1 ½ cups chocolate wafer crumbs (about 36 wafers)
- 5 tablespoons unsalted butter, melted
- ¼ cup granulated sugar
- ¼ teaspoon salt
- For the Cherry Filling:
- 4 cups fresh sweet cherries, pitted (or 2 cans (14.5 oz each) pitted cherries in water, drained)
- ½ cup granulated sugar
- 3 tablespoons cornstarch
- ¼ cup water
- 1 tablespoon lemon juice
- ½ teaspoon almond extract
- For the Chocolate Cream Filling:
- 1 ½ cups heavy cream
- 4 ounces bittersweet chocolate, finely chopped
- 2 tablespoons unsalted butter
- 1 teaspoon vanilla extract
- Pinch of salt
- For the Whipped Cream Topping:
- 1 ½ cups heavy cream
- 3 tablespoons powdered sugar
- ½ teaspoon vanilla extract
- Optional Garnish:
- Chocolate shavings
- Fresh cherries
Preparing the Chocolate Crust:
- Combine the Dry Ingredients: In a medium bowl, whisk together the chocolate wafer crumbs, granulated sugar, and salt. Make sure there are no large clumps of crumbs.
- Add the Melted Butter: Pour the melted butter into the bowl with the dry ingredients. Use a fork to mix everything together until the crumbs are evenly moistened and resemble wet sand.
- Press into the Pie Plate: Transfer the crumb mixture to a 9-inch pie plate. Use the bottom of a measuring cup or your fingers to firmly press the crumbs evenly onto the bottom and up the sides of the pie plate. Make sure the crust is compact and uniform in thickness. This is important for preventing it from crumbling later.
- Chill the Crust: Cover the pie plate with plastic wrap and refrigerate for at least 30 minutes, or preferably an hour. This will help the crust set and hold its shape. You can also freeze the crust for 15-20 minutes to speed up the process.
Making the Cherry Filling:
- Prepare the Cherries: If using fresh cherries, wash them thoroughly and pit them using a cherry pitter or a paring knife. If using canned cherries, drain them well in a colander. Pat them dry with paper towels to remove excess moisture. This will prevent the filling from becoming too watery.
- Combine Ingredients in a Saucepan: In a medium saucepan, combine the pitted cherries, granulated sugar, cornstarch, and water. Stir well to ensure the cornstarch is fully dissolved.
- Cook the Filling: Place the saucepan over medium heat. Bring the mixture to a simmer, stirring constantly. Continue to cook, stirring frequently, until the filling has thickened and the cherries are tender, about 5-7 minutes. The filling should be glossy and translucent.
- Add Flavorings: Remove the saucepan from the heat and stir in the lemon juice and almond extract. Taste the filling and adjust the sweetness or tartness as needed.
- Cool the Filling: Let the cherry filling cool completely before pouring it into the chocolate crust. This will prevent the crust from becoming soggy. You can speed up the cooling process by spreading the filling in a shallow dish.
Preparing the Chocolate Cream Filling:
- Heat the Heavy Cream: In a medium saucepan, heat the heavy cream over medium heat until it just begins to simmer. Do not let it boil.
- Pour over Chocolate: Remove the saucepan from the heat and pour the hot cream over the finely chopped bittersweet chocolate in a heatproof bowl.
- Let it Sit: Let the mixture sit for about 1 minute to allow the heat to melt the chocolate.
- Whisk Until Smooth: Gently whisk the cream and chocolate together until the chocolate is completely melted and the mixture is smooth and glossy. Be careful not to over-whisk, as this can cause the chocolate to seize.
- Add Butter and Vanilla: Stir in the unsalted butter and vanilla extract until the butter is melted and fully incorporated. Add a pinch of salt to enhance the chocolate flavor.
- Cool Slightly: Let the chocolate cream filling cool slightly at room temperature for about 15-20 minutes before pouring it over the cherry filling. This will help it set properly.
Assembling the Pie:
- Pour in the Cherry Filling: Once the cherry filling has cooled completely, pour it evenly into the prepared chocolate crust.
- Pour in the Chocolate Cream Filling: Gently pour the slightly cooled chocolate cream filling over the cherry filling. Spread it evenly to cover the entire surface.
- Chill the Pie: Cover the pie with plastic wrap and refrigerate for at least 4 hours, or preferably overnight, to allow the fillings to set completely. This is crucial for a clean slice.
Making the Whipped Cream Topping:
- Chill the Bowl and Beaters: Before making the whipped cream, chill the mixing bowl and beaters in the freezer for about 15-20 minutes. This will help the cream whip up faster and hold its shape better.
- Combine Ingredients: In the chilled bowl, combine the heavy cream, powdered sugar, and vanilla extract.
- Whip the Cream: Using an electric mixer, beat the cream on medium speed until soft peaks form. Then, increase the speed to medium-high and continue beating until stiff peaks form. Be careful not to over-beat the cream, as it can turn into butter.
Finishing Touches:
- Spread the Whipped Cream: Once the pie has chilled completely, remove it from the refrigerator. Spread the whipped cream evenly over the top of the chocolate cream filling. You can create swirls or patterns with a spoon or a piping bag.
- Garnish (Optional): Garnish the pie with chocolate shavings and fresh cherries, if desired.
- Serve and Enjoy: Slice the pie and serve immediately. Store any leftover pie in the refrigerator. It’s best enjoyed within 2-3 days.
Conclusion:
This Chocolate Cherry Cream Pie isn’t just a dessert; it’s an experience. The rich, decadent chocolate, the bright, tart cherries, and the smooth, creamy filling all come together in a symphony of flavors and textures that will leave you wanting more. I truly believe this pie deserves a spot on your baking bucket list. It’s the perfect showstopper for any occasion, from a casual family gathering to a more formal holiday celebration. Trust me, the rave reviews will be pouring in!
But why is this recipe a must-try? It’s the perfect balance of indulgence and simplicity. While it looks impressive, the steps are straightforward and easy to follow, even for beginner bakers. The combination of the deep chocolate flavor with the burst of cherry is simply irresistible. It’s a classic pairing that never fails to delight, and the creamy filling elevates it to a whole new level of deliciousness. Plus, who can resist a slice of homemade pie? It’s comfort food at its finest, and this particular recipe is guaranteed to bring a smile to everyone’s face.
Now, let’s talk about serving suggestions and variations. While this pie is absolutely divine on its own, a dollop of freshly whipped cream or a scoop of vanilla ice cream takes it to the next level. For an extra touch of elegance, you could sprinkle some shaved chocolate or a few chopped cherries on top. If you’re feeling adventurous, try adding a splash of cherry liqueur to the filling for an even more intense cherry flavor. Another fun variation is to use different types of chocolate, such as dark chocolate for a more intense flavor or milk chocolate for a sweeter treat. You could even experiment with different types of cherries, like Rainier cherries for a sweeter, less tart flavor.
For a truly decadent experience, consider serving this Chocolate Cherry Cream Pie slightly chilled. This allows the flavors to meld together beautifully and the filling to set perfectly. You can also make the pie ahead of time and store it in the refrigerator for a day or two, making it a great option for entertaining. Just be sure to cover it tightly to prevent it from drying out.
I’m so excited for you to try this recipe! I poured my heart and soul into perfecting it, and I truly believe it’s one of the best pies I’ve ever made. It’s a guaranteed crowd-pleaser, and I know you’ll love it as much as I do.
So, what are you waiting for? Grab your ingredients, preheat your oven, and get ready to bake up a slice of heaven. And most importantly, don’t forget to share your experience with me! I’d love to hear how it turned out, what variations you tried, and what your family and friends thought. You can leave a comment below, tag me on social media, or even send me an email. I can’t wait to see your beautiful creations! Happy baking! I am confident that this Chocolate Cherry Cream Pie will become a family favorite.
Chocolate Cherry Cream Pie: A Decadent Dessert Recipe
Decadent chocolate cherry pie featuring a chocolate wafer crust, sweet cherry filling, rich chocolate cream, and fluffy whipped cream topping.
Ingredients
Instructions
Recipe Notes
- Using high-quality bittersweet chocolate will enhance the flavor of the chocolate cream filling.
- Make sure the cherry filling is completely cooled before pouring it into the crust to prevent a soggy crust.
- Chilling the pie thoroughly is essential for a clean slice.
- Be careful not to overwhip the cream, as it can turn into butter.
- If you don’t have fresh cherries, canned cherries work well, but be sure to drain them thoroughly.

Leave a Comment