

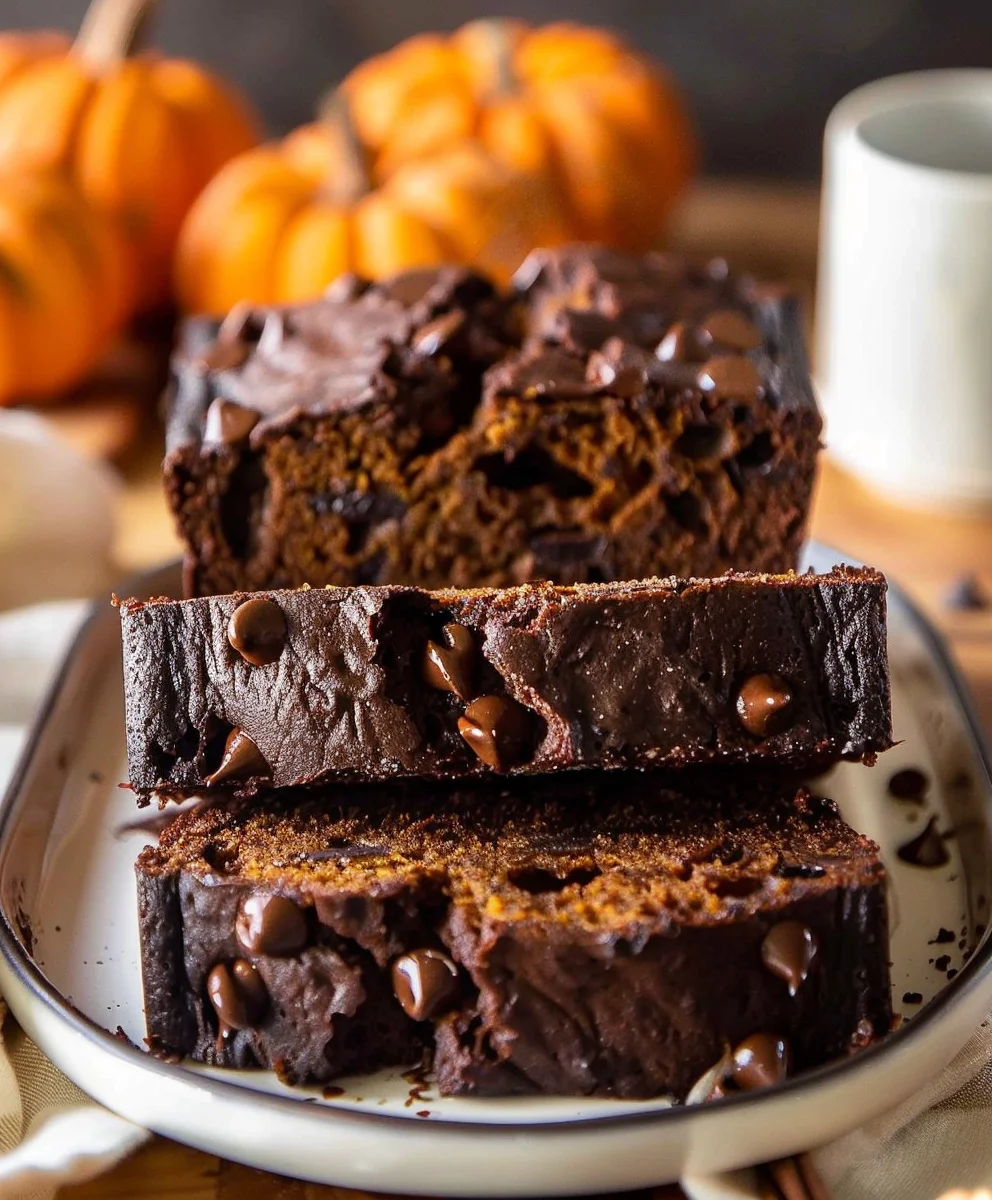
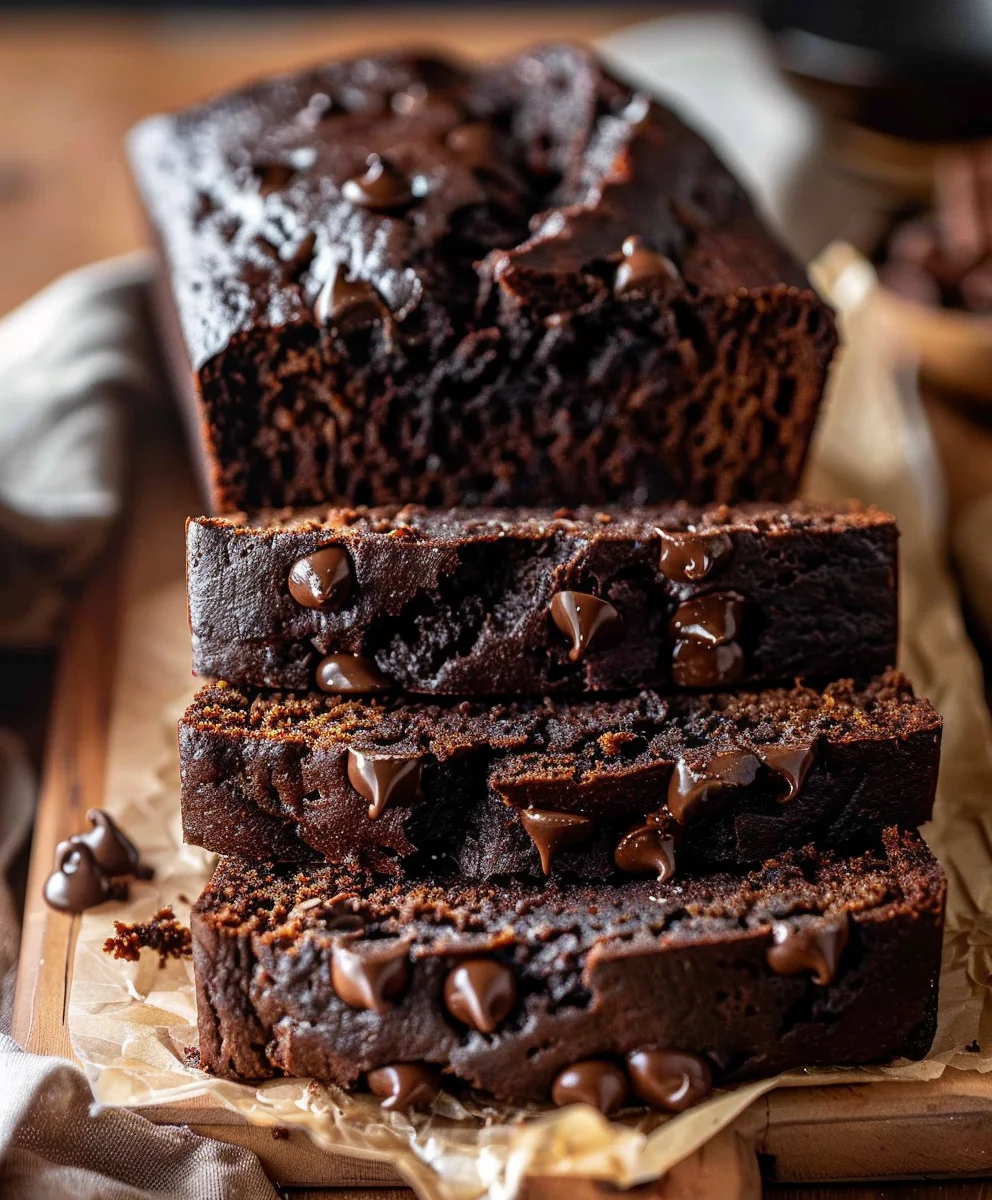
Chocolate Pumpkin Bread. There are few things that encapsulate the essence of autumn quite like the heartwarming aroma of freshly baked pumpkin bread wafting through your home. But what if we took that beloved seasonal comfort and elevated it to an even more indulgent experience? I’m talking about the exquisite marriage of spiced pumpkin and rich, melty chocolate chips, creating a loaf that’s simply irresistible. This isn’t just a recipe; it’s an invitation to savor the season in its most delicious form.
A Timeless Autumn Tradition, Reimagined
While traditional pumpkin bread has graced our tables for generations, a staple of fall harvests and holiday gatherings, the addition of chocolate transforms it into something truly special. People adore this dish for its incredible moistness, the gentle sweetness of pumpkin perfectly balanced with a medley of warm spices like cinnamon and nutmeg, and of course, the delightful pockets of gooey chocolate that burst with flavor in every bite. Whether you enjoy a slice for breakfast with your morning coffee, as an afternoon pick-me-up, or a comforting dessert, this Chocolate Pumpkin Bread offers a perfect blend of nostalgia and luxurious indulgence. It’s remarkably simple to prepare, making it an ideal treat for busy home bakers seeking maximum flavor with minimal fuss. Join me in celebrating the ultimate fall bake!

Ingredients:
Creating this irresistible Chocolate Pumpkin Bread begins with gathering a harmonious blend of pantry staples. I’ve carefully selected each ingredient to ensure a moist, flavorful loaf with that perfect hint of spice and decadent chocolate. Get ready to bake something truly special!
-
For the Wet Ingredients:
- 1 (15-ounce) can pumpkin puree: Make sure this is 100% pure pumpkin, not pumpkin pie filling, which already contains spices and sugar. I always opt for a good quality brand for the best flavor and texture in my pumpkin bread.
- 1 cup granulated sugar: This provides the primary sweetness and contributes to the bread’s tender crumb.
- 1/2 cup packed light brown sugar: The molasses in brown sugar adds a lovely depth of flavor and extra moisture, making the chocolate pumpkin bread incredibly moist.
- 1/2 cup vegetable oil: Or any neutral-flavored oil like canola oil. This is my secret to an incredibly moist and tender crumb that stays fresh for days.
- 2 large eggs: At room temperature, if possible, as they emulsify better with the other wet ingredients, leading to a smoother batter.
- 1/4 cup milk: Whole milk or 2% works wonderfully here, adding a touch more richness and helping to thin out the batter just enough.
- 1 teaspoon vanilla extract: A good quality pure vanilla extract is essential to elevate all the other flavors in our chocolate pumpkin bread.
-
For the Dry Ingredients:
- 1 3/4 cups all-purpose flour: I always recommend sifting your flour or at least whisking it well to ensure an even distribution and prevent lumps.
- 1 teaspoon baking soda: Our leavening agent that reacts with the acidic pumpkin to give our bread its beautiful lift.
- 1/2 teaspoon baking powder: This provides an extra boost of lift, ensuring a light and airy texture.
- 1 teaspoon ground cinnamon: The quintessential pumpkin spice, bringing warmth and classic flavor.
- 1/2 teaspoon ground nutmeg: Offers a warm, slightly nutty undertone that pairs perfectly with pumpkin.
- 1/4 teaspoon ground cloves: A powerful spice, a small amount adds a wonderful depth and aromatic complexity.
- 1/4 teaspoon ground ginger: Provides a subtle spicy kick that complements the other fall spices beautifully.
- 1/2 teaspoon salt: Crucial for balancing the sweetness and enhancing all the other flavors. Don’t skip it!
-
For the Glorious Add-Ins:
- 1 1/2 cups chocolate chips: I love using a mix of semi-sweet and dark chocolate chips for complexity, but use your favorite! You can also chop up a chocolate bar for varied texture.
Equipment You’ll Need:
Having the right tools makes all the difference when baking. Here’s a quick list of what I typically use to make my Chocolate Pumpkin Bread:
- Two 8.5 x 4.5-inch loaf pans (or one 9×13 inch baking pan for a sheet cake style, or one large 9×5 inch loaf pan, though baking time will vary slightly).
- Large mixing bowls (at least two).
- Whisk.
- Rubber spatula.
- Measuring cups and spoons.
- Wire cooling rack.
- Parchment paper (optional, but highly recommended for easy removal).
- Non-stick cooking spray or butter for greasing the pans.
Let’s Get Started! Preparing Your Chocolate Pumpkin Bread Batter
This is where the magic begins! Follow these steps carefully to ensure a perfectly moist and flavorful Chocolate Pumpkin Bread. I’ve broken it down to make it super easy for you.
- Preheat and Prepare: First things first, let’s get the oven ready. I always preheat my oven to 350°F (175°C). This ensures the oven is at the correct temperature when your batter is ready to go in, which is crucial for even baking. Next, prepare your loaf pans. I like to generously grease two 8.5 x 4.5-inch loaf pans with non-stick cooking spray or butter. For extra insurance against sticking, especially with such a moist bread, I often line the bottom of the pans with a strip of parchment paper, leaving an overhang on the longer sides to create “slings” for easy removal. Then, lightly grease the parchment paper as well. If you’re using one large 9×5 inch loaf pan, the process is the same, just adjust your baking time later.
- Whisk the Dry Ingredients: In a large mixing bowl, I combine all the dry ingredients. This includes the 1 3/4 cups all-purpose flour, 1 teaspoon baking soda, 1/2 teaspoon baking powder, 1 teaspoon ground cinnamon, 1/2 teaspoon ground nutmeg, 1/4 teaspoon ground cloves, 1/4 teaspoon ground ginger, and 1/2 teaspoon salt. I give these a really good whisk for about 30 seconds to 1 minute. This step is more important than you might think! Whisking thoroughly ensures that the leavening agents and spices are evenly distributed throughout the flour, which will lead to a perfectly risen and consistently flavored bread. Set this bowl aside for now.
- Combine the Wet Ingredients: In a separate, even larger mixing bowl, I start by combining the wet ingredients. I pour in the entire 15-ounce can of pumpkin puree, followed by the 1 cup of granulated sugar and 1/2 cup of packed light brown sugar. Next, I add the 1/2 cup of vegetable oil, the 2 large eggs, 1/4 cup of milk, and 1 teaspoon of vanilla extract. I grab my whisk again and mix these ingredients really well until they are completely smooth and homogenous. You want to make sure there are no streaks of egg or lumps of sugar remaining. This usually takes me about 1-2 minutes of vigorous whisking. The mixture will be beautifully orange and aromatic!
- Marry the Wet and Dry: Now for the moment of truth – combining the two mixtures. I gradually add the dry ingredients into the wet ingredients, usually in about three additions. After each addition, I use my rubber spatula to gently fold the ingredients together until just combined. The key here is not to overmix! Overmixing develops the gluten in the flour too much, which can result in a tough, dense bread instead of the moist, tender crumb we’re aiming for. It’s okay if there are a few small streaks of flour remaining; these will disappear during baking. As soon as the flour is mostly incorporated, I stop mixing.
- Fold in the Chocolate Chips: Once the batter is just combined, it’s time for the star of the show – the chocolate chips! I gently fold in the 1 1/2 cups of chocolate chips with my rubber spatula. I like to ensure they are evenly distributed throughout the batter, so every slice of your Chocolate Pumpkin Bread gets a delightful burst of chocolate. Again, be gentle and don’t overmix. A few quick folds are all you need to get those chips incorporated. This generous amount of chocolate really elevates the bread from good to truly exceptional.
Baking Your Delicious Chocolate Pumpkin Bread
With the batter perfectly prepared, the anticipation builds! Let’s get this wonderful Chocolate Pumpkin Bread into the oven.
- Fill the Loaf Pans: Carefully divide the glorious batter evenly between your two prepared 8.5 x 4.5-inch loaf pans (or pour into your single larger pan). I use my rubber spatula to help spread the batter into an even layer. If you’re using parchment paper slings, give them a little gentle tug to make sure they’re sitting properly. For a single large loaf pan, you might want to level the top of the batter with the back of a spoon for a nice, even rise.
- Bake to Perfection: Gently transfer the loaf pans to your preheated 350°F (175°C) oven. For two smaller loaves, I typically bake them for about 50-65 minutes. If you’re using a single 9×5-inch loaf pan, the baking time will be longer, usually around 60-80 minutes.
- Test for Doneness: How do I know when my Chocolate Pumpkin Bread is perfectly baked? I insert a wooden skewer, toothpick, or a thin knife into the center of the loaf. When it comes out clean or with just a few moist crumbs attached (no wet batter!), your bread is ready. If it comes out with wet batter, simply return the loaves to the oven and continue baking for another 5-10 minutes, then test again. Sometimes, if the tops are browning too quickly, I’ll loosely tent the loaves with aluminum foil for the last 15-20 minutes of baking to prevent over-browning.
- Cooling Process: Once baked, remove the pans from the oven. Don’t rush this part! I let the loaves cool in their pans on a wire rack for about 10-15 minutes. This allows the bread to set up properly and prevents it from falling apart when you try to remove it. After this initial cooling, I carefully use the parchment paper slings (if I used them) or run a knife around the edges of the pan to gently remove the loaves from the pans. Then, I place them directly on the wire rack to cool completely. Cooling completely is key for the best texture, especially if you plan to slice it neatly or add a glaze.
A Note on Oven Variations:
Every oven is a little different, so these times are a guideline. I recommend checking for doneness starting at the lower end of the time range.
Optional: For an Extra Touch – A Cream Cheese Glaze
While this Chocolate Pumpkin Bread is absolutely divine on its own, a simple cream cheese glaze takes it to an entirely new level of indulgence. It adds a lovely tang and extra moisture that complements the pumpkin and chocolate beautifully. I highly recommend trying it!
Ingredients for the Glaze:
- 2 ounces cream cheese: Softened at room temperature.
- 1 tablespoon unsalted butter: Softened at room temperature.
- 1 cup powdered sugar: Sifted, to prevent lumps.
- 1-2 tablespoons milk: Or heavy cream, for desired consistency.
- 1/2 teaspoon vanilla extract: To enhance the flavor.
- Pinch of salt: Balances the sweetness.
Preparing the Glaze:
- Beat Cream Cheese and Butter: In a medium bowl, I combine the softened cream cheese and softened butter. Using a whisk or an electric hand mixer, I beat them together until they are completely smooth and creamy, with no lumps remaining. This usually takes about 1-2 minutes.
- Add Powdered Sugar and Flavorings: Next, I gradually add the sifted powdered sugar, a little at a time, beating until fully incorporated after each addition. Then, I stir in the vanilla extract and a tiny pinch of salt.
- Adjust Consistency: Finally, I add the milk, starting with one tablespoon, and beat until the glaze reaches a smooth, pourable, but still thick consistency. If it’s too thick, I add the second tablespoon of milk, a teaspoon at a time, until it’s just right. I’m looking for a consistency that will drizzle beautifully over the bread without being too thin and running right off.
Applying the Glaze:
Once your Chocolate Pumpkin Bread has cooled completely (this is very important, otherwise the glaze will melt and soak into the bread), you can apply the glaze. I like to drizzle it generously over the tops of the loaves using a spoon, letting it cascade down the sides. You can do this artfully or simply spread it with an offset spatula for a thicker coating. Allow the glaze to set for about 15-20 minutes before slicing, if you can resist!
Serving and Storing Your Chocolate Pumpkin Bread
You’ve put in the work, and now it’s time to enjoy the fruits of your labor! Here’s how I like to serve and store my Chocolate Pumpkin Bread.
- Serving Suggestions: This bread is absolutely delicious served slightly warm or at room temperature. I often enjoy a thick slice with my morning coffee or as an afternoon treat. It also makes a fantastic dessert, perhaps with a dollop of whipped cream or a scoop of vanilla ice cream for an extra special touch. The chocolate chips, still slightly gooey if served warm, are a delightful contrast to the spiced pumpkin.
- Storing Your Loaves: To keep your Chocolate Pumpkin Bread fresh and moist, I recommend storing it in an airtight container at room temperature for up to 3-4 days. If you’ve added the cream cheese glaze, it’s best to store the bread in the refrigerator, again in an airtight container, for up to a week. Before serving chilled bread, I often let it come to room temperature for about 30 minutes, or gently warm individual slices in the microwave for 10-15 seconds for that freshly baked feel.
- Freezing for Later: This bread freezes beautifully! Once completely cooled, I wrap individual slices or whole loaves tightly in plastic wrap, then again in aluminum foil, and place them in a freezer-safe bag. It can be frozen for up to 2-3 months. To enjoy, simply thaw at room temperature or gently warm slices in the microwave or oven. Having a stash of Chocolate Pumpkin Bread in the freezer is a true lifesaver for last-minute guests or sudden cravings!
Tips and Tricks for the Best Chocolate Pumpkin Bread:
Over the years, I’ve learned a few things that truly make a difference when baking this amazing Chocolate Pumpkin Bread. Here are my top tips to ensure your bread turns out perfectly every single time:
- Do Not Overmix the Batter: I cannot stress this enough! Once you combine the wet and dry ingredients, mix only until the flour streaks disappear. Overmixing develops gluten, leading to a tough, dry bread. We want tender and moist, so mix just enough!
- Measure Flour Correctly: For consistent results, I always recommend spooning your flour into the measuring cup and then leveling it off with the back of a knife. Scooping directly from the bag can compact the flour, leading to too much flour in your recipe and a dry bread.
- Room Temperature Eggs: While not strictly essential, using room temperature eggs helps them incorporate more smoothly into the wet ingredients, creating a more uniform and emulsified batter. If you forget, a quick trick is to place them in a bowl of warm water for 5-10 minutes.
- Quality Pumpkin Puree: Always use 100% pure pumpkin puree, not pumpkin pie filling. Pie filling has added sugars and spices that will throw off the balance of this recipe. The label should clearly state “100% Pure Pumpkin.”
- Don’t Be Shy with Spices: This recipe uses a good amount of fall spices, which is exactly what gives this Chocolate Pumpkin Bread its signature cozy flavor. If you love a stronger spice profile, feel free to add another 1/4 teaspoon of cinnamon or a tiny pinch more ginger.
- Vary Your Chocolate Chips: While semi-sweet chocolate chips are classic, don’t be afraid to experiment! Dark chocolate chips offer a richer, less sweet contrast to the pumpkin, while milk chocolate chips make it extra decadent. You could even use white chocolate chips for a different flavor profile. A mix of two types is often my favorite approach.
- Add-In Variations: Beyond chocolate chips, consider folding in 1/2 cup of chopped walnuts or pecans for a delightful crunch. A handful of dried cranberries can also add a lovely tartness that complements the pumpkin beautifully.
- Prevent Sticking with Parchment Paper: As I mentioned, lining your loaf pans with parchment paper (creating “slings”) is a foolproof way to ensure your loaves come out of the pan easily and intact. It makes cleanup a breeze too!
- Know Your Oven: Ovens can vary significantly in temperature. If you find your bread is baking too quickly or too slowly, an oven thermometer can be a great investment to ensure accurate temperatures. If the top is browning too fast, loosely tent with foil.
- Cool Completely Before Slicing (especially with glaze): While it’s tempting to dive right in, allowing the bread to cool completely allows it to set up properly. This is crucial for clean slices and for the glaze to adhere beautifully without melting. Patience is a virtue, especially when baking!
- Make Ahead Option: The batter can be made ahead and stored in an airtight container in the refrigerator for up to 24 hours. Just be sure to give it a gentle stir before pouring into pans and baking. This is a great tip for busy mornings or entertaining.
- Gift Giving: This Chocolate Pumpkin Bread makes a wonderful homemade gift! Wrap cooled loaves beautifully in cellophane and tie with a festive ribbon. It’s always a welcomed treat during the fall and holiday seasons.
Conclusion:
And there you have it! We’ve reached the sweet finale of our delicious journey together, and I truly hope you’re feeling as inspired as I am to get baking. This isn’t just another recipe; it’s an invitation to experience a truly special treat that beautifully marries the cozy, comforting flavors of autumn with the timeless indulgence of chocolate. I can confidently say that this particular recipe for Chocolate Pumpkin Bread stands out from the crowd for so many wonderful reasons. It achieves that perfect balance of being incredibly moist, wonderfully aromatic, and utterly irresistible. The way the rich, bittersweet chocolate melds with the earthy sweetness of pumpkin and a hint of warm spices creates a symphony of flavors that truly sings on your palate. It’s comforting without being heavy, decadent without being overwhelming, and surprisingly easy to achieve, even for those who might be new to baking. The aroma that will fill your kitchen as it bakes is, in itself, a reward, setting a wonderfully cozy atmosphere that simply can’t be bought.
Now, let’s talk about how to best enjoy this masterpiece once it’s out of the oven and cooled to perfection. While a thick, warm slice on its own is absolutely divine, I love experimenting with different serving suggestions to elevate the experience even further. Imagine it as the perfect companion to your morning coffee or a steaming mug of chai tea – the subtle bitterness of the coffee or spices playing beautifully against the bread’s sweetness. For a truly decadent dessert, try warming a slice slightly and serving it with a generous dollop of freshly whipped cream, perhaps infused with a touch of vanilla bean or even a hint of maple syrup. A scoop of good quality vanilla bean ice cream melting slowly over a warm piece of this bread is also an absolute game-changer, turning a simple bread into a sophisticated dessert. And don’t shy away from toasting a slice and spreading it with a little cream cheese or even a simple pat of butter; the slight crispness from toasting adds another delightful texture. This bread also makes a truly thoughtful and cherished gift for friends, family, or neighbors during the holiday season, wrapped simply with a pretty ribbon – it’s a taste of homemade warmth that everyone appreciates.
Feeling adventurous? This recipe is incredibly adaptable, offering so many opportunities for delightful variations. If you prefer a nuttier texture, feel free to fold in a half cup of chopped walnuts or pecans along with the chocolate chips. For an even richer chocolate experience, consider using a mix of dark chocolate chunks and milk chocolate chips, or even adding a swirl of melted chocolate into the batter just before baking for a marbled effect. You could also experiment with the spice profile; a pinch of allspice, cardamom, or even a tiny grating of fresh ginger can add intriguing layers of flavor. For those with a sweeter tooth, a simple powdered sugar glaze, made with confectioners’ sugar and a splash of milk or orange juice, drizzled over the cooled bread would be a fantastic addition. Or, if you’re looking to make it extra special, a cream cheese swirl baked right into the center of the loaf offers a tangy counterpoint that’s utterly delicious. The beauty of this recipe lies in its versatility, allowing you to tailor it exactly to your personal preferences and creativity.
I truly believe that making this recipe will bring a unique sense of joy and satisfaction to your kitchen. The process is straightforward, the ingredients are accessible, and the reward is truly magnificent. So, please, don’t just read about it; dive in and bake this incredible bread! I promise you won’t regret it. The aroma, the taste, the texture – it all adds up to an experience that is deeply comforting and utterly delicious. Once you’ve pulled your beautiful loaf from the oven and savored your first slice, I would absolutely love to hear all about your experience. Did you add any fun variations? How did your family and friends react? Please share your baking triumphs, your photos, and your thoughts with me. There’s nothing I love more than seeing our community bring these recipes to life. Happy baking, my friends, and get ready to fall in love with the best Chocolate Pumpkin Bread you’ve ever tasted!
Chocolate Pumpkin Bread
An easy and delicious fall treat, this Chocolate Pumpkin Bread combines moist spiced pumpkin with rich, melty chocolate chips for an irresistible seasonal comfort.
Ingredients
-
¼ cup Butter, melted and cooled
-
1 teaspoon Vanilla extract
-
1 Egg
-
⅓ cup Granulated sugar
-
½ cup Brown sugar
-
½ teaspoon Kosher salt
-
½ cup Greek yogurt
-
½ cup Cocoa powder
-
1 ½ cups Canned pumpkin puree
-
1 cup Flour
-
1 teaspoon Baking soda
-
1 cup Chocolate chips
Instructions
-
Step 1
Preheat oven to 350°F (175°C). Grease and line two 8.5×4.5-inch loaf pans (or one 9×5-inch) with parchment paper, leaving an overhang for easy removal. -
Step 2
In a large mixing bowl, whisk together 1 cup flour, 1 teaspoon baking soda, ½ teaspoon kosher salt, and ½ cup cocoa powder until thoroughly combined. Set aside. -
Step 3
In a separate, larger bowl, combine 1 ½ cups canned pumpkin puree, ⅓ cup granulated sugar, ½ cup brown sugar, ¼ cup melted butter, 1 large egg, ½ cup Greek yogurt, and 1 teaspoon vanilla extract. Whisk vigorously until the mixture is completely smooth and uniform. -
Step 4
Gradually add the whisked dry ingredients to the wet ingredients in about three additions. Using a rubber spatula, gently fold the ingredients together until just combined. Be careful not to overmix; a few small streaks of flour are acceptable. -
Step 5
Gently fold in 1 cup chocolate chips with your spatula, ensuring they are evenly distributed throughout the batter. Avoid overmixing. -
Step 6
Divide the batter evenly between the prepared loaf pans. Transfer to the preheated oven and bake for 50-65 minutes for two smaller loaves, or 60-80 minutes for a single large loaf. The bread is done when a wooden skewer or toothpick inserted into the center comes out clean or with a few moist crumbs attached. -
Step 7
Remove the pans from the oven and let the loaves cool in their pans on a wire rack for 10-15 minutes. After this initial cooling, carefully remove the loaves from the pans (using the parchment slings if applicable) and place them directly on the wire rack to cool completely before slicing and serving.
Important Information
Nutrition Facts (Per Serving)
It is important to consider this information as approximate and not to use it as definitive health advice.
Allergy Information
Please check ingredients for potential allergens and consult a health professional if in doubt.


Leave a Comment