

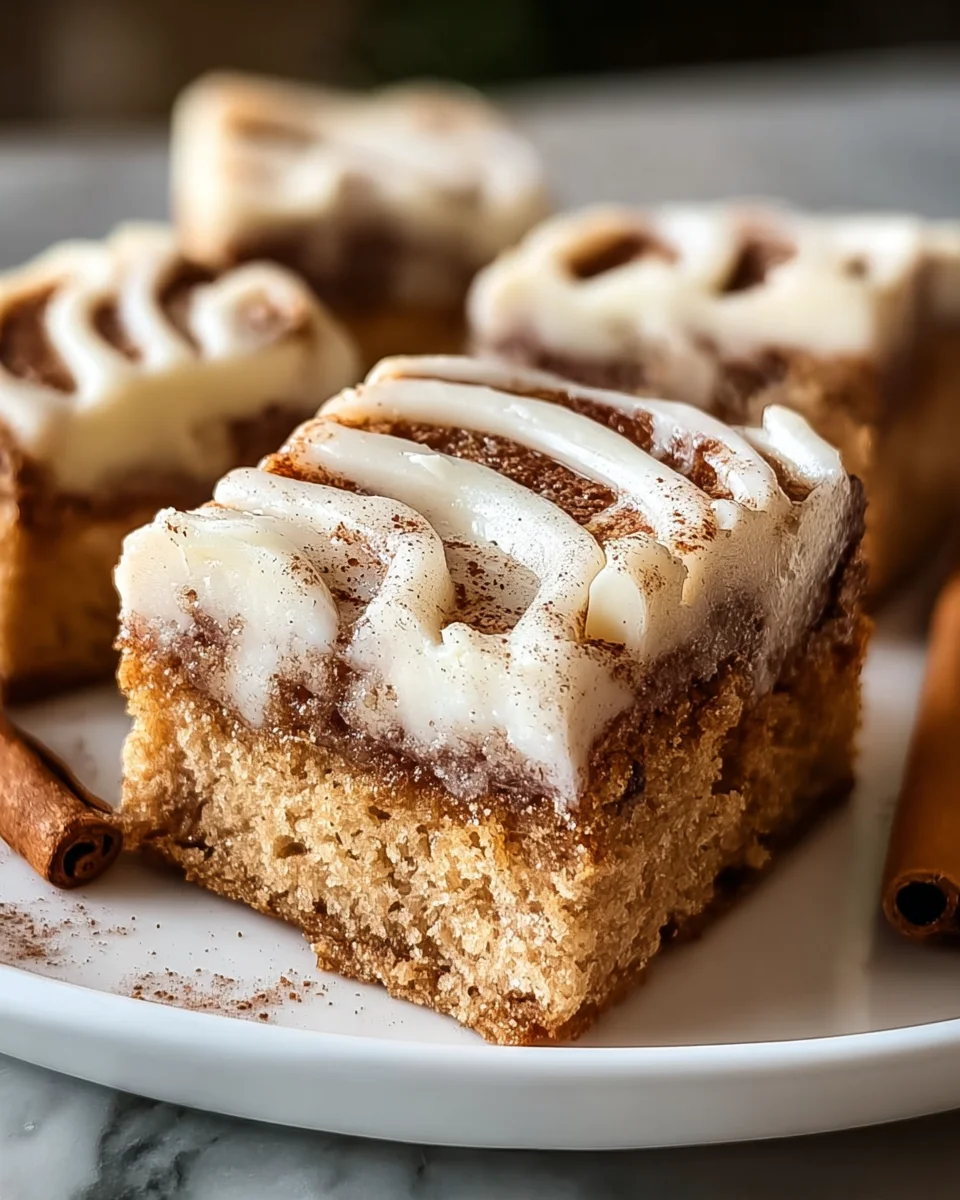
Cinnamon Roll Bliss Bars Recipe Delicious Dessert – a phrase that immediately conjures images of warm, gooey, cinnamon-spiced perfection, all without the traditional fuss of individual rolls! Imagine taking everything you adore about a classic cinnamon roll – that tender, sweet dough swirled with a fragrant cinnamon sugar filling, crowned with a generous drizzle of creamy glaze – and transforming it into a convenient, shareable bar. It’s truly a game-changer for anyone craving that iconic treat but perhaps short on time. While the original cinnamon roll traces its delectable roots back to 17th-century Sweden, evolving into the beloved pastry we know today, these bliss bars offer a modern, simplified twist that captures all that historical charm.
People absolutely adore this dish because it delivers all the comforting, familiar flavors and irresistible textures in an incredibly accessible format. Each bite is an experience of soft, chewy goodness, bursting with aromatic cinnamon, making this
Cinnamon Roll Bliss Bars Recipe Delicious Dessert
an absolute must-try for your next gathering or simply a delightful indulgence for yourself. I’m thrilled to share how incredibly simple it is to bring this magic to your kitchen, proving that blissful dessert doesn’t have to be complicated.

Ingredients:
Creating these incredible Cinnamon Roll Bliss Bars is a delightful journey, and it all starts with gathering the right components. Here’s everything you’ll need to achieve that perfect balance of soft, sweet, and utterly blissful flavor.
For the Cinnamon Roll Bar Base:
- 2 ½ cups (300g) all-purpose flour, spooned and leveled
- 1 teaspoon baking powder
- ½ teaspoon baking soda
- ½ teaspoon salt
- ¾ cup (170g) unsalted butter, softened to room temperature
- 1 ½ cups (300g) granulated sugar
- 2 large eggs, room temperature
- 1 teaspoon pure vanilla extract
- ¾ cup (180ml) sour cream or plain Greek yogurt, room temperature
For the Irresistible Cinnamon Swirl:
- ½ cup (113g) unsalted butter, melted
- 1 cup (200g) packed light brown sugar
- 2 tablespoons ground cinnamon
For the Dreamy Cream Cheese Frosting:
- 8 ounces (226g) full-fat cream cheese, softened to room temperature
- ½ cup (113g) unsalted butter, softened to room temperature
- 4 cups (480g) powdered sugar (confectioners’ sugar), sifted
- 1 teaspoon pure vanilla extract
- 2-3 tablespoons milk (any kind), as needed for consistency
- Pinch of salt (optional, to balance sweetness)
Instructions:
Get ready to embark on a culinary adventure that culminates in the most delicious dessert you’ve ever tasted! Follow these steps carefully to create your very own Cinnamon Roll Bliss Bars.
Phase 1: Preparing the Cinnamon Roll Bar Base
- Preheat and Prep: Begin by preheating your oven to 350°F (175°C). Take a 9×13 inch baking pan and grease it thoroughly with butter or non-stick cooking spray. For easier removal later, I often like to line the pan with parchment paper, leaving an overhang on the sides – this creates convenient handles.
- Combine Dry Ingredients: In a medium-sized bowl, whisk together the 2 ½ cups of all-purpose flour, 1 teaspoon of baking powder, ½ teaspoon of baking soda, and ½ teaspoon of salt. Make sure these dry ingredients are well combined so that the leavening agents are evenly distributed throughout our delicious dessert bars. Set this bowl aside for a moment.
- Cream Butter and Sugar: In a large mixing bowl, using an electric mixer on medium speed, cream together the ¾ cup of softened unsalted butter and 1 ½ cups of granulated sugar. Beat them together until the mixture is light, fluffy, and pale in color, which usually takes about 2-3 minutes. This step is crucial for incorporating air, contributing to the soft texture of our Cinnamon Roll Bliss Bars.
- Add Eggs and Vanilla: Scrape down the sides of the bowl with a rubber spatula. Now, add the 2 large room temperature eggs, one at a time, beating well after each addition until fully incorporated. Follow this by mixing in the 1 teaspoon of pure vanilla extract. The mixture might look a little curdled at this point, but don’t worry, it will come together beautifully.
- Alternate Wet and Dry: With the mixer on low speed, gradually add half of your dry ingredient mixture to the wet ingredients, mixing just until almost combined. Then, add the ¾ cup of sour cream (or Greek yogurt) and mix until just incorporated. Finish by adding the remaining dry ingredients, mixing only until no streaks of flour remain. Be careful not to overmix! Overmixing can develop the gluten in the flour too much, leading to tough bars instead of the tender Cinnamon Roll Bliss Bars we’re aiming for.
- Spread the Base: Carefully spoon the thick batter into your prepared 9×13 inch baking pan. Use an offset spatula or the back of a spoon to spread the batter evenly across the bottom of the pan. The batter will be quite thick, so take your time to get an even layer. This will form the delightful foundation of our “Cinnamon Roll Bliss Bars Recipe Delicious Dessert.”
Phase 2: Crafting the Irresistible Cinnamon Swirl
- Prepare the Swirl Mixture: In a separate small bowl, combine the ½ cup of melted unsalted butter, 1 cup of packed light brown sugar, and 2 tablespoons of ground cinnamon. Stir these ingredients together until they form a thick, pasty, and wonderfully fragrant cinnamon sugar mixture. This is where the signature “cinnamon roll” flavor truly begins!
- Create the Swirl: Dollop spoonfuls of this rich cinnamon mixture evenly over the top of the bar base in the pan. Don’t worry about it being perfectly neat; the beauty of a swirl is its organic pattern. Once all the cinnamon mixture is distributed, take a butter knife or a skewer and gently swirl it into the batter. Try to reach down into the batter to create deep pockets of cinnamon goodness, but avoid over-swirling, as you still want distinct streaks of cinnamon. This intricate swirl is what makes these Cinnamon Roll Bliss Bars truly special.
Phase 3: Baking Your Cinnamon Roll Bliss Bars
- Time to Bake: Place the baking pan into your preheated 350°F (175°C) oven. Bake for approximately 30-38 minutes. Baking times can vary depending on your oven, so it’s always good to keep an eye on them.
- Check for Doneness: The bars are ready when the edges are lightly golden brown, and a wooden skewer or toothpick inserted into the center (avoiding a large cinnamon swirl pocket) comes out clean or with only a few moist crumbs attached. The top should feel set and lightly spring back when gently touched. You’ll know they’re almost done when your kitchen starts filling with the most inviting aroma of cinnamon – a true sign of a “Cinnamon Roll Bliss Bars Recipe Delicious Dessert” in the making!
- Cool Completely: Once baked, remove the pan from the oven and place it on a wire rack to cool completely. This step is very important! Attempting to frost warm bars will result in a melted, runny mess and will not allow the bars to set properly. Patience is key here; let them cool for at least 1-2 hours, or until they are completely at room temperature.
Phase 4: Whipping Up the Dreamy Cream Cheese Frosting
- Soften Ingredients: Ensure both your 8 ounces of full-fat cream cheese and ½ cup of unsalted butter are at a proper room temperature. This is crucial for achieving a smooth, lump-free frosting. If your cream cheese is too cold, you’ll end up with lumps, no matter how much you beat it.
- Cream Cheese and Butter: In a clean large mixing bowl, using your electric mixer on medium-high speed, beat together the softened cream cheese and softened unsalted butter until the mixture is completely smooth, light, and fluffy, which should take about 2-3 minutes. Scrape down the sides of the bowl frequently to ensure everything is evenly combined.
- Add Remaining Ingredients: Gradually add the 4 cups of sifted powdered sugar to the cream cheese mixture, beating on low speed until most of the sugar is incorporated, then increase the speed to medium-high and beat until smooth. Mix in the 1 teaspoon of pure vanilla extract and the optional pinch of salt.
- Adjust Consistency: If the frosting appears too thick, add the milk one tablespoon at a time, beating after each addition until you reach your desired creamy, spreadable consistency. You want it to be thick enough to hold its shape but soft enough to spread easily over your cooled Cinnamon Roll Bliss Bars.
Phase 5: Assembling and Serving Your Delicious Dessert
- Frost the Cooled Bars: Once the Cinnamon Roll Bliss Bars are completely cooled (and I mean completely!), spoon the dreamy cream cheese frosting generously over the top. Use an offset spatula or the back of a spoon to spread the frosting evenly from edge to edge. Don’t be shy with the frosting – it’s a critical component of the “Cinnamon Roll Bliss Bars Recipe Delicious Dessert” experience!
- Chill to Set (Optional but Recommended): For cleaner cuts and to allow the frosting to firm up slightly, you can place the frosted bars in the refrigerator for about 20-30 minutes before cutting. This isn’t strictly necessary, but it does make serving a bit neater.
- Slice and Serve: Using a sharp knife, cut the bars into your desired size. I usually go for 24 squares (6×4 arrangement), but you can make them larger or smaller depending on your preference. Wipe the knife clean between cuts for the prettiest slices.
- Storage: Store any leftover Cinnamon Roll Bliss Bars in an airtight container in the refrigerator for up to 3-4 days. While they are amazing fresh, the flavors often meld and deepen beautifully after a day or two in the fridge. Bring them to room temperature for about 15-20 minutes before serving again for the best texture and flavor. Enjoy every single bite of this absolutely delicious dessert!
Conclusion:
Well, my friends, we’ve reached the sweet end of our journey with what I genuinely believe will become a staple in your baking repertoire. If you’ve followed along, you already know the magic that happens when classic cinnamon roll flavors meet the convenience of a bar. I can’t stress enough how truly spectacular this recipe is. It effortlessly delivers all the warm, comforting, and utterly irresistible goodness of your favorite bakery treat without any of the fuss of rolling, cutting, and proofing traditional cinnamon rolls. This makes it an absolute game-changer for busy mornings, impromptu gatherings, or simply when you crave something incredibly delicious without spending hours in the kitchen. The tender, spiced interior, the gooey cinnamon swirl, and that luscious cream cheese frosting all come together in perfect harmony, creating a dessert that is both nostalgic and excitingly simple to make. I’ve had countless friends and family rave about these, and I’m confident you’ll experience the same enthusiastic reception.
Now, let’s talk about the best ways to enjoy these culinary masterpieces. While they are absolutely divine eaten straight from the pan – perhaps still warm, with the frosting just slightly melted – there are so many delightful ways to serve them. For a truly luxurious experience, I highly recommend warming a slice ever so slightly in the microwave or a low oven and then pairing it with a generous scoop of premium vanilla bean ice cream. The contrast between the warm, spiced bar and the cold, creamy ice cream is simply heavenly. They also make an incredible accompaniment to your morning coffee or afternoon tea, transforming an ordinary break into a moment of pure bliss. Imagine starting your day with a square of this comforting treat and a hot cup of joe – it’s a little slice of heaven right in your own kitchen! For those special occasions, a light dusting of extra cinnamon or a few chopped pecans on top can elevate their presentation even further, making them look as impressive as they taste.
But don’t stop there! This versatile recipe also lends itself beautifully to creative variations once you’ve mastered the basic technique. Feel free to experiment with different additions to the filling or the frosting. For a nutty crunch, consider folding in some finely chopped walnuts or pecans into the cinnamon sugar mixture. If you’re feeling adventurous, a tiny pinch of cardamom or a whisper of ground nutmeg alongside the cinnamon can add an intriguing layer of complexity to the flavor profile. In the autumn months, I sometimes swirl a tablespoon or two of pumpkin puree into the cream cheese frosting for a seasonal twist that’s absolutely divine. Or, for a brighter note, a little bit of orange or lemon zest grated into the frosting can provide a wonderful counterpoint to the richness. You could even swap out the cream cheese frosting for a simple powdered sugar glaze if you prefer something a little lighter, though I truly believe the cream cheese frosting is the crowning glory of these bars. The possibilities are truly endless, allowing you to tailor this treat to your exact preferences or whatever ingredients you have on hand.
I truly hope you feel inspired to dive into your kitchen and give this incredible recipe a try. Baking, for me, is such a joyful and rewarding experience, and there’s nothing quite like the aroma of fresh baking wafting through your home. This particular recipe brings so much comfort and happiness with minimal effort, making it a perfect project for bakers of all skill levels. So, please, gather your ingredients, preheat your oven, and prepare to be amazed. Once you experience the sheer delight of these homemade treats, I promise you won’t look back. And here’s the best part: I absolutely love hearing about your baking adventures! Once you’ve made these “Cinnamon Roll Bliss Bars Recipe Delicious Dessert” wonders, please come back and share your experience with me. Did you try a fun variation? How did your family react? Did they disappear as quickly as they did in my house? Your feedback, your photos, and your stories truly make my day. Happy baking, and get ready to spread some serious bliss!
Cinnamon Roll Bliss Bars Recipe: Delicious Dessert Treat!
Imagine taking everything you adore about a classic cinnamon roll – that tender, sweet dough swirled with a fragrant cinnamon sugar filling, crowned with a generous drizzle of creamy glaze – and transforming it into a convenient, shareable bar. It’s truly a game-changer for anyone craving that iconic treat but perhaps short on time.
Ingredients
Instructions
Important Information
Nutrition Facts (Per Serving)
It is important to consider this information as approximate and not to use it as definitive health advice.
Allergy Information
Please check ingredients for potential allergens and consult a health professional if in doubt.

Leave a Comment