

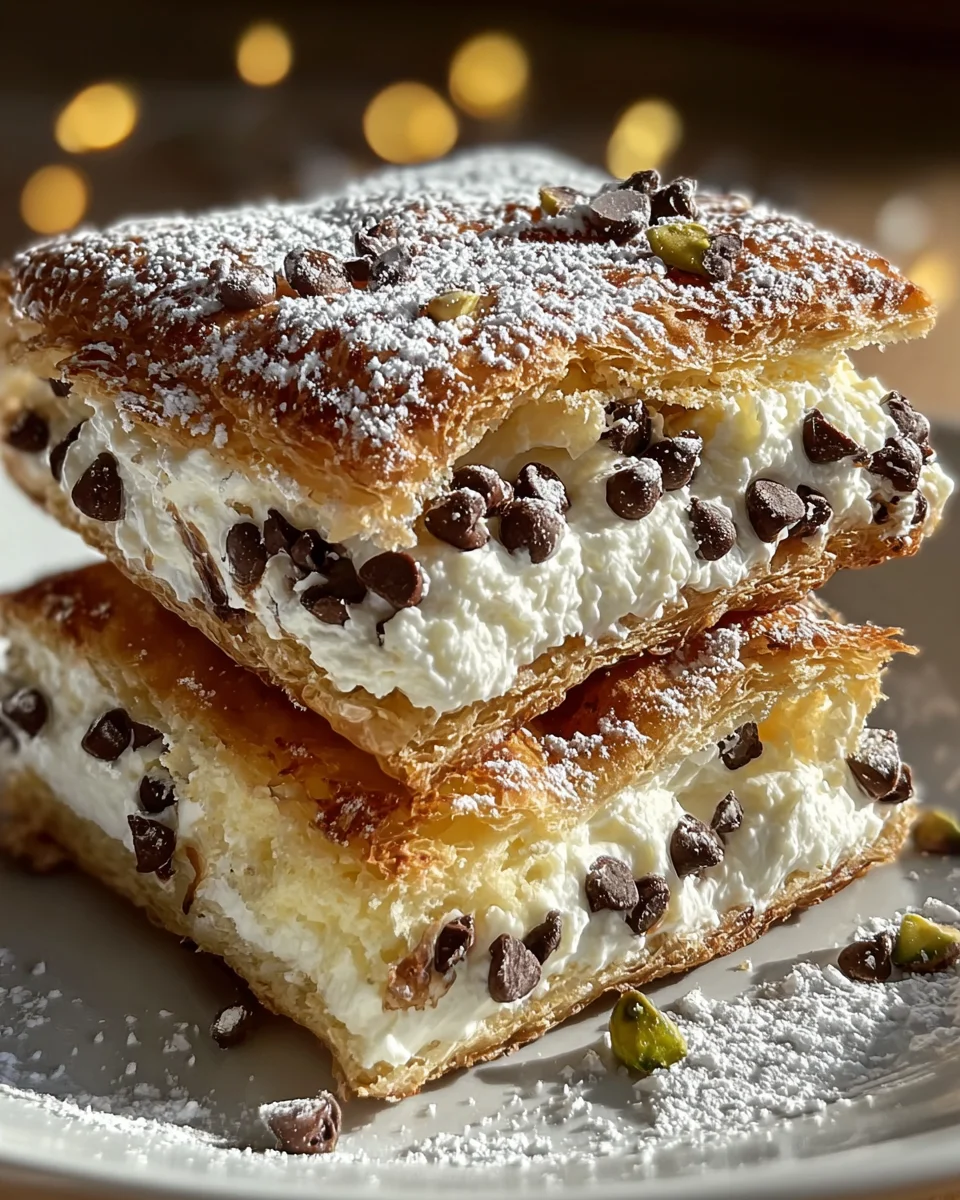
Classic Cannoli Squares are about to become your new favorite dessert sensation, offering all the beloved flavors of traditional Sicilian cannoli without the intricate rolling and frying. I remember the first time I tried a cannoli; that perfect crunch of the shell giving way to a rich, sweet ricotta filling was absolutely divine. Originating from Sicily, cannoli have a rich history, often associated with festive celebrations and a symbol of Italian pastry mastery. Traditionally, they involve delicate fried pastry shells filled with a creamy mixture, often infused with candied fruit or chocolate chips. However, for those of us who adore the taste but appreciate convenience, these innovative squares are a revelation.
Why Everyone Loves Cannoli Squares
People universally adore the combination of a crispy crust and the lusciously smooth, subtly sweet ricotta cheese filling, frequently brightened with orange zest or mini chocolate chips. It’s that irresistible interplay of textures and the delightful balance of sweetness that makes them so popular. These Classic Cannoli Squares capture that magic beautifully, making them perfect for sharing at any gathering or simply indulging yourself after a long day, providing an authentic taste experience with remarkable ease. You’ll find them an impressive yet incredibly simple way to bring a taste of Italy right into your home kitchen.

Ingredients:
Creating these delightful Classic Cannoli Squares starts with selecting the right ingredients. For the best results, always aim for high-quality components, as they truly shine through in the final product. Here’s everything you’ll need:
- For the Cannoli Dough:
-
2 cups (240g) all-purpose flour: I always sift my flour to ensure there are no lumps and to make the dough lighter and easier to work with. It makes a noticeable difference in the texture of our finished squares.
-
2 tablespoons (25g) granulated sugar: Just enough to lend a subtle sweetness to the pastry, complementing the rich filling without overpowering it.
-
1/2 teaspoon fine sea salt: Crucial for balancing the flavors and enhancing the overall taste of the dough.
-
1/4 cup (56g) unsalted butter, very cold and cut into small cubes: Using cold butter is key here, similar to making pie crusts. It helps create those wonderful flaky layers when fried, giving our Classic Cannoli Squares that signature crunch.
-
1 large egg yolk: Provides richness and helps bind the dough, contributing to a tender texture.
-
1/2 cup (120ml) dry white wine, Marsala wine, or apple cider vinegar: Traditionally, Marsala wine is used, which imparts a unique depth of flavor. However, if Marsala isn’t available or preferred, a dry white wine or even apple cider vinegar can work wonderfully to tenderize the dough and prevent it from becoming tough. I often use apple cider vinegar for a slightly tangier note!
-
1 teaspoon pure vanilla extract: Adds a lovely aromatic quality to the dough.
-
Vegetable oil or canola oil for frying: You’ll need enough to fill a deep pot to at least 3-4 inches (about 7-10 cm) for proper frying. Make sure it’s a neutral-flavored oil with a high smoke point.
-
- For the Cannoli Filling:
-
2 pounds (900g) whole milk ricotta cheese: This is the star of our filling! Always opt for whole milk ricotta, as it’s creamier and richer than part-skim. It’s absolutely essential to drain it thoroughly to achieve that perfectly thick, non-watery filling. I usually let mine drain overnight in the refrigerator.
-
1 1/2 cups (180g) powdered sugar (confectioners’ sugar), sifted: Sifting is non-negotiable here to prevent lumps and ensure a silky-smooth filling. Adjust to your sweetness preference; some like it a bit less sweet, so taste as you go!
-
1 teaspoon pure vanilla extract: A generous splash of good quality vanilla elevates the creamy ricotta beautifully.
-
1/2 teaspoon ground cinnamon: Offers a warm, classic spice note that pairs wonderfully with the ricotta. Feel free to adjust or omit if you prefer.
-
Zest of 1 small orange (optional, but highly recommended): This is one of my secret ingredients! A little orange zest brightens the entire filling and adds an authentic Italian touch that truly makes these Classic Cannoli Squares sing.
-
1/2 cup (90g) mini chocolate chips or finely chopped bittersweet chocolate (optional): A classic mix-in. I love the textural contrast the chocolate provides against the creamy filling.
-
1/4 cup (40g) finely diced candied orange peel or mixed candied fruit (optional): For those who appreciate traditional Sicilian flavors. It adds a lovely chewiness and citrusy sweetness.
-
- For Garnish:
-
1/2 cup (75g) finely chopped pistachios or candied cherries: Provides a beautiful color contrast and a delightful crunch when sprinkled on the ends of the filled squares.
-
Additional powdered sugar for dusting: A final flourish that makes these Classic Cannoli Squares look absolutely irresistible.
-
Preparing the Cannoli Dough
The dough for our Classic Cannoli Squares is where the magic begins. It needs care, patience, and attention to detail to achieve that perfectly crisp, bubbly texture. Think of it as a labor of love that will be richly rewarded.
-
Combine Dry Ingredients: In a large mixing bowl, whisk together the sifted all-purpose flour, granulated sugar, and fine sea salt. Make sure these are thoroughly combined to ensure even seasoning throughout our dough.
-
Cut in the Butter: Add the very cold, cubed unsalted butter to the dry ingredients. Using your fingertips, a pastry blender, or a food processor, cut the butter into the flour mixture until it resembles coarse crumbs, with some pea-sized pieces of butter remaining. This step is crucial for flakiness! If using your hands, work quickly to prevent the butter from warming too much.
-
Mix Wet Ingredients: In a separate small bowl, whisk together the egg yolk, Marsala wine (or your chosen substitute like dry white wine or apple cider vinegar), and vanilla extract. This creates our flavorful liquid component.
-
Form the Dough: Pour the wet mixture into the dry ingredients. Mix with a spoon or your hands until a shaggy dough forms. Then, turn the dough out onto a lightly floured surface. Knead the dough gently for about 5-7 minutes. The goal here is to develop some gluten, but not too much. You want the dough to be smooth, elastic, and no longer sticky. If it feels too dry, add a tiny bit more wine, a teaspoon at a time. If it’s too sticky, add a little flour. I love feeling the dough transform under my hands – it’s a very satisfying process.
-
Rest the Dough: Form the dough into a disc, wrap it tightly in plastic wrap, and refrigerate it for at least 1 hour. Ideally, I let mine rest for 2 hours, or even overnight. This resting period is incredibly important! It allows the gluten to relax, making the dough much easier to roll out thinly, and it also allows the flavors to meld beautifully. Skipping this step often results in tough dough, which we definitely want to avoid for our exquisite Classic Cannoli Squares.
-
Roll the Dough: Once rested, unwrap the dough and cut it into two or three manageable pieces. On a lightly floured surface, using a rolling pin or a pasta machine, roll one piece of dough out very, very thinly – we’re aiming for about 1/16 to 1/32 of an inch (1.5-0.8 mm) thick. The thinner the dough, the crispier your cannoli squares will be! This might take some effort, but it’s worth it for that authentic snap. If using a pasta machine, start at the widest setting and gradually work your way down to the second or third thinnest setting.
-
Cut the Squares: Using a sharp knife or a pastry wheel, cut the thinly rolled dough into squares, approximately 3×3 inches (7.5×7.5 cm). You can make them larger or smaller depending on your preference, but this size works perfectly for individual servings. Gather any scraps, re-knead them gently, and roll them out again to cut more squares. Don’t waste a single bit of this precious dough!
Making the Cannoli Filling
The filling is arguably the heart of any cannoli, and for our Classic Cannoli Squares, we want nothing short of pure, creamy perfection. The secret lies in proper draining of the ricotta and gentle mixing.
-
Drain the Ricotta Thoroughly: This is arguably the most critical step for the filling! Place the whole milk ricotta cheese in a fine-mesh sieve lined with several layers of cheesecloth. Set the sieve over a bowl and refrigerate it for at least 4 hours, but preferably overnight. The goal is to remove as much excess liquid (whey) as possible. A well-drained ricotta will result in a thick, stable, and incredibly creamy filling that won’t make your squares soggy. I often press it gently with a plate weighted down with a can to speed up the draining process.
-
Prepare the Powdered Sugar: Sift the powdered sugar into a medium-sized bowl. This step is non-negotiable as it breaks up any lumps, ensuring a perfectly smooth and luxurious filling. There’s nothing worse than biting into a lumpy cannoli!
-
Combine Ingredients: Once the ricotta is thoroughly drained and firm, transfer it to a large bowl. Add the sifted powdered sugar, vanilla extract, ground cinnamon, and the optional orange zest. If you’re incorporating it, the orange zest adds an authentic brightness that truly elevates the flavor profile of these Classic Cannoli Squares.
-
Mix Until Smooth: Using a rubber spatula or a hand mixer on low speed, mix all the ingredients together until the filling is completely smooth and creamy. Be careful not to overmix, as this can make the ricotta watery again. We’re looking for a luscious, velvety consistency.
-
Fold in Add-ins (Optional): If you’re adding mini chocolate chips, chopped bittersweet chocolate, or candied fruit, gently fold them into the ricotta mixture. I usually save a few for garnish later, too!
-
Chill the Filling: Cover the bowl with plastic wrap and refrigerate the filling for at least 30 minutes. Chilling allows the flavors to meld beautifully and helps the filling firm up, making it easier to pipe into the fried shells later. A well-chilled filling is easier to work with and tastes better!
Frying the Cannoli Squares
Frying the dough squares is where they transform from simple dough into the incredibly crisp and bubbly shells that are the foundation of our Classic Cannoli Squares. Safety and temperature control are paramount here.
-
Set Up Your Frying Station: Choose a sturdy, deep pot or Dutch oven (I prefer cast iron for even heat distribution). Pour enough vegetable or canola oil into the pot to reach a depth of 3-4 inches (7-10 cm). Attach a deep-fry thermometer to the side of the pot. Have a baking sheet lined with several layers of paper towels ready for draining the fried shells. Also, have a pair of long-handled tongs or a spider strainer nearby.
-
Heat the Oil: Heat the oil over medium-high heat until it reaches a consistent temperature of 350-360°F (175-180°C). Maintaining the correct oil temperature is crucial! If the oil isn’t hot enough, the dough will absorb too much oil and become greasy. If it’s too hot, the squares will brown too quickly on the outside before cooking through, and they might burn. I constantly monitor my thermometer.
-
Fry the Squares in Batches: Carefully slide 3-4 dough squares into the hot oil. Do not overcrowd the pot, as this will lower the oil temperature and lead to greasy, less crispy squares. Fry for about 1-2 minutes per side, or until they are a beautiful golden brown color and covered in those lovely signature cannoli bubbles. They should look light, airy, and inviting. Use your tongs to gently flip them to ensure even browning.
-
Drain and Cool: Once golden brown, use your tongs or spider strainer to carefully remove the fried squares from the oil. Hold them over the pot for a moment to allow excess oil to drip off, then transfer them to the prepared paper towel-lined baking sheet to drain further. As they drain, they will continue to crisp up. Repeat this process with the remaining dough squares, adjusting the heat as necessary to maintain the oil temperature between batches. It’s always better to take your time here for perfectly crisp results. I often find myself admiring the beautiful bubbling texture as they fry, knowing they’ll be fantastic for our Classic Cannoli Squares.
-
Cool Completely: Allow the fried cannoli squares to cool completely on the paper towels before attempting to fill them. They need to be at room temperature to maintain their crispness and prevent the filling from melting. This usually takes about 15-20 minutes.
Assembling the Classic Cannoli Squares
Now for the most exciting part: bringing everything together! Assembling your Classic Cannoli Squares is quick and fun, but remember, timing is key to prevent sogginess.
-
Prepare for Filling: Transfer your well-chilled cannoli filling into a piping bag fitted with a large round or star tip. If you don’t have a piping bag, you can use a sturdy Ziploc bag with one corner snipped off. Make sure your fried cannoli squares are completely cool.
-
Fill the Squares: Take one fried cannoli square. Hold it gently but firmly. Pipe a generous amount of filling onto one half of the square, then gently spread it evenly across the entire surface using a small offset spatula or the back of a spoon. You want a good, thick layer of that creamy ricotta. Repeat with all the remaining squares.
-
The Golden Rule: Fill Just Before Serving! This is the most important tip for enjoying the best Classic Cannoli Squares. The crispy shell and creamy filling are a match made in heaven, but if filled too far in advance, the moisture from the ricotta will soften the fried pastry, making it less crisp. Aim to fill them no more than an hour before you plan to serve them. This ensures every bite is met with that delightful contrast of crisp shell and smooth, rich filling.
Finishing Touches and Serving
A little presentation goes a long way. These final steps will make your Classic Cannoli Squares look as good as they taste, perfect for any occasion.
-
Garnish with Pistachios: Once filled, gently press the finely chopped pistachios or candied cherries onto the sides or ends of each filled square. The green of the pistachios adds a vibrant visual appeal and a wonderful nutty crunch. If you used candied fruit in the filling, a sprinkle on top also looks lovely.
-
Dust with Powdered Sugar: For a final elegant touch, lightly dust the finished Classic Cannoli Squares with additional powdered sugar using a small sieve or sifter. This adds a beautiful snowy appearance and a little extra sweetness.
-
Arrange and Serve: Arrange your freshly assembled Classic Cannoli Squares on a beautiful platter and serve immediately. Watch them disappear quickly! They are truly a showstopper dessert that combines classic Italian flavors with a convenient, easy-to-eat format. I love seeing the delight on people’s faces when they bite into one of these, experiencing that perfect blend of crisp pastry and sweet, creamy filling. Enjoy your masterpiece!
Conclusion:
As we wrap up our journey with this incredible dessert, I genuinely hope you’re feeling inspired and excited to dive into your kitchen. These Classic Cannoli Squares truly stand out as a revelation for anyone who adores the iconic Italian pastry but perhaps shies away from the traditional, more labor-intensive preparation. What makes this recipe an absolute must-try, in my humble opinion, is its ingenious simplicity combined with an undeniable authenticity of flavor. You get all the delightful essence of a perfectly crafted cannolo – that rich, creamy ricotta filling, subtly sweet and often laced with hints of citrus or chocolate, paired with a satisfyingly crisp texture – but without the fuss of frying delicate shells or hunting down specialized equipment. It’s a dessert that speaks of celebration and comfort, designed to be accessible to home bakers of all skill levels, promising a generous yield of pure joy that’s perfect for sharing or savoring all by yourself. The beauty lies in its elegant presentation and the sheer delight it brings with every single bite, making it an instant classic in your dessert repertoire.
Serving Suggestions & Delightful Variations:
Once your beautiful squares have had ample time to chill and set, the moment of presentation is almost as delightful as the first bite. I love serving these chilled, perhaps with a delicate dusting of powdered sugar just before they hit the table, which adds a lovely visual appeal and a whisper of extra sweetness. For an added touch of elegance, consider a scattering of mini chocolate chips or finely chopped candied orange peel over the top – classic cannoli accoutrements that elevate the experience. They pair wonderfully with a strong espresso after dinner, or as a sophisticated treat during an afternoon tea gathering. Imagine a platter of these squares gracing your holiday table or becoming the star of your next potluck – they’re guaranteed to impress!
But the fun doesn’t stop there! This recipe is incredibly versatile, inviting you to unleash your creativity and make it uniquely yours. For the filling, consider infusing your ricotta with different flavors. A teaspoon of almond extract can add a delightful nutty complexity, or a dash of espresso powder can introduce a subtle mocha note that complements the sweetness beautifully. If you’re a fan of citrus, a little extra lemon or orange zest really brightens up the entire dish. Don’t shy away from experimenting with additions to the filling either; miniature chocolate chips are always a hit, but finely chopped pistachios or even a tiny amount of candied ginger could offer an exciting textural and flavor contrast. For those who love a bit of crunch on top, a sprinkle of toasted, crushed pistachios or hazelnuts adds a wonderful finish.
Thinking about the crust? While our chosen base is fantastic, you could experiment with different types of shortbread cookies for a subtle flavor alteration, or even use a graham cracker crust for a slightly different texture and taste profile. Just remember to adjust the butter quantity to ensure it binds well. For a truly decadent twist, a light drizzle of melted dark chocolate or a delicate caramel sauce over each square just before serving can transform them into an even more luxurious dessert. And for a truly festive look, consider garnishing with a few vibrant fresh berries, like raspberries or blueberries, which provide a beautiful color contrast and a hint of tartness against the sweet, creamy filling. The possibilities are genuinely endless, and each variation offers a new dimension to this already beloved treat.
Your Turn to Create and Share!
Now, it’s your moment to shine! I wholeheartedly encourage you to roll up your sleeves and give this incredible Classic Cannoli Squares recipe a try. You’ll find immense satisfaction in creating such a spectacular dessert with relative ease, and the compliments you’ll receive are just the icing on the cake. Don’t be afraid to experiment with the variations I’ve suggested, or even invent your own unique twists. That’s the beauty of home baking – it’s a journey of discovery and personal expression. Once you’ve whipped up a batch, I would absolutely love to hear about your experience! What was your favorite part? Did you try any exciting variations? Please share your triumphs, your serving ideas, and even your “aha!” moments. Your feedback and creativity inspire me and our entire community of dessert lovers. So go ahead, bake these delightful squares, share them with your loved ones, and let the joy of this fantastic Italian-inspired dessert fill your home. Happy baking!
Classic Cannoli Squares (Baked)
Enjoy all the beloved flavors of traditional Sicilian cannoli in an easy-to-make baked square format. Crispy pre-made pie crusts filled with a rich, creamy ricotta filling, perfect for any occasion. Note: This version uses pre-made pie crusts and is baked, not fried.
Ingredients
Instructions
Important Information
Nutrition Facts (Per Serving)
It is important to consider this information as approximate and not to use it as definitive health advice.
Allergy Information
Please check ingredients for potential allergens and consult a health professional if in doubt.

Leave a Comment